Tag Archives: work

jenkenis ERROR: Error fetching remote repo ‘origin‘ [How to Solve]

explain:

During the work, Jenkins made such a mistake in pulling gitlab as below:

jenkenis ERROR: Error fetching remote repo ‘origin‘


The pipeline command is as follows:

pipeline {
    agent any

  options {
      timeout(time: 2, unit: 'HOURS') 
  }
  
    stages {
        stage('Fetch code') {
            steps {
                echo 'Hello World'
                checkout([$class: 'GitSCM', branches: [[name: '*/master']],
                doGenerateSubmoduleConfigurations: false, extensions: [[$class: 'CloneOption', depth: 1, noTags: true, reference: '', shallow: true, timeout: 120]], 
				submoduleCfg: [],userRemoteConfigs: [[credentialsId: '49352c9d-3f03-4271-8b60-2fddab3ca058', url:
                '[email protected]']]])
                
            }
        }
    }
}

Solution:

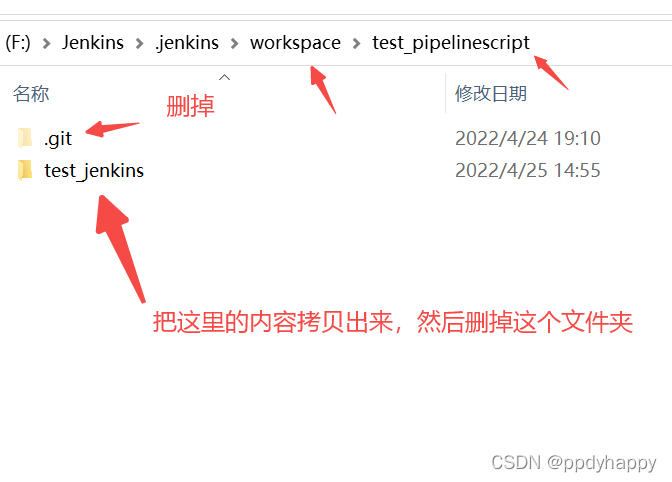
cd to the specified directory under the corresponding workspace, such as workspace\test_pipelinescript here, and manually clone the project to the local through git clone. It should be noted here:

1. Delete the .git folder in the test_pipelinescript directory;

2. Copy everything in the test_jenkins directory to test_pipelinescript

3. Restart Jenkins service.

Enter services.msc through Win + R, find Jenkins service and stop –> Start

4. Re-trigger Jenkins to execute again, and it’s OK.

Error: Java: error: release version 5 not supported solution to run error

Error reporting reason

Java compiler setting error in project structure or setting

resolvent

1. Project structure
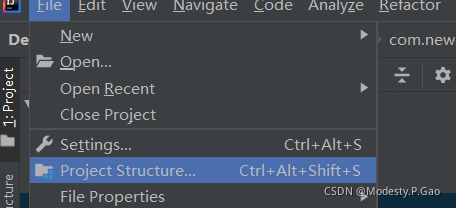
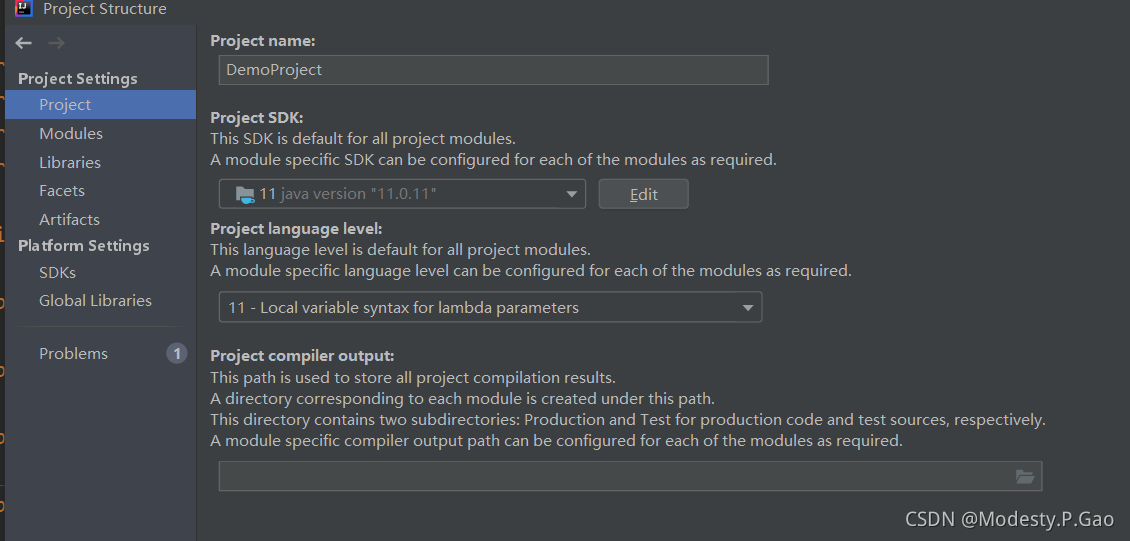
Click f I l e → P R O j e c t s t r u c t u r e file \ rightarrow project structurefile → projectstructure

Ensure that the SDK versions under project are the same

2、Preferences

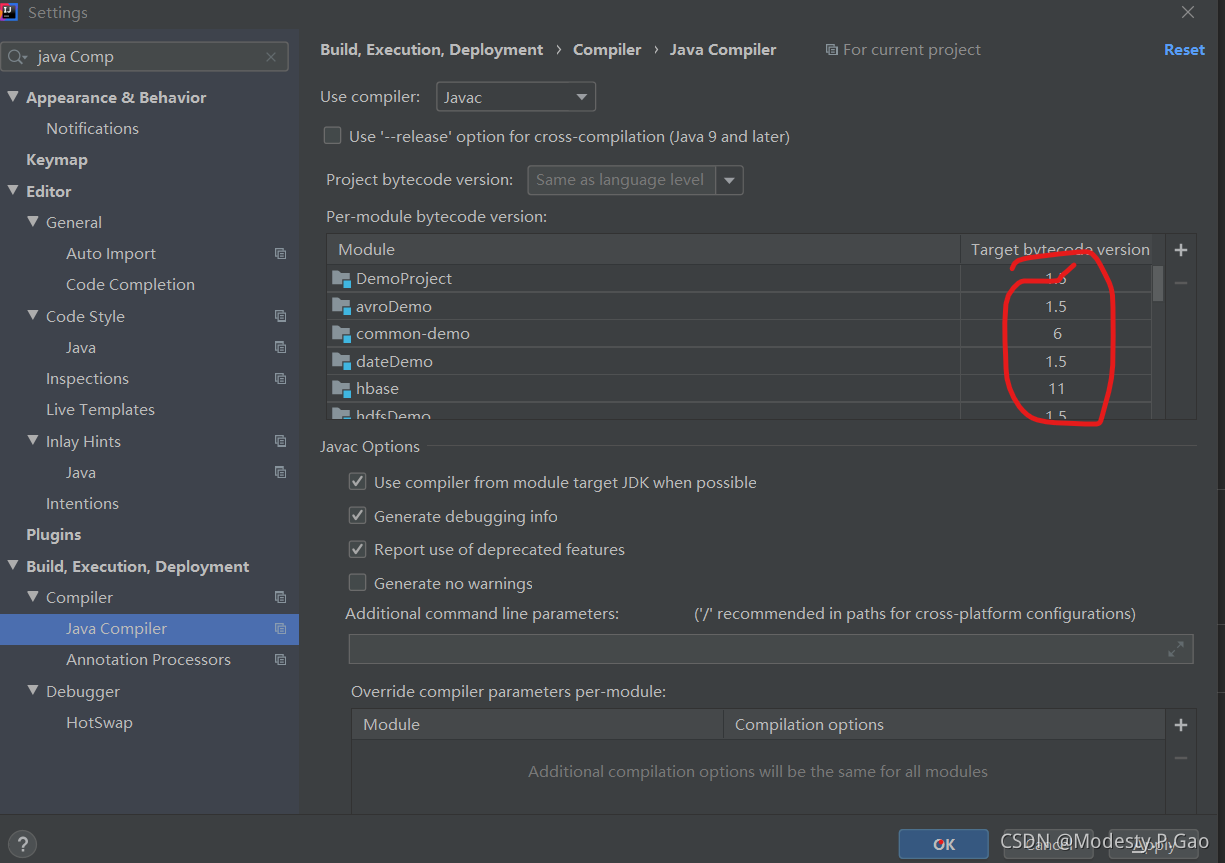
    Click setting in preferences (or win version) to search java compiler and ensure that the target byte code
    version is the same as the selected version

DB: the solution of table already exist when migrating

        When running rake DB: migrate, you sometimes find an error in rake abort. Rake says that a table already exists, so it can’t do the work of this migrate. This table does exist, so how can rake skip this table or force it to be overridden?There is one area that needs to be modified:

Original migrate file:

Ruby code


    class   CreateProducts  & lt;   ActiveRecord::Migration      def   self.up        create_ table  : products   do  | t|          t.column  : title,  : string          t.column  : description,  : text          t.column  : image_ url,  : string        end      end        def   self.down        drop_ table  : products      end    end   

    Modified migrate file:

    Ruby code


      class   CreateProducts  & lt;   ActiveRecord::Migration      def   self.up        create_ table  : products,  : force  =& gt;   true   do  | t|          t.column  : title,  : string          t.column  : description,  : text          t.column  : image_ url,  : string        end      end        def   self.down        drop_ table  : products      end    end   

      Do you see that in create_ In the parameter of table, add: force = & gt; True.

Some projects cannot be imported because they already exist in the workspace

Some projects cannot be imported because they already exist in the But I have modified the project name in the. Project file, but I still can’t import it. I found this article from the Internet. It turns out that you need to find the relevant record in the eclipse workspace and delete it: there is no project with the same name in the workspace, but there must be a place to record the previous project information, which may be… Find the following: XXXXXXXX, workspace,. Metadata,. Plugins\ org.eclipse.core . resources \. Projects folder, delete the folder with the same name

Record how to solve this problem:

MyEclipse is unable to import Java projects. There are two common situations:

1、Some projects cannot be imported because they already exist in the workspace

2、Some projects were hidden because they exist in the workspace directory

Reason: a project with the same name already exists in the workspace, so it cannot be imported.

solve:

1. Modify project name: right click refactor rename or F2

2. Open the. Project file in the project — modify & lt; name & gt; ProjectName & lt; / Name & gt;

3. There is no project with the same name in the workspace. There must be a place to record the previous project information… Find the following: XXXXXXXX, workspace,. Metadata,. Plugins\ org.eclipse.core . resources \. Projects folder, delete the folder with the same name.

Article from http://blog.csdn.net/leo_ Thanks to the author.

076_ OpenGL graphics program development practice

OpenGL Graphic Program Development Practice
Delphi tutorial series books (076) “OpenGL graphics program development practice” (state) finishing Email: [email protected]
Download Address:
Pdf

Xie Danrui Publishing House: Northwestern Polytechnical University Press ISBN: 7561219393 Available Date: 2006-9-6 Published Date: August 2005 Open Book: 16 Page Number: 293 Edition: 1-1
Content abstract
As a kind of graphics industry standard, OpenGL is widely used in practical work and occupies a very important position. This book USES the Delphi programming environment about OpenGL function principle, mainly introduced the development of computer graphics and development present situation, the related theory of OpenGL and OpenGL characteristics and working principle, the basic knowledge of OpenGL and advanced application techniques, the last instance system and how to using the OpenGL technology, integrated complex three-dimensional realistic graphics. This book is well-structured, informative, innovative and practical. It can be used as a reference for undergraduate students, graduate students, scientific researchers and graphic and image developers.
preface
Visualization of scientific computation, computer animation and virtual reality are three hot research directions in the field of computer graphics in recent years. Their technical core is the rendering of three-dimensional realistic graphics. At present, 3D realistic graphics technology has been successfully and widely used in military, aerospace, aviation, medicine, geological exploration, 3D games and industrial CAD design and other fields, so that people can directly operate the physical information in the 3D graphics world, and directly communicate with the computer. This technology has unified the power of man and machine in an intuitive and natural way, and this revolutionary change will undoubtedly greatly improve the quality and efficiency of people’s work. Therefore, it is of great theoretical and practical significance to actively promote the research of computer graphics. OpenGL is the abbreviation of Open Graphics Library, which is a set of high performance Graphics processing system developed by SGI company. It is the software interface of Graphics hardware, meaning the Open Graphics Library. With OpenGL, programmers can create interactive applications to achieve realistic three-dimensional graphics and images, which can be used in many fields that require a high degree of simulation of the real world. Due to its openness and high reusability, it has now become an industry standard. OpenGL is designed to be independent of hardware, independent from the window system, running a variety of operating systems can be used on a variety of computers, and can work in the network environment in the client/server mode, is a professional graphics processing, scientific computing and other high-end application areas of the standard graphics library. OpenGL as a graphics industry standard, almost all the visual application development tools support OpenGL integration, such as Delphi, VC++, VB, JAVA and so on. However, the current introduction of OpenGL principle of the reference resources are almost based on C or VC++, which is familiar with the Delphi programming environment for the majority of developers, is undoubtedly a pity. As we all know, Delphi with its simple and easy to use visual development environment, high efficiency compiler, powerful PASCAL language in the field of visual development tools occupies a very important position. Based on the above factors, this book uses the Delphi programming environment to tell the principle of OpenGL function. The book consists of 16 chapters. Chapter 1 briefly introduces the development of computer graphics and the development of graphics and images. Chapter 2 and Chapter 3 introduce the Delphi programming foundation and object-oriented theory; Chapter 4 introduces the basic situation of OpenGL graphics library, OpenGL characteristics and working principle; Chapter 5 introduces the foundation of entity modeling and describes the basic drawing commands of OpenGL, including the description of point entity, line entity and surface entity. Chapter 6 introduces the theory of view transformation in OpenGL, including model transformation, view transformation, projection transformation, view-area transformation and matrix stack operation. Chapters 7 and 8 cover colors and lighting in OpenGL; Chapters 9 to 13 introduce the advanced application techniques of OpenGL, including blending, anti-aliasing, fog, display lists, bitmaps, fonts, texture mapping, frame caching, and animation. Chapter 14 introduces the evaluation program and the principle of nonuniform rational B-splines. Chapter 15 explains how interactive OpenGL works, including selection mechanisms and feedback mechanisms. As a conclusion, Chapter 16 systematically describes how to comprehensively use OpenGL technology to draw complex 3D realistic graphics through several examples. This book is well-structured and informative. Much of the source code provided in the book is compiled under the Delphi 7.0 environment. This book can not only be used as a college undergraduate, graduate study of computer graphics course, but also for research institutes of researchers, computer graphics and image developers have a high reference value. Xue Huifeng, Wu Huixin and Xie Danrui participated in the compilation of the book. In addition, Xia Xiaoye, Gao Xiong, Xu Rongyue and Bai Linfei also participated in the compilation. Due to the limited level, there are omissions and mistakes in the book, please readers friends criticism and correction. Author April 2005
directory
The first chapter graphics and image development status
1.1 The booming development of computer graphics
1.2 OpenGL leads the trend of graphic image development
1.3 Selection of development tools
The second chapter is Delphi language foundation
2.1 Delphi Integrated Development Environment
2.2 Basic concepts of Delphi language
2.3 Data types
2.4 Variables and Constants
2.5 Operators and expressions
2.6 Statements
2.7 Process and Function
Chapter 3 Object-Oriented Programming
3.1 Classes and Objects
3.2 Class declarations
Members of the 3.3 class
3.4 Three features of OOP
3.5 Class Operators
3.6 Objects
3.7 Exception Handling
Chapter 4 is an overview of OpenGL
4.1 History of OpenGL
4.2 Basic features of OpenGL
4.3 Architecture of OpenGL
4.4 OpenGL workflow
4.5 OpenGL function library
4.6 Basic graphics functions of OpenGL
4.7 Future and prospect of OpenGL
The fifth chapter is the foundation of entity modeling
5.1 Preparation before drawing
5.2 OpenGL data types and function forms
5.3 Description of basic geometric primitives
5.4 Using glBegin() and glEnd()
5.5 Normal vector
5.6 Draw basic primitive instances
Chapter 6 View transformation
6.1 Mathematical basis of graph transformation
6.2 From 3D Space to 2D Plane
6.3 View transformation and model transformation
6.4 Projection transformation
6.5 Visual area transformation
6.6 Additional cut plane
6.7 View transform instance
Chapter 7 Colors in OpenGL
7.1 Color perception
7.2 Colors in the computer
7.3 RGBA mode and color index mode
7.4 Specify the shadow model
7.5 Examples of color usage
Chapter 8 Light
8.1 Real World and OpenGL Lighting
8.2 Illumination Sphere Case Analysis
8.3 Create Light Source..
8.4 Select the lighting model
8.5 Define material properties
8.6 Illumination math calculation
8.7 Lighting in color index mode
Chapter 9 Mixing, anti-aliasing, fog
9.1 Mixing
9.2 Anti-aliasing
9.3 the fog
Chapter 10 shows the list
10.1 The basic concept of displaying lists
10.2 Show the creation and execution of lists
10.3 Show nested use of lists
10.4 Management of display lists
10.5 Multiple operations to display lists
10.6 Use display lists to change encapsulation mode
Chapter 11 Bitmaps, Characters, and Images
11.1 Bitmap
11.2 Characters
11.3 Images
Chapter 12 Texture Mapping
12.1 Basic steps for texture mapping
12.2 Specify the texture
12.3 Texture Control
12.4 Texture coordinates
Chapter 13 Frame Caching and Animation
13.1 frame cache
13.2 pixel segment testing and operation
13.3 Accumulate the cache
13.4 Dual cache animation
Chapter 14 Evaluation Procedures and Nonuniform Rational B-Splines
14.1 Evaluation procedure
14.2 NURBS curves and surfaces
Chapter 15 Selection and Feedback
15.1 Selection
15.2 Feedback
Chapter 16 OpenCL advanced application skills
16.1 Flames dancing
16.2 Three-dimensional trees
16.3 Texture Synthesis Application
References…
Eclipse package explorer related problems and Solutions

Problems and Solutions:
Use case description: Right click on a project in the Package Explorer, select “Open in New Window”, close the previous Eclipse window, and close the new one
Problem: After opening Eclipse, the Package Explorer will always be in the project of open in new Window
Solutions: This solution personal feel very feasible, but may have a better way, my way is, direct delete/eclipse working directory workspace \. Metadata \. Plugins \ org. The eclipse UI. The workbench folder workbench. The XML file, then, the eclipse before some of the relevant Settings window will disappear, but this does not trouble, and this method can make the eclipse open load something small and open eclipse will fairly quickly
The
Problem and Solution ii:
Use case description: As mentioned in question 1 above, the project that opened in the new window was either deleted in Explorer or changed its name
Problem: The Package Explorer will always be empty
Solution: can be as a method to solve above problem, but there is a better, open the workbench. XML, find the input factoryID = “org. Eclipse. UI. Internal. Model. ResourceFactory”, change can be put behind the path values, the said the root directory “/”

Error: required request body is missing, @ requestbody annotation usage

RequestBody is a json formatted parameter converted to Java Type,
for receiving content-type application/json requests, data Type is json: {” aaa “:” 111 “, “BBB” : “222”}
When not using the @RequestBody annotation, one may receive data submitted in a Content-type application/ X-www-Form-urlencoded Type request, in a format of AAA =111& BBB =222,form form submission and jQuery’s.post() method send requests of this type.
JQuery’s $. Ajax (url, [Settings])
1. The default ContentType value is: Application/x-www-Form-urlencoded; Charset = utf-8
this format is the form submission format, the data is key1=value1& Key2 = value2 format
2. Although the ajax data attribute value format is :{key1:value1,key2:value2}, it will be changed to key1=value1& The key2=value2 format is submitted to the background
3. If Ajax wants to interact with SpringMVC, key1=value1& Key2 =value2 format, springMVC in the background only need to define the object or parameter, will be automatically mapped.
4. If springMVC parameters have @RequestBody annotation (receive JSON string format data), Ajax must convert the date property value to JSON string, not to JSON object (js object, automatically converted to key=value). Also, change the value of the contentType to: Application/JSON; Charset =UTF-8, so attributes annotated with @RequestBody are self-mapped to values
note that the requested parameters are not in json format, not in json format, and do not annotate with @requestbody

Why fan error appears in ThinkPad Lenovo IBM notebook

The original web site: http://pcweixiu.baike.com/article-11345.html

fan fan error error – as the name suggests is the machinery, in accordance with the general standard fault handler, the problem of processing method is to directly replace the fan and the joint of the heat sink can solve the black screen problem of fan error is not into the system. The main cause of the failure is due to the outlet, without dust easily into the cooling system and even when use, because all the machine only one internal fan to their necks to the work of all the heat caused by internal dust accumulated too much make a cooling fan fan increase lubrication part of the internal friction. Due to the increased resistance and limited instantaneous current at startup, the motor supply power is insufficient, and the machine detects that the fan is not started, so an error is reported. Replace CPU cooling fan is simple and direct approach, produce the IBM series machine appear fan another root cause of the error is on the motherboard temperature control chip, a temperature control chip is refers to the high and low in the temperature of the CPU card to control the fan running, if temperature control chip out of the question, also can appear on black screen fan error is not into the system, of course, in reality the moment you can also press the esc key to skip to into the system, but this case fan but how high is your CPU temperature, fan don’t return, because you skipped the self-inspection process of IBM, So the proposal had better be to appear this problem, change fan or graphics card chip directly, must not be penny wise and pound foolish, and burned CPU… Hehe…


IBM fan

solution:
first explain that this method needs a certain hands-on ability, it is suggested that friends who do not have enough experience in disassembly do not try it easily. In case of emergency, I can tell you that a simple temporary solution is to blow a deep breath into the heat sink (the position mentioned above), which should be ready to start.
this was due to the design models of laptop is very pay attention to the light, so the heat in the form of large heat sink and fan, the radiator covers the CPU and graphics boards (P series with long tube fan), and in addition to cool the CPU fan is directly to the heat from the air duct, so fan became the absolute core of the cooling system. The machine must be taken apart for the dust to be thoroughly cleared. There are many specific disassembly methods on the Internet. Simply put, remove all the screws marked 1, 2, 3 and 4 on the back, and then remove the keyboard and palm rest successively from the front. (The keyboard and palm have a wire to take off each, be careful not to break, if your palm rest is TrackOnly type, you may not have the palm take off that wire).
CPU radiator fin on a total of three or screw, because there is glue on the graphics card part of the radiator so can not directly take off, it is best to use a word screwdriver gently sled. When you take it off, you can see that there is a lot of dust under the fan. Clean it up first. On the surface, the fan is fixed between two radiators, which appear to be attached by rivets so are difficult to remove. In fact, it is not a rivet, just a very common clip, with a word screwdriver or a thin blade slightly with some force can be pry open (must choose a little bit of toughness, the blade in the moment folded is very dangerous). When the fan is removed, it is connected to the motor, and because a stick runs directly through the coil of the motor in order to reduce the volume, the fan page can be removed with a pinch. The following work needless to say, see the see can not see but also will deposit ash in the place is clean, it is best to fan on the shaft of some lubricating oil. And then put it back in order. That should be the end of it. Note: After cleaning and installation, please apply thermal conductive silicone grease, otherwise the machine will crash or shut down suddenly after long use.
(It is suggested that friends who like smoking should not smoke when using the computer, otherwise your CPU cooling fan will be broken soon, and the root cause of the failure is that the fan has been charged by the smoking machine.)

Typical error log for IPSec ACL mismatch

IPSec ACL is what we usually call VPN traffic of interest. In real life, problems caused by this ACL configuration error are very common. The typical error is “QM FSM error”, which can be checked by running “Debug Crypto isakmp” on PIX/ASA.

May 15 09:17:11 [IKEv1]: Group = X.X.X.X, IP = X.X.X.X,
QM FSM error (P2 struct & 0x41f7f80, mess id 0x4d3d6016)!

May 15 09:17:11 [IKEv1]: Group = X.X.X.X, IP = X.X.X.X, construct_ipsec_delete(): No SPI to identify Phase 2 SA!

May 15 09:17:11 [IKEv1]: Group = X.X.X.X, IP = X.X.X.X, Removing peer from correlator table failed, no match!

Cisco’s website explains the error log:

QM FSM Error

The IPsec L2L VPN tunnel does not come up on The PIX Firewall or ASA, and The QM FSM error message proves ambiguous. One possible reason is The proxy identities, such as interesting traffic, Access Control List (ACL) or crypto ACL, do not match on both the ends. Check the configuration on both the devices, and make sure that the crypto ACLs match.

This article explains the whole process of IKE and IPsec in detail:
http://jackiechen.blog.51cto.com/196075/158222

This article from “facing the sea, spring flowers” blog, declined to reprint!

Summary of database

Group By
Group By and aggregation function can be used to achieve Group accumulation. For example, if you were asked to display the salary totals for each
department, you could use the following statement.
SELECT department_number
,SUM (salary_amount)
FROM employee
GROUP BY department_number;

result:
department_number Sum(salary_amount)
401 74150.00
403 80900.00
301 58700.00

note that all the fields accumulated without grouping in the SELECT clause must appear in the
GROUP BY clause, otherwise the following error message will be returned:
ERROR: 3504 Selected non-aggregate values must be part of the associated group.

for the above example the Department_Number field is not accumulated so it must appear in the group
BY clause. This basic rule must be borne in mind.

WHERE clause and GROUP BY clause
WHERE clause and GROUP BY clause are used together, GROUP BY only performs grouping aggregation calculation on data records that conform to the WHERE limit
system. In other words, the WHERE sub-
sentence removes unqualified data records before doing the actual aggregate calculation. What’s the combined salary for department 401 and 403?
SELECT department_number
,SUM (salary_amount)
FROM employee
WHERE department_number IN (401, 403)
GROUP BY department_number
;

results:
department_number Sum (salary_amount)
403 80900.00
401 74150.00

GROUP BY and ORDER BY
after the GROUP BY, ORDER BY makes the grouping statistics show
in the specified ORDER. For example, to show the number of people in a department, the total salary, the highest salary in a department, the lowest salary in a department
, and the average salary in a department by department number, you can use the following SQL statement:
SELECT department_number (TITLE ‘DEPT’)
,COUNT (*) (TITLE ‘#_EMPS’)
,SUM (salary_amount) (TITLE ‘TOTAL’)
(FORMAT ‘zz, ZZZ,zz9.99’)
,MAX (salary_amount) (TITLE ‘HIGHEST’)
(FORMAT ‘ ‘zz, ZZZ,zz9.99’)
,MIN (TITLE ‘amount)
(FORMAT ‘zz, ZZZ,zz9.99’)
,AVG (TITLE ‘AVERAGE’)
(FORMAT ‘zz, ZZZ,zz9.99’)
FROM employee
GROUP BY department_number
ORDER BY department_number
;

results are as follows:
DEPT #_EMPS TOTAL LOWEST AVERAGE
301 3 116,400.00 57,700.00 29,250.00 38,800.00
401 7 245,575.00 46,000.00 24,500.00 35,082.14
403 6 233,000.00 49,700.00 31,000.00 38,833.33

SELECT department_number AS DEPT
,COUNT (*) AS #_EMPS
,CAST (SUM (salary_amount) AS FORMAT ‘zz, ZZZ,zz9.99’)
AS TOTAL
,CAST (MAX (salary_amount) AS FORMAT ‘zz, ZZZ,zz9.99’)
AS LOWEST
,CAST (MIN (salary_amount) AS FORMAT ‘zz, ZZZ,zz9.99’)
AS br>,CAST (AVG (salary_amount) AS FORMAT ‘zz, ZZZ,zz9.99’)
AS _AVERAGE)
FROM employee
GROUP BY department_number
ORDER BY department_number; Since AVERAGE is itself a keyword, in the above example, it is preceded by an underscore
to distinguish it.
when grouping statistics on multiple fields, GROUP BY produces only one level of summary. Example
such as: for the department 401 and 403 according to the work code group statistics salaries.
SELECT department_number
,job_code
,SUM (salary_amount)
FROM employee
WHERE department_number IN (401, 403)
GROUP BY department_number, job_code
ORDER BY 1, 2;

results:
department_number job_code SUM (salary_amount)
401 411100 37850.00
401 412101 107825.00
401 412102 56800.00
401 413201 43100.00
403 431100 31200.00
403 432101 As you can see from this example, when there are multiple fields in GROUP BY, it can only produce a summary of level
, and the summary is made according to the last field (here is job_code).

GROUP BY and HAVING conditions
HAVING conditions clause is used together with GROUP to limit the result of grouping statistics to
and only return the grouping statistics that meet its conditions.
for example, show the number of people in the department, total salary, maximum salary in the department,
minimum salary and average salary in the department by department number order, if only show the department with average salary less than 36000.
SELECT department_number (TITLE ‘DEPT’)
,COUNT (*) (TITLE ‘#_EMPS’)
,SUM (salary_amount) (TITLE ‘TOTAL’)
(FORMAT ‘zz, ZZZ,zz9.99’)
,MAX (salary_amount) (TITLE ‘HIGHEST’)
(FORMAT ‘ ‘zz, ZZZ,zz9.99’)
,MIN (TITLE ‘amount)
(FORMAT ‘zz, ZZZ,zz9.99)
,AVG (TITLE ‘AVERAGE’)
(FORMAT ‘zz, ZZZ,zz9.99’)
FROM employee
GROUP BY department_number
HAVING AVG (salary_amount) < 36000;

result:
DEPT #_EMPS TOTAL b> 401 7 245,575.00 46,000.00 24,500.00 35,082.14

1, WHERE: data records are used to qualify the tables that participate in the grouping aggregation operation. Only
data records that meet the criteria are selected to participate in the grouping aggregation.
2, GROUP BY: to GROUP the records that meet the WHERE clause
3, HAVING: to qualify the GROUP aggregation results that can be returned
4, ORDER BY: to specify the output ORDER of the results