UEFI+BMR to UEFI+GPt win10 under the installation of ubuntu16.04 dual system
UEFI+MBR lossless conversion to UEFI+GPt
First when the installation of Win10 non personal operation, resulting in the setting of UEFI+BMR neither fish nor fish. Although in principle it is possible to install UEFI+BMR with Rufus, ocD requires that you change to the most reasonable partitioning method and do not change or take advantage of subsequent installations of Ubuntu.
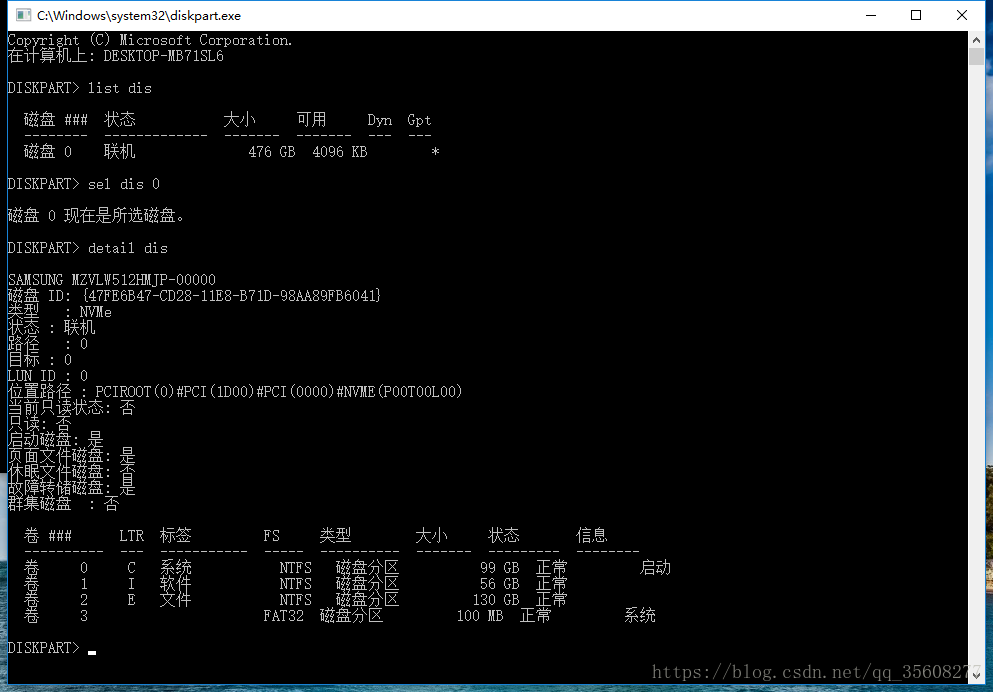
1.1 View the partitioning method:
1. Open the command prompt CMD (win+r, type CMD)
2. Type diskpart.exe
3. List dis
4. Sel dis 0
5. Detail dis

(It is strongly recommended to use Rufus to make ios image. Ultro in floppy disk does not set the partitioning mode, but there are actually differences between traditional legacy (corresponding to easyBCD,), UEFI+MBR, and UEFI+GPI, which will bring unnecessary error report when installing Ubuntu system)
Traditional Legacy USES easyBCD to set up boot and boot, but if it is UEFI, it does not need to download easyBCD, and it cannot be used.
So the first step is to change the hard disk partition mode to GPT
1.2 Partition helper changes disk information
Use Windows 10 with MBR2GPT
There are several prerequisites that may not be met:
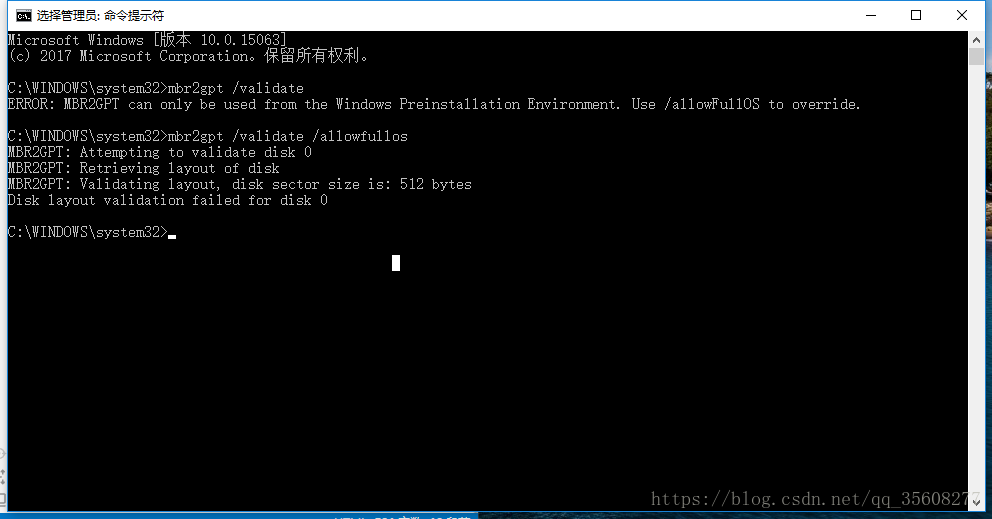
is primary except for the system partition. No more than three primary partitions at a time. Otherwise, the error is as follows.
Disk layout validation failed for disk 0
So the premises have to be met. Nondestructive changes to the hard disk partition are required.

How to do this: Make partition and primary partition changes to the disk yourself using partition Helper 6.3.
partition helper can split the disk and divide the disk space for Ubuntu. But do not split it until you have changed GPT.
if in addition to the system partition, more than 3, need to right merge partition first (later can be divided out again).
if the partition is a logical partition, right-click to convert the primary partition.
Just follow the instructions and go on. (It is better to make a copy of the software and run under C:\Program Files, otherwise the disk will be prompted to be occupied when processing)
Disk management is also possible
1.3 Windows 10 comes with MBR2GPR
After conversion, mBR2GPT should be normal.
step:
open CMD, input:
1.mbr2gpt /validate /allowfullos
2.mbr2gpt /convert /allowfullos
The conversion process automatically creates the EFI partition (100M) required for the UEFI + GPT partition format
Note:
this will encounter a problem:
before the boot menu option still exists, that is, there are two Windows boot manager.
boot will default when the MBR generated boot item, but can not start.
so in the case of single system need to enter uefi BIOS mode manual selection, very troublesome problem.
But when Ubuntu is installed and booted, there is no such problem.
Tag Archives: ubuntu
Ubuntu reads the shared folder under windows Unable to mount location Failed to retrieve share list from server

Solutions:
Modify /etc/hosts in Ubuntu
Add a list of data: Windows host IP address + Windows host name
It can be solved.
Text link:
http://www.ubuntututorials.com/unable-mount-location-failed-retrieve-share-list-server/
Modify the screen resolution after installing Ubuntu 16.04 (xrandr: Failed to get size of gamma for output default)
Ubuntu 16.04 has only one option after installation, 1024×768. Using the xrandr command has an error:
xrandr: Failed to get size of gamma for output default
You can’t set it using the CVT command, nor can you modify xorg.conf.
Solutions:
打开:/etc/default/grub
搜索:#GRUB_GFXMODE=640x480
编辑:640x480 改成你想要的分辨率,并取消前面的#
例如:GRUB_GFXMODE=1920x1080
更新:sudo update-grub
重启: reboot
If the above method has not been solved, then there is another situation is the video card driver has not been installed, the need to reinstall the video card driver can solve the above problem.
Ubuntu18 “Activation of network connection failed” cannot access the Internet 【Solution】
Ubuntu18 “Activation of Network Connection Failed “cannot connect to the Internet [Solution]
System environment: Windows 10 and Ubuntu18.04 dual systems
Activation of network connection failed. The Activation of network connection failed was reported by Ubuntu18.04 today. The Activation of network connection failed.
Plug in the wireless card, the wireless card can surf the Internet normally.
computer to Win10 environment, wired can be normal Internet. Explain the hardware is good. The problem is only the driver, or network card configuration problem.
The Internet tried all kinds of solutions, including computer rebooting, router rebooting and so on, to no avail.
Finally, the computer shuts down. Let it sit for a few minutes, then turn it on, and Ubuntu18 will be able to surf the web normally.
Ha ha, solution: computer shut down, and then wait to start . It’s amazing.
February 5, 2020 sijing, Shanghai
System and host port mapping under virtualbox
Virtualbox is installed under Ubuntu and XP is installed under VirtualBox,
Requirements:
Accessing xp Web services under Ubuntu,
Methods:
To do port mapping in Ubuntu, execute the following command (turn the virtual off before executing) :
VBoxManage setextradata “xp” “VBoxInternal/Devices/pcnet/0/LUN# 0/Config/web/Protocol” TCP
VBoxManage setextradata “xp” “VBoxInternal/Devices/pcnet/0/LUN# 0/Config/web/GuestPort” 80
VBoxManage setextradata “xp” “VBoxInternal/Devices/pcnet/0/LUN# 0/Config/web/HostPort” 8888
The operating system name of the “XP” virtual machine; Pcnet is a network type; The Web can be anything;
Completed: start the xp virtual machine, and then under the ubuntu browser to access the address is: http://www.test.com:8888/, 80 service will show the xp system.
Just to remind you, there’s one question that’s been bothering me for a long time:
Description:
NAT#0: configuration query for “HostPort” int failed (VERR_CFGM_VALUE_NOT_FOUND).
Unknown error creating VM (VERR_CFGM_VALUE_NOT_FOUND).
When using VBoxManage setextradata “xp” “VBoxInternal/Devices/pcnet/0/LUN# 0/Config/web/HostPort”, 8080, the above problems;
Later: 8080 into 8888 port IS OK.
Glxchoosevisual failed in Ubuntu 16.04 steam
system :Ubuntu16.04
after the update of graphics card driver steam has been prompted that ‘glXChooseVisual failed’, how can I bear
different methods on many blogs, the graphics drivers have changed and changed, the system kernel has also changed, finally still can not completely solve the problem, of course, it may be my machine was I do too much, a variety of miscellaneous problems stacked together
the final solution is
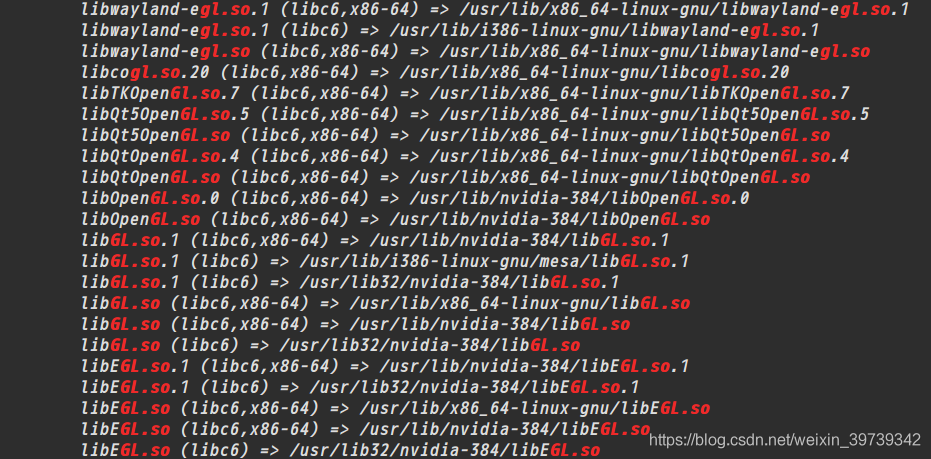
if you are using a nvidia driver, sometimes you will find libgl.so.1 pointing to the fuzzy libGL provided by mesa and nvidia. To test this, run this command on the terminal :
sudo ldconfig -p | grep -i gl.soyou’re going to get

then you only need to delete the library provided on the table, as follows :
sudo rm /usr/lib/i386-linux-gnu/mesa/libGL.so.1and steam will be perfect
this issue was a night, finally found in this web site (https://askubuntu.com/questions/834254/steam-libgl-error-no-matching-fbconfigs-or-visuals-found-libgl-error-failed-t/903488#903488), a try, the perfect solution!!!!!
Solution to “the grub PC ‘package failed to install into / target / when installing Ubuntu server
“The ‘grub-pc’ package failed to install into /target/ “this is a problem I encountered in The process of installing Ubuntu server 14.10, solution: disconnect The network at The appropriate time (I was configuring APT) during The installation process, or directly install without network. this scheme has been tried by the author and confirmed to be feasible.
Error in installing cryptograph failed building wheel for cryptography
sudo apt-get install build-essential libssl-dev libffi-dev python3-dev
reference https://cryptography.io/en/latest/installation/#building-cryptography-on-linux
OpenLDAP main: TLS init def ctx failed: -1
problem error
system: Ubuntu 14.04
version: OpenLDAP 2.4.42
tool: slapd ldap-utils openssl libssl-dev
creates the certificate through openssl and adds it to the cn=config database. Restart the service failed. Syslog error
“main: TLS init def CTX failed: -1”
I created cert file by openssl in ubuntu 14.04. So I installed openssl/libssl-cert before, the error shown in this environment. When started the service, it failed with “main: TLS init def CTX failed: -1 “in syslog.
solution
It works after following steps:
- check your certfile path whether it is correct. Check whether the certificate file path in the cn=config configuration exists and is correct
- check your file permission. Inspection certificate file permissions
chown openldap. Openldap/etc/SSL/certs/ldapcert pem
chown openldap. Openldap/etc/SSL/private/ldapkey pem
chmod -r 0400/etc/SSL/certs/ldapcert. Pem
chmod -r 0400 The/etc/SSL/private/ldapkey. Pem
Example Example:
– rw – r – r – 1 root root 1383 Dec 1 09:47/etc/SSL/certs/cacert pem
– r – 1 the openldap openldap 3808 Dec 1 09:48/etc/SSL/certs/ldapcert pem
– r – 1 the openldap openldap 09:47 891 Dec 1 /etc/ssl/private/ldapkey.pem - Whether install libssl-dev/ssl-cert, especially ssl-cert. Whether libssl-dev/ssl-cert
- Whether add user openldap to group ssl-cert. Adduser openldap ssl-cert adduser openldap ssl-cert
- Whether certfile is correct. Verification certificate is correct
openssl verify - CAfile/etc/SSL/certs/cacert pem/etc/SSL/certs/ldapcert pem- Check apparmor. With the 1 st step, if your cert file is not under the path/etc/SSL /... Your should add your cert file path to/etc/apparmor. D/usr. Sbin. Slapd, then reload the apparmor service like this:
/etc/init. D/apparmor reload
check apparmor, cooperate with the first, if not in the/etc/SSL /.. Need to configure the/etc/apparmor. D/usr. Sbin. Slapd, and restart the apparmor service
If you have any other question, do feel free to concat to me 32634366 @qq.comps:
I have stuck with this for a long time, it done work after installed ssl-cert and added user openldap to group ssl-cert.ref:
http://readthefuckingmanual.net/error/1257/


- Check apparmor. With the 1 st step, if your cert file is not under the path/etc/SSL /... Your should add your cert file path to/etc/apparmor. D/usr. Sbin. Slapd, then reload the apparmor service like this:
RTR3InitEx failed with rc=-1912 (rc=-1912)
main reason: having installed virtualbox before, there are multiple virtualboxes in the system. You can uninstall all virtualboxes first, and then install
again
. Uninstall all virtualbox:
sudo apt-get autoremove 'virtualbox*'
2. Reinstall:
sudo DPKG -i virtualbox – 5.2 _5. 2.6-120293 ~ Ubuntu ~ xenial_amd64. Deb
Virtual environment: error: virtualenv is not compatible with this system or executable
I install the python virtual environment
with the following command
pip install --user virtualenv
#不行的话用下一句命令安装virtualenv
#sudo apt-get install python-virtualenv
python virtual environment installation successful, I created a Virtualenv directory in my home directory. I’m going to put all the virtual environments in this directory. Then, go to this directory and I’ll use the following command to create a virtual environment (I’ll call this virtual environment flask-env)
virtualenv helloworld, however, it reports the following error message 
solution:
open. Bashrc
with the following command
sudo gedit ~/.bashrcadd the following information
on the last line of the open file
export LD_LIBRARY_PATH=$LD_LIBRARY_PATH:/home/helloworld/anaconda3/libnote: cannot have Spaces, on either side of the equal sign “=”/home/helloworld/anaconda3/lib this part is the python lib address, to write this part according to your specific situation.
and then rerun
virtualenv helloworldvirtual environment is created successfully, and the activation command is as follows:
vivian@vivian-Super-Server:~/HelloWorld$ virtualenv helloworldUsing base prefix '/home/vivian/anaconda3'
New python executable in /home/vivian/HelloWorld/helloworld/bin/python
Installing setuptools, pip, wheel...done.
vivian@vivian-Super-Server:~/HelloWorld$ source helloworld/bin/activate
close virtual environment
deactivatenote: the path of the virtual environment cannot have Chinese, otherwise this problem will also occur
After installation, Ubuntu encountered [SDB] asking for cache data failed assembling drive cache: write through
the original address: http://blog.csdn.net/liufei_learning/article/details/8521221
when installing ubuntu12.10 64bit server, the following error occurs:
[11690.011238] [SDB] Asking for cache data failed
[11690.011248] [SDB], drive cache: write through
googel found the following solution, which is a bug in ubuntu: after uninstalling on my machine, there will be no problem, but there will be a problem when reinstalling. For a temporary solution, write a script to start up and run
sudo rmmod ums_realtek
http://askubuntu.com/questions/132100/errors-in-dmesg-test-wp-failed-assume-write-enabled
|
|
I’m having the same issue on the official 12.04 LTS relase I also believe it is causing the system to be less responsive. According to some sources it’s harmless. (i can apparently only post 2 links) The following thinks this is error output from an onboard card reader: https://bbs.archlinux.org/viewtopic.php?pid=1059099 It’s confirmed to be an upstream issue in https://bugs.launchpad.net/ubuntu/+source/linux/+bug/987993 Run lsusb and find the offending device nathan@Ham-Bone:~$ lsusb Bus 001 Device 001: ID 1d6b:0002 Linux Foundation 2.0 root hub Bus 002 Device 001: ID 1d6b:0002 Linux Foundation 2.0 root hub Bus 003 Device 001: ID 1d6b:0001 Linux Foundation 1.1 root hub Bus 004 Device 001: ID 1d6b:0001 Linux Foundation 1.1 root hub Bus 005 Device 001: ID 1d6b:0001 Linux Foundation 1.1 root hub Bus 006 Device 001: ID 1d6b:0001 Linux Foundation 1.1 root hub Bus 007 Device 001: ID 1d6b:0001 Linux Foundation 1.1 root hub Bus 008 Device 001: ID 1d6b:0001 Linux Foundation 1.1 root hub Bus 001 Device 002: ID 0bda:0158 Realtek Semiconductor Corp. USB 2.0 multicard reader 在我的情况下,它是Realtek多卡阅读器,快速检查 $ dmesg | grep realtek [ 4.716068] usbcore: registered new interface driver ums-realtek $ lsmod | grep realtek ums_realtek 17920 0 显示模块ums-realtek $sudo rmmod ums_realtek 为我解决了一个可逆的问题。这是 $sudo modprobe ums_realtek 再次启用读卡器。我还没有测试它是否工作,因为我从来没有使用它
tbody> <表> < |
|
7 我有同样的问题在正式12.04 LTS中继,我也相信这是导致系统反应更慢。根据一些消息来源,它是无害的。(显然我只能发布2个链接) 在 中被确认为上游问题 https://bugs.launchpad.net/ubuntu/ +源/ linux/+错误/ 987993
在我的情况下,它是Realtek多卡阅读器,快速检查 显示模块ums-realtek 为我解决了一个可逆的问题。这是 再次启用读卡器。我还没有测试它是否工作,因为我从来没有使用它 |