Tag Archives: solution

Imresize import error: cannot import name ‘imresize’

Import imresize in Python code:

from scipy.misc import imresize

Unable to import due to the following error:

ImportError: cannot import name 'imresize'

This is due to the problem with the version of SciPy. The function imresize will no longer be included in the version after SciPy 1.3.0

imresize is deprecated! imresize is deprecated in SciPy 1.0.0, and will be removed in 1.3.0. Use Pillow instead: numpy.array ( Image.fromarray (arr).resize()).

Therefore, in order to use imresize, you need to reduce SciPy to an earlier version:

pip3 install scipy==1.1.0

Problem solving.

Python parallel processing makes full use of CPU to realize acceleration

Recently, Python is used to process the public image database. Due to the large amount of data, it takes too long to process the images one by one in serial. Therefore, it is decided to adopt the parallel mode to make full use of the CPU on the host to speed up the processing process, which can greatly reduce the total processing time.

Here we use the concurrent.futures Module, which can use multiprocessing to achieve real parallel computing.

The core principle is: concurrent.futures It will run multiple Python interpreters in parallel in the form of sub processes, so that Python programs can use multi-core CPU to improve the execution speed. Since the subprocess is separated from the main interpreter, their global interpreter locks are also independent of each other. Each subprocess can use a CPU core completely.

The specific implementation is also very simple, the code is as follows. How many CPU cores the host has will start how many Python processes for parallel processing.

import concurrent.futures


def function(files):
    # To do what you want
    # files: file list that you want to process


if __name__ == '__main__':
    with concurrent.futures.ProcessPoolExecutor() as executor:
        executor.map(function, files)

After changing to parallel processing, my 12 CPUs run at full load, and the processing speed is significantly faster.


“Cannot access GitHub because this site uses HSTs.” Problem solving

When I click the GitHub link in the morning, I am prompted that I can’t access it because the website uses HSTs.

The solution is relatively simple, in Chrome browser address bar input chrome://net-internals/#hsts , find the delete domain security policies key, and enter the domain name: github.com , and then click delete. You can access it normally.


Clion breakpoint not triggered debugging no response to solve the problem

When using clion to debug C + + code, there is no response when debugging after adding breakpoints, and breakpoints are not triggered. After checking some materials, we found that there was a problem. When compiling, we need to set the debug mode in cmakelists. The solution is to add the following code to cmakelists:

set(CMAKE_BUILD_TYPE Debug)

When recompiling and debugging, breakpoints can be triggered normally.

After canceling the startup of Ubuntu terminal, it will automatically enter the base environment of CONDA

After installing Anaconda on Ubuntu, every time you start the terminal, it will automatically enter the CONDA base environment. You can exit the CONDA environment through the following instructions:

conda deactivate

But considering that you need to perform this step to exit every time, it is troublesome, so you want to start the terminal without entering the CONDA environment. It is recommended to modify the config file of CONDA

conda config --set auto_activate_base false

However, I don’t use it here. After starting, I will automatically enter the base environment of CONDA. The final solution is to modify the configuration file of CONDA directly

sudo vi ~/.condarc

Add in the last line:

auto_activate_base: false

So far, it’s done.

Query specific settings through “CONDA – H”:

usage: conda [-h] [-V] command ...

conda is a tool for managing and deploying applications, environments and packages.

Options:

positional arguments:
  command
    clean        Remove unused packages and caches.
    config       Modify configuration values in .condarc. This is modeled
                 after the git config command. Writes to the user .condarc
                 file (/home/XXX/.condarc) by default.
    create       Create a new conda environment from a list of specified
                 packages.
    help         Displays a list of available conda commands and their help
                 strings.
    info         Display information about current conda install.
    init         Initialize conda for shell interaction. [Experimental]
    install      Installs a list of packages into a specified conda
                 environment.
    list         List linked packages in a conda environment.
    package      Low-level conda package utility. (EXPERIMENTAL)
    remove       Remove a list of packages from a specified conda environment.
    uninstall    Alias for conda remove.
    run          Run an executable in a conda environment. [Experimental]
    search       Search for packages and display associated information. The
                 input is a MatchSpec, a query language for conda packages.
                 See examples below.
    update       Updates conda packages to the latest compatible version.
    upgrade      Alias for conda update.

optional arguments:
  -h, --help     Show this help message and exit.
  -V, --version  Show the conda version number and exit.


[extremely simple and effective] installing docker under centos6. X

1. Upgrade Linux kernel

    rpm –import https://www.elrepo.org/RPM-GPG-KEY-elrepo.org


    rpm -Uvh http://www.elrepo.org/elrepo-release-6-8.el6.elrepo.noarch.rpm     


    yum –enablerepo=elrepo-kernel install kernel-lt -y

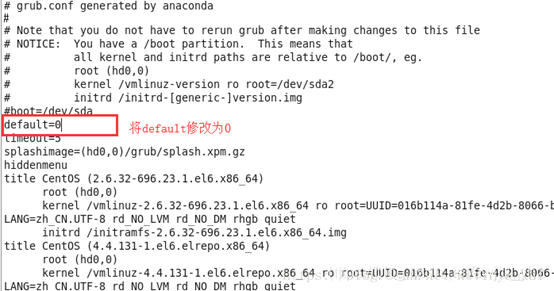
2. Modify default startup order

   vim /etc/ grub.conf

Restart the server

shutdown -r now

3. Disable SELinux

4. Offline installation of docker with static binary files

reference resources https://docs.docker.com/install/linux/docker-ce/binaries/#install -static-binaries

This installation method is the most simple and correct, the rest of the online reference rpm, yum installation all have a variety of problems.


1. Download static binary file

go to https://download.docker.com/linux/static/stable/ (or change stable to edge or test), select your hardware platform, and then download. Tgz files related to the docker CE version to be installed.


2. Decompress

$ tar –xzvf docker-18.06.3- ce.tgz For this, please install it on demand

Required: move the binary file to a directory on the executable path, such as/usr/bin /.

——–Without this step, it is invalid to call docker under the docker file

$ sudo cp docker/* /usr/bin/

3. Start the docker daemon:

$ sudo dockerd&

Note: if the following error occurs when starting the daemons:

The reason is that CGroup is not mounted on the host computer. To add a mount, the solution is as follows:

vim /etc/fstab

none        /sys/fs/cgroup        cgroup        defaults    0    0

Save and restart.

4. Start the docker command test

docker -v

Use subprocess to execute the command line, and the pipeline is blocked

When using subprocess to execute a series of CMD commands in Python, occasionally there will be blocking, and the command does not continue to execute.

reason:

The pipe of a subprocess has a size. Before python2.6.11, the size of pipe was the size of file page (4096 on i386),
# after 2.6.11, it became 65536. Therefore, when the output content exceeded 65536, it would cause blocking

solve:

1. Use tempfile to expand the cache;

2. Remove unnecessary output to reduce the output

In scheme 1, the temporary file tempfile is used to expand the cache

out_ temp = tempfile.SpooledTemporaryFile (bufsize=10 * 1000)
fileno = out_ temp.fileno ()
process = subprocess.Popen (cmd, stdout=fileno, stderr=fileno, shell=True) # stdout= subprocess.PIPE ,

Scheme 2, according to the actual situation to reduce unnecessary data.

Using AspectJ to transfer the data written to FTP service to MySQL database

Recently, the company’s project has carried out the rectification of performance improvement. It was originally planned to use FTP to write the collected underlying data to the file, and the client will read the FTP file again, and then parse and display it according to the demand. In the actual application process, the display effect is not ideal due to the slow reading and parsing of the FTP file. Therefore, it is proposed that the data written to FTP should be parsed and stored in the database for the client Read the database directly, no need to read the file and parse, so as to improve the display effect and performance of this part.

After several options, in the light of minimal changes and smooth transition, the original part of FTP writing remains intact, and the client’s parsing display function is also retained. Using AspectJ, the method of writing FTP file (upload ()) is pointcut. Once FTP writes a file, the operation of writing database part is triggered. First, the parameters of upload () are obtained, and these parameters are parsed , stored in a global list, the SQL method will construct the insert statement through the global list, and finally addbatch will execute and submit. Considering that frequent connection to the database for insertion will seriously affect the performance, the insert operation is set as a scheduled task, and the corresponding insert will be constructed according to the global list every 60 seconds SQL, execute and submit transactions, so as to reduce the pressure of the database and clear the current list; in order to ensure data security, the insert and list clear operations are placed in a synchronized statement segment to prevent the list from being changed when constructing SQL. So far, the transfer of the original FTP data is completed.

Advantages: 1. Aspect programming, without affecting the original system architecture and business code, realizes the optimization of functions, and still maintains loose coupling;

2. Keep the original function and make a smooth transition;

Paste part of the code as follows (integrated development under the spring framework)

@Aspect

@Enable scheduling
@ enable aspect jautoproxy// enable aspect proxy
@ component()
public class dbsyncaop{

//Set upload (..) to pointcut and name it pointcustsignature ()

@Pointcut(“execution(* com.bjtct.oom . mms.service.FileManager .upload(..))”)
public void pointcustSignature(){}

//2. Set the loading priority of the uploadfileaspect method to high and load it first

@Around(“pointcustSignature()”)
@Order(value=1)
public Object uploadFileAspect(ProceedingJoinPoint pjp) throws Throwable{

//upload() execute before ,get upload() paramaters code here 

List<String> fileNames = (List<String>) pjp.proceed ();

//upload() execute after ,handle upload() paramaters  here,and store data in mysql code here 

//handle upload() paramaters

List<Map<String, String>> fieldMapList = handleMsg(type, mqMsg);  

//param is a global list. Here, the data originally written to FTP is saved to param, which is used to construct the inserted SQL statement

synchronized(params){
List<Object> param;
for(int i=0; i< fieldMapList.size (); i++){
param = new ArrayList<Object>();
msg = fieldMapList.get (i);
System.out.println (“msg: “+msg);
param.add (new Date());
param.add (msg);
param.add (type);

params.add (param);
}
}

//Schedule tasks regularly, execute the method regularly, and insert the data obtained from FTP

@Scheduled(cron = “${ DBSync.schedule.delay .cron}”)
private void proceedInsertion(){

if(!”Y”.equalsIgnoreCase(DBSyncEnabled)){
return;
}
log.info (“DBSyncAop scheduling start”);
Connection conn = null;
PreparedStatement ps = null;
log.info (“##params size: “+ params.size ());
synchronized(params){
if(! params.isEmpty ()){
try{
conn = DataSourceUtils.getConnection (scheduleDataSource);
conn.setAutoCommit (false);
List param;
ps = conn.prepareStatement (insertSql);
for(int i=0; i< params.size (); i++){
param = params.get (i);
ps.setDate (1, new java.sql.Date (((Date) param.get (0)).getTime()));//timestamp
ps.setString (2, (String) param.get (1));//fileName
ps.setString (3, (String) param.get (2)); //json msg
ps.setString (4, (String) param.get (3));//mq type
ps.addBatch ();
log.info (“DBSyncAop scheduling added batch”);
}
ps.executeBatch ();
conn.commit ();
log.info (“DBSyncAop scheduling committed”);
conn.setAutoCommit (true);
params.clear ();
} catch (Exception e) {
log.error (“insert MQ information data contact” + e.getmessage());
e.printstacktrace();
} finally {
try {
} DataSourceUtils.doCloseConnection (conn, scheduleDataSource);
} catch (SQLException e) {
log.error (e.getMessage());
e.printStackTrace();
}
}
}
}
log.info (“DBSyncAop scheduling finish”);

}

}

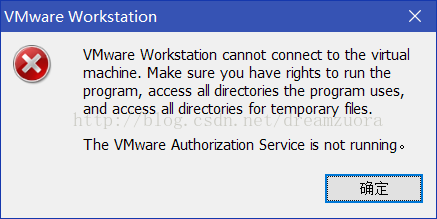
Solve the problem that the virtual machine can’t be opened? Tips on VMware Workstation cannot connect to the virtual machine

resolvent:

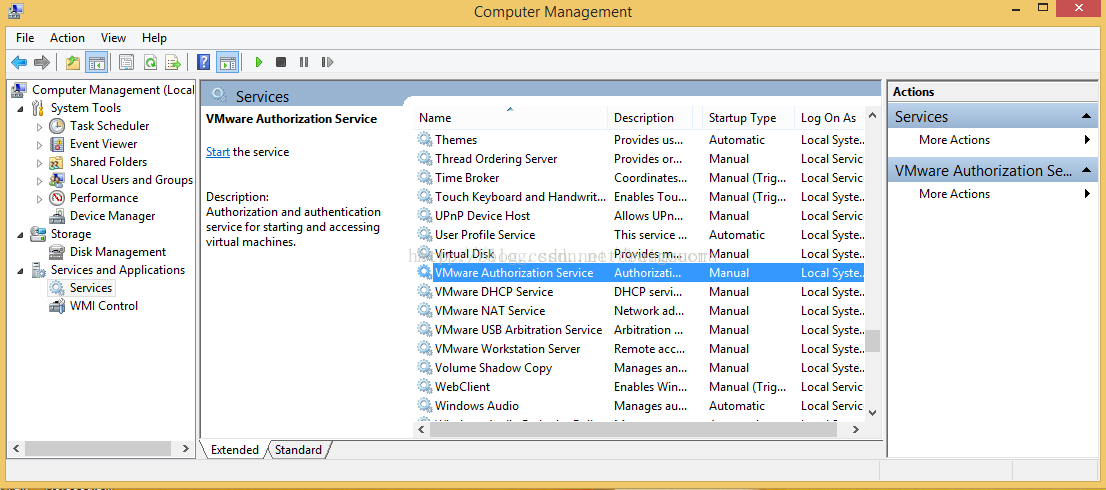
From the prompt message, we can see that the problem is that the VMware authorization service has not been started. The specific processing method is as follows:

No1. “This PC” — right click “manage” — “service and Applications” — “service” — “VMware authorization service” in the right column

Then restart the virtual machine!

java.lang.NoSuchMethodError Quote: javax.servlet.com Yeah. HttpServletRequest.isAsyncStarted ()Z

When developing jetty 9 embedded system, it starts normally, but when browsing the page, an error is reported as follows:

java.lang.NoSuchMethodError : javax.servlet.http . HttpServletRequest.isAsyncStarted () Z
reason: jetty 9 relies on servlet API version 3. X. if other third-party open source libraries in the project implicitly rely on servlet API version 2. X, this error will be reported.
Reprinted: https://www.cnblogs.com/yjmyzz/p/5090990.html