Tag Archives: solution

Solution of no response of progress bar in MFC program

The MFC program written a few days ago, the progress bar will not respond when the program is running to deal with large tasks. It will be updated again only at the end of processing, and it will be directly updated to the full status of the progress bar, which is very unpleasant. Today, running MFC program again, I really can’t stand this situation. It’s very easy to find information on the Internet and get a solution.

reference resources http://blog.csdn.net/thinkhy/article/details/5777856

 
MSG msg;


while(PeekMessage(& msg,NULL,0,0,PM_ REMOVE))

{

TranslateMessage(& msg);

DispatchMessage(& msg);

}


The problem can be solved by adding the above code before the program loop processing task, and the progress bar can be updated continuously. As for the inherent principle of the solution, there is probably an understanding about MFC message circulation and message pump.

Opencv2.4.9 + ffmpeg1.2.12 installation configuration and problem solution under Ubuntu 14.04

In the process of video processing, two feature extraction methods, space-time interest points (stip) and improved dense trajectories (IDT), are used. We can find the open algorithm source code on the author’s home page. They need opencv and ffmpeg to run smoothly under Linux. We have used these two tools before, but now we want to use them again after changing the working environment, but there are still many problems in the process of configuration and installation. Therefore, I feel it is necessary to record the specific process, problems and solutions for future use, and hope to bring a little help to others.


Opencv2.4.9 and ffmpeg 1.2.12 source package download

These two software in the official website can be directly found in various versions of the source code package, download, compile and install. If you don’t particularly need the latest version of the software, I suggest that you use the earlier version that has been used by most people, and you can easily find the corresponding solution when there is a problem. I chose opencv2.4.9 and ffmpeg 1.2.12.

Opencv2.4.9 download
the official website provides download links from the earlier version 1.0.0 to 3.1 and 2.4.13, which means that different operating systems have different software packages
http://opencv.org/downloads.html
The download address of version 2.4.9 that I used is as follows:
0 https://sourceforge.net/projects/opencvlibrary/files/opencv-unix/2.4.9/opencv-2.4.9.zip/downloadFFmpeg1.2.12 The latest version of ffmpeg is 3.1.4, and the update speed is relatively fast. Personal choice of the early version 1.2.12 has been able to meet the actual needs, and the download address is as follows:
0 https://ffmpeg.org/olddownload.html

Ffmpeg compilation configuration

Ffmpeg is a leading multimedia framework, which can be used to record, convert digital audio and video, and convert them into open source programs. It includes the leading audio/video coding libraries libavcodec, libavutil, libavformat, etc.

1. Uninstall the previously installed ffmpeg and x264 software
in order to prevent version problems, it is recommended to uninstall the previously (possibly) installed version first. The order is as follows:

sudo apt-get -qq remove ffmpeg x264 libx264-dev

2. Install dependencies and related software

sudo apt-get install yasm
sudo aptitude install libx264-dev libfaac-dev libmp3lame-dev libtheora-dev libvorbis-dev libxvidcore-dev  libxext-dev libxfixes-dev

3. Compile and install
decompress the ffmpeg package and enter the decompressed directory

cd ffmpeg-1.2.12

Environment configuration [4]

./configure --prefix=/usr/local/ffmpeg --enable-gpl --enable-version3 --enable-nonfree --enable-postproc --enable-pthreads --enable-libfaac --enable-libmp3lame --enable-libtheora --enable-libx264 --enable-libxvid --enable-x11grab --enable-libvorbis --enable-nonfree --enable-pic --enable-shared

Note that there may be carriage return or character problems in the process of copying. If there is a problem with the prompt command, you need to carefully check the space and carriage return. If you use prefix to specify the installation path of the software, you need to modify the corresponding path in the configuration file so that the system can find the installation path of ffmpeg

vi /etc/profile

Press insert and add the following two lines at the end of the file:

export FFMPEG_HOME=/usr/local/ffmpeg 
export PATH=$FFMPEG_HOME/bin:$PATH

Press ESC and enter “: WQ” to exit and save, and then make the above changes take effect. The command is as follows:

source profile

After all configuration is completed, prepare to install. The command is as follows:

make
make install

After installation, you will see three directories in/usr/local/ffmpeg: Bin executable file directory, lib static and dynamic link library directory, and header files used in include programming.

4. Check whether the installation configuration is correct
it is said on the Internet that you can test whether the installation is successful by executing ffplay to play the video file in the bin directory. However, I did not generate ffplay after compiling and installing. There are only ffmpeg and ffserver in the bin directory. Therefore, we directly check whether the version is correct, and there is no problem when we use it later. The order is as follows:

ffmpeg -version

The correct version and configuration information appears, indicating that the installation is successful.

Opencv compilation and installation

The full name of OpenCV is: open source computer vision library. Opencv is a cross platform computer vision library based on BSD license (open source), which can run on Linux, windows and Mac OS operating systems. It is lightweight and efficient, which is composed of a series of C functions and a small number of C + + classes. It also provides the interfaces of python, ruby, MATLAB and other languages, and realizes many general algorithms in image processing and computer vision [5].

1. Install dependencies

sudo apt-get -qq install libopencv-dev build-essential checkinstall cmake pkg-config libjpeg-dev libjasper-dev libavcodec-dev libavformat-dev libswscale-dev libdc1394-22-dev libxine-dev libgstreamer0.10-dev libgstreamer-plugins-base0.10-dev libv4l-dev python-dev python-numpy libtbb-dev libqt4-dev libgtk2.0-dev libopencore-amrnb-dev libopencore-amrwb-dev x264 v4l-utils 

2. Compile and install
to unzip the downloaded opencv package and enter the unzipped directory

cd opencv-2.4.9

Create compile directory, compile and install

mkdir release
cd release
cmake -D CMAKE_BUILD_TYPE=RELEASE -D CMAKE_INSTALL_PREFIX=/usr/local ..
make
sudo make install

It takes a long time to compile here. After completion, the following prompt information will be printed on the last line:

-- Configuring done
-- Generating done
-- Build files have been written to: /opt/opencv-2.4.9

During the compilation process, you may stay in the line “configuring done” for a long time. Don’t stop the compilation in a hurry. You need to wait patiently for the compilation to complete. During the installation process, there will be a progress prompt in the form of “[10%]” percentage, and the process will be very slow. Please wait patiently.

Tip: after cmake is completed, relevant information will appear, in which you can check whether ffmpeg has been supported. If yes is supported, ffmpeg will appear after it. There are also some encoding and formats with yes.

3. Environment configuration
all library files are installed under/usr/local/lib by default, and all header files are installed under/usr/local/include/opcv * /. Modify the environment configuration [6], and the command is as follows:

vim /etc/ld.so.conf

Press the insert key to add in the last line of the file

/usr/local/lib

Press ESC key to enter “: WQ” to exit and save, and then execute the following command:

ldconfig

At this point, opencv installation is complete.

Libcxcore. So. 2 cannot find a solution to the problem

After opencv is installed, the IDT algorithm can run normally, but the following errors appear when executing stip program:

./bin/stipdet: error while loading shared libraries: libcxcore.so.2: cannot open shared object file: No such file or directory

Look at the problem, it means that the shared library file libcxcore. So. 2 can’t be found during the execution of the program. This file or path doesn’t exist. From the online search results, most of the problems are prepared to use stip to obtain video features, but dense track programs do not have this problem. This problem and several solutions are available on the stackoverflow website for reference [7].

I didn’t succeed in creating soft links. Maybe I didn’t set it correctly at that time, and then I didn’t have root permission. Finally, I adopted a temporary method. To set the search directory of shared library, the command is as follows:

export LD_LIBRARY_PATH=[enter your path]/opencv-2.4.9/release/lib

When executing some external programs under Linux, you may be prompted that the shared library cannot be found, which is quite common. The reason for this problem is that although the shared library has been installed, the program cannot find the file when it is ready to call.

My problem is that the shared library file is installed in other “non/lib or/usr/lib” directory, but after the installation, the non root user does not have the permission to add a path in the “/ etc/LD. So. Conf”. So export is a global variable LD_ LIBRARY_ Path, and then run the program will go to this directory to find the shared library [8].

Execute stip program

If you directly execute “.”/bin/stippet – help “in this directory, you will not be able to execute. You must turn stippet and stipshow into executable files. For convenience, I directly changed it to fully open executable permissions [9]. The order is as follows:

chmod 777 bin/stipdet
chmod 777 bin/stipshow

For programs with dense trajectories, the same method can be used to execute normally. In addition, the global variable of export will no longer take effect every time the command window is closed. Therefore, before executing the stip program, we must first set the search directory of the shared library according to the above method, and there will be no problem that libcxcore. So. 2 cannot be found.

Opencv version view

During use, you may need to check the installed version of OpenCV. You can use the following command [10]:

pkg-config --modversion opencv

PKG config is a very useful tool for compiling applications and library files. One of its functions is to check the version number of the library.

Python calls opencv module

If you need to use Python to call opencv module, you can install Python first and then load CV [4]. The order is as follows:

sudo apt-get install python-opencv
sudo apt-get install python-numpy
python
import cv


References: <
> 1] https://www.di.ens.fr/~laptev/interestpoints.html
[2] https://lear.inrialpes.fr/people/wang/improved_trajectories
[3] https://ffmpeg.org/about.html
[4] http://blog.csdn.net/u010106759/article/details/51931815
[5] http://opencv.org/
[6] http://blog.csdn.net/firefoxbug/article/details/7554409
[7] http://stackoverflow.com/questions/5212728/libcxcore-so-2-missing-in-opencv
[8] http://blog.csdn.net/sahusoft/article/details/7388617
[9] http://blog.chinaunix.net/uid-21880738-id-1813031.html
[10] http://blog.csdn.net/ppp2006/article/details/47445903

Install Java runtime JRE in Ubuntu 16.04

Recently, we need to use Vuze software to download things in the Ubuntu system. When we run the program, we are prompted that there is a lack of JRE environment. In order to solve this problem, we have found many solutions on the Internet. Under normal conditions, run the following command to install:

sudo apt-get install openjdk-7-jre

However, after the command is executed, the error “package ‘openjdk-7-jre’ has no installation candidate” is prompted, as shown in the figure below

This problem should be caused by the current data source does not contain JRE, but it is also troublesome to find an available data source to add. In fact, you can directly download the tar.gz package corresponding to JRE from Oracle’s Java official website. The command is as follows:

wget http://javadl.oracle.com/webapps/download/AutoDL?BundleId=225345_090f390dda5b47b9b721c7dfaa008135

Unzip the downloaded file, I put it directly under the home directory, and change the unzipped folder name to JRE, which is ~/JRE . Then, set the environment variables by modifying the /etc/profile file. The command is as follows:

sudo gedit /etc/profile

Add the following lines at the end of the file:

export JAVA_HOME=~/jre
export PATH=$PATH:$JAVA_HOME/bin
export CLASSPATH=$JAVA_HOME/lib

Save, exit. Enter the following command to make it work. (you may need to restart the system here)

sudo source /etc/profile

Check the Java version,

java -version

If the version information is displayed successfully, the environment is installed successfully

When executing the source command, the prompt "command not found" is also dizzy. The reason mentioned on the Internet is due to the modification of the path environment variable. You need to re export the environment variable through the following command:

export PATH=/bin:/usr/bin:/usr/local/bin

So far, the problem has been solved.

Solutions to the problem that Ubuntu is stuck when copying large files and can’t mount mobile hard disk normally

Recently, in the process of copying a large number of files (more than 100g) from the Ubuntu system to the mobile hard disk, there is a situation of stuck. At the beginning, it used the direct folder copy and paste method. When it got stuck, it was replaced by the “SCP – R” method, but it didn’t work.

The main reason for this problem is that the write cache of kernel in Ubuntu system is too large, so that there is a congestion bottleneck when writing from high-speed storage to low-speed devices.

The solution is to avoid using file manager and SCP. When copying large files, the following instructions can be used:

rsync -avP source/ target/

Rsync is a remote data synchronization tool, which can quickly synchronize the files between multiple hosts through LAN/WAN, and view the file transfer process and rate, which is very convenient.

In addition, when the copy to the mobile hard disk is stuck, the file index directory is damaged due to forcibly pulling out the mobile hard disk, which makes the Ubuntu system unable to mount the mobile hard disk, and the following error prompt appears:

Failed to mount '/dev/sdb1': Input/output error 
NTFS is either inconsistent, or there is a hardware fault, or it's a 
SoftRAID/FakeRAID hardware. In the first case run chkdsk /f on Windows 
then reboot into Windows twice. The usage of the /f parameter is very 
important! If the device is a SoftRAID/FakeRAID then first activate 
it and mount a different device under the /dev/mapper/ directory, (e.g. 
/dev/mapper/nvidia_eahaabcc1). Please see the 'dmraid' documentation 
for more details.

According to the above tips, it can be solved in Windows system  
1. Enter CMD in “run” under windows to enter DOS command line window  
2. Find the volume name of the mobile hard disk (such as G:)  
3. On the command line, enter:

chkdsk G:/f

CHKDSK command is used to scan disk, automatically check and fix index error. There are three stages after the instruction input in step 3 above. If there are a large number of files, it will take a long time, and you need to wait patiently for the repair to be completed. After that, it can be mounted normally in the Ubuntu system.

The solution of “error in NLS loop more than 50” in R language

When using multiple nonlinear regression (NLS function) in R language, we often encounter the problem that “the number of error in NLS cycles exceeds the maximum of 50”.

The main reason is that the default maximum number of iterations in NLS is 50. At this time, you only need to use NLS. Control to modify the maximum number of iterations
for example, change the maximum number of iterations to 1000:

nlc <- nls.control(maxiter = 1000)
m1 <- nls(y ~ a * x1 ^ b * x2 ^ c, 
          control = nlc, 
          start = list(a = 1, b = 1, c = 1),
          trace = T)

Ecilpse: All Common Shortcut keys

Alt + ?   #Code tips

ctrl + l #Go to a line

ctrl + D #delete the line where the cursor is

ctrl + shift + r #Access a file

ctrl + shiif + f #Formatting

ctrl + shift + o #Package introduction

alt + arrow keys down # Move the cursor down the line

alt + arrow keys up # Move the cursor up the line

ctrl + alt + arrow keys down # Copy down the line where the cursor is

ctrl + alt + arrow keys up # Copy cursor row up

alt + shift + R # Rename method name

ctrl +/ #Add single line comment, uncomment if comment is already added

Ctrl + 1 # Quick fix

Shift + Enter # insert empty line in the next line of the current line (this time the mouse can be anywhere in the current line, not necessarily at the end) 

Shift+Ctrl+Enter # insert a blank line in the current line (same principle as the previous article)

Ctrl+M # Maximize the current Edit or View (press again to do the opposite)

Ctrl+H #Search in the whole project

A solution to automatically convert special characters into Unicode when taking out data from MySQL and encapsulating it into JSON

    @Test
    public void xxx() throws ParseException, UnsupportedEncodingException, Exception {
        ArrayList<JSONObject> list = new ArrayList<>();
        String s = "Appliances jerry-built, poor quality clothing ...... still believe that "e-commerce custom products" more affordable";
        JSONObject json = new JSONObject();
        json.put("title", s);
        JSONObject json1 = new JSONObject();
        json1.put("title", s);
        list.add(json);
        list.add(json1);
        System.out.println("old:"+list.toString());
        System.out.println("new"+StringEscapeUtils.unescapeJava(list.toString()));
    }

Output:
before transformation: [{“title”: “home appliances cut corners and poor clothing quality”}]
after transformation [{“title”: “home appliances cut corners and poor clothing quality”}]
after transformation [{“title”: “home appliances cut corners and poor clothing quality”} Also believe that “e-commerce customized products” are more affordable “}, {” title “:” home appliances cut corners, poor quality of clothing Also believe that “e-commerce customized products” are more affordable “}]

Pytorch failed to specify GPU resolution

Recently, I ran pytorch’s training code on an 8-card server without any problem. However, after the CUDA is re installed, it is impossible to specify which GPU to run on. It can only be used from Block 0 in order. After checking some information, the problem has been solved.

1. To specify which GPU to run on in Python program, the following methods are usually adopted:

import os
import torch

os.environ["CUDA_VISIBLE_DEVICES"] = "4,5,6,7"

Or execute the following commands directly from the command line (not recommended):

export CUDA_VISIBLE_DEVICES=4,5,6,7

2. According to the previous writing method, suddenly the above code is invalid. No matter how to modify the visible GPU number, the final program is used from Block 0 in order. The problem lies in the location of the specified GPU line of code“ os.environ [“CUDA_ VISIBLE_ Devices “] =” 4,5,6,7 “” move to import torch and other codes, followed by import OS, that is, in the following way:

import os

os.environ["CUDA_VISIBLE_DEVICES"] = "4,5,6,7"

import torch

3. Some common instructions for viewing GPU information are attached for later use, as follows:

import torch

torch.cuda.is_available()  # Check if cuda is available

torch.cuda.device_count() # Returns the number of GPUs

torch.cuda.get_device_name(0) # Return the GPU name, the device index starts from 0 by default

torch.cuda.current_device() # Returns the current device index

How to Solve ModuleNotFoundError: No module named ‘_bz2‘

When running pytorch code, “modulenotfoundererror: no module named” is reported_ Bz2 ‘”error, the complete error message is as follows:

Traceback (most recent call last):
  File "stat_model.py", line 1, in <module>
    from torchstat import stat
  File "/usr/local/lib/python3.7/site-packages/torchstat/__init__.py", line 11, in <module>
    from torchstat.reporter import report_format
  File "/usr/local/lib/python3.7/site-packages/torchstat/reporter.py", line 1, in <module>
    import pandas as pd
  File "/usr/local/lib/python3.7/site-packages/pandas/__init__.py", line 55, in <module>
    from pandas.core.api import (
  File "/usr/local/lib/python3.7/site-packages/pandas/core/api.py", line 24, in <module>
    from pandas.core.groupby import Grouper, NamedAgg
  File "/usr/local/lib/python3.7/site-packages/pandas/core/groupby/__init__.py", line 1, in <module>
    from pandas.core.groupby.generic import (  # noqa: F401
  File "/usr/local/lib/python3.7/site-packages/pandas/core/groupby/generic.py", line 44, in <module>
    from pandas.core.frame import DataFrame
  File "/usr/local/lib/python3.7/site-packages/pandas/core/frame.py", line 88, in <module>
    from pandas.core.generic import NDFrame, _shared_docs
  File "/usr/local/lib/python3.7/site-packages/pandas/core/generic.py", line 70, in <module>
    from pandas.io.formats.format import DataFrameFormatter, format_percentiles
  File "/usr/local/lib/python3.7/site-packages/pandas/io/formats/format.py", line 48, in <module>
    from pandas.io.common import _expand_user, _stringify_path
  File "/usr/local/lib/python3.7/site-packages/pandas/io/common.py", line 3, in <module>
    import bz2
  File "/usr/local/lib/python3.7/bz2.py", line 19, in <module>
    from _bz2 import BZ2Compressor, BZ2Decompressor
ModuleNotFoundError: No module named '_bz2'

The reason for this error is that I use Python 3.7, but bz2 is installed in Python 3.6, so I can’t find it. In order to solve this problem, we need to copy the BZ Library in Python 3.6 to Python 3.7. The specific process is as follows:

1. Find the BZ library file in the path of python3.6, that is, the_ bz2.cpython-36m-x86_ 64-linux- gnu.so ”。

ls /usr/lib/python3.6/lib-dynload/

You can see that “- 36m” in the file name corresponds to Python 3.6.

2. Switch to the path corresponding to python3.7 and copy the file to the directory

cd /usr/local/lib/python3.7/lib-dynload

sudo cp /usr/lib/python3.6/lib-dynload/_bz2.cpython-36m-x86_64-linux-gnu.so ./

3. Modify the file name and change “- 36m” to “- 37m”

sudo mv _bz2.cpython-36m-x86_64-linux-gnu.so _bz2.cpython-37m-x86_64-linux-gnu.so

So far, the problem has been solved.


It should be noted that there is also a path/usr/lib/python3.7/lib-dynload. It is useless to copy the file to this directory. I need to copy it to the/usr/local/lib/python3.7/lib-dynload directory here.

Web Crawler: How to get the data in the web page and disguise the header, disguise as a browser to visit many times, avoid a single visit leading to IP blocked

User agent: user agent. It is a kind of identification that provides information such as browser type, operating system and version, CPU type, browser rendering engine, browser language, browser plug-in, etc. The UA string is sent to the server every time the browser makes an HTTP request

Referer: http referer is a part of the header. When a browser sends a request to a web server, it usually brings a referer to tell the server which page I’m linking from, so that the server can get some information for processing

	public static String getHtmls(String url) throws IOException {
		RequestConfig globalConfig = RequestConfig.custom().setCookieSpec(CookieSpecs.IGNORE_COOKIES).build();
		String html = "";
		CloseableHttpClient httpClient = HttpClients.custom().setDefaultRequestConfig(globalConfig).build();
		HttpGet httpget = new HttpGet(url);
		//Browser identifier (OS identifier; encryption level identifier; browser language) Rendering engine identifier Version information
		httpget.setHeader("User-Agent","Mozilla/5.0 (Linux; U; Android 2.3.6; zh-cn; GT-S5660 Build/GINGERBREAD) AppleWebKit/533.1 (KHTML, like Gecko) Version/4.0 Mobile Safari/533.1 MicroMessenger/4.5.255");
	    // Camouflage head
		httpget.setHeader("Referer", "https://mp.weixin.qq.com");
		
		try {
			HttpResponse responce = httpClient.execute(httpget);//
			int resStatu = responce.getStatusLine().getStatusCode();
			if (resStatu == HttpStatus.SC_OK) {

				HttpEntity entity = responce.getEntity();
				if (entity != null) {
					html = EntityUtils.toString(entity);// Get html source code
				}
			}
		} catch (Exception e) {
			System.out.println("request " + url + " error!");
			e.printStackTrace();
		} finally {
			// close
			httpClient.close();
		}
		return html;
	}

Open the top left corner of the chrome page to display the volume and playback chrome.exe Problem solving

Today, I opened chrome to watch the video. After a while, the volume and playback interface appeared in the upper left corner of the page chrome.exe , as shown in the figure below. It’s the same after restart. I feel this bug is stupid.

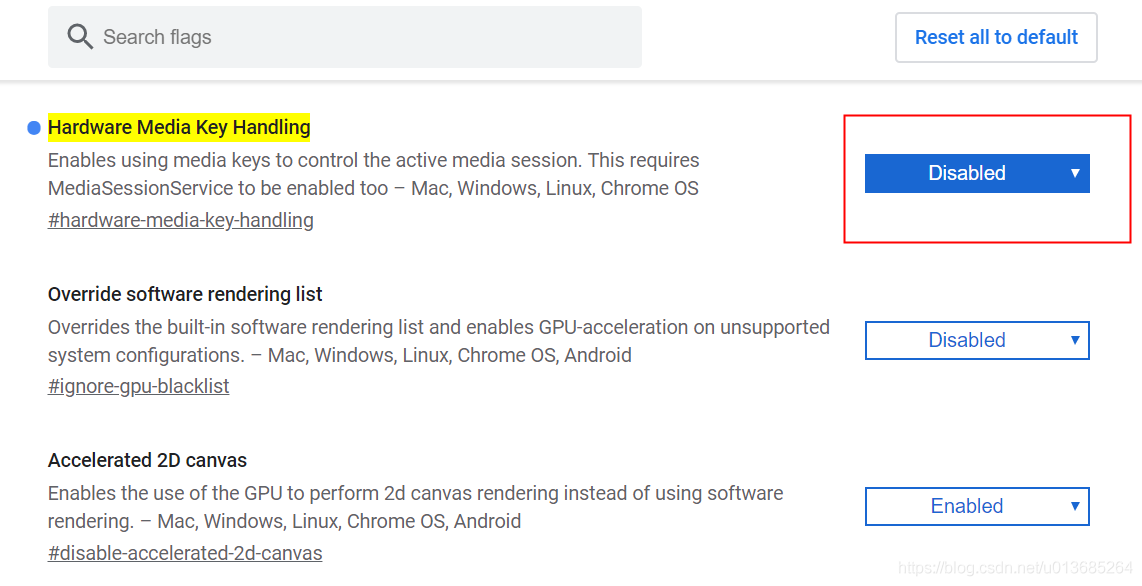
After checking the information, enter in the address bar and press enter.

chrome://flags/#hardware-media-key-handling

Set the drop-down list on the right side of hardware media key handling highlighted in yellow to disabled and restart chrome to solve this problem.

Solution to prompt “system group policy forbids installation of this device” in win10 system

A few days ago, the system automatically updated the graphics driver, resulting in a lot of problems. Re install the video card driver, but the error of “system group policy forbids the installation of this device, please contact the administrator” is prompted. We checked some information on the Internet, and finally solved this problem by modifying the relevant items in the local group policy of the system. Now the scheme is recorded as follows.

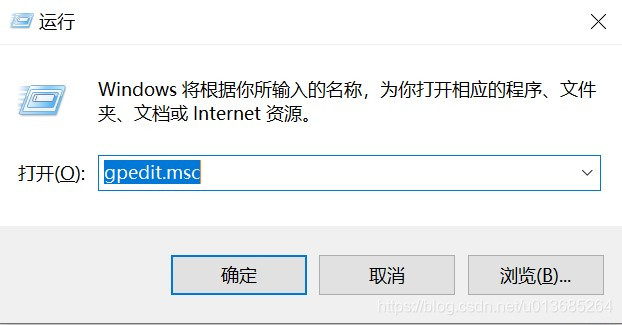
1. First, win + R opens the “run” dialog box

gpedit.msc

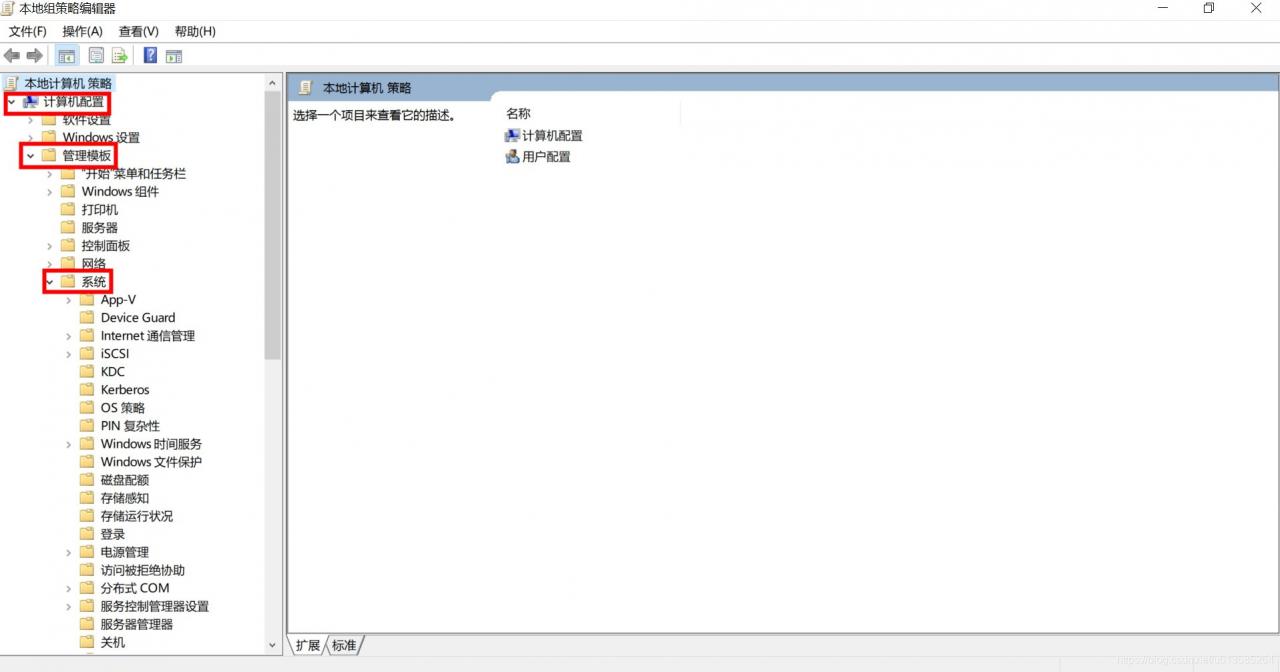
2. Enter the local group policy editor and click “computer configuration – & gt; management template – & gt; system”.

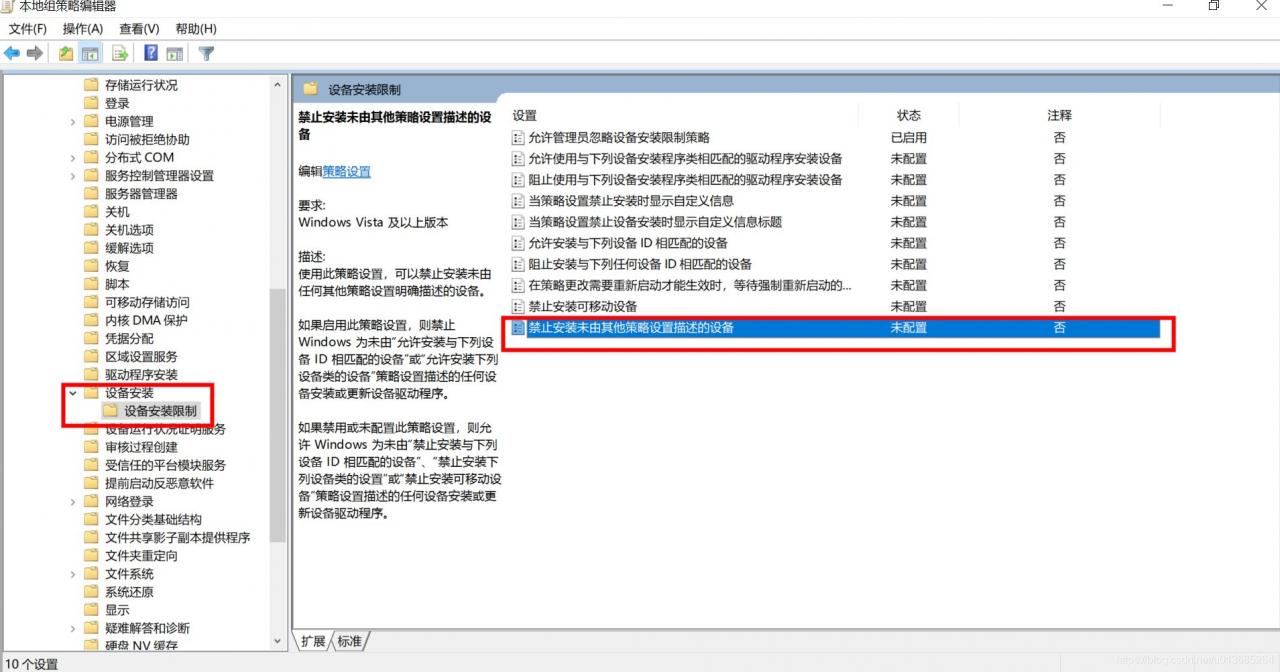
3. Find “device installation restrictions” under “device installation” and click to display the following list:

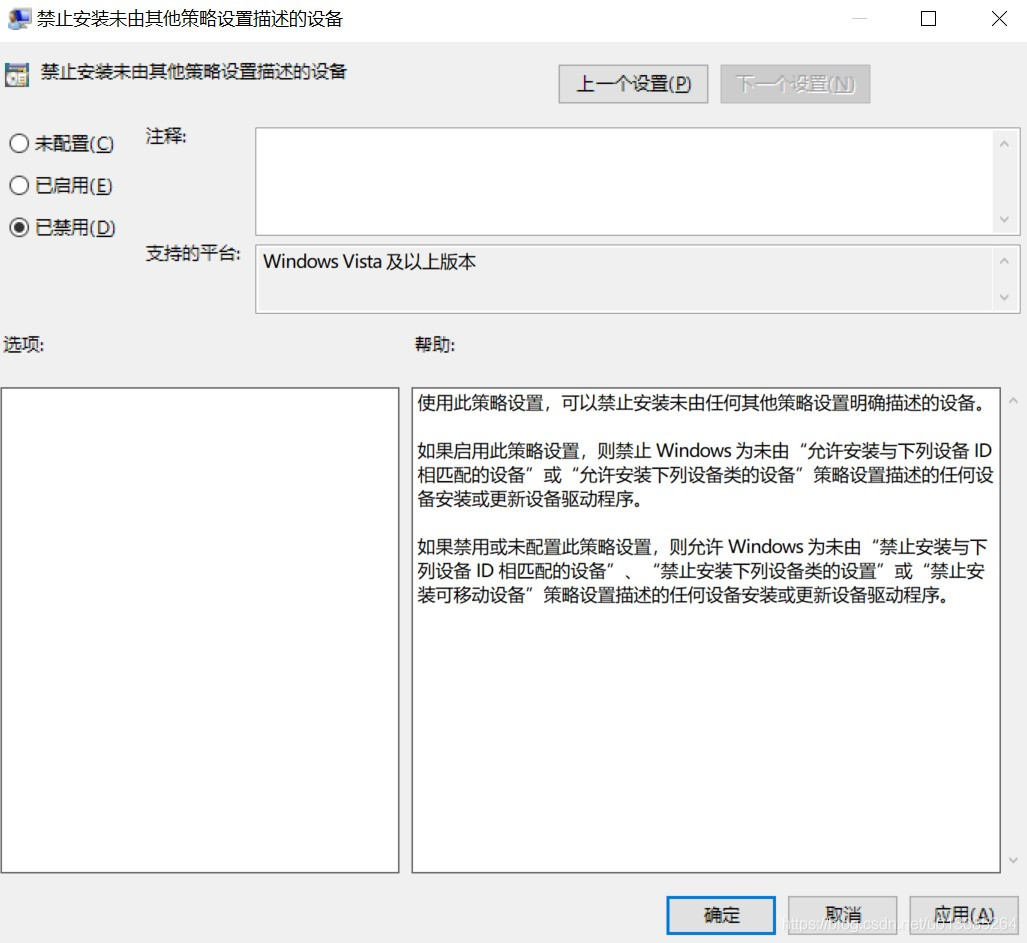
4. Double click “prohibit installation of devices not described by other policy settings”, select “disabled”, and click “apply and confirm” to save the settings.

5. At this point, you can install the graphics driver normally.