Tag Archives: solution

[Git] git pull pull remote git push to remote git commit submit reject

The GIT command has been introduced in previous blog posts. But for some scenes, it is still a little strange to use
git command git introduction and common command list

[scenario 1] pull the remote git warehouse branch to the local (this branch does not exist locally)

# recommand method
git fetch
# git checkout Remote branch name (dev is the example branch name)
git checkout dev
git pull

# other method (Not recommand)
git fetch
# git checkout -blocal branch name origin/remote branch name # actually associates the remote branch to the local branch
git checkout -b dev origin/dev
git pull

git push

[scenario 2] push the newly created local branch to the remote git warehouse
[scenario 3] solve [remote rejected] intg/dev – & gt; Intg/dev (hook declined) problem

# Check out the new local branch. The contents of the new branch are identical to the contents of the previous branch. When it is created, it will automatically switch to the new branch
git checkout -b new branch name
# [Suggestions] After modifying or creating a new file, it is recommended that you run the following two lines before committing
# Execute the command to resolve the [remote rejected] intg/dev -> intg/dev (hook declined) issue
git stash
git pull --rebase
git commit -m "comments in quotes for commit"
git push --set-upstream origin branch name

[solution] Python flash database migrate error type error: option values must be strings

Problem situation:

After the database has been configured in the Python Flask project and the model class has been defined, execute the command.
# Note: The db in the command is the name of one of the commands for the database defined in the configuration
$ python manage.py db init
$ python manage.py db migrate -m "initial"
Execute to migrate, followed by an error reporting.

File “C:\Python36\lib\configparser.py”, line 1177, in _validate_value_types raise TypeError(“option values must be strings”)
TypeError: <flask_script.commands.Command object at 0x000000F01214E6D8>: option values must be strings

Solution.
Check the configuration file of the database.

 # Configuration information for the database
    SQLALCHEMY_DATABASE_URL = "mysql://root:[email protected]:3306/databasename"

Note: Here’s sqllchemy_ DATABASE_ URL , correct writing: Sqlalchemy_ DATABASE_ URI
URI > I

Please change the name of the configuration.

you can also read the contents of stckoverflow: https://stackoverflow.com/questions/49472259/python-manage-py-db-migrate-makesoption-values-must-be-strings-in-flask-mi

Ngnix+gunicorn+Flag project deployment in Ubuntu

Related environment installation

The following operations are performed on the remote server (ubuntu 16.04)

Update apt related source first

	sudo apt-get update

MySQL installation

	apt-get install mysql-server
	apt-get install libmysqlclient-dev

Redis installation

sudo apt-get install redis-server

Install virtual environment

pip install virtualenv
pip install virtualenvwrapper

Make the installed virtualenvwrapper effective. Edit the ~ /. Bashrc file as follows:

export WORKON_HOME=$HOME/.virtualenvs
export PROJECT_HOME=$HOME/workspace

source /usr/local/bin/virtualenvwrapper.sh

Make the edited document effective

source ~/.bashrc
requirements file

A python project can contain a requirements.txt file to record all dependent packages and their exact version numbers for deployment in a new environment.

In the virtual environment, use the following command to generate the dependent package in the current virtual environment to the file with version number:
PIP free > Requirements. TXT
when you need to create a full copy of this virtual environment, you can create a new virtual environment and run the following command on it:
PIP install - R requirements. TXT
when you install flash MySQL DB, you may report an error, which may be because the dependent package is not installed, Execute the following command to install the dependency package:
sudo apt get build dep Python mysqldb to install the dependency package

Nginx

The program is written in C language
to realize the shunting, forwarding and load balancing
related operations
installation
$sudo apt get install nginx
running and stopping

/etc/init.d/nginx start #start
/etc/init.d/nginx stop  #stop

Configuration file
edit file/etc/nginx/sites available/default

If there are multiple servers, configure them here and modify the proxy under the location node_ pass

upstream flask {
        server 127.0.0.1:5000;
        server 127.0.0.1:5001;
}
server {
        # Listening on port 80
        listen 80 default_server;
        listen [::]:80 default_server;

        root /var/www/html;

        index index.html index.htm index.nginx-debian.html;

        server_name _;

        location/{
                # Requests are forwarded to the gunicorn server
                proxy_pass http://127.0.0.1:5000;
                # Requests are forwarded to multiple gunicorn servers
                # proxy_pass http://flask;
                # Set the request header and pass the header information to the server side 
                proxy_set_header Host $host;
                # Set request header and pass original request ip to gunicorn server
                proxy_set_header X-Real-IP $remote_addr;
        }
}

Gunicorn

Gunicorn (green Unicorn) is a HTTP server for Python WSGI
transplanted from Ruby’s Unicorn project
the gunicorn server is compatible with various web frameworks, with very simple implementation and lightweight resource consumption
gunicorn starts directly with commands, There is no need to write configuration files
related operations
install
PIP install gunicorn
view options
gunicorn - H
run

-w: Indicates a process (worker)
-b: indicates bind ip address and port number (bind) 
-D: daemon
--reload: auto refresh (update code, auto refresh available when debug)

gunicorn - W 2 - B 127.0.0.1:7000 running file name: Flash program instance name
for example:
gunicorn - W 2 - B 0.0.0.0:7000 app:app -D --Reload

copy local code to remote
SCP – R local file path [email protected] : remote save path

[solution] Google Chrome browser hijacked by hao123 chrome://version Command line tampered

Problem description

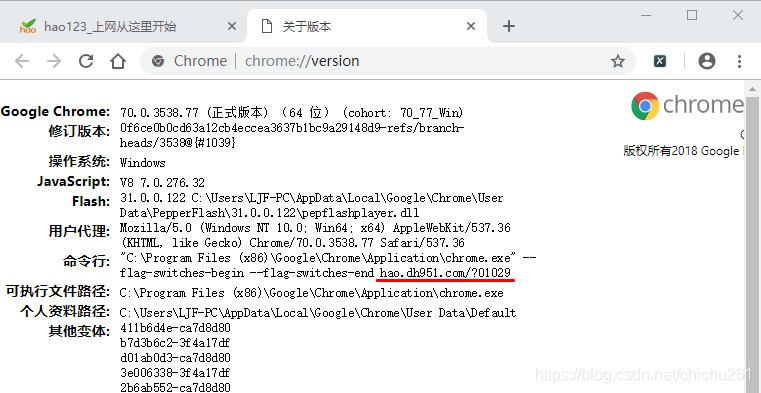
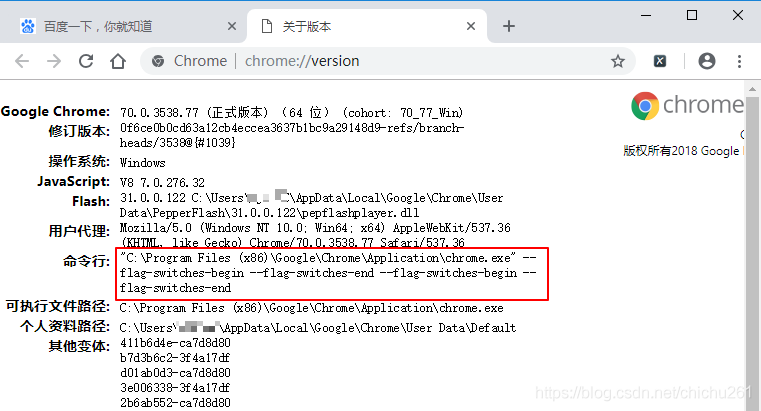
Install a new system, install Google Chrome browser, open it and automatically jump to the hijacked website. I was hijacked by hao123, and my liking for hao123 declined instantly. The browser input in the browser chrome://version you can see "command line......" The last part was tampered with

Problem solving

I tried a lot of Baidu out of the way, in addition to the same, the key is not more convenient, not perfect to solve my problem

Finally, the successful solution is as follows

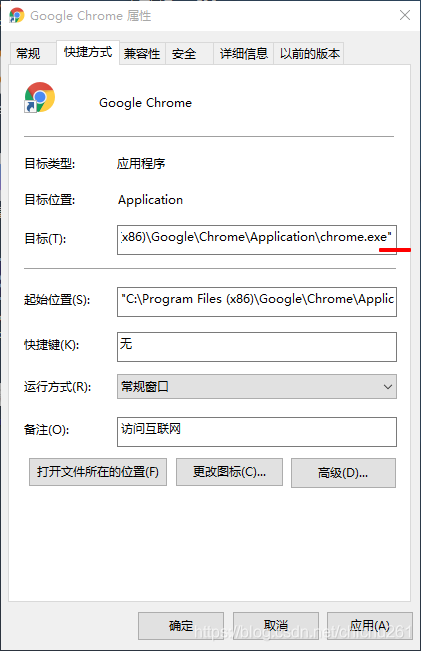
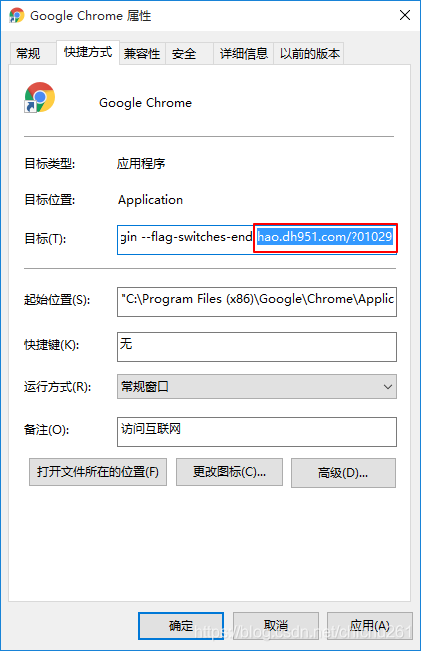
Step 1: desktop browser – & gt; Right click – & gt; Attributes – & gt; Target

Looking at the end of the target, some people may display the tampered web address
their tampered advanced, as shown in the figure, which does not show tampering at all

Step 2: enter in Chrome browser chrome://version --> Copy command line content – & gt; Paste to target location in browser properties -- & gt; Delete/modify the contents outlined in the diagram as needed

Step 3: restart the browser

If you delete it, jump to the default home page after restart and view it again chrome://version The display content is normal

Step 4: if Chrome is fixed in the taskbar, you need to cancel and fix it again

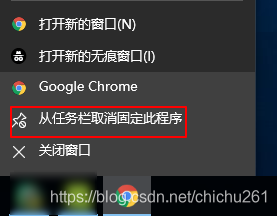
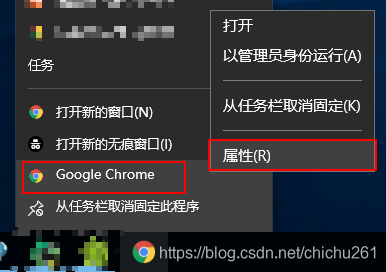
Step 5: if there is still a problem, please refer to the picture to open the attribute. Then repeat the previous operation again

Perfect solution to the problem, I hope you can comment or like it. Convenient for later screening.

[solution] install L2TP and related settings in Ubuntu 18.04

preface

Before, according to the company’s business needs, it was necessary to connect L2TP VPN on ubuntu16.04
for a whole day, but it was not installed successfully
Baidu tried all kinds of methods
finally, I felt that a system should be re installed. Rebooted Ubuntu 18.04

Solution
1. Command line input:

sudo apt-get install network-manager-l2tp-gnome

2. From the drop-down arrow in the upper right corner of Ubuntu 18.04, find Settings or directly click the gear type icon to enter settings
3. In the Settings interface, select Network , and VPN
appears in the interface. 4. Click + on the right side of VPN ,
to see Layer 2 Tunneling Protocol (L2TP)
to explain that the executed command takes effect
5. Click L2TP to enter the interface and fill in the proxy address, user name and password
the rest are default. Test the connection
note: if the company has other settings, it needs to communicate with colleagues.

[solution] a perfect solution to the problem of failed to load module “Canberra GTK module” in Ubuntu

[solution] series updated…

Problem Description:

Prompt for error when executing command in Ubuntu 18.04 command line: failed to load module "Canberra GTK module"

Solution:
1. Execute the following command, I believe it will work wonders

sudo apt-get install libcanberra-gtk-module

2. During execution, enter y
3 according to the prompt, and re execute the command that just reported the error

Python flash project to obtain the request user IP address addr

Direct deployment of flash on server

import logging
from flask import Flask, render_template, request

# Initialize the Flask application
app = Flask(__name__)

# Default route, print user's IP
@app.route('/')
def index():
	 ip = request.remote_addr
	 logging.debug(ip)
	 return render_template('index.html', user_ip=ip)


if __name__ == '__main__':
	 app.run(host="0.0.0.0", port=80)

Nginx agent in docker and flash in gunicorn

In this case, according to the above code can only get to the server address. You need to use werkzeug.middleware.proxy_ fix

import logging
from flask import Flask, render_template, request
from werkzeug.middleware.proxy_fix import ProxyFix

# Initialize the Flask application
app = Flask(__name__)
app.wsgi_app = ProxyFix(app.wsgi_app, num_proxies=1)


# Default route, print user's IP
@app.route('/')
def index():
	 ip = request.remote_addr
	 logging.debug(ip)
	 return render_template('index.html', user_ip=ip)

What can I do if I find IP

Flag gets the user’s IP, queries the user’s login times, and seals the IP

Several implementation methods of Python timing task

Recently, we need to deal with timing tasks, and the implementation schemes of timing tasks are sorted out
let’s take it for ourselves. The link is the official sample
todo provides the implementation scheme of the sample

sched Python built in Library

https://docs.python.org/zh-cn/3/library/sched.html

schedule

https://pypi.org/project/schedule/

crontab

https://pypi.org/project/python-crontab/

Django-crontab

https://pypi.org/project/django-crontab/

Celery crontab

The asynchronous timing task is realized through the cell timing task
TODO

Linux Crontab

This blog: Linux timing task command crontab detailed explanation and examples

Sample GitHub link

TODO

[HTML] Python extracts HTML text to TXT

Regular debarking method

# -*- coding: utf-8 -*-
import re

def html_tag_rm(content: str):
	dr = re.compile(r'<[^>]+>',re.S)
	return dr.sub('',content)

nltk

It’s cumbersome
needs to install nltk, numpy, pyyaml

# -*- coding: utf-8 -*-
import nltk


def html_tag_rm(content: str):
	return nltk.clean_html(content)

htmlParser

import re
from sys import stderr 
from traceback import print_exc
from HTMLParser import HTMLParser

 
class _DeHTMLParser(HTMLParser): 
    def __init__(self): 
        HTMLParser.__init__(self) 
        self.__text = [] 
 
    def handle_data(self, data): 
        text = data.strip() 
        if len(text) > 0: 
            text = re.sub('[ \t\r\n]+', ' ', text) 
            self.__text.append(text + ' ') 
 
    def handle_starttag(self, tag, attrs): 
        if tag == 'p': 
            self.__text.append('\n\n') 
        elif tag == 'br': 
            self.__text.append('\n') 
 
    def handle_startendtag(self, tag, attrs): 
        if tag == 'br': 
            self.__text.append('\n\n') 
 
    def text(self): 
        return ''.join(self.__text).strip() 
 
 
def dehtml(text): 
    try: 
        parser = _DeHTMLParser() 
        parser.feed(text) 
        parser.close() 
        return parser.text() 
    except: 
        print_exc(file=stderr) 
        return text 
 
 
def main(): 
    text = r'''''
        <html>
            <body>
                <b>Project:</b> DeHTML<br>
                <b>Description</b>:<br>
                This small script is intended to allow conversion from HTML markup to 
                plain text.
            </body>
        </html>
    ''' 
    print(dehtml(text)) 
 
 
if __name__ == '__main__': 
    main()

Opencv perfect configuration strategy 2015 (win7 + opencv 2.4.9 + vs 2013)

The original computer is a 32-bit win7 system. Due to the needs of the project, the previous vs 2010 is updated to the current vs 2013. Reconfigure opencv environment, version 2.4.9( Win7 + Opencv 2.4.9 + VS 2013)

In the past, we used to manually add the link library to configure the environment, which was very troublesome. Find the perfect configuration strategy called opencv on the Internet and try it. This method uses the way of writing property sheet, which can directly import the created property sheet into the project to complete the configuration of OpenCV, which is very convenient and fast. Thank you. The link is as follows:

http://my.phirobot.com/blog/2014-02-opencv_ configuration_ in_ vs.html

During this period, I also encountered a very confused problem. In the past, the manual configuration method was used, and there was no problem in opening the test image. This time, after importing the property sheet, the same method was used to test, but it always failed. It indicates that the related header file of OpenCV cannot be found, so it is thought that it is caused by the configuration error of property sheet or the system variable not being updated. After setting system variables several times and restarting, it still can’t be solved, which is very confusing. After searching the opencv directory, you can find the relevant header files, but the latest version is different from the previous directory. The original reason for finding data is that there is a problem with the path, not the property table.

Directly include the following files in the original project, no need to include different header files, convenient and fast( The header file of opencv.hpp contains all the header files in opencv library.)

#include <opencv2\opencv.hpp>

Problems and solutions of installing Ubuntu 12.04 in win7


Some time ago, due to the need of experiment, I installed Ubuntu 12.04 system under win7 of my computer. There are some problems in the process of installation and follow-up. The problem is not big, but it is very troublesome and takes a lot of time to solve. Here, I will record my problems and solutions( Most of the solutions are based on the information consulted on the Internet according to the problems encountered. In order to avoid redundancy, the website address is listed directly, which is explained here.)

Installing Ubuntu on hard disk under win7_ 12.04 dual system tutorial

My computer is a 32-bit win7 system, which is the version 12.04 downloaded from the official website of Ubuntu. This version is a stable version. The latest version has reached 13.10. There are some new features, but I don’t think I can use them for the time being. You can download it according to your needs. After downloading, I found materials on the Internet, and there are many tutorials. I am mainly based on a data of Baidu Library installation, the problem is not big.

Tutorial website: http://wenku.baidu.com/view/51cd525777232f60ddcca1ae.html

ASUS cannot install Ubuntu 10.10 or later

When starting the Ubuntu CD or U disk, a cursor is flashing and cannot be installed
the following errors occurred during the installation process:

EISA:Probing bus 0 at eisa.0
EISA:Cannot allocate resource for mainboard
Cannot allocate resource for EISA slot 1
Cannot allocate resource for EISA slot 2
Cannot allocate resource for EISA slot 3
Cannot allocate resource for EISA slot 4
Cannot allocate resource for EISA slot 5
Cannot allocate resource for EISA sl ot 6
Cannot allocate resource for EISA slot 7
Cannot allocate resource for EISA slot 8
EISA:Detected 0 cards.
cpuidle:using governor ladder
cpuidle:using governor menu
TCP cubic registered
NET:Registered protocal family 10
lo:Disabled Privacy Extensions
NET:Registered protocal family 17
Using IPI N o-Shortcut mode
registered taskstats version 1

……

It’s very complicated to have such a problem, and I don’t know where the problem is at the beginning. Later, I checked the information and found that it was a problem with ASUS notebook. I/O interface settings need to be modified before installation
website: http://www.linuxidc.com/Linux/2011-04/35315.htm

After modifying the I/O interface, it must be modified again according to the requirements, otherwise it is easy to have various problems.

Ubuntu 12.04 offline installation of wireless network card driver

After the system is installed, it is found that the wireless network cannot be connected because the wireless network card driver is not installed. This problem has been solved for a long time and a lot of information has been searched
website: http://blog.sina.com.cn/s/blog_ 735bcfa601016d68.html

The solution of installing cable network card driver in Ubuntu 12.04

Wired network card driver solutions, see, only for reference
website: http://blog.csdn.net/b_ dogs881221/article/details/8822647

Introduction to the boot method of double system re installing win7 and Ubuntu repairing win7

After the installation of Ubuntu is successful, there will be problems in win7 system boot when the computer is turned on, and redundant boot items will appear. Or modify the boot order of the system according to personal preference. These are all very good solutions
website: http://jingyan.baidu.com/article/72ee561aa1d123e16138df81.html

Ubuntu cannot create a new folder

When creating a new folder in Ubuntu, there is a problem that it cannot be created. The reason is that there are no permissions, “you are not the owner, so you cannot change these permissions.”

Directly log in with root or open the file manager with root authority, that is, input sudo Nautilus in the terminal to solve the problem.
The solution of PDF file unable to display thumbnail in win7

The computer has been refitted to a 64 bit version of win 7. After installing the official adobe reader software, it was found that the PDF file could not display the thumbnail in the system. This is very inconvenient for viewing a large number of PDF files, and it also looks very uncomfortable. In the Internet to seek a variety of solutions, such as the use of PDF file opened after the use of save as way, really temporarily solve the problem of a path under the thumbnail display. But this way is extremely inconvenient, and does not cure the problem.

In fact, this problem is due to the failure of adobe reader PDF thumbnail preview function in the system. This problem can be solved by installing the adobe reader PDF thumbnail preview invalidation patch. After installation, the PDF file can display thumbnails normally. The download address of the patch is as follows:

http://www.xitongzhijia.net/soft/29537.html