Tag Archives: solution

Failed to load file or assembly MySql.Web Solution

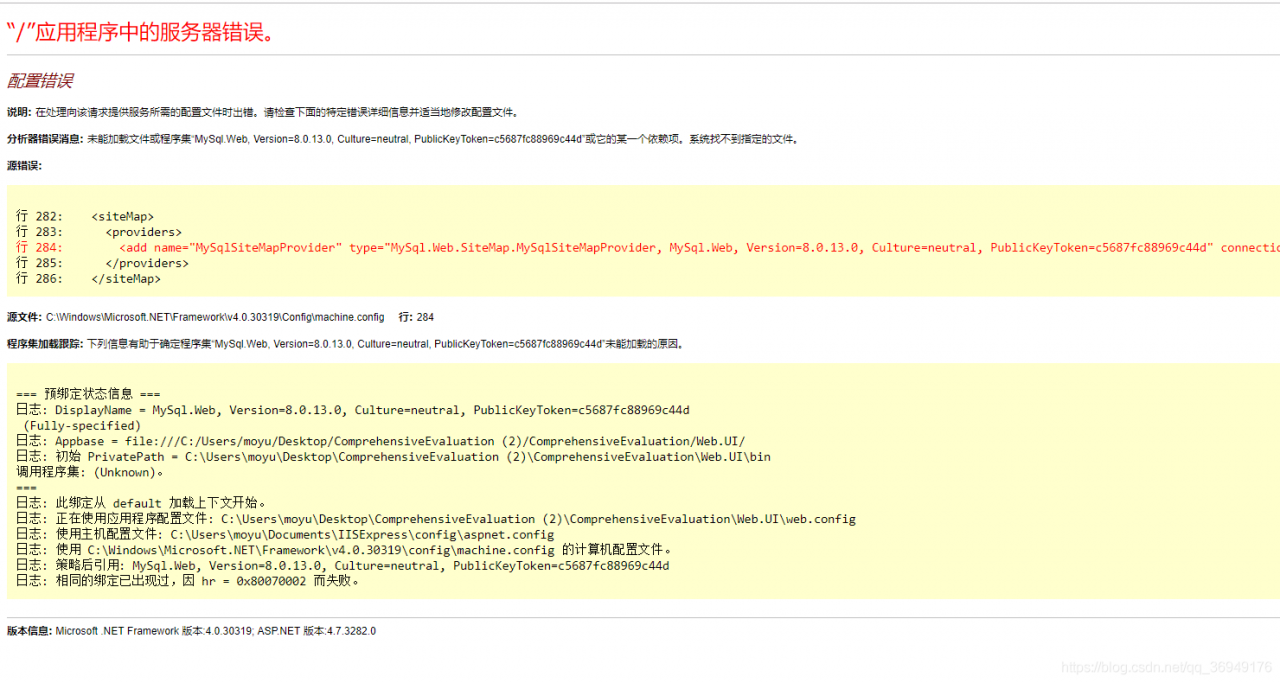
Configuration error

Description: an error occurred while processing the configuration file required to service the request. Check the specific error details below and modify the configuration file as appropriate.

parser error message: failed to load file or assembly“ MySql.Web , version = 8.0.13.0, culture = neutral, publickeytoken = c5687fc88969c44d “or one of its dependencies. The system cannot find the specified file.

Source error:

Line 282:    <siteMap>
Line 283:      <providers>
Line 284:        <add name="MySqlSiteMapProvider" type="MySql.Web.SiteMap.MySqlSiteMapProvider, MySql.Web, Version=8.0.13.0, Culture=neutral, PublicKeyToken=c5687fc88969c44d" connectionStringName="LocalMySqlServer" applicationName="/" />
Line 285:      </providers>
Line 286:    </siteMap>

Source file: C:: Windows\ Microsoft.NET \Framework\v4.0.30319\Config\ machine.config Line: 284

assembly load trace: the following information helps determine the assembly“ MySql.Web , version = 8.0.13.0, culture = neutral, publickeytoken = c5687fc88969c44d “.

Source file: C:: Windows\ Microsoft.NET \Framework\v4.0.30319\Config\ machine.config There’s a problem

All we need to do is go to C: windows\ Microsoft.NET \Framework\v4.0.30319\Config\ machine.config Find the file

take machine.config.defalut Remove the following. Default and replace the original machine.config Replace it

Error:Execution failed for task ‘:app:transformClassesWithDexForDebug’

Three errors: non zero exit value 1; non zero exit value 2; non zero exit value 3

Note that the dependent package, library dependent package and LIBS package should not be repeated

1.Error:Execution failed for task ‘: app:transformClassesWithDexForDebug ’.

com.Android.build . api.transform.TransformException : com.android.ide . common.process.ProcessException : org.gradle.process . internal.ExecException : Process ‘command ‘F:\Program Files (x86)\Java\jdk1.8.0_ 31\bin\ java.exe ” finished with non-zero exit value 1

This is because the dependency packages are duplicated (like V4 and nineoldandroids), as shown in the figure. The dependency on easeui is implemented in app, but the dependency on this package is added to both app and library files. So report this error, modify it and report it again, just clean and rebuild it

2.Error:Execution failed for task ‘: app:transformClassesWithDexForDebug ’.

com.android.build . api.transform.TransformException : com.android.ide . common.process.ProcessException : org.gradle.process . internal.ExecException : Process ‘command ‘F:\Program Files (x86)\Java\jdk1.8.0_ 31\bin\ java.exe ” finished withnon-zero exit value 2

This error is in the app’s build.Gradle Just add the following sentence to it.

android {

defaultConfig {
    ...
    multiDexEnabled true
}

}
3.Error:Execution failed for task ‘:app:transformClassesWithDexForDebug’.

com.android.build.api.transform.TransformException: com.android.ide.common.process.ProcessException: org.gradle.process.internal.ExecException: Process ‘command ‘F:\Program Files (x86)\Java\jdk1.8.0_31\bin\java.exe” finished withnon-zero exit value 3

This error is added to the app.bulid, and then rebuild, and then run it again. 4g can be modified depending on the computer configuration (2g, 3g, 6g, 8g).

dexOptions {
    javaMaxHeapSize "4g"
}

Token bucket implementation with adaptive token generation rate

In order to ensure the stable operation of the system, we often limit the flow of requests. If we do not limit the flow, massive requests are likely to crush the system. It is often a good choice to discard some requests to ensure that most of the requests can respond normally

The most commonly used current limiting method is the token bucket, which is simple to implement and highly reliable. It only needs to add a token to the token bucket at a constant rate. After the request comes, go to the token bucket to get the token. If the token is empty, access will be denied.

But token bucket is difficult to use, because it is difficult to determine the appropriate amount of traffic limit. If it is too large, the system can’t bear it. If it is too small, the hardware performance can’t be fully utilized. Moreover, the hardware of each machine may be inconsistent. You can’t put a set of token bucket parameters on different servers. Even if you find the right parameters, with the iterative update of your system version, the original parameters may not be so suitable. It is often very difficult to find a suitable parameter.

We can use smartratelimiter to solve this problem. It can find a suitable parameter according to your hardware.

It will start a coroutine to monitor the CPU and memory usage of the hardware. If the CPU and memory usage exceeds the warning value, it will reduce the token generation rate and the traffic into the system. If the utilization rate of CPU and memory is too low and the real request rate is higher than the token generation rate, the system is considered to be unsaturated. At this time, the token generation rate will be increased and the flow into the system will be increased. In this way, the most appropriate parameter value can be found according to the hardware condition of the machine.

OK, no more nonsense, just code

Let’s look at the data structure first

type TokenBucket struct {
	Capacity          int64        //Token bucket capacity can cache some tokens
	Ch chan bool //Token bucket
	CountPerSecond int64 //The number of tokens generated per second
	AddTimer *time.Ticker //Timer for adding tokens
	RealPerSecond int64 //actually requests per second
	Counter int64 //Counter
	RealPerSenconds *Queue //Queueue for caching requests per second
	ResetCounterTimer *time.Ticker // timer to reset the counter
	UpdateTimer *time.Ticker //Update the timer that generates the token rate
	CpuPercent float64 // warning value of cpu usage
	MemPercent float64 //Warning value of memory usage
}

Create a token bucket

func NewTokenBucket(capacity int64, countPerSecond int64, cpuPercent float64, memPercent float64) *TokenBucket {
	tokenBucket := &TokenBucket{
		Capacity:          capacity,
		Ch:                make(chan bool, capacity),
		CountPerSecond:    countPerSecond,
		AddTimer:          time.NewTicker(time.Duration(int64(time.Second)/countPerSecond)),
		RealPerSenconds:   &Queue{},
		ResetCounterTimer: time.NewTicker(1 * time.Second),  //每Reset the counter every second
		UpdateTimer: time.NewTicker(10 * time.Second), //default 10 seconds to try to update the token generation rate
		CpuPercent: cpuPercent,
		MemPercent: memPercent,
	}
	//Start the token generation process
	go tokenBucket.add()
	//Start the token generation rate update procedure
	go tokenBucket.updateRate()
	//start the request rate logging concatenation
	go tokenBucket.resetAndSaveCounter()
	return tokenBucket
}

Next, let’s take a look at the core method to update the token bucket generation rate

/**
If the cpu usage or memory usage is greater than the warning value, the token generation rate decreases by 10%.
If the cpu usage and memory usage are less than 80% of the warning value, and the real request token rate is greater than the token generation rate, the token generation rate is increased by 10%.
*/
func (tokenBucket *TokenBucket) updateRate() {
	for {
		select {
		case <-tokenBucket.UpdateTimer.C:
			v, _ := mem.VirtualMemory()
			//Memory usage
			mem := v.UsedPercent
			//cpu usage
			cc, _ := cpu.Percent(10*time.Second, false)
			if cc[0] > tokenBucket.MemPercent || mem > tokenBucket.MemPercent {
				tokenBucket.CountPerSecond = tokenBucket.CountPerSecond - tokenBucket.CountPerSecond/10
				tokenBucket.doUpdateRate()
			}

			if cc[0] < tokenBucket.MemPercent-tokenBucket.MemPercent/5 &&
				mem < tokenBucket.MemPercent-tokenBucket.MemPercent/5 &&
				tokenBucket.RealPerSecond > tokenBucket.CountPerSecond {
				tokenBucket.CountPerSecond = tokenBucket.CountPerSecond + tokenBucket.CountPerSecond/10
				tokenBucket.doUpdateRate()
			}
			fmt.Printf("memory usage: %f,cpu usage: %f,current token bucket speed limit:%d,real speed: %d\n",
				mem, cc[0], tokenBucket.CountPerSecond, tokenBucket.RealPerSecond)
		}
	}

}

func (tokenBucket *TokenBucket) doUpdateRate() {
	t := tokenBucket.AddTimer
	defer t.Stop()
	//Create a new Ticker and replace the original
	tokenBucket.AddTimer = time.NewTicker(tokenBucket.getDuration())
}

Next, let’s see how to get the actual number of requests per second

/**
The real token request rate is the maximum value of requests per second in the last 10s
*/
func (tokenBucket *TokenBucket) resetAndSaveCounter() {
		for {
			select {
			case <-tokenBucket.ResetCounterTimer.C:
				//If the queue is greater than 10, discard the first value stuffed untilsize=10
				for i := 0; i < len(*tokenBucket.RealPerSenconds)-10; i++ {
					tokenBucket.RealPerSenconds.Pop()
				}

				tokenBucket.RealPerSenconds.Push(tokenBucket.Counter)
				//Counter zeroing
				for {
					if atomic.CompareAndSwapInt64(&tokenBucket.Counter, tokenBucket.Counter, 0) {
						break
					}
				}
				var temp int64
				for _, value := range *tokenBucket.RealPerSenconds {
					if temp < value {
						temp = value
					}
				}
				tokenBucket.RealPerSecond = temp
			}
		}

}

Next, there are two ways to get a token

/**
Get the token and return directly if you don't get it
*/
func (tokenBucket *TokenBucket) GetToken() bool {
	atomic.AddInt64(&tokenBucket.Counter, 1)
	select {
	case <-tokenBucket.Ch:
		return true
	default:
		return false
	}
}

/**
Get the token and wait until the timeout if you don't get it
*/
func (tokenBucket *TokenBucket) TryGetToken(timeout time.Duration) bool {
	atomic.AddInt64(&tokenBucket.Counter, 1)
	t := time.NewTimer(timeout)
	defer t.Stop()
	select {
	case <-tokenBucket.Ch:
		return true
	case <-t.C:
		return false
	}
}

Finally, add a token

func (tokenBucket *TokenBucket) add() {
	for {
		select {
		case <-tokenBucket.AddTimer.C:
			tokenBucket.doAdd()
		}
	}
}

func (tokenBucket *TokenBucket) doAdd() {
	if int64(len(tokenBucket.Ch)) < tokenBucket.Capacity {
		tokenBucket.Ch <- true
	}
}

Source code address: click here

If it helps you, please click star on GitHub, thank you!

SQL Server 2008 18456 error and SA unable to login solution

SQL Server 2008 does not allow remote connection by default, and SA account is disabled by default. If you want to use SSMS to connect to SQL Server 2008 on remote server locally, you need to do two parts of configuration:

SQL Server 2008 does not allow remote connection by default, and SA account is disabled by default. If you want to use SSMS to connect to SQL Server 2008 on remote server locally, you need to do two parts of configuration:

1. SQL Server Management Studio Express (SSMS)

2. SQL Server Configuration Manager/SQL Server Configuration Manager (SSCM)

There are two points to note:

12005’s peripheral application configurator changed place in 2008

2. Some settings take effect and need to restart SQL server

Step 1: open SSMS, connect to database with windows identity, log in, right-click and select “properties”

Step 2: select “security” on the left and “SQL server and windows authentication mode” on the right to enable mixed login mode

Step 3: select “connect”, check “allow remote connection to this server”, and then click “OK”

Step 4: expand “security” & gt; “login” & gt; “Sa”, right-click and select “properties”

Step 5: select “general” on the left and “SQL server authentication” on the right, and set the password

Step 6: select “status”, select “enable”, and click “OK”

Step 7: right click the database and select aspect

Step 8: set “server configuration” and “remoteaccessenabled” property to “true”, and click “OK”

Step 9: so far, SSMS has been set up. Exit first, stop and restart SQL Server service, and then log in with SA. Success means that the SA account has been enabled


Step 10: start to configure SSCM

Start SQL Server Configuration Manager in windows menu

Select “SQL Server service” on the left and make sure that “SQL Server” and “SQL server browser” on the right are running (if not, go to “Microsoft SQL Server 2012localdb” and re open SQL configuration manager)

Step 11: the following is the English version of the interface. As shown in the figure: the TCP/IP on the right is “disabled” by default. Double click to open the settings panel and change it to “enabled”

Step 12: select the “IP addresses” tab and set the port “1433”

Step 13: as shown in the figure, change “TCP/IP” of “client protocols” to “enabled”

Step 14: after configuration, restart SQL Server 2008.

At this point should be able to use, but still want to confirm the firewall.

After SQL Server 2005/2008 Express is installed, remote connection is disabled by default. If remote access is required, manual configuration is required.

Turn on firewall settings. take SQLServr.exe (C:\Program Files\Microsoft SQL Server\MSSQL10.SQLEXPRESS\MSSQL\Binn\ sqlservr.exe )Add to the allowed list.

More articles, related information, and so on, WeChat official account: fish science and technology information. Or click the link: http://mp.weixin.qq.com/mp/homepage?__ biz=MzU5MjY1ODg0NA==&hid=3&sn=c8b9f858ce938d785e3f799a8cb59574&scene=18#wechat_ redirect 

Mapped Statements collection does not contain value for XXXX

Today, I stepped into an interesting pit with mybatis. After a day’s searching, I didn’t find the problem. Let me tell you about the conventional solutions.

The command space of the mapping file of

    mybatis is inconsistent with the fully qualified name of the interface; it is possible that the name of the mapping file of mybatis is inconsistent with the class name of the interface; in another case, the method declared by the interface is not included in the mapping file.

But I checked n times! N times! There is no problem. It’s perfect, but it’s a mistake!

The result is that the XML file is not compiled!

When compiling, put the XML file in the folder like this

you can see that the XML file is not compiled.
We are here pom.xml Add the following code to the

<build>
        <resources>
            <resource>
                <directory>src/main/java</directory>
                <includes>
                    <include>**/*.xml</include>
                </includes>
            </resource>
            <resource>
                <directory>${basedir}/src/main/resources</directory>
            </resource>
        </resources>
    </build>

Recompile

XML is compiled to solve the problem

Solution to cross domain sharing problem of session

Before discussing the cross domain sharing of session, we should first understand what session has done and has not done

    HTTP is stateless, that is to say, the server does not know who has visited it, but sometimes we need to keep this state. For example, if the user logs in every time, the user experience is really bad. Session solves this problem. It maintains the user login information on the server and generates a jsessionid for the customer The client will take this jsession ID with it the next time it visits the server, and the server will search the user information according to this ID. Of course, the disadvantages of session are also obvious. Session exists in the memory of the server. If there are too many sessions, the performance of the server will be affected. Because session is only in one server, when there are multiple servers, accessing other servers will definitely fail.

After making clear what session does and its defects, it is much easier to solve the problems existing in session. Let me briefly talk about five solutions

Session stickysession copy session centralized storage cookietoken

Session sticky: it means that requests from the same client will fall on the same server, because they will not fall on other servers, so cross domain problems will not occur. But the disadvantage of this scheme is very obvious, that is, no matter what algorithm is used, the user will decide which server the user’s request falls on, which may cause a single point of pressure, and if a server has problems, it may cause people in an area to be unable to access

Session replication: refers to the synchronization of session information between servers, that is, all session information is saved on each server. The disadvantages of doing so are also very obvious. As mentioned above, session is stored in memory, which will seriously affect the performance of the server. Of course, you can also store it in the database, but it will greatly affect the response speed. Another disadvantage is that when the traffic is too large, it will cause a lot of network overhead due to the problem of mutual synchronization

Session centralized storage: it refers to the centralized storage of sessions in a third-party server, which can be redis, database or other things. When you need to access it, go to this server. This also has some disadvantages. First of all, it is a single point problem. If the server goes down, all services are unavailable. Therefore, it is necessary to build a cluster here, which will waste server resources. Another point is that every time you verify, you need to check with this server, which will increase the network overhead and reduce the access speed

Cookie: the state information is no longer saved in the server, but in the client. Every time the client visits the server, it brings the information to the server. However, cookies also have many problems. The most concerned problem is security. Because information is stored on the client, it is easy to be stolen and tampered with. Of course, there are solutions to these security problems. This is not the main reason for restricting cookies. The real reason for restricting cookies is that many devices do not support * * cookies

Token: similar to cookie, token is maintained by client, and information is stored in client, which is platform independent. A token is essentially a string given by the server to the client, which contains some authentication information. It is equivalent to an identity token. You can get its service with this token. Compared with cookie, token is more flexible and can be generated anywhere. The permission system based on token is very easy to implement

Of course, the above five solutions are not the only ones. I just listed a few representative ones.

Solutions are used to solve problems. There is no good saying about the above solutions. Only the right one is the best.

The solution of PL / SQL can’t connect to the remote server after installing Oracle locally

Before, there was no Oracle client installed on the computer, just using PL/SQL to access the remote server. During this time, I want to install myself for fun. As a result, after installing Oracle 10g locally, PL/SQL can’t access the original server. Baidu didn’t find a feasible solution for a long time. Later, I thought of Google. It’s really professional. The first result I found solved my problem… I don’t want to talk too much nonsense. I want to talk about my problems and solutions.


Prompt when connecting to the server:

Ora-12514: the listener is currently unable to recognize the service requested in the link description


I think there is something wrong with the configuration. And then check it on the Internet. The solutions found (I used them and they are feasible) are as follows:


Configure listener of Oracle server

Modify the & lt; installation directory & gt;/network/admin/directory listener.ora and tnsnames.ora Two files. among

The listener file is as follows:

# listener.ora Network Configuration File: /oracle/app/product/10.1.0/db_ 1/network/admin/ listener.ora

# Generated by Oracle configuration tools.

SID_ LIST_ LISTENER =

(SID_ LIST =

(SID_ DESC =

(SID_ NAME = PLSExtProc)

(ORACLE_ HOME = /oracle/app/product/10.1.0/db_ 1)

(PROGRAM = extproc)

)

(SID_ DESC =
(GLOBAL_ Dbname = Demo1) # Demo1 is the Oracle instance name
(Oracle)_ HOME = /oracle/app/product/10.1.0/db_ 1)
(SID_ NAME = demo1)
)

)

LISTENER =

(DESCRIPTION_ LIST =

(DESCRIPTION =

(ADDRESS = (PROTOCOL = IPC)(KEY = EXTPROC1))

(address = (protocol = TCP) (host = 192.168.0.100) (Port = 1521)) # IP address is Oracle server

)

)

tnsnames.ora The document is amended as follows:

# tnsnames.ora Network Configuration File: /oracle/app/product/10.1.0/db_ 1/network/admin/ tnsnames.ora

# Generated by Oracle configuration tools.

Demo1 =
(description =
(address = (protocol = TCP) (host = 192.168.0.100) (Port = 1521))?The IP address is Oracle server
(connect)_ DATA =
(SERVER = DEDICATED)
(SERVICE_ Name = Demo1) # Demo1 is the Oracle instance name or service name, which can be modified by netmgr or netca
)

)

EXTPROC_ CONNECTION_ DATA =

(DESCRIPTION =

(ADDRESS_ LIST =

(ADDRESS = (PROTOCOL = IPC)(KEY = EXTPROC1))

)

(CONNECT_ DATA =

(SID = PLSExtProc)

(PRESENTATION = RO)

)

)

The above modifications can also be configured through netmgr and netca.

After modification, restart the listener

After modifying these configurations, you can connect to the server.


Feeling: I haven’t really used PL/SQL and Oracle before, but this time I have a problem I felt that the problem of crouching trough was very advanced. At that time, I was a little flustered. My first reaction was to ask others, but I was not willing to. So I went to the Internet to find a solution. Baidu didn’t find a feasible solution for a long time. Later, I asked in the classmate group, and no one knew the solution. Some students asked Google, so I became a living horse doctor and tried it I searched for it, and it turned out…. The result is what you see now ~ some things can’t only look at the surface, and can’t be scared by the problems. When you work hard to solve them, you will find that they are all small cases. Ha ha, it’s not bad. I haven’t solved a problem that makes me feel successful for a long time. come on.

MySQL driver compiling method of QT under windows and solutions to abnormal errors

2015-11-20

Recently, in the process of compiling QT’s MySQL driver with MinGW under windows, it was compiled through several twists and turns. In the process of compiling, there are many problems. In order to avoid similar errors in the subsequent driver compilation and facilitate the rapid completion of this driver compilation, the compilation methods are sorted out.

This method is illustrated by a case of my own compiling environment.

1、 Compiling environment

Operating system: win7 64 bit

MySQL service version: mysql-5.5.46-win32

QT version: 4.8.6

Compiling environment: MinGW 64 bit

2、 Compilation steps

(1) Generate libmysql. A file

Because MinGW compiler needs to use “. A” suffix static library file to connect with static library, but according to MySQL database, there is only “. Lib” format static library, so it needs to be converted. Two tools are needed for conversion reimp.exe and dlltool.exe The paths of these two tools need to be configured in the path environment variable. The conversion command is as follows:

First of all, open the CMD command input box and enter the Lib path under the MySQL installation path. For example, my path is: “C:// program files (x86)  MySQL  MySQL server 5.5  lib”.

Next, enter the following commands in turn:

reimp -d  libmysql.lib

dlltool -k -d  libmysql.def  -l libmysql.a

After successful execution, you can view the library file of libmysql. A in this path.

(2) Editor mysql.pro Engineering documents

Find it in the installation path of QT mysql.pro The path of my pro file is: “C:// Qt/4.8.6/SRC/plugins/sqldrivers/MySQL”.

open mysql.pro File, add the following configuration below:

INCLUDEPATH+=”C:/ProgramFiles(x86)/MySQL/MySQL Server 5.5/include/”

LIBS+= -L”C:/ProgramFiles(x86)/MySQL/MySQL Server 5.5/lib/” –llibmysql

The second line can also be written as follows:

LIBS+= “C:/ProgramFiles(x86)/MySQL/MySQL Server 5.5/lib/libmysql.a”

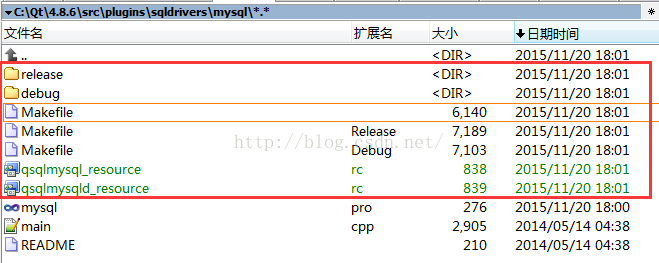
Makefile Makefile.Debug 、 Makefile.Release Three makefile files and others. As shown in the figure below:
(3) Edit makefile file

Take the debug version as an example. open Makefile.Debug File, find LIBS = “XXXX” line and modify it. Because there is a problem with this configuration generated.

The original configuration is as follows:

LIBS = -L”c:\Qt\4.8.6\lib”debug\qsqlmysqld_ resource_ res.o -llibmysql “-LC:/ProgramFiles(x86)/MySQL/MySQL Server 5.5/lib/” -llibmysql -lQtSqld4 -lQtCored4

According to our intention, according to makefile’s syntax rules, we can clearly find the problem. First of all, “L” must be placed outside the path of the configuration library. Second, the – llibmysql command has repetition.

It is revised as follows:

LIBS = -L”c:\Qt\4.8.6\lib”debug\qsqlmysqld_ resource_ res.o -L “C:/Program Files(x86)/MySQL/MySQLServer 5.5/lib/” -llibmysql -lQtSqld4 -lQtCored4

Or it can be modified as follows:

LIBS = -L”c:\Qt\4.8.6\lib”debug\qsqlmysqld_ resource_ res.o “C:/Program Files(x86)/MySQL/MySQL Server5.5/lib/libmysql.a” -lQtSqld4 -lQtCored4

The release version of makefile is modified in the same way.

(4) Execute the make command

Use the mingw32 make command to execute makefile. If no parameter is added, it will be executed by default Makefile.Debug . You can write debug or release or both after mingw32 make command to execute the corresponding version of makefile.

For example, execute debug and release makefile at the same time. The command is as follows:

mingw32-make debug release

After successful execution, you can see qsqlmysqld. A qsqlmysqld.dll Two library files, in the release folder, see qsqlmysql. A qsqlmysql.dll Two library files.

These four library files are the static library and dynamic library driven by MySQL of debug and release versions.

(5) Copy the driver file to the specified directory

Copy the four driver files generated in the previous step to the database driver directory of QT, that is, under the path of “C:: (QT) ﹣ 4.8.6 ﹣ plugins ﹣ sqldrivers”.

(6) Copy libmysql.dll File to specified directory

Install the libmysql.dll Copy the dynamic library file to the bin directory of QT, i.e. “C:// Qt/4.8.6/plugins/sqldrivers”. At this point, use QT to write a program to connect to MySQL database.

3、 Test whether the driver is available

Write demo program to test QT driver. The main codes are as follows:

#include <QtCore/QCoreApplication>  

#include <QDebug>  

#include <QStringList>  

#include <QString>  

#include <QSqlDatabase>  

int main(int argc, char *argv[])  

{  

    QCoreApplication a(argc, argv);  

    qDebug()<<“Available drivers:”;  

    QStringList drivers = QSqlDatabase::drivers();  

    foreach(QString driver,drivers)  

    qDebug()<<“\t”<<driver;  

    return a.exec();  

}  

Add in project file

QT       +=sql

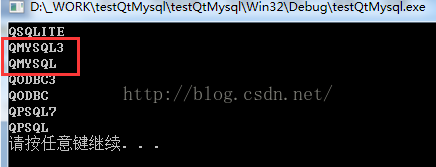
Running this demo program, you can see “qmysql3” and “qmmysql” in the list of available drivers. As shown in the figure below:
4、 Common problems and Solutions

(1) Cannot find – llibmysql
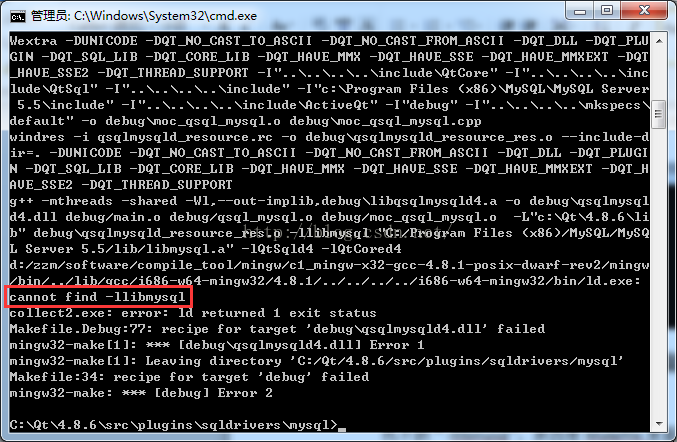
“- llibmysql” cannot be found because the configuration in makefile is incorrect. After modifying Makefile, compile it again, and the compilation passes.

The solution to this problem is: check the configuration in Makefile, modify it to conform to the rules of makefile syntax, and then try again.

(2) Undefined reference to ‘MySQL’_ character_ set_ name@4 ’
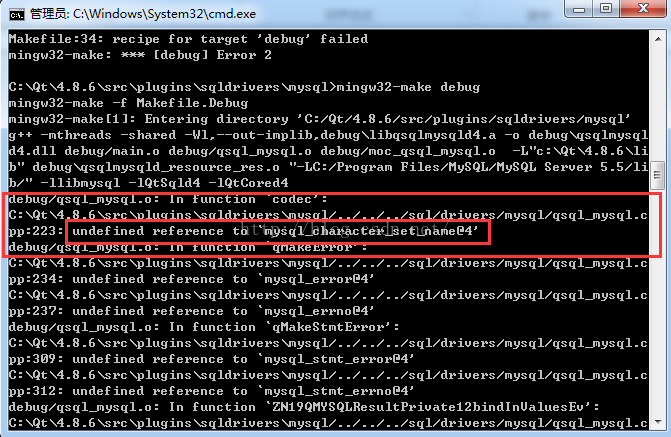
This situation, as well as a series of undefined references related to MySQL, is due to a problem loading the MySQL library. After online query of relevant information, we know that it is the version problem of MySQL database. When using the link library in 64 bit MySQL database, we will report this error.

The solution is to install a 32-bit MySQL database and configure it mysql.pro File, compile the driver again, and the error will not appear again.

(3) Unrecognized command line option \ “- fno keep inline dllexport \”
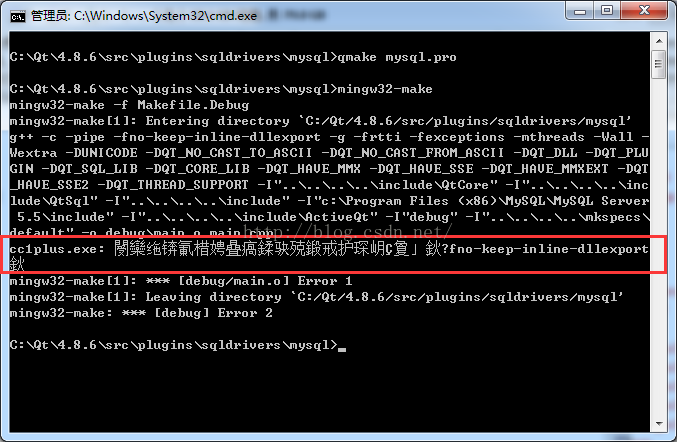
The reason for this error is that the version of the compiler is relatively low. To query the version of the currently used gcc compiler is GCC – 4.4.0. The explanation of the online information is as follows:

this is because\”-fno-keep-inline-dllexport\” is the option of mingw 4.6.1, but i’musing 4.5. So I change it by installingcodelite-3.5.5377-mingw4.6.1-wx2.9.2.exe

The translation is as follows:

This is because the option “- fno keep inline dllexport” is a function of mingw4.6.1. The current version is too low, so the gcc compiler of version 4.6.1 or above is needed.

Later, the MinGW compiler environment of 4.8.1 version of gcc compiler was installed. When compiling this driver, the above error disappeared.

Therefore, the solution to this problem is to install the gcc compiler above 4.6.1.
How to use C + + function pointer array

2015-11-24

1、 Origin

Under what circumstances did you come up with an array of function pointers?Because there are a series of sequential functions in a program recently written, and the forms of these functions are basically the same, it is necessary to judge the execution result of each step, whether the execution is successful or not. If the execution is successful, the next function will continue to be executed. If the execution fails, the terminal will execute and exit.

Because there are many functions to be executed in turn, there are five. To write code according to the conventional way of thinking is to judge the result of each step by if-else, and decide the content of the next step according to the result. At present, there are only five functions to be executed. If there are more similar functions to be executed in sequence, this function will be very long, not easy to read, and the code will not be beautiful.

Considering that the parameter list and return value of the current function are basically the same, we consider whether we can traverse the function pointer array, store the function pointer in the array and traverse the array, so as to execute the function pointed to by the corresponding pointer in turn, judge the results one by one, and do the corresponding processing. In this way, the result processing part can adopt a unified way, which is very convenient to judge, the code is also very simple and clear, and it is easy to read.

So online query related information, to understand the use of function pointer array. Through data query, the use of C + + function pointer array can be divided into two categories, one is the use of global function pointer array (the same as C language), the other is the use of C + + member function pointer array. Now the two cases are sorted out respectively.

2、 The use of global function pointer array in C

(1) Requirements

1. The parameter list and return value type of a series of functions to be called should be identical;

2. It is required to put the function pointer to be called into the function pointer array (if the function must have sequential execution, then the storage order of the function pointer should be consistent with the calling order);

3. When calling, take out the function pointer to be executed from the array and execute the corresponding function.

(2) Code case

Reference from: http://blog.csdn.net/feitianxuxue/article/details/7300291


#include <iostream> 

using namespace std; 


void function0(int); 

void function1(int); 

void function2(int); 


int _ tmain(int argc, _ TCHAR* argv[]) 

Void (* f [3]) (int) = {function0, function1, function2};// save the three function pointers in the array F

      intchoice;

      cout<< “Enter a number between 0 and 2,3 to end: “;

      cin>> choice;

//handle user selection

      while((choice >= 0) && (choice <3))

      {

//call a function in the array f

(* f [choice]) (choice);// F [choice] select the pointer whose position is choice in the array.

//the pointer is dereferenced to call the function, and choice is passed as an argument to the function.

             cout<< “Enter a number between 0 and 2,3 to end: “;

             cin>> choice;

      }

      cout<< “Program execution completed.” << endl;

      system(“pause”);

      return0;

}


void function0(int a)

{

      cout<< “You entered” << a << ” so function0 wascalled\n\n”; 

}


void function1(int b)

{

      cout<< “You entered” << b << ” so function1 wascalled\n\n”;

}


void function2(int c)

{

      cout<< “You entered” << c << ” so function2 wascalled\n\n”;

}

3、 The use of pointer array of member function in C + + class

(1) Requirements

When using the pointer array of member function in C + + class, it is different from that of C. The requirements are as follows:

1. It is required that the parameter list and return value type of the member function put into the function pointer array are completely consistent;

2. Define a function pointer array, and specify the length of the array (equal to the number of member functions to be stored), and assign the member function pointer to the corresponding array variable during initialization (if the function must have sequential execution, the storage order of the function pointer should be consistent with the calling order);

3. When calling, take out the function pointer to be executed from the array and execute the corresponding function. When calling, use “& gt; *” or “. *” to point to array elements, otherwise an error will be reported during compilation.

(2) Code case

Reference from: http://www.cppblog.com/dragon/archive/2010/12/02/135250.html


/*

* small program for testing pointer array of member function

* key points of the code have been marked in red

 */

#include <iostream>

using namespace std;


class Test

{

public:

   Test();

   ~Test();


private:

   void add5(){ res+=5;}

   void add6(){ res+=6;}

//this 2 is very important. If it is not written in VC, an error will be reported, but it is not reported in QT, but an error will be reported during the deconstruction!

    void (Test::*add[2])();

public:

   void DoAddAction();

   void Display();

private:

   int res;

};


Test::Test()

{

//pay attention to the writing here

    add[0]=&Test::add5;

    add[1]=&Test::add6;

   res=0;

}


Test::~Test()

{


}


void Test::DoAddAction()

{

    for (int i=0;i<2;i++)

    {

//using class member function pointer must have a call of “& gt; *” or “. *”

        (this->*add[i])();

    }

}


void Test::Display()

{

   cout<<“The res is:”<<res<<endl;

}


int main()

{

   Test * test=new Test();

   test->DoAddAction();

   test->Display();

   delete test;

   return 0;

}

4、 Summary

The above methods illustrate the method of using function pointer array in C and C + + classes. It is obvious that using function pointer array can call functions more conveniently, make the code concise and beautiful, and provide a level of code quality.

In the future program development process, we encounter similar problems. When we can use the function pointer array, we can try to only use the function pointer array to make the development easier and more fun.