Tag Archives: python

Python uses the priority queue to get the maximum k elements

Use PriorityQueue to get the maximum K elements
In order to sort slightly larger numbers, sometimes you don’t want all of the data, you just want the maximum k numbers up front, if you use sorted numbers ([…]). )[::-1][:k] Implementation efficiency is much lower. In order to optimize the execution speed, PriorityQueue can be used to achieve the maximum k elements. At the same time, the space can also be significantly optimized

import queue
import random

K = 12
q = queue.PriorityQueue()
tlist = []

for ith in range(100):
    q.put((ith, ith + random.randrange(100)))
    if q.qsize() > K: q.get() # pop least item
        
while not q.empty():
    tnum = q.get()
    tlist.append(tnum)

tlist.sort(reverse=True)
print(tlist)

The effect

[(99, 187), (98, 152), (97, 184), (96, 136), 
(95, 105), (94, 119), (93, 109), (92, 169), 
(91, 149), (90, 143), (89, 91), (88, 92)]

Priorityqueue are in queue bag and priorityqueue implementation in the queue is called headq inside the top of the heap, so did not provide key parameters change priority queue sorting rules, only from small to large, ascending order so, in order to get top K elements, need to queue size is greater than K pop team first element, maintain the biggest K in queue, and then use a list to undertake the element in the queue, and then descending sort results for the target at a time.

MinGW + libpython installation record

> Error conda.core.link:_execute_actions(337): An ERROR occurred while installing package ‘;
> Error conda.core.link:_execute_actions(337): An ERROR occurred while installing package ‘; ERROR conda.core.link:_execute_actions(337): An ERROR occurred while the package was installed;


Type in the following code in CMD:

conda install mingw libpython

The following error occurred:

The following NEW packages will be INSTALLED:

    conda-package-handling: 1.7.2-py36h76e460a_0
    libpython:              2.1-py36_0
    mingw:                  4.7-1
    tqdm:                   4.55.1-pyhd3eb1b0_0

The following packages will be UPDATED:

    conda:                  4.3.30-py36h7e176b0_0 --> 4.9.2-py36haa95532_0
    conda-env:              2.6.0-h36134e3_1      --> 2.6.0-1
    menuinst:               1.4.10-py36h42196fb_0 --> 1.4.16-py36he774522_1
    pycosat:                0.6.2-py36hf17546d_1  --> 0.6.3-py36h2bbff1b_0
    vc:                     14-h2379b0c_2         --> 14.2-h21ff451_1
    vs2015_runtime:         14.0.25123-hd4c4e62_2 --> 14.27.29016-h5e58377_2

Proceed ([y]/n)?y

libpython-2.1- 100% |###############################| Time: 0:00:37   1.08 MB/s
ERROR conda.core.link:_execute_actions(337): An error occurred while installing package 'defaults::tqdm-4.55.1-pyhd3eb1b0_0'.
CondaError: Cannot link a source that does not exist. D:\software\Anaconda\Scripts\conda.exe
Running `conda clean --packages` may resolve your problem.
Attempting to roll back.

Solutions:

conda clean --all

Type in the following code again:

conda install mingw libpython

Installation successful!

Python installation tutorial

Python Installation Tutorial
I. The blogger speaks for himself
With the rapid development of artificial intelligence, Python language is becoming more and more popular among people. The blogger taught himself a while ago, but this time he consolidated it again and shared the pits I met with with you. To help you learn less detours.
Hope to be helpful to you, welcome to leave a comment and ask questions.
At the bottom of the PS article is my python3.7 package download link, which you can download yourself.
 
Ii. Installation environment
The installation environment of this tutorial is: Win7 or Win10 system
Python version: Python 3.7.
As for the installation of Linux and other python versions, you can refer to them.
 
Three, installation steps
1. Python3.7 will be downloaded from the official website
1. To download the Python version on the official website of Python, you need to download the corresponding version (check whether you are a 32-bit operating system or a 64-bit operating system in the computer-Property). I am 64-bit, so I download the corresponding installation package (as shown in the figure below: Windows x86-64 Executable Installer).
The official website download address is as follows:
https://www.python.org/downloads/windows/

 
Notes:
If you typed https://www.python.org, you’ll have to look for the option on the page. It’s better to just type in the details.
Python can also download a ZIP version (Windowsx86-64 Embeddable Zip file), but sometimes many DLL files are lost after downloading, and it is difficult to fix these problems. Therefore, it is recommended to download the Windows X86-64 Executable installer.
2. Python3.7 installation tutorial
1) Double-click the downloaded EXE program to enter the installation interface after downloading.
The installation interface can choose the default installation, also can customize the installation, I prefer the custom installation, default installation path is relatively deep, custom installation define their own shallow directory, easy to find the following.

 
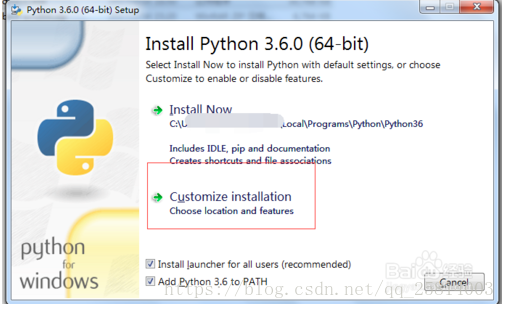
2) When choosing the path to install, you can check “Add Python 3.6 toPATH” at the bottom. This will Add user variables directly by default, and you don’t need to Add them later

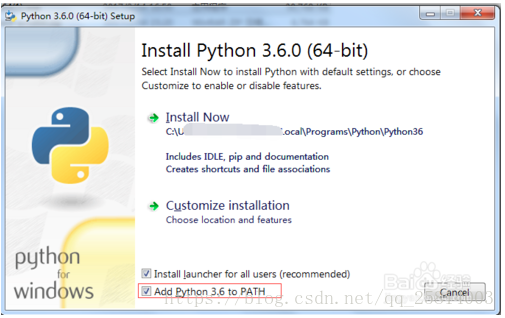
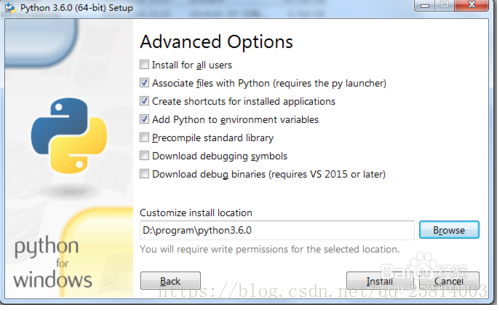
3) After the selection, proceed to the next step. All default choices are ok. If necessary, the path of installation and storage can be directly updated in the next step.

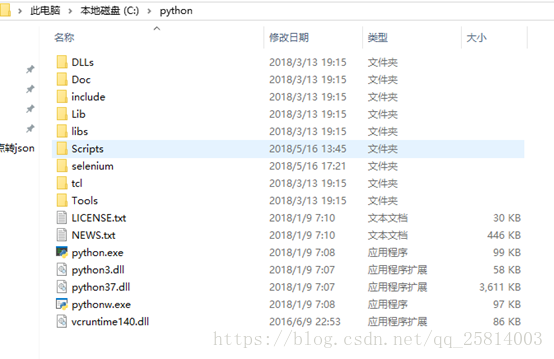
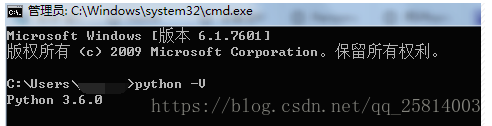
4) If the next step continues, the installation will be prompted. You can also see the relevant information in Figure 2 below in the installation directory. Execute Python-V (capital V oh) in CMD at the same time to see the successfully installed version.
At this point, Python is successfully installed and ready to use.

5) The schematic diagram after installation is as follows
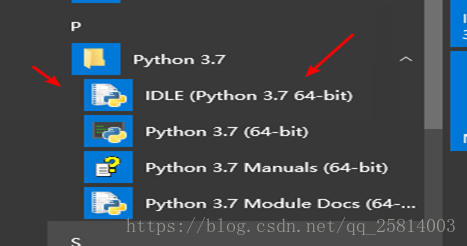

3. IDLE use
After the installation is completed, we find Python IDLE in the start menu and double-click to run it, and then we can debug our Python code in our IDLE.

 
Remark:
The above mentioned is the process of Python IDLE installation and debugging in Windows platform. Usually, The Linux system, such as Ubuntu and CentOS, has installed Python programs with the system by default. In Linux system, IDLE is called Python interpreter, and it starts from the terminal emulator by typing the command “Python”. Everything in Python starts with this IDLE editor, and after getting started, you can choose more of your favorite Python editors, such as Wing IDE, the professional Python editor.
 
Iv. Summary of matters needing attention
1: Go to www.python.org to download. (My computer is a Windows system, so the 3.7 version I downloaded is Download Windows X86-64 Executable Installer)
2: Run directly after downloading and customize installation. (Remember to check Add Python 3.7to PATH)
3: Enter python-V test in the Python directory after installation
4: After success, search for IDLE in the start menu. Just double-click to run it (IDLE comes with the Python download and is the INTEGRATED development environment for Python)
 
5. Download address
I have uploaded the Python package, and you can download it directly, either from the official website or from my link address.
download:
https://download.csdn.net/download/qq_25814003/10464931
 

Python conversion hex to string, high and low data processing

Python converts HEX to String, String to HEX high-low data processing

def Hex_Str16(data):
    hex_str = '{:04X}'.format(data*100)
    data_h, data_l = hex_str[0:2], hex_str[2:4]
    return  int(data_h, base=16), int(data_l, base=16)

def Hex_Str32(data):
    hex_str = '{:08X}'.format(data*100)
    data_1, data_2, data_3, data_4 = hex_str[:2], hex_str[2:4], hex_str[-4:-2], hex_str[-2:]
    return  int(data_1, base=16), int(data_2, base=16), int(data_3, base=16), int(data_4, base=16)

def Hex_Str64(data):
    hex_str = '{:016X}'.format(data*100)
    data_1, data_2, data_3, data_4, data_5, data_6, data_7, data_8 =hex_str[:2], hex_str[2:4], hex_str[4:6], hex_str[6:8],\
        hex_str[-8:-6], hex_str[-6:-4], hex_str[-4:-2], hex_str[-2:]
    return  int(data_1, base=16), int(data_2, base=16), int(data_3, base=16), int(data_4, base=16),\
        int(data_5, base=16), int(data_6, base=16), int(data_7, base=16), int(data_8, base=16)

def Str_Hex16(data):
    Str= data[0]+data[1]
    return int(Str,16),Str

def Str_Hex32(data):
    Str = data[0] + data[1] + data[2] + data[3]
    return int(Str,16),Str

def Str_Hex64(data):
    Str = data[0] + data[1] + data[2] + data[3]+ data[4] + data[5] + data[6] + data[7]
    return int(Str,16),Str    

print(Hex_Str16(255))
print(Hex_Str32(255))
print(Hex_Str64(255))

data = ['0f','ff']
data_1 = ['00','00','0f','ff']
data_2 = ['00','00','00','00','00','00','0f','ff']
print(Str_Hex16(data))
print(Str_Hex32(data_1))
print(Str_Hex64(data_2))

The results are as follows

(99, 156)
(0, 0, 99, 156)
(0, 0, 0, 0, 0, 0, 99, 156)
(4095, '0fff')
(4095, '00000fff')
(4095, '0000000000000fff')

Some mistakes and solutions in Django

Some of Django’s common mistakes and fixes
The CSS and JS files fail to model the existing tables the data table field names don’t match the model field URL match problem view function passes the data problem

CSS and JS files are invalid
When you load a view with CSS and JS files, the easiest way to do this is to say href= “absolute path to file”, but a lot of times you write relative paths because it’s easier. If relative paths are used, static files cannot be found when a page submits a form or redirects to a view function with arguments. So load static file {% load static %} and use reverse parsing to make the page look for static files.
Model existing tables
To create ORM on tables that have already been in the database, run Python manager.py InspectDB & GT; Model.py to generate the model for the existing table, make sure to comment db_manage =False or delete it directly, otherwise Django has no permission to operate on the table.
The data table field name does not match the model field
The corresponding column is not a field name. You can implement the ORM by setting db_column = “corresponding field name” in the model
Url matching problem
When your two url matching rules are written very closely, if load is written on the top without any initial restriction (^), the following url will match the first one, even if it resolves
, such as the following two urls:

  url(r'load/(?P<index>.*)/', views.load, name='load'),
  url(r'manage_load/(?P<index>.*)/', views.manage_load, name='manage_load'),

Since the LOAD URL is written above, when you parse the URL backwards, {% URL “load” %}, by default Django matches urls from top to bottom, matching the first one because there is no restriction on the beginning and end.

  url(r'^load/(?P<index>.*)/', views.load, name='load'),
  url(r'manage_load/(?P<index>.*)/', views.manage_load, name='manage_load'),

You can use ^,$as a starting and ending character limit and it won’t match any other URL.
View functions pass data problems

request.session["index"] = index
request.session.flush()

In many cases, passing values from view function to view function is the simplest way to record data except passing parameters to view function. The following sentence can be used to clear session in the login interface or some fixed page, otherwise the data will exist until it is destroyed automatically by Django.

Exception: jupyter command Jupiter notebook not found

Open jupyter notebook times error Exception: jupyter command jupyter-noteboook not found.


at this time you can choose to enter pip3 install jupyter notebook to reinstall the notebook, it appears as follows:

namely the notebook has been installed, the current available version version 20.3.1, and we are using version 20.3
The solution
WARNING: enter the command line as c:\python38\ python.exe-m PIP install –upgrade PIP

version after the update can reopen jupyter notebook

Get the startup activity of Android apk

Get the Start Activity for Android APK

adb connect phone open APP

adb -s 192.168.0.11:6688 shell dumpsys window Windows | grep “mCurrent” # gets the package name of the current APP

adb shell dumpsys activity > Act.txt # gets the activity information
# on the act. TXT find android. Intent. The category. The LAUNCHER behind the name of the activity is to start the activity
Adb -s 192.168.0.11:6688 shell am start – n com. Dragon. Read/pages. Splash. SplashActivity #

Python rename renumber


# -*- coding: utf-8 -*-
import os
import numpy as np
import cv2

list_path = r"F:\project\cls\yanshen\20201209/"
g = os.walk(list_path)

test_dataset = ['%s/%s' % (i[0], j) for i in g for j in i[-1]]


for index,filename in enumerate(test_dataset):

    name = f'/{index:04d}.jpg'
    dir_name=os.path.dirname(filename)
    os.rename(filename,dir_name+name)

Filter images:

  g = os.walk(list_path)
        img_files = ['%s\\%s' % (i[0], j) for i in g if i[0].endswith('JPEGImages') for j in i[-1] if
                     j.endswith('jpg')]


Modulenotfounderror: no module named ‘CV2’ – (version problem)

Ubuntu Running OpenCV project tip: ModuleNotFoundError: No Module Named ‘Cv2’
Haha, that was the problem when it was first installed. Just throw me up.
1. Reason: the versions are inconsistent
The problem is that when installing OpencV-Python, the detailed version number is appended, which makes it different from the Python environment. In addition, there will be other problems, I can’t remember exactly.
2. Solutions

    first use the instruction: PIP install opencv-python to execute once, if the .py file or so to see the next one; Just do not append the version number when installing OpencV-Python.

Solve the problem of red wavy line in pychar when importing module written by oneself

Solve the problem of red wavy line in the module imported from Pycharm
A red wavy line appears in the module imported by myself in Pycharm, as shown in the figure below. However, it can operate normally. The main problem is the file directory, and the module simply imported by import cannot find the path.

if you don’t feel comfortable with the red wavy line, you can also choose to solve this problem. The next two steps will be completed.
step 1:
enter Settings, go to the Python Console under the Console, check the option “Add source roots to PYTHONPAT”, and then click OK
. Step 2:
right click on the Directory and select Mark Directory as in the popup menu bar, then continue to select Sources Root, and you will immediately see the red wavy line in the code has been automatically removed.