Tag Archives: Nginx company

[Nginx] solution: it can’t be accessed on the background API interface after HTTPS (access the specified port through the domain name)

Demand

Original address: http://ip :54774/api_ Name
now requires you to access the specified port through the domain name: https://api.example.com/api_ name
realization

The most important thing is to configure the reverse proxy address of location

When we enter the domain name/API_ Name
will be mapped by nginx to IP or domain name: 54774/API_ Name path go to the nginx directory, open nginx. Conf , add reverse proxy :

server
{
    listen 80;
	listen 443 ssl http2;
    server_name https://api.example.com;
    
    # Reverse Proxy
    location ~ ^/api_name {
        proxy_pass http://ip:54777;
    }
    
    #SSL-START SSL-related configuration, please do not delete or modify the next line with the comment 404 rules
    #error_page 404/404.html;
    ssl_certificate    /www/server/panel/vhost/cert/api.example.com/fullchain.pem;
    ssl_certificate_key    /www/server/panel/vhost/cert/api.example.com/privkey.pem;
    ssl_protocols TLSv1.1 TLSv1.2 TLSv1.3;
    ssl_ciphers EECDH+CHACHA20:EECDH+CHACHA20-draft:EECDH+AES128:RSA+AES128:EECDH+AES256:RSA+AES256:EECDH+3DES:RSA+3DES:!MD5;
    ssl_prefer_server_ciphers on;
    ssl_session_cache shared:SSL:10m;
    ssl_session_timeout 10m;
    add_header Strict-Transport-Security "max-age=31536000";
    error_page 497  https://$host$request_uri;


    #SSL-END
    
    #ERROR-PAGE-START  Error page configuration, which can be commented, deleted or modified
    #error_page 404 /404.html;
    #error_page 502 /502.html;
    #ERROR-PAGE-END
    
    #PHP-INFO-START  PHP reference configuration, can be commented or modified
    #include enable-php-72.conf;
    #PHP-INFO-END
    
    #REWRITE-START URL rewrite rule reference, the modification will cause the panel to set the pseudo-static rules are invalid
    #include /www/server/panel/vhost/rewrite/api.example.com.conf;
    #REWRITE-END
    
    #Files or directories to which access is prohibited
    location ~ ^/(\.user.ini|\.htaccess|\.git|\.svn|\.project|LICENSE|README.md)
    {
        return 404;
    }
    
    #One Click Application for SSL Certificate Verification Directory Related Settings
    location ~ \.well-known{
        allow all;
    }
}
    1. overload configuration file:
./nginx -s reload

nginx: [error] open() “/usr/local/nginx/logs/nginx.pid“ failed (2: No such file or directory)

An error was reported when starting nginx: nginx: [error] open() “/ usr/local/nginx/logs/ nginx.pid ”Failed (2: no such file or directory)
solutions
are different every time I encounter them. I have encountered two solutions here, and I’d like to share them here

Situation 1: nginx.conf Of nginx.pid Annotated
Enter nginx.conf Catalog editor

sudo vi /usr/local/nginx/conf/nginx.conf

Just cancel the comments and restart nginx

sudo nginx -s reload 

Case 2: no configuration directory is specified

Enter to use the specified nginx.conf Restart nginx in the form of file (first, make sure that the PID in the first case is not commented, otherwise it may be opened for the first two times, but an error will still be reported later)

sudo /usr/local/nginx/sbin/nginx -c /usr/local/nginx/conf/nginx.conf


Nginx realizes the same background service for portal and business

The first stage: modify the initial path access in the framework

The default access address was modified. Because I was not familiar with the configuration of the framework at that time, and there was no architecture related documentation, the attempt failed. Although the modification is completed, you can directly access the home page of the portal according to the domain name, but the back-end business can’t be accessed normally. I doubt that I have changed something. If you are familiar with ruoyi architecture and have completed this modification method, please give me more advice.

The second stage: using nginx to separate the front and back of the portal

The portal page of the website uses static HTML pages, and then the data request is implemented through Ajax. Configure two domain names to resolve to the server where the service is located, the first level domain name to access the portal related functions, and the second level domain name to access the background management page. Two schemes are prepared. One is to simply use HTML and Ajax. First, nginx forwards the request to the HTML page according to the domain name, and then uses Ajax to get the data from the background when the page is initialized. The second is to use Vue, which is actually an optimization on the first one. Through the loop contained in Vue and other tags, it is easy to load and echo the data, but When the page is loaded, the unresolved Vue variables will be displayed first. The experience is very poor, so this method is abandoned. I think the efficiency and page rendering experience of the first method will be very poor, so in the case of other implementation methods, I will not consider this method for the moment. In fact, these two methods can achieve basic requirements such as data loading.

The third stage: directly using the page of the original project

At the beginning, I didn’t think of this method, but later when I modified the second method, I suddenly thought that according to the previous project experience, I can do redirection jump in nginx, so I began to try this way. The basic idea is: configure two servers in nginx to monitor port 80, and judge which server to enter according to the domain name. When the access is a first-class domain name, judge the website related business, that is, judge whether the URL contains only the domain name. If it contains only the domain name, then redirect the request to the path of the portal home page. For other requests, handle them normally .

No more nonsense. Go directly to nginx configuration

server {
	listen 80;
	server_name ywgl.*****.com;
	index index.html;
	set $ht_server 127.0.0.1:8080;
	
	location /{
		proxy_pass_header Server;
		proxy_set_header Host $http_host;
		proxy_set_header X-Real-IP $remote_addr;
		proxy_set_header X-Scheme $scheme;
		proxy_pass http://$ht_server;

	}
  
}
server {
	listen 80;
	server_name www.******.com;
	index index.html;
	set $mh_server 127.0.0.1:8888;


	location /{
		
		proxy_pass_header Server;
		proxy_set_header Host $http_host;
		proxy_set_header X-Real-IP $remote_addr;
		proxy_set_header X-Scheme $scheme;
		
		if ($request_uri ~* "^/$") {
			rewrite ^/(.*)$ http://www.******.com/home/index?; # Preventing multiple redirects
		}
		proxy_pass http://$mh_server ;
	}


}

explain:

$request_ Uri ~ * “^/$” this condition is to determine whether the access request is www. * * *. Com, not www. * * *. COM/*/*, because even if the access request is www. * * *. Com, nginx will send a $request_ What URI gets will still contain a ‘/’.

Finally, if you have any ideas, welcome to exchange.

Solve the problem of 404 Not Found error in nginx accessing dynamic interface

Problem description

We design a set of recruitment back transfer system, and use ant design Vue and jfinal framework at the front and back end respectively. You want to deploy the project to the server, but external access always reports 404 not found

Solutions

The error is: the dynamic interface can not be found, but I don’t know whether there is a problem in the project or after nginx agent.
Therefore, it is necessary to test the interface of the project itself and the interface after nginx proxy.

First, test the interface in the project

Enter the command: curl on the Ubuntu side http://localhost :port/xxx/xxx

Here my interface is. curl http://localhost:20294/sys/login

Results of operation:

It shows that there is no problem with the interface in my project.

Test the interface after nginx proxy again

Then input the command in Ubuntu

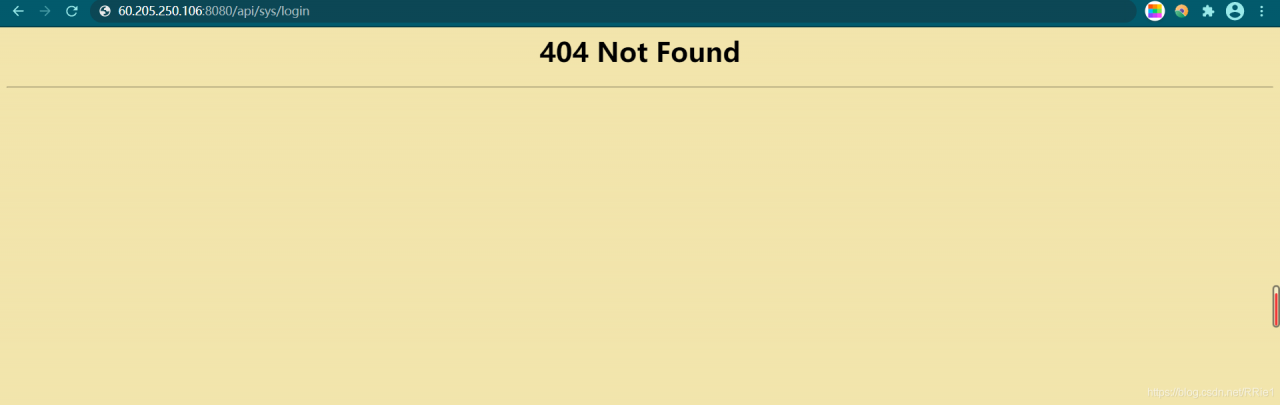
curl http://localhost:8080/api/user/login

Running result:

the prompt here is that the interface cannot be found, which indicates that the problem lies in the proxy server nginx, so we need to modify the configuration file of nginx.

According to the suggestions of other blogs, I added a slash to this place in nginx configuration

after restarting the server, it still can’t work.

Complete solution

When I didn’t know what to do, I suddenly found that there were two nginx in my server ····
I was wondering if it was because there were two nginx, and the modified configuration file was not the nginx I started. So I replaced all nginx configuration files with my original configuration files, and then restarted. Still not

Worried about the two nginxs, I deleted all nginxs in the server. Delete steps (run the following steps in turn:

ps aux|grep nginx  #View nginx processes
kill -9 process number #Kill the nginx queried in the previous step (process number is in the second column)
find/-name nginx #Find the nginx file address
rm -rf xxx #Delete all nginx files

Finally, use weget to install the new nginx, and then install it according to the original installation steps. After modifying the configuration file, run curl to access the dynamic interface. All of a sudden, it’s OK!

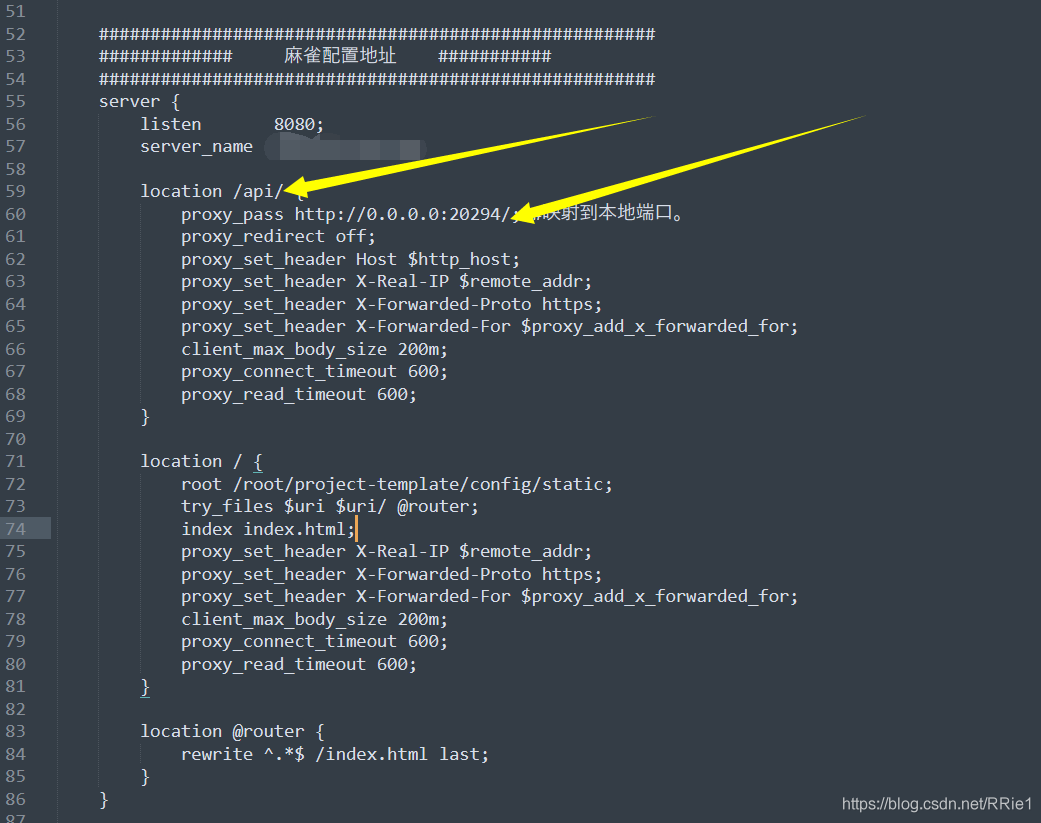
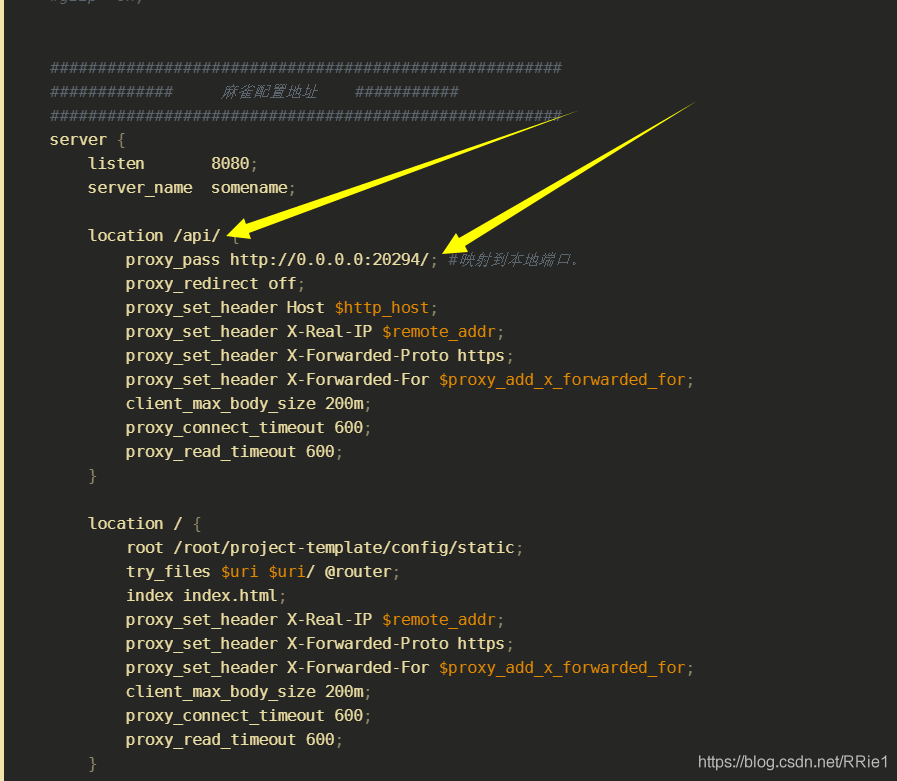
The following is my nginx configuration file:

user root;
#user  nobody;
worker_processes  4;

#error_log  logs/error.log;
#error_log  logs/error.log  notice;
#error_log  logs/error.log  info;
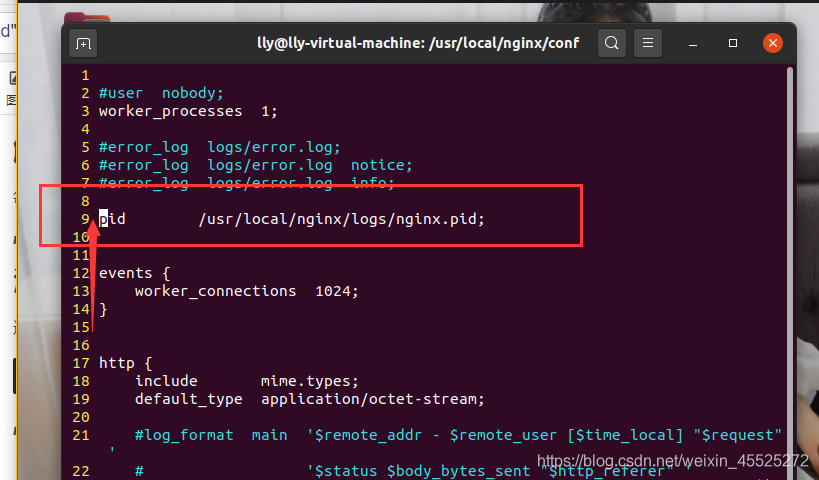
#pid        logs/nginx.pid;


events {
    worker_connections  1024;
}


http {
    include       mime.types;
    default_type  application/octet-stream;
    log_format main '$remote_addr - $remote_user [$time_local] "$request" '
                      '$status $body_bytes_sent "$http_referer" '
                      '"$http_user_agent" "$http_x_forwarded_for"';

    server_names_hash_bucket_size 128;
    client_header_buffer_size 32k;
    underscores_in_headers on;
    large_client_header_buffers 4 32k;
    client_max_body_size 50m;
    #log_format  main  '$remote_addr - $remote_user [$time_local] "$request" '
    #                  '$status $body_bytes_sent "$http_referer" '
    #                  '"$http_user_agent" "$http_x_forwarded_for"';

    #access_log  logs/access.log  main;

    sendfile        on;

    #keepalive_timeout  0;
    keepalive_timeout  65;
    tcp_nopush          on;
    fastcgi_connect_timeout 300;
    fastcgi_send_timeout    300;
    fastcgi_read_timeout    300;
    fastcgi_buffer_size     64k;
    fastcgi_buffers     4   64k;
    fastcgi_busy_buffers_size 128k;
    fastcgi_temp_file_write_size 256k;
    tcp_nodelay         on;

    #gzip  on;


    ######################################################
    #############     Sparrow configuration address    ###########
    ######################################################
    server {
        listen       8080;
        server_name  somename;

        location /api/ {
            proxy_pass http://0.0.0.0:20294/; #Mapping to the local port.
            proxy_redirect off;
            proxy_set_header Host $http_host;
            proxy_set_header X-Real-IP $remote_addr;
            proxy_set_header X-Forwarded-Proto https;
            proxy_set_header X-Forwarded-For $proxy_add_x_forwarded_for;
            client_max_body_size 200m;
            proxy_connect_timeout 600;
            proxy_read_timeout 600;
        }
        
        location/{
            root /root/project-template/config/static;
            try_files $uri $uri/ @router;
            index index.html;
            proxy_set_header X-Real-IP $remote_addr;
            proxy_set_header X-Forwarded-Proto https;
            proxy_set_header X-Forwarded-For $proxy_add_x_forwarded_for;
            client_max_body_size 200m;
            proxy_connect_timeout 600;
            proxy_read_timeout 600;
        }

        location @router {
            rewrite ^.*$ /index.html last;
        }
    }
}

note: when configuring the dynamic access API, remember to add a slash at the end

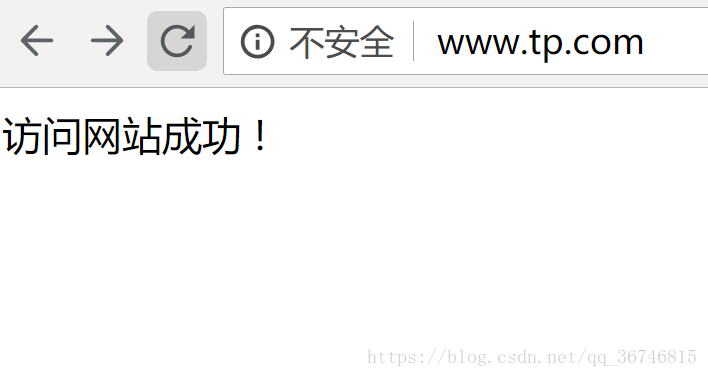
So far, the problem has been solved perfectly.

Configure HTTPS and self signed certificate for nginx

1、 Get the certificate ready.

The steps are similar to those described in using OpenSSL to self issue the server’s HTTPS certificate. Again here.

Making CA certificate:
1 ca.key CA private key:
OpenSSL gensa - DES3 - out ca.key 2048
making the decrypted CA private key (generally unnecessary):
OpenSSL RSA - in ca.key -out ca_ decrypted.key
ca.crt CA root certificate (public key):
OpenSSL req - New - x509 - days 7305 - key ca.key -out ca.crt make and generate the certificate of the website and use CA signature for authentication. Here, assume that the website domain name is blog.creke.net generate blog.creke.net Certificate private key: OpenSSL genrsa - DES3 - out blog.creke.net .pem 1024 Making the decrypted blog.creke.net Certificate private key: OpenSSL RSA - in blog.creke.net .pem -out blog.creke.net . key generate signature request: OpenSSL req - New - key blog.creke.net .pem -out blog.creke.net . CSR in common Fill in the website domain name in the name, such as blog.creke.net Can generate a certificate to change the site, but also can use the pan domain name, such as * creke.net To generate site certificates available for all secondary domain names. Sign with Ca:

openssl ca -policy policy_anything -days 1460 -cert ca.crt -keyfile ca.key -in blog.creke.net.csr -out blog.creke.net.crt

Among them, the policy parameter allows the signed Ca and website certificate to have different country, place name and other information, and the days parameter is the signature time limit. If "I am unable to access the /… /Ca/newcerts directory/etc/PKI/TLS/ openssl.cnf Then: MKDIR - P Ca/newcerts touch CA/ index.txt Touch Ca/serial echo "01" & gt; then re execute the signature command. Finally, put ca.crt Paste the contents of to blog.creke.net . CRT. This is more important! If not, some browsers may not support it. OK, now you need the private key of the website blog.creke.net . key and website certificate blog.creke.net . CRT is ready. Next, start to configure the server.

2、 Configure nginx

Open a new virtual host and set it in the server {} section

listen 443;

ssl on;

ssl_certificate /path/to/blog.creke.net.crt;

ssl_certificate_key /path/to/blog.creke.net.key;

The path is the path of the website certificate just generated. Then use the following command to detect configuration and reload nginx: detect configuration: nginx - T reload: nginx - s reload

3、 Optimize nginx configuration

    optimize nginx performance by adding:

    ssl_session_cache shared:SSL:10m;
    ssl_session_timeout 10m;
    

    According to the official documents, the 1m cache can store 4000 sessions. Add: keep alive to the virtual host server {} configured with HTTPS_ Timeout 70; sometimes, you will find that after the program such as phpMyAdmin logs in, it will jump to HTTP by mistake. The solution is to locate "location ~. * (PHP | PHP5)?${}" in include fcgi.conf ; or in fastcgi_ Add after param configuration:

    fastcgi_param HTTPS on;
    
    fastcgi_param HTTP_SCHEME https;
    

    Here is the official document of nginx about HTTPS, which can be used as a reference.

Note: transferred from http://blog.creke.net/762.html

Nginx, which is suitable for front-end H5 requests, routes and forwards according to the URL and cuts the URL

1. Ruqirement
nginx accepts the request url uniformly and forwards it
http://172.16.51.91:9000/api/order/create/44010000
http://172.16.51.91:9000/api/order/create/44060000
目标:
http://172.15.10.13:9001/api/order/create
http://172.15.10.13:9002/api/order/create
2. nginx Settings

server {
        listen      9000;
        server_name  172.16.51.91;

		location ~*(44010000)$ {
                rewrite ^/(.*)/44010000$ http://172.15.10.13:9001/$1 permanent;
        }
		 location ~*(44060000)$ {
                 rewrite ^/(.*)/44060000$ http://172.15.10.13:9002/$1 permanent;
        }	

}

Nginx routes and forwards according to the URL and cuts the URL

1. Ruqirement
nginx accepts the request url uniformly and forwards it
http://172.16.51.91:9000/44010000/api/order/create
http://172.16.51.91:9000/44060000/api/order/create
goal:
http://172.15.10.13:9001/api/order/create
http://172.15.10.13:9002/api/order/create
2. nginx Setting

server {
    listen   9000;
    server_name 172.16.51.91;

	location /44010000/ {
		    proxy_pass http://172.15.10.13:9001/;
    }
		 location /44060000/ {
         proxy_pass http://172.15.10.13:10002/;
    }
}

Solution: configuration of multiple front ends separated from front end and back end of nginx

1. Business scenarios

According to the business requirements, the front-end code needs to distinguish between the main business code and the sub business code.

2. Solutions

Routing is based on the root of the relative path.

3. Configuration file

  server {
        listen       9207;
        server_name  192.168.30.158;
        root /home/qdfinance/apps/pages/insure_wx/;

        #Front-end dependent business code pages are routed with relative paths to root/h5
        location /h5/ {
          root    /home/qdfinance/apps/pages/insure_wx_h5/;
          add_header Cache-Control "no-cache, no-store";
          rewrite ^/h5/(.*)$ /index.html  break;
        }
		#Reverse proxy tomcat service
        location/{
           proxy_set_header Host $host:$server_port;
           proxy_pass   http://192.168.80.192:8098/;
           root /home/qdfinance/apps/pages/insure_wx/;
           error_page 404 /index.html;
        }
		#Front-end main business code page
        location   =/{
          root /home/qdfinance/apps/pages/insure_wx/;
          add_header Cache-Control "no-cache, no-store";
        }
        location /index.html {
          root  /home/qdfinance/apps/pages/insure_wx/;
          add_header Cache-Control "no-cache, no-store";
        }
        location /statich5/ {
           root /home/qdfinance/apps/pages/insure_wx_h5/; 
        } 
  
        location /static/ {
          root  /home/qdfinance/apps/pages/insure_wx/;
        }
        location /detail/ {
          rewrite ^/(.*)$ /index.html last;
        }
		location /me {
          rewrite ^/(.*)$ /index.html last;
        }
        location /login/ {
          rewrite ^/(.*)$ /index.html last;
        }
        location /customer {
          rewrite ^/(.*)$ /index.html last;
        }
        location /customer-add {
          rewrite ^/(.*)$ /index.html last;
        }
        location /subscribe {
          rewrite ^/(.*)$ /index.html last;
        }
        location /order {
          rewrite ^/(.*)$ /index.html last;
        }
        location /order-detail {
          rewrite ^/(.*)$ /index.html last;
        }
        location /main {
          rewrite ^/(.*)$ /index.html last;
        }
        location /auth {
          rewrite ^/(.*)$ /index.html last;
        }
        location /policy {
          rewrite ^/(.*)$ /index.html last;
        }
        location /intellect {
          rewrite ^/(.*)$ /index.html last;
        }
		location /intellectanswerlist {
          rewrite ^/(.*)$ /index.html last;
        }
		location /immed {
          rewrite ^/(.*)$ /index.html last;
        }
        location /docking {
          rewrite ^/(.*)$ /index.html last;
        }
		location /success {

          rewrite ^/(.*)$ /index.html last;
        }
		location /error {
          rewrite ^/(.*)$ /index.html last;
        }
    }

Nginx front end and back end separation + service cluster reverse proxy

1. Scene

Nginx implements the separation of front and back end, and the reverse proxy of service cluster.

2. Nginx configuration instance

upstream portal-system {
       server 127.0.0.1:8061 max_fails=3 fail_timeout=30s;
       server 172.31.88.30:8061 max_fails=3 fail_timeout=30s;
}

server {
        listen       80;
        server_name  47.102.168.177;
        root /opt/pages/dispatch-portal-system/;

       location/{
         proxy_set_header Host $host:$server_port;
         proxy_pass   http://portal-system;
       }

       location /images/ {
         alias  /opt/images/dispatch-portal-system/;
       }
       
       location /favicon.ico {
         root /opt/images/dispatch-portal-system/;
       }
       
       location /api/user/updateImage/ {
          proxy_set_header Host $host:$server_port;
          proxy_pass   http://127.0.0.1:8061/;
       }

       location   =/{
          root /opt/pages/dispatch-portal-system/;
          add_header Cache-Control "no-cache, no-store";
       }
	   
        location /index.html {
          root  /opt/pages/dispatch-portal-system/;
          add_header Cache-Control "no-cache, no-store";
        }

        location /static/ {
          root  /opt/pages/dispatch-portal-system/;
        }

}


NxL job cluster nginx routing forwarding and reverse proxy

1. Scene

Two servers are deployed with XXL job respectively to build a high availability cluster

Provide easy request URL

2. Nginx configuration

 upstream xxl-jobs {
        server 192.168.30.01:9500 max_fails=3 fail_timeout=30s;
        server 192.168.30.02:9500 max_fails=3 fail_timeout=30s;
    }

     server {
        listen    8888;
        server_name  localhost;
        location/{
            proxy_pass http://xxl-jobs;
            index  index.html index.htm;
        }
        error_page   500 502 503 504  /50x.html;
        location = /50x.html {
            root   html;
        }
    }


Nginx reverse proxy MySQL

1. Scene

Mysql database in the pure Intranet environment, no public IP, no VPN.

2. Programme

Install nginx on a server with public IP and in the same Intranet environment with MySQL service to realize the routing and forwarding of MySQL access.

3. Nginx installation

Nginx version needs 1.9 or above. Nginx not only implements HTTP reverse proxy, but also supports TCP reverse proxy.

1) When compiling nginx, you need to add the parameter — with stream to load NGX_ stream_ core_ Module

Examples

./configure –prefix=/opt/software/nginx –with-http_ stub_ status_ module –with-http_ ssl_ module –with-stream –with-stream_ ssl_ module –with-pcre=/usr/local/src/pcre-8.35

4. Nginx configuration file nginx.conf

Monitor port 3307 with public IP server, and jump to port 3306 of 172.31.88.27.

Special note: stream should be in the same level directory as HTTP

stream {
    upstream mysql3306 {
        hash $remote_addr consistent;
        server 172.31.88.27:3306 weight=5 max_fails=3 fail_timeout=30s;
    }
	
	 server {
        listen 3307;
        proxy_connect_timeout 10s;
        proxy_timeout 200s;
        proxy_pass mysql3306;
    }
}