Argument interpolation should be of type InterpolationMode instead of int.
-
- provide
from torchvision.transforms import InterpolationMode
Image.BICUBIC
-
- Replace as
InterpolationMode.BICUBIC
Argument interpolation should be of type InterpolationMode instead of int.
from torchvision.transforms import InterpolationMode
Image.BICUBIC
InterpolationMode.BICUBIC
This error is usually caused by the version of mmcv
just click in one by one according to the following error prompt to find utils.py file:
change the code in the circle below:
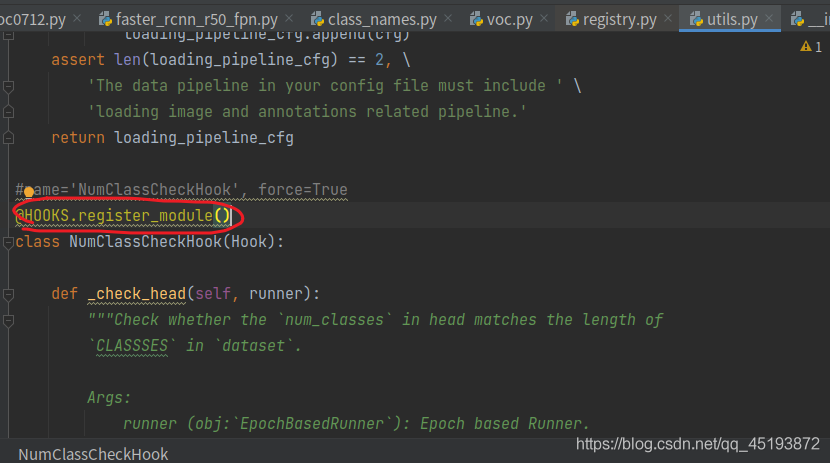
add in brackets:
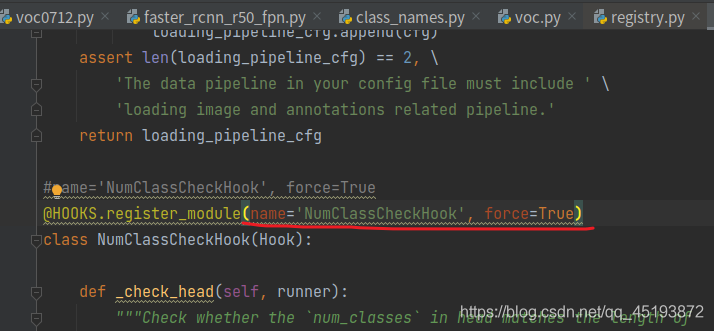
finally, it can run successfully.
Similar questions:
keyerror: ‘XXX is already registered in xxx’
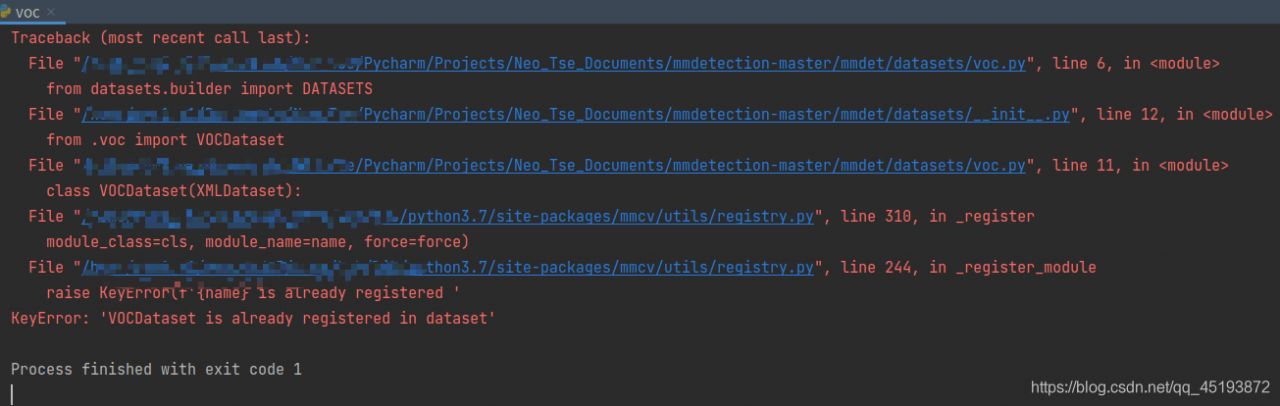
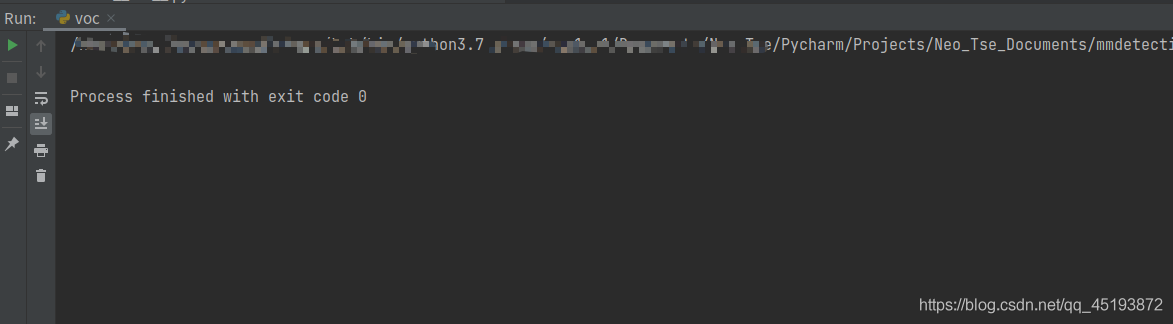
Results: it runs perfectly
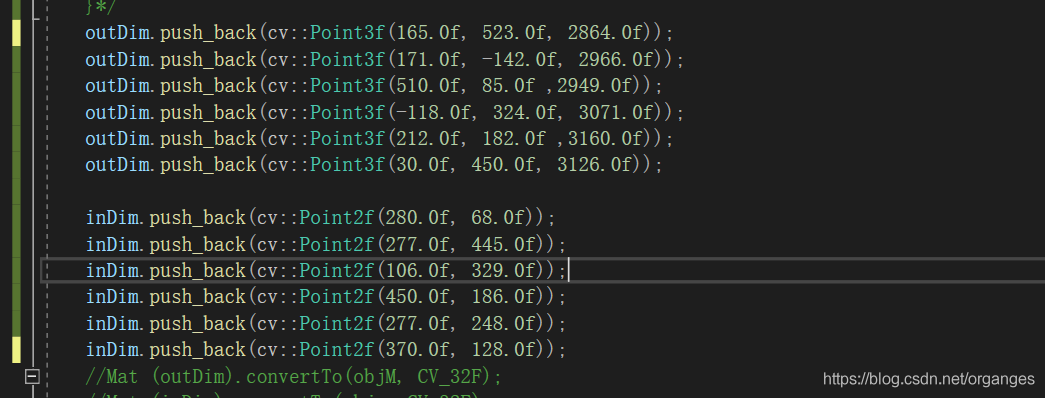
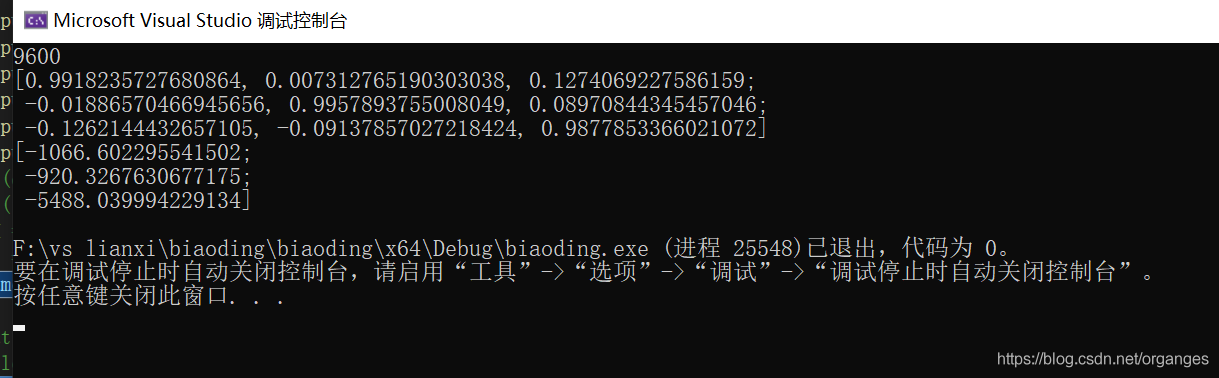
Solve the problem of solvepnp (outdim, indim, cameramatrix, distcoeff, RVEC, tvec); There is an unhandled exception at 0x00007ffbc3844b89 (in biaoding.exe): Microsoft C + + exception: CV:: exception, in the memory location of 0x000000571351b2d0
Mapping 3D point cloud to 2D image, using OpenCV solvepnp, running error
OpenCV(4.5.1) Error: Assertion failed (( (npoints >= 4) || (npoints == 3 && amp; flags == SOLVEPNP_ ITERATIVE && amp; useExtrinsicGuess) || (npoints >= 3 && amp; flags == SOLVEPNP_ SQPNP) ) && amp; npoints == std::max(ipoints.checkVector(2, CV_ 32F), ipoints.checkVector(2, CV_ 64F))) in cv::solvePnPGeneric, file C:\build\master_ winpack-build-win64-vc15\opencv\modules\calib3d\src\solvepnp.cpp, line 802
The error is as follows:

The input coordinates of 3D point cloud and 2D pixel are:

Conversion type:

After the conversion, the output of outdim and indim is changed, and it is no longer a 6 * 3 matrix, so an error will be reported
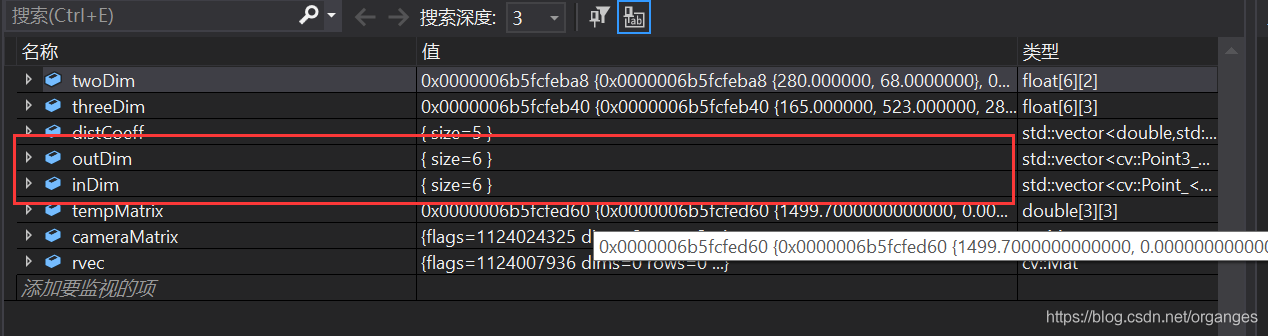
So the error is because the matrix dimensions in solvepnp are inconsistent. The solution is to use push again in the most stupid way_ Back redefines outdim and indim, instead of using for loop to define outdim and indim, just in case cameramatrix is also redefined

Finally, the rotation translation matrix from radar to camera and the result map of point cloud mapping to image are obtained
The source is Mr. Bai Xiang of Huazhong University of science and technology.
import numpy as np
import shapely
from shapely.geometry import Polygon,MultiPoint  #Polygon

line1=[2,0,2,2,0,0,0,0,2] #One-dimensional array representation of the coordinates of the four points of the quadrilateral, [x,y,x,y....]
a = np.array(line1).reshape(4, 2) # quadrilateral two-dimensional coordinate representation
poly1 = Polygon(a).convex_hull # python quadrilateral object, will automatically calculate four points, the last four points in the order of: top left bottom right bottom right top left top
print(Polygon(a).convex_hull) # you can print to see if this is the case


line2=[1,1,4,1,4,4,1,4]
b=np.array(line2).reshape(4, 2)
poly2 = Polygon(b).convex_hull
print(Polygon(b).convex_hull)

union_poly = np.concatenate((a,b))   #Merge two box coordinates to become 8*2
#print(union_poly)
print(MultiPoint(union_poly).convex_hull) # contains the smallest polygon point of the two quadrilaterals
if not poly1.intersects(poly2): #If the two quadrilaterals do not intersect
    iou = 0
else:
    try:
        inter_area = poly1.intersection(poly2).area #intersection area
        print(inter_area)
        #union_area = poly1.area + poly2.area - inter_area
        union_area = MultiPoint(union_poly).convex_hull.area
        print(union_area)
        if union_area == 0:
            iou= 0
        #iou = float(inter_area)/(union_area-inter_area)  #wrong
        iou=float(inter_area)/union_area
        # iou=float(inter_area) /(poly1.area+poly2.area-inter_area)
        # The source code gives two ways to calculate IOU, the first one is: intersection part / area of the smallest polygon containing two quadrilaterals
        # The second one: intersection/merge (common way to calculate IOU of rectangular box)
    except shapely.geos.TopologicalError:
        print('shapely.geos.TopologicalError occured, iou set to 0')
        iou = 0

print(a)
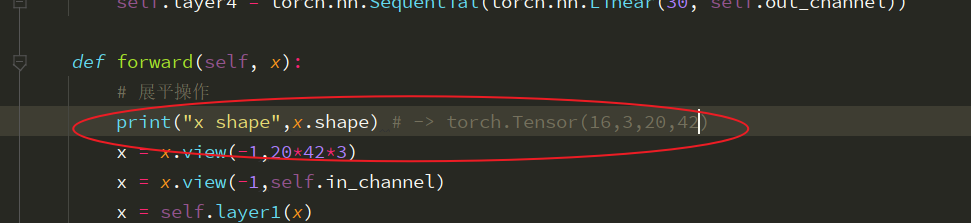
print(iou)raise ValueError(‘Expected input batch_ size ({}) to match target batch_ size ({}).’
Remember to print the size of the picture before forward propagation. I didn’t notice that all the pictures come in RGB three channel data this time. When using the . View function, I remember to look at it first. When I used it, I calculated the size of the picture directly according to a single channel. Generally, this is the phenomenon that the size of the picture does not match
The phenomenon of mating
Today, we did an experiment on the model saved by keras, hoping to help you understand the differences between the models saved by keras.
We know that the model of keras is usually saved as a file with the suffix H5, such as final_ model.h5。 The same H5 file uses save () and save_ The effect of weight () is different.
We use MNIST, the most common data set in the universe, to do this experiment
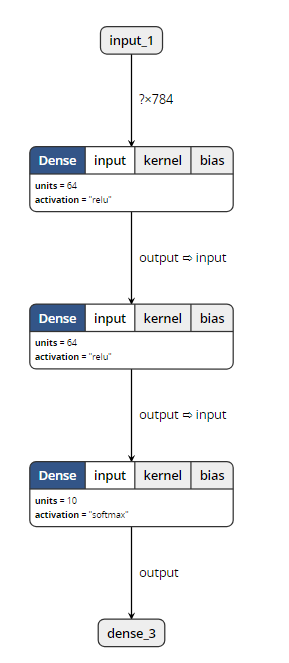
inputs = Input(shape=(784, ))
x = Dense(64, activation='relu')(inputs)
x = Dense(64, activation='relu')(x)
y = Dense(10, activation='softmax')(x)

model = Model(inputs=inputs, outputs=y)
Then, import MNIST data for training, and save the model in two ways. Here, I also save the untrained model, as follows:
from keras.models import Model
from keras.layers import Input, Dense
from keras.datasets import mnist
from keras.utils import np_utils
(x_train, y_train), (x_test, y_test) = mnist.load_data()
x_train=x_train.reshape(x_train.shape[0],-1)/255.0
x_test=x_test.reshape(x_test.shape[0],-1)/255.0
y_train=np_utils.to_categorical(y_train,num_classes=10)
y_test=np_utils.to_categorical(y_test,num_classes=10)
inputs = Input(shape=(784, ))
x = Dense(64, activation='relu')(inputs)
x = Dense(64, activation='relu')(x)
y = Dense(10, activation='softmax')(x)
model = Model(inputs=inputs, outputs=y)
model.save('m1.h5')
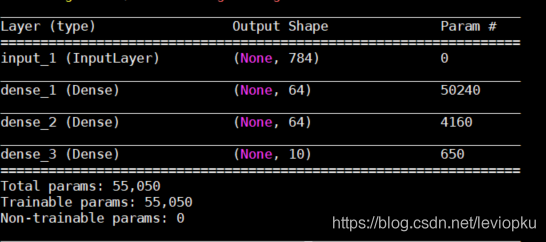
model.summary()
model.compile(loss='categorical_crossentropy', optimizer='sgd', metrics=['accuracy'])
model.fit(x_train, y_train, batch_size=32, epochs=10)
#loss,accuracy=model.evaluate(x_test,y_test)
model.save('m2.h5')
model.save_weights('m3.h5')
As you can see, I have saved m1.h5, m2.h5 and m3.h5 files. So, let’s see what’s the difference between these three things. First, look at the size:

M2 represents the result of the model saved by save (), which not only keeps the graph structure of the model, but also saves the parameters of the model. So it’s the biggest.
M1 represents the result of the model before training saved by save (). It saves the graph structure of the model, but it should not save the initialization parameters of the model, so its size is much smaller than m2.
M3 means save_ Weights () saves the results of the model. It only saves the parameters of the model, but it does not save the graph structure of the model. So it’s much smaller than m2.
Through the visualization tool, we found that: (open M1 and M2 can show the following structure)
When opening m3, the visualization tool reported an error. So it can be proved that save_ Weights () does not contain model structure information.
Loading model
The model files saved by two different methods also need different loading methods.
from keras.models import load_model

model = load_model('m1.h5')
#model = load_model('m2.h5')
#model = load_model('m3.h5')
model.summary()
Only when loading m3. H5, this code will report an error. Other outputs are as follows:
It can be seen that only the H5 file saved by save() can be downloaded directly_ Model () open!
So, how can we open the saved parameter (M3. H5)?
This is a little more complicated. Because m3 does not contain model structure information, we need to describe the model structure again before loading m3, as follows:
from keras.models import Model
from keras.layers import Input, Dense


inputs = Input(shape=(784, ))
x = Dense(64, activation='relu')(inputs)
x = Dense(64, activation='relu')(x)
y = Dense(10, activation='softmax')(x)

model = Model(inputs=inputs, outputs=y)
model.load_weights('m3.h5')
The above m3 into M1 and M2 is no problem! It can be seen that the model saved by save () has obvious advantages except that it takes up more memory. Therefore, in the case of no lack of hard disk space, it is recommended that you use save () to save more.
be careful! If you want to load_ Weights (), you must ensure that the calculation structure with parameters described by you is completely consistent with that in H5 file! What is parametric computing structure?Just fill in the parameter pit. We changed the above non parametric structure and found that H5 files can still be loaded successfully. For example, changing softmax to relu does not affect the loading.
For save() and save() of keras_ No problem at all
preface
The official series of Computer Vision Daily organized the large-scale inventory work of ECCV 2020
See above for details:
2020 target detection ECCV paper large inventory (49 papers) ECCV 2020 semantic segmentation large inventory (article 37) [ECCV paper 2020 instance segmentation paper inventory (12 paper) (https://blog.csdn.net/amusi1994/article/details/108999316)
This paper mainly includes: panoramic segmentation and other directions. Two papers have been sorted out, and the PDF of all papers have been packaged. Baidu cloud resources are as follows:
Link: https://pan.baidu.com/s/12WBsFFJKelcS7Fvrqiv3HQ
extraction code: t7nr
The article directories
Preface Panoramic Segmentation Paper Download PDF
Panoramic segmentation
Joint Semantic Instance Segmentation on Graphs with the Semantic Mutex Watershed
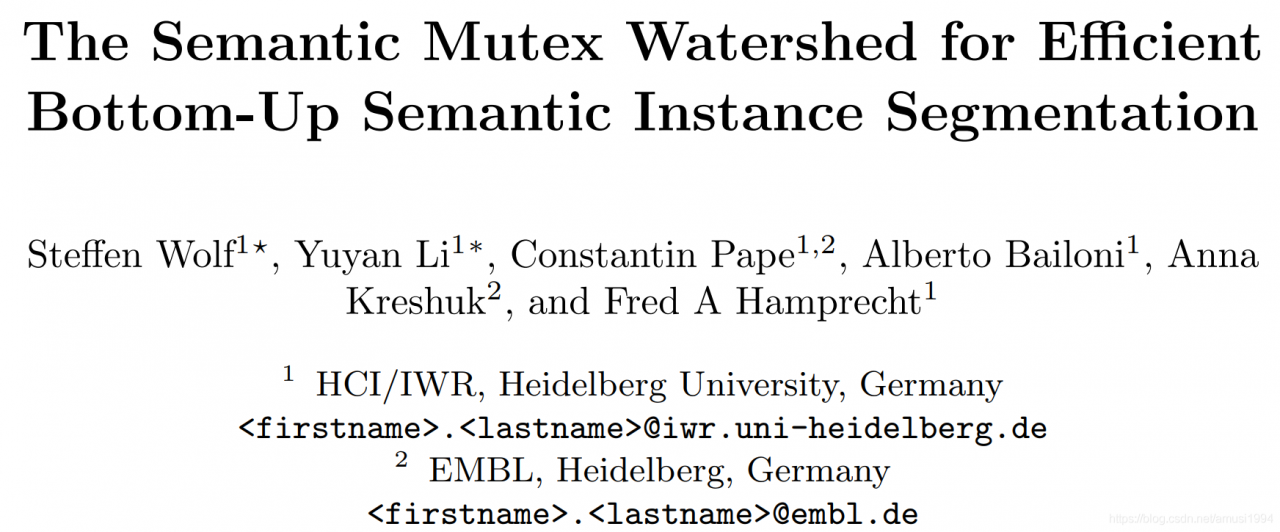
Author units: Heidelberg university paper: https://www.ecva.net/papers/eccv_2020/papers_ECCV/html/5393_ECCV_2020_paper.php code: no Chinese reading: no
Axial-DeepLab: Stand-Alone Axial-Attention for Panoptic Segmentation
Author unit: Johns Hopkins university, Google paper: https://www.ecva.net/papers/eccv_2020/papers_ECCV/html/1564_ECCV_2020_paper.php code: https://github.com/csrhddlam/axial-deeplab in Chinese reading: no
Paper PDF Download
The PDF of the above 14 papers has all been packaged, Baidu Cloud link:
Link: https://pan.baidu.com/s/12WBsFFJKelcS7Fvrqiv3HQ
extraction code: t7nr
#define GLEW_STATIC
#define GLEW_STATIC
#define GLEW_STATIC
#define GLEW_STATIC
#define GLEW_STATIC
#include < GL/glew.h>
#include < GLFW/glfw3.h>
#include
# pragma comment (lib, “glew32. Lib”)
int main() {
glfwInit();
glfwWindowHint(GLFW_CONTEXT_VERSION_MAJOR, 3);
glfwWindowHint(GLFW_CONTEXT_VERSION_MINOR, 3);
glfwWindowHint(GLFW_OPENGL_PROFILE, GLFW_OPENGL_CORE_PROFILE);


// Open GLFW Window
GLFWwindow* window = glfwCreateWindow(800, 600, "My OpenGL Game", NULL, NULL);

if (window == NULL)
{
	printf("open window failed");
	glfwTerminate();
	return -1;
}

glfwMakeContextCurrent(window);

// Init GLEW
GLboolean glewExperimental = true;
if (glewInit() != GLEW_OK)
{
	printf("init GLEW failed");
	glfwTerminate();
	return -1;
}

glViewport(0, 0, 800, 600);

while (!glfwWindowShouldClose(window))
{
	glfwSwapBuffers(window);
	glfwPollEvents();
}

glfwTerminate();
return 0;
}
Glew32.dll
1
1
1
1
1
1
br>
> You need to enter the C disk with admin privileges, then put a copy of glew32.dll into C:\Windows\SysWOW64, the problem is fixed, the window appears
Python == 2.7* or ( >= 3.4 and < 3.6 )
The conda distribution is highly recommended. Python 2.4 was supported up to and including the release 0.6. Python 2.6 was supported up to and including the release 0.8.2. Python 3.3 was supported up to and including release 0.9.
NumPy >= 1.9.1 <= 1.12
Earlier versions could work, but we don’t test it.
SciPy >= 0.14 < 0.17.1
Only currently required for sparse matrix and special functions support, but highly recommended. SciPy >=0.8 could work, but earlier versions have known bugs with sparse matrices.
BLAS installation (with Level 3 functionality)
Recommended: MKL, which is free through Conda withmkl-servicepackage. Alternatively, we suggest to install OpenBLAS, with the development headers (-dev,-devel, depending on your Linux distribution).
Optional requirements
GCC compiler with
g++(version >=4.2.*), and Python development files
Highly recommended. Theano can fall back on a NumPy-based Python execution model, but a C compiler allows for vastly faster execution.
nose >= 1.3.0
Recommended, to run Theano’s test-suite.
Sphinx >= 0.5.1, pygments
For building the documentation. LaTeX and dvipng are also necessary for math to show up as images.
pydot-ng
To handle large picture for gif/images.
NVIDIA CUDA drivers and SDK
Highly recommended Required for GPU code generation/execution on NVIDIA gpus. See instruction below.
libgpuarray
Required for GPU/CPU code generation on CUDA and OpenCL devices (see: GpuArray Backend).
pycuda and skcuda
Required for some extra operations on the GPU like fft and solvers. We use them to wrap cufft and cusolver. Quick installpip install pycuda scikit-cuda. For cuda 8, the dev version of skcuda (will be released as 0.5.2) is needed for cusolver:pip install pycuda; pip install git+https://github.com/lebedov/scikit-cuda.git#egg=scikit-cuda.
warp-ctc
Required for Theano CTC implementation. It is faster then using an equivalent graph of Theano ops.
Requirements installation through Conda (recommended)
Install Miniconda
Follow this link to install Miniconda.
Note
If you want fast compiled code (recommended), make sure you have g++ installed.
Install requirements and optional packages
conda install numpy scipy mkl-service libpython <m2w64-toolchain> <nose> <sphinx> <pydot-ng> <git>
Note
Arguments between <…> are optional. m2w64-toolchain package provides a fully-compatible version of GCC and is then highly recommended. git package installs git source control through conda, which is required for the development versions of Theano and libgpuarray
Package parameterized is also optional but may be required for unit testing. It is available via pip.
pip install parameterized
Install and configure the GPU drivers (recommended)
Warning
OpenCL support is still minimal for now.
Install CUDA drivers
Follow this link to install the CUDA driver and the CUDA Toolkit.
You must reboot the computer after the driver installation.
Installation
Stable Installation
With conda
If you use conda, you can directly install both theano and pygpu. Libgpuarray will be automatically installed as a dependency of pygpu.
conda install theano pygpu
Warning
Latest conda packages for theano (>= 0.9) and pygpu (>= 0.6*) currently don’t support Python 3.4 branch.
With pip
If you use pip, you have to install Theano and libgpuarray separately.
theano
Install the latest stable version of Theano with:
<sudo> pip install <--user> Theano[test, doc]
Any argument between <…> is optional. Use sudo for a root installation. Use user for a user installation without admin rights. It will install Theano in your local site-packages. [test] will install the requirements for testing. [doc] will install the requirements in order to generate the documentation.
If you encountered any trouble, head to the Troubleshooting page.
The latest stable version of Theano is 0.9.0 (tagged with rel-0.9.0).
libgpuarray
For the stable version of Theano you need a specific version of libgpuarray, that has been tagged v0.6.9. Download it with:
git clone https://github.com/Theano/libgpuarray.git
cd libgpuarray
git checkout tags/v0.6.5 -b v0.6.9
and then follow the Step-by-step instructions.
Bleeding-Edge Installation (recommended)
Install the latest, bleeding-edge, development version of Theano with:
<sudo> pip install <--user> <--no-deps> git+https://github.com/Theano/Theano.git#egg=Theano
Any argument between <…> is optional. Use sudo for a root installation. Use user for a user installation without admin rights. It will install Theano in your local site-packages. Use no-deps when you don’t want the dependencies of Theano to be installed through pip. This is important when they have already been installed as system packages.
If you encountered any trouble, head to the Troubleshooting page.
libgpuarray
Install the latest, development version of libgpuarray following the Step-by-step instructions.
Note
Currently, you need libgpuarray version 0.7.1 that is not in conda default channel. But you can install it with our own channel mila-udem (that support only Python 2.7 and 3.5):
conda install -c mila-udem pygpu
Developer Installation
Install the developer version of Theano with:
git clone git://github.com/Theano/Theano.git
cd Theano
<sudo> pip install <--user> <--no-deps> -e .
Any argument between <…> is optional. Use sudo for a root installation. Use user for a user installation without admin rights. It will install Theano in your local site-packages. Use no-deps when you don’t want the dependencies of Theano to be installed through pip. This is important when they have already been installed as system packages. -e makes your installation editable, i.e., it links it to your source directory.
If you encountered any trouble, head to the Troubleshooting page.
libgpuarray
See instructions for bleeding-edge installation about libgpuarray.
Instructions for other Python distributions (not recommended)
If you plan to use Theano with other Python distributions, these are generic guidelines to get a working environment:
Look for the mandatory requirements in the package manager’s repositories of your distribution. Many distributions come with
pippackage manager which use PyPI repository. The required modules are Python (of course), NumPy, SciPy and a BLAS implementation (MKL or OpenBLAS). Use the versions recommended at the top of this documentation. If the package manager provide a GCC compiler with the recommended version (see at top), install it. If not, you could use the build TDM GCC which is provided for both 32- and 64-bit platforms. A few caveats to watch for during installation:Install to a directory without spaces (we have placed it in
C:\SciSoft\TDM-GCC-64)If you don’t want to clutter your system PATH un-checkadd to pathoption. Enable OpenMP support by checking the optionopenmp support option.Install CUDA with the same instructions as above. Install the latest, development version of libgpuarray following the Step-by-step instructions.
Graph
dev_close_window ()
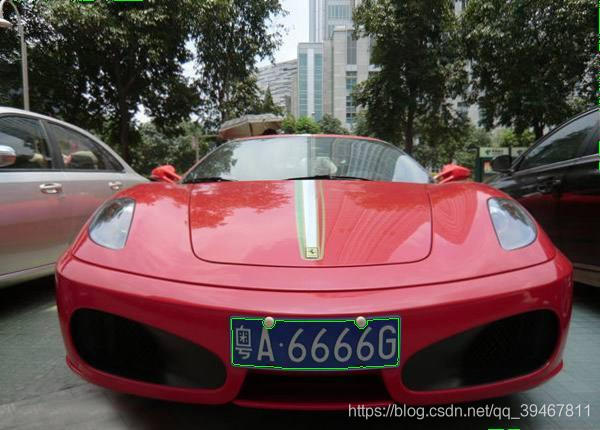
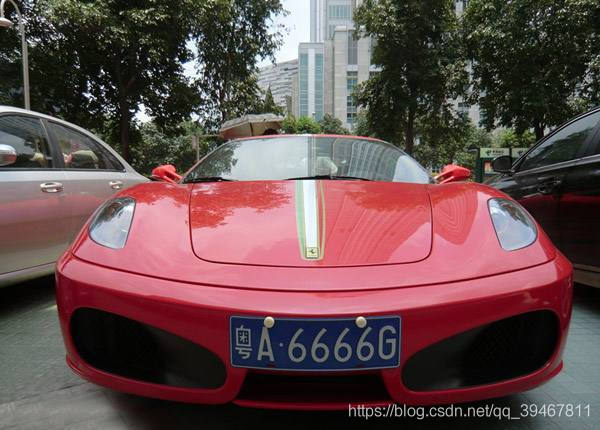
*车牌定位及倾斜旋转
read_image (Car, 'E:/Halcon_Learn/car.jpg')
get_image_size (Car, Width, Height)
dev_open_window (0, 0, Width, Height, 'black', WindowHandle)
dev_set_color ('green')
dev_set_line_width (3)
decompose3 (Car, Image1, Image2, Image3)
threshold (Image1, Regions, 0, 31)
connection (Regions, ConnectedRegions)
select_shape (ConnectedRegions, SelectedRegions, 'area', 'and', 4636.72, 5508.59)
dilation_circle (SelectedRegions, RegionDilation, 3.5)
erosion_circle (RegionDilation, RegionErosion, 3.5)
fill_up (RegionErosion, RegionFillUp)
orientation_region (RegionFillUp, Phi)
area_center (RegionFillUp, Area, Row, Column)
vector_angle_to_rigid (Row, Column, Phi, Row, Column, rad(180), HomMat2D)
affine_trans_image (Car, ImageAffineTrans, HomMat2D, 'constant', 'false')
affine_trans_region (RegionFillUp, RegionAffineTrans, HomMat2D, 'nearest_neighbor')
reduce_domain (ImageAffineTrans, RegionAffineTrans, ImageReduced)
*显示定位车牌
dev_display (ImageAffineTrans)
overpaint_region (ImageAffineTrans, RegionAffineTrans, [0,255,0], 'margin')
dump_window_image (Image_define, WindowHandle)
write_image (Image_define, 'jpg', 0, 'E:/Halcon_Learn/car_define')
stop ()
*字符分割
rgb1_to_gray (ImageReduced, GrayImage)
invert_image (GrayImage, ImageInvert)
threshold (GrayImage, Regions1, 61, 126)
connection (Regions1, ConnectedRegions1)
select_shape (ConnectedRegions1, SelectedRegions1, ['area','height'], 'and', [219,31.607], [321.78,40.742])
sort_region (SelectedRegions1, SortedRegions, 'character', 'true', 'row')
*字符识别
read_ocr_class_mlp ('Industrial_0-9A-Z_NoRej.omc', OCRHandle)
do_ocr_multi_class_mlp (SortedRegions, ImageInvert, OCRHandle, Class, Confidence)
*显示
smallest_rectangle1 (SortedRegions, Row1, Column1, Row2, Column2)
count_obj (SortedRegions, Number)
dev_display (Car)
for i := 1 to Number by 1
* disp_message (WindowHandle, Class[i-1], 'window', Row2[i-1], Column1[i-1], 'red', 'false')
set_tposition (WindowHandle, Row2[i-1], Column1[i-1])
write_string (WindowHandle, Class[i-1])
endfor
dump_window_image (Image, WindowHandle)
write_image (Image, 'jpg', 0,'E:/Halcon_Learn/car_result')
Results the