Tag Archives: android development

[Android] method of removing title bar and using request window feature (Window.FEATURE_ NO_ Title); why does it fail

Use RequestWindowFeature (window.feature_no_title) to hide the cause of the title bar failure.
might be an activity that inherits from AppCompatActivity.
Create an activity that inherits an activity. Create an activity that inherits an activity.
The first method is often used when getting started:

requestWindowFeature(Window.FEATURE_NO_TITLE);
//Remove the title bar Note that this sentence must be written in front of the setContentView() method, otherwise it will report an error

The second is defined in the AndroidManifest.xml file

<application android:theme="@android:style/Theme.NoTitleBar">

Wrote, then the application will remove the title bar, if just want to get rid of a certain Activity of the title bar, you can add this property to the Activity inside the tag
the third: this is not commonly used in general application, is in the res/values below to create a new style. The XML file

<?xml version="1.0" encoding="UTF-8" ?>
<resources>
    <style name="notitle">
        <item name="android:windowNoTitle">
            true
        </item>
    </style>
</resources>

In this way, we have a custom style, which is equivalent to a theme, and then define it in the AndroidManifest.xml file, which also removes the title bar

<application 
    android:icon="@drawable/icon" 
    android:label="@string/app_name" 
    android:theme="@style/notitle">

Create an Activity that inherits AppCompatActivity by default

getSupportActionBar().hide();
//Remove the title bar Note that this sentence must be written after the setContentView() method

2 You can do the following configuration in AndroidManifest.xml so that there is no title bar

<application
   android:theme="@style/Theme.AppCompat.NoActionBar">
Android error reporting: error inflating class android.webkit.WebView

The project reported an unexplained error. However, I met this error three months ago, and it was only today that I got away with it.

First of all, what happened to this error

The layout file writes a WebView control, loads it in the activity, and then crashes! Only some lower version mobile phones can work normally.

Looking puzzled, I know one thing, there is no problem without reason, and there is nothing that can not be solved. But in the face of this, I gave up, because sometimes the project time is very tight, even Baidu for a long time can not solve the problem, had to keep the problem. I rebuilt a project.

Solution summary:

1. If you encounter this WebView rendering exception on Android o, add it under the application of manifest:

<meta-data android:name="android.webkit.WebView.EnableSafeBrowsing"
           android:value="true"/>

2. Error in loading WebView:

reason:

Non native app stores will prompt you to update “Android system WebView”. Update is good, that part of the mobile phone brush machine, Google’s own WebView package lost.

3. A foreign brother said (the problem has been solved)

I had same problem and i solved this problem by changing its theme in manifest.

Modify the theme of Applaction.

I changed any attribute in the theme, that is, a color attribute. After completing this topic and modifying, the project can run normally, and the crash problem disappears. My heart is still full of doubts.

On the error report after the command of ADB shell error:device not A solution of found

When debugging Android development and connecting mobile phones, it is clear that the development mode has been turned on and USB debugging is allowed. After connecting the mobile phone, the device still cannot be found, and an error is reported after inputting the ADB shell in the console error:device not found。 The methods on the Internet can be roughly divided into:
1. ADB kill server to kill the ADB process, and then use the ADB start server command to start it;
2. Detect port 5037( adb.exe Whether the default port is occupied or not adb.exe For processes that occupy port 5037, restart the ADB service:
2.1. ADB nodeamon server: check whether port 5037 is occupied;
2.1 2.2, netstat – ano | findstr “5037”: check which process occupies port 5037;
2.3, tasklist | findstr “21152”: check which program created this process (21152 is the PID of a process occupying port 5037);
2.4, taskkill/F/PID 21152: turn off the process;
2.5, ADB devices: display the current connected devices.
Another solution is provided here, by manually viewing the hardware ID and installing Google native Android debug driver;
1. Right click my computer – & gt; management – & gt; device management – & gt; Android phone. Here we can see the corresponding Android device driver.
2. Right click the attribute of the driver, select the hardware ID in the attribute (P) option under the details option, and record the information in the following value (V). For example, the value of a device is:

USB\VID_2A45&PID_0C02&REV_????&MI_01
USB\VID_2A45&PID_0C02&MI_01

Focus on 2a45 and 0c02.
3. Find the SDK directory of Android development and download (assuming you have downloaded it through the SDK manager) in the computer, and enter into the system of ⁃ extras ⁃ Google ⁃ USB_ In the driver folder, find Android_ winusb.inf This is a Google configuration file for Android. Found in file[ Google.NTx86 ](for 32-bit platform, 64 bit is the same as adding) in this line, you can see a lot of Android device driver information below, for example:

;Google Nexus One
%SingleAdbInterface%        = USB_Install, USB\VID_18D1&PID_0D02
%CompositeAdbInterface%     = USB_Install, USB\VID_18D1&PID_0D02&MI_01

Here, we only need to copy the driver information in the format of this file, and modify it with 2a45 and 0c02 obtained in 2, as follows:

;MEIZU metal
%SingleAdbInterface%        = USB_Install, USB\VID_2A45&PID_0C02
%CompositeAdbInterface%     = USB_Install, USB\VID_2A45&PID_0C02&MI_01

Save and close.
4. Uninstall the original driver and restart the computer. Make sure that the mobile phone has entered the developer mode and allows USB debugging. Select the connection mode to transfer files. Then right click computer – & gt; manage – & gt; device management – & gt; other devices again. You can see a question mark on the ADB interface option, indicating that the driver is not installed correctly. Select the ADB interface and right-click to select Update Driver Software – & gt; browse the computer to find the driver software. In browsing, select Android, the hardware device driver information file that we added before_ winusb.inf The folder of (d): – Android – SDK – Extras – Google – USB_ In this case, you only need to select a folder, not a file). Next, choose always install.
5. After successful installation, an Android phone option will appear in device management.

Android “handler” is abstract; can’t be identified solution

Today, when I use Android’s own refresh control, I need a handler for instance calls, but I report an error in my own instance calls
“handler” is abstract; can’t be identified
because there is an error in my import library. I use Android’s handler library instead of Java’s handle library
the solution is as follows
use “import” to import android.os.Handler ; ”Replace “import” java.util.logging .Handler;”

This can be solved, in addition to the reference to this blog

””Device not found” error causes and Solutions

This is a common error you may encounter when using SQLite in Android development.
See this in conjunction with my other article, “ADB is not an internal or external command, nor is it an executable application.”
Executing ADB shell under CMD. It is likely that your ADB version is low. (You can view your version of ADB with the adb version command.)
Here’s how to solve this problem.
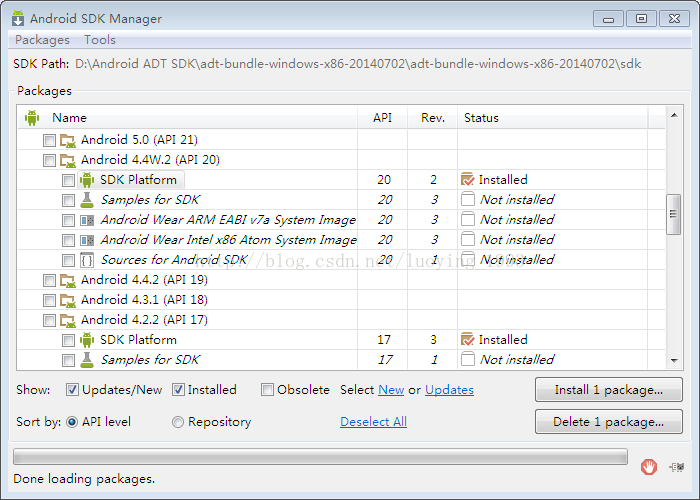
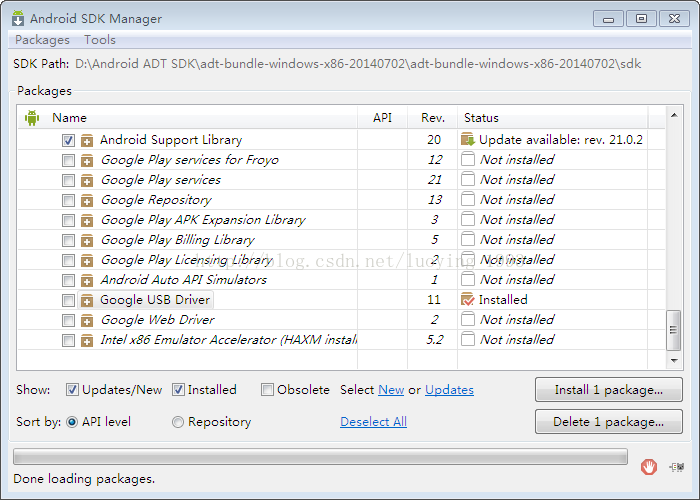
Open the Android SDK Manager in Eclipse, upgrade the SDK Platform, and download the Google USB Driver. As shown in the figure below:


At this point, the problem is solved by executing adb.exe again.

failed to find Build Tools revision 23.0.2  Install Build Tools 23.0.2 and sync project

Error:Cause: failed to find Build Tools revision 23.0.2
Install Build Tools 23.0.2 and sync project

error description: AndroidStudio opens the project to display this error;

error cause: buil-tools version 23.0.2

is configured in build.gradle of an open project module

 buildToolsVersion "23.0.2"

but build-tools 23.0.2

is not in the SDK

solution:

first: download build-tools version 23.0.2 through SDK manager;

second: configure the downloaded build tools version information in SDK manager;

reference: AndroidStuido view installed SDK API and Tools version

Perfect solution Error:Execution failed for task ‘: APP:transformClassesWithDexForDebug ‘… Problem

believe that everyone in the Android development can not avoid to be integrated in the process of the third party after a project, integration, sometimes it will encounter this ash often hate transformClassesWithDexForDebug, detailed Log is as follows:


Error:Execution failed for task ':APP:transformClassesWithDexForDebug'.
> com.android.build.api.transform.TransformException: com.android.ide.common.process.ProcessException: java.util.concurrent.ExecutionException: java.lang.UnsupportedOperationException

The main reason for this problem is that the introduction of Libary overlaps with some Libs in existing projects. Please check in detail and make sure that there is only one copy of lib in use, such as v4, v7, utdid.jar, etc.

if you use other android’s official support library see, http://developer.android.com/tools/support-library/features.html

if there is still a problem after the above situation check, you can try to use the following configuration to solve the problem

defaultConfig {
    ...
    minSdkVersion 14
    targetSdkVersion 21
    ...

    //Enabling multidex support.
    multiDexEnabled true
}
dependencies {
    compile ´com.android.support:multidex:1.0.1´
}


and then in the manifest we introduce this, if there is a custom AppApplication, let your own AppApplication inherit this class

<?xml version="1.0" encoding="utf-8"?>
<manifest xmlns:android="http://schemas.android.com/apk/res/android"
    package="com.example.android.multidex.myapplication">
    <application
        ...
        android:name="android.support.multidex.MultiDexApplication">
        ...
    </application>
</manifest>

may also be a JDK version 1.8 problem, which is not an accident, so suspect that Gradle has compatibility problems with JDK 1.8 and try to reduce the number of JDK dependencies to 1.7

compileOptions {
    sourceCompatibility JavaVersion.VERSION_1_7
    targetCompatibility JavaVersion.VERSION_1_7
}

can be run or there will be errors after the configuration is completed, so we can also add this sentence in app.bulid and re-run after that. The specific amount or 4g can be seen from the computer configuration modification (2g, 3g, 6g, 8g).

dexOptions {
    javaMaxHeapSize "4g"
}

the above is the Error: I met in the Execution failed for task ‘: APP: transformClassesWithDexForDebug’ all solutions, sharing out hope to help everyone.


Android installation failure: install_ FAILED_ NO_ MATCHING_ ABIS: Failed to extract native libraries, res=-113.

installation failed, message failed to complete session :INSTALL_FAILED_NO_MATCHING_ABIS: failed to extract native library, res=-113.

if an existing version of apk exists, it is possible to resolve this problem by uninstalling that version and then reinstalling it.

warning: uninstalling removes application data!

do you want to uninstall an existing application?

my reason is:

USES a hundred degree map:

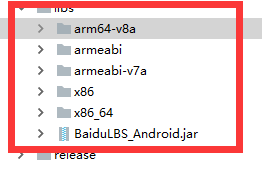
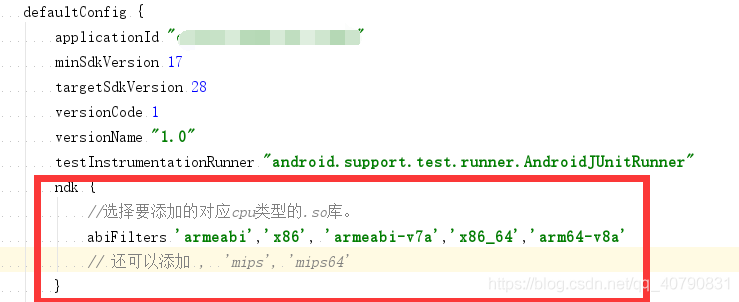
forgot to add the corresponding CPU type library

solution: add the corresponding type library in build.gradle (app) and synchronize to

When

is added, you are ready to install and run. If you do not use a third-party shelf package, just add the following compilation configuration

under defaultConfig in build.gradle (app)

splits {
    abi {
        enable true
        reset()
        //缺少什么CPU类型就添加对应的类型即可
        include 'armeabi','x86', 'armeabi-v7a','x86_64','arm64-v8a', 'mips', 'mips64'
        universalApk true
    }
}


Failed to find Build Tools revision 27.0.3

because of the problem of the computer system, the entire 8G memory of the computer running Android Studio was consumed, so I just reinstalled the computer and re-installed Android Studio.

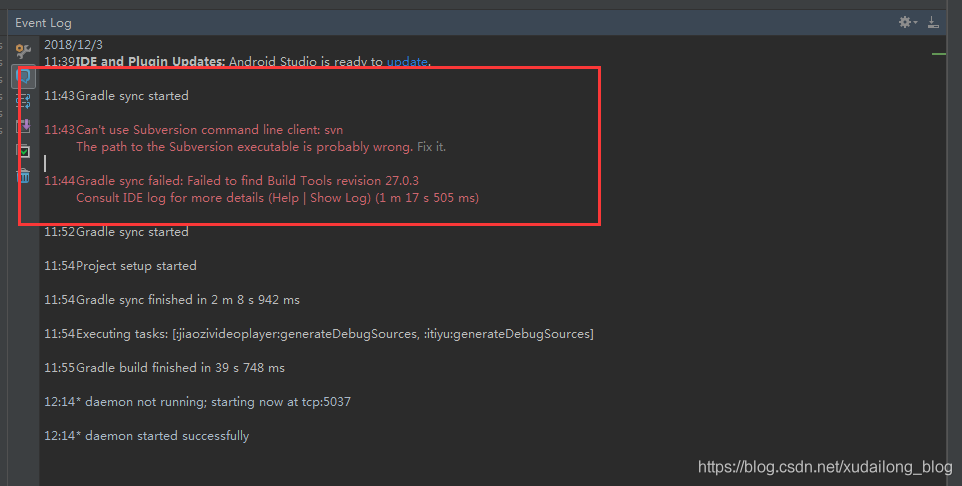
error message
11:44	Gradle sync failed: Failed to find Build Tools revision 27.0.3
		Consult IDE log for more details (Help | Show Log) (1 m 17 s 505 ms)

when Android studio was installed and the project was imported, Failed to find Build Tools revision 27.0.3 which caused the compilation to fail. The main problem is that the APT tool compiled by Android Studio is inconsistent with the tool imported by the target project. My download is a compilation tool of 28.0.3, while the target Android project USES a compilation tool of 27.0.3, so we need to download such a compilation tool.

download address:

http://mirrors.neusoft.edu.cn/android/repository/

select version (since I have a Windows PC) :

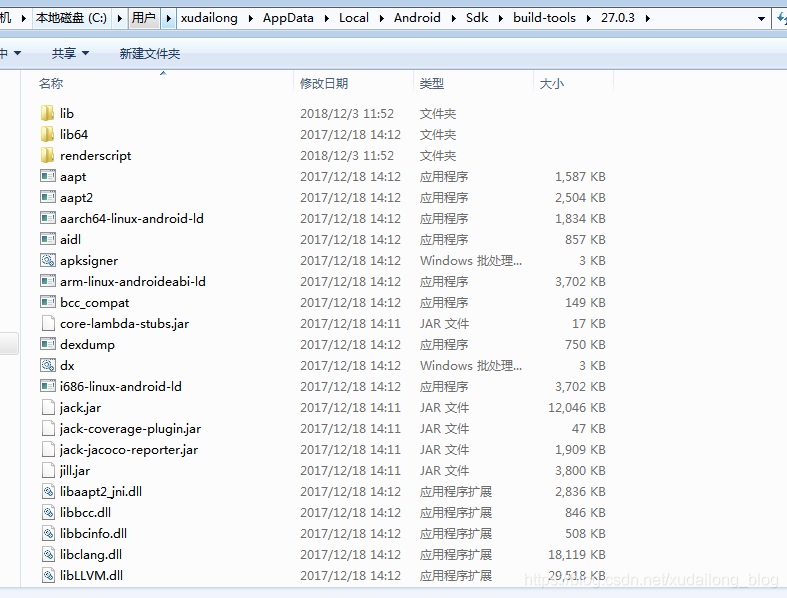
unzip and place in the corresponding folder:


28.0.3 folder here can be deleted without

copied content

now after we rebuild, we find that the small compiled triangle lines in the project can be used