Read and write BMP image with Pure C language

Read and write BMP image with pure C language

For the students who have just come into contact with digital images, there should be a question about how to read a BMP image in pure C language. I believe this is also the first step of digital image processing. If I am lucky to see this document, I will be the first light on your digital image processing road!

Understanding the composition of BMP


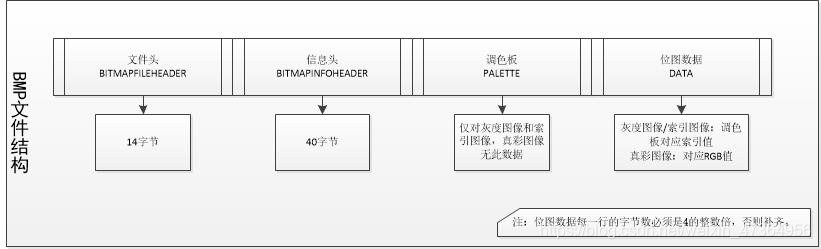
Don’t talk too much nonsense, just load the dry goods.

code

Define the header file as “BMP. H”, and define read_ BMP function is read function, write function_ BMP function is write function
read BMP diagram

#include <stdlib.h>
#include <math.h>
#include <Windows.h>
#include "bmp.h"
/* store the pixel width height and bitmap depth of the original image */
FILE* fpbmp;
FILE* fpout;
unsigned char* fpBmpHeader; //bitmap header
unsigned char* fpFileHeader; //bitmap information
RGBQUAD* pColorTable; //BMP palette
int read_bmp(const char* path, unsigned char *pBmpBuf,int *Width,int *Height,int * bitCount)
{
	fpbmp = fopen(path, "rb");//path is the image path
	unsigned short s;
	fread(&s, 1, 2, fpbmp);
	//judge whether the read image is a BMP image string"BM"=19778
	if (s == 19778)
	{
		printf("Open bmp success!!!\n");
	}
	else
	{
		printf("Open bmp fail!!!\n");
		return -1;
	}
	fseek(fpbmp, 0, SEEK_SET);
	BITMAPFILEHEADER fileHead;
	fread(&fileHead, sizeof(BITMAPFILEHEADER), 1, fpbmp);

	BITMAPINFOHEADER infoHead;
	fread(&infoHead, sizeof(BITMAPINFOHEADER), 1, fpbmp);

	*Width = infoHead.biWidth;
	*Height = infoHead.biHeight;
	*bitCount = infoHead.biBitCount;
	int lineByte = (*Width * *bitCount/8 + 3)/4 * 4;
	fseek(fpbmp, sizeof(BITMAPFILEHEADER) + sizeof(BITMAPINFOHEADER) + sizeof(RGBQUAD),SEEK_SET);
	fread(pBmpBuf, lineByte * *Height, 1, fpbmp);//pBmpBuf is the RGB data of the image, which is also the data we will process
	return 0;
}

Write BMP map

int write_bmp(unsigned char* img, int* Width, int* Height, int* bitCount)
{
	fpout = fopen("out.bmp", "wb+");
	if (fpbmp == NULL)
	{
		printf("read bmp failed!!!\n");
		return -1;
	}
	int lineByte = (*Width * *bitCount/8 + 3)/4 * 4;
	if (lineByte == 0)
	{
		printf("err");
		return -1;
	}
	fpFileHeader = new unsigned char[(sizeof(BITMAPFILEHEADER))];
	fseek(fpbmp, 0, SEEK_SET);  //Position the original image Offset position
	fseek(fpout, 0, SEEK_SET); //position the new map Offset position
	fread(fpFileHeader, 1, sizeof(BITMAPFILEHEADER), fpbmp);
	fwrite(fpFileHeader, 1, sizeof(BITMAPFILEHEADER), fpout);


	fpBmpHeader = new unsigned char[(sizeof(BITMAPINFOHEADER))];
	fseek(fpbmp, sizeof(BITMAPFILEHEADER), SEEK_SET);
	fseek(fpout, sizeof(BITMAPFILEHEADER), SEEK_SET);
	fread(fpBmpHeader, 1, sizeof(BITMAPINFOHEADER), fpbmp);
	fwrite(fpBmpHeader, 1, sizeof(BITMAPINFOHEADER), fpout);

	pColorTable = new RGBQUAD[256];
	fseek(fpbmp, sizeof(BITMAPFILEHEADER) + sizeof(BITMAPINFOHEADER), SEEK_SET);
	fseek(fpout, sizeof(BITMAPFILEHEADER) + sizeof(BITMAPINFOHEADER), SEEK_SET);
	fread(pColorTable, sizeof(RGBQUAD), 256, fpbmp);
	fwrite(pColorTable, sizeof(RGBQUAD), 256, fpout);

	fseek(fpout, sizeof(BITMAPFILEHEADER) + sizeof(BITMAPINFOHEADER) + sizeof(RGBQUAD), SEEK_SET);
	fwrite(img, lineByte * *Height, sizeof(char), fpout);
	fclose(fpout);
	fclose(fpbmp);
	return 0;
}

Main function call

#include <stdio.h>
#include <stdlib.h>
#include <math.h>
#include <Windows.h>
#include "bmp.h"

int main()
{
	int width, height, bitCount = 0;
	unsigned char* pBmpBuf = (unsigned char*)malloc(1000 * 1000 * 3);
	const char* path = "D:\\test\\read_bmp_image\\1-B.bmp";
	read_bmp(path, pBmpBuf, &width, &height, &bitCount);
	write_bmp(pBmpBuf, &width, &height, &bitCount);
}

Summarize, read_ The pbmpbuf parameter returned by BMP function is assigned to write_ The IMG parameter of BMP function realizes the whole process of BMP graph from reading to writing. If you are interested in it, you will get unexpected results.
Note: the website of online conversion BMP map can convert any format photos to BMP format. It’s easy to use. Link to BMP image conversion website

Using mybatis statement.getGenreatedKeys(); usegeneratedkeys = “true”; using self incrementing primary key to get primary key value policy and Oracle do not support self incrementing, Oracle uses sequence

Parametertype: parameter type, which can be omitted
MySQL supports auto-incrementing primary key, which is also used by mybatis statement.getGenreatedKeys ();
usegeneratedkeys = “true”; use self incrementing primary key to get the primary key value strategy
keyproperty; specify the corresponding primary key property, that is, after mybatis gets the primary key value, which property of JavaBean encapsulates the value

Oracle does not support self incrementing; Oracle uses sequence to simulate self incrementing;
the primary key of data inserted each time is the value obtained from the sequence; how to get this value

<insert id="addEmp" databaseId="oracle">
        <!-- 
        keyProperty:Which property of the javaBean the primary key value is encapsulated to find out
        order="BEFORE":the current sql is run before inserting sql
               AFTER: the current sql is run after the insert sql
        resultType:the return value type of the checked out data

        BEFORE running order.
            first run selectKey query id sql; find out the id value encapsulated to the id property of the javaBean
            In the run insert sql; you can take out the value corresponding to the id property
        AFTER running order.
            Run the insert sql first (take the new value from the sequence as id)
            then run the selectKey query sql for id.
         -->
        <selectKey keyProperty="id" order="BEFORE" resultType="Integer">
            <!-- Write sql statement to query primary key -->
            <!-- BEFORE-->
            select EMPLOYEES_SEQ.nextval from dual 
            <!-- AFTER:
             select EMPLOYEES_SEQ.currval from dual -->
        </selectKey>

        <!-- The primary key at the time of insertion is obtained from the sequence -->
        <!-- BEFORE:-->
        insert into employees(EMPLOYEE_ID,LAST_NAME,EMAIL) 
        values(#{id},#{lastName},#{email<!-- ,jdbcType=NULL -->}) 
        <!-- AFTER:
        insert into employees(EMPLOYEE_ID,LAST_NAME,EMAIL) 
        values(employees_seq.nextval,#{lastName},#{email}) -->
    </insert>

Mxnet.gluon Load Pre Training

import mxnet as mx
from mxnet.gluon import nn
from mxnet import gluon,nd,autograd,init
from mxnet.gluon.data.vision import datasets,transforms
from IPython import display
import matplotlib.pyplot as plt
import time
import numpy as np

# download fashionMNIST data
fashion_train_data = datasets.FashionMNIST(train=True)
#get the infos of the img and the corrrsponding lable
images,labels = fashion_train_data[:]

#transforms swithc datas
transformer = transforms.Compose([
    transforms.ToTensor(),
    transforms.Normalize(0.13,0.31)])
#switch datas
fashion_data = fashion_train_data.transform_first(transformer)

#Set the size of the batch
batch_size = 256
# On windows system, please set num_workers to 0, otherwise it will cause thread error
train_data = gluon.data.DataLoader(fashion_data,batch_size=batch_size,shuffle=True,num_workers=0)

#Loading validation data
fashion_val_data = gluon.data.vision.FashionMNIST(train=False)
val_data = gluon.data.DataLoader(fashion_val_data.transform_first(transformer),
                                   batch_size=batch_size,num_workers=0)
#Define the GPU to be used, use GPU to accelerate training, if there are multiple GPUs, you can define more than one
gpu_devices = [mx.gpu(0)]
#define network structure
LeNet = nn.HybridSequential()
#Build a LeNet network structure
LeNet.add(
    nn.Conv2D(channels=6,kernel_size=5,activation="relu"),
    nn.MaxPool2D(pool_size=2,strides=2),
    nn.Conv2D(channels=16,kernel_size=3,activation="relu"),
    nn.MaxPool2D(pool_size=2,strides=2),
    nn.Flatten(),
    nn.Dense(120,activation="relu"),
    nn.Dense(84,activation="relu"),
    nn.Dense(10)
)
LeNet.hybridize()
#Initialize the weight parameters of the neural network, use GPU to accelerate the training
LeNet.collect_params().initialize(force_reinit=True,ctx=gpu_devices)
# Define softmax loss function
softmax_cross_entropy = gluon.loss.SoftmaxCrossEntropyLoss()
# set optimization algorithm, use stochastic gradient descent sgd algorithm, learning rate set to 0.1
trainer = gluon.trainer(LeNet.collect_params(), "sgd",{"learning_rate":0.1})
# Calculate the accuracy rate
def acc(output,label):
    return (output.argmax(axis=1) == label.astype("float32")).mean().asscalar()

#Set the number of iterations
epochs = 10
#training model
for epoch in range(epochs):
    train_loss,train_acc,val_acc = 0,0,0
    epoch_start_time = time.time()
    for data,label in train_data:
        #Use GPU to load data to accelerate training
        data_list = gluon.utils.split_and_load(data,gpu_devices)
        label_list = gluon.utils.split_and_load(label,gpu_devices)
        # forward propagation
        with autograd.record():
            #Get prediction results on multiple GPUs
            pred_Y = [LeNet(x) for x in data_list]
            #Calculate the loss of predicted values on multiple GPUs
            losses = [softmax_cross_entropy(pred_y,Y) for pred_y,Y in zip(pred_Y,label_list)]
        # backpropagation update parameters
        for l in losses:
            l.backward()
        trainer.step(batch_size)
        #Calculate the total loss on the training set
        train_loss += sum([l.sum().asscalar() for l in losses])
        # Calculate the accuracy on the training set
        train_acc += sum([acc(output_y,y) for output_y,y in zip(pred_Y,label_list)])

    for data,label in val_data:
        data_list = gluon.utils.split_and_load(data,ctx_list=gpu_devices)
        label_list = gluon.utils.split_and_load(label,ctx_list=gpu_devices)
        #Calculate the accuracy on the validation set
        val_acc += sum(acc(LeNet(val_X),val_Y) for val_X,val_Y in zip(data_list,label_list))

    print("epoch %d,loss:%.3f,train acc:%.3f,test acc:%.3f,in %.1f sec"%
          (epoch+1,train_loss/len(labels),train_acc/len(train_data),val_acc/len(val_data),time.time()-epoch_start_time))
#save
LeNet.export("lenet",epoch=1)

#loading the moudle files
LeNet = gluon.nn.SymbolBlock.imports("lenet-symbol.json",["data"],"lenet-0001.params")

Spark-SQL Error: A JNI error has occurred, please check your installation and try again Exceptio

Error: a JNI error has occurred, please check your installation and try again
exception in thread “main” java.lang.NoClassDefFoundError : org/slf4j/Logger

Solution:
the command line can temporarily import the following variable, or configure it to the environment variable.

	#Add the Hadoop classpath to SPARK_DIST_CLASSPAHT
export SPARK_DIST_CLASSPATH=$(hadoop classpath)

Template Render Error Solution (Hexo blog theme, GIT upload)

Error information

INFO  Start processing
FATAL Something's wrong. Maybe you can find the solution here: http://hexo.io/do                                                                                                                                                                                               cs/troubleshooting.html
Template render error: (unknown path) [Line 310, Column 115]
  expected variable end

According to the prompt, you can enter the reference website

http://hexo.io/docs/troubleshooting.html

The source of the questions provided in the website is
1. The topic configuration file 2 config.yml There is a problem in ;, most likely because the configuration file is not separated by spaces.
First, go to the topic directory and open config.yml files…. My topic is yilia

..\themes\yilia\config.yml

Then, is there any of the following

Error.
  Home:/
  All articles:/archives
Correct.
  Home: /
  All articles: /archives

Correct format: The configuration item is followed by the parameter with a space

2. My problem is in the second item, that is, there are some characters that can’t be used in the articles I wrote, which leads to errors in the conversion of. MD format articles

..\source\_posts articles in the folds

Solution: carefully check .. \ source\_ Are there "{}" and other symbols in the posts directory, or are the codes not put into the code box

.The md file format is markdown, and you can use three stops to indicate the code box
```Write the code in the middle``

The convenient way is that the full text is annotated with pause sign, so there is no need to check

Python2.7 + uwsgi error internal server error

First of all, I had no problem running the project before. Then I updated the code and restart uwsgi as usual today. As a result, the access interface reported an error internal server error and checked it uwsgi.xml and uwsgi.log 、 error.log They didn’t find any problems, and then they went to stop uwsgi and started uwsgi again, and the problems appeared in the uwsgi.log Inside. It is due to compilation errors at the code level. If I don’t stop uwsgi and restart uwsgi, I will never get the error log. Therefore, I think there is a bug in the logging mechanism of uwsgi

Find the corresponding code error to solve, return to normal!

Python error: syntax error: encoding problem: utf8

Python error: syntax error: encoding problem: utf8

Such as the title.
The first line reported an error, but I have checked the file code, it is indeed utf8.
At this point, use Notepad + + to open the file, and you can see the newline style of the file at the bottom right. (CR LF is windows style, LF is UNIX style)

so I found that the original. Py file is UNIX newline style, because I pulled it from GitHub, and the original author’s environment is probably UNIX.
So the. Py file can be converted to a Windows style line feed.

finish

About iView reporting error in Vue project: error in mounted hook: “typeerror: this$ parent.updateNav is not a function”

At present, it is not found that the error report has any impact on the function of the project, but the error report is always unpleasant, so it is necessary to solve the problem and record it.

The main reason is the nonstandard use of tabs components in the project, such as & lt; tabpane & gt; & lt; & tabpane & gt; without & lt; tabs & gt; & lt; & tabs & gt; package in the outer layer of the label.

Solution to syntaxerror: invalid syntax in PIP install XXX

Solution to syntaxerror: invalid syntax in PIP install XXX

Statement: 1. PIP install requests are taken as an example; 2. Windows system;
first of all, check whether you have run PIP in the python environment. If so, please open the start menu, enter CMD, find the command prompt and open it.
Enter PIP install requests in CMD, If “not an internal or external command, nor a runnable program or batch file” appears, the specific solutions are as follows:
1. Find the folder where Python is located, find the scripts file, and use Ctrl + C to copy the file path. Take an individual as an example: C: 2 2. Return to the desktop, right-click “my computer” and click “properties”
3. In the pop-up page, select “advanced system settings – variable environment – path – Edit – add the file path copied in step 1 and click OK
4. Restart the computer

After restarting the computer, open CMD again, and then enter the command PIP install requests. If
appears, the installation is successful and the problem is solved.