When releasing the version, windeployqt is used to generate the corresponding library, but it is inadvertently directly in C: \ QT \ qt5.13.2 \ 5.13.2 \ msvc2017_ Generated in 64 \ bin, overwriting qt5core.dll, resulting in debugging failure
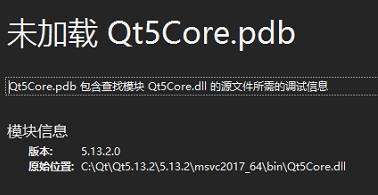
it can be solved by replacing the original qt5core.dll.
The ADB server port is changed to 10001, and appium cannot connect to the device
After modifying the ADB server port to 10001, enter ADB devices – L in CMD to successfully detect the device:

Open appium and run the script. The appium running log shows that the device cannot be connected and has been killing the port number 5037 ADB server. The error information is as follows:
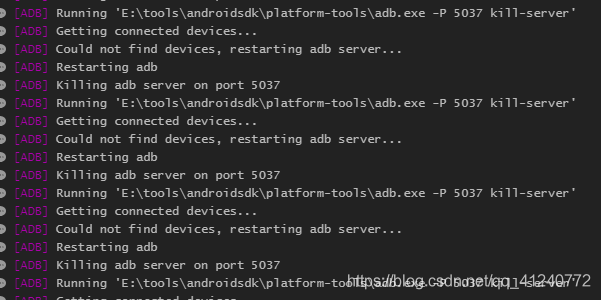
I changed the port number of the ADB server to 10001. Why do I still kill 5037?
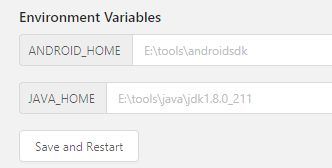
Seeing this error, when I first thought about it, the environment variable of the modified port was not configured to appium. Click the edit configurations button of appium, and I found that there were no new buttons, but only the default environment variable:
I searched a lot of information on the Internet and found no solution. Finally, I found a solution in an appium Chinese user guide, Put the guide link here: appium Chinese User Guide – Jianshu (Jianshu. Com)
Modify the running script and add ‘adbport’: ‘10001’ to desired_ In caps Dictionary:
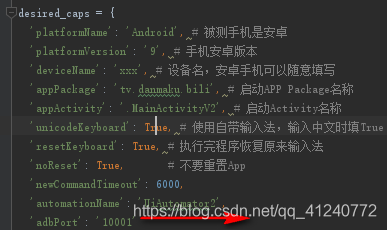
Restart appium, run the script again, connect the device successfully, and solve the problem!
PS: when using appium, you can familiarize yourself with the above instructions and have a general understanding of appium; Then, when running, you should pay attention to the running log. Many problems can be located step by step through the error reporting of the log
Doris decommission be node stuck [How to Solve]
Question
In Doris 0.13.15 precompiled version
Doris decommission three be nodes stuck
alter system decommission backend "be_host-1:9050"
alter system decommission backend "be_host-2:9050"
alter system decommission backend "be_host-3:9050"
Stuck
analysis
To view the source code, you need to adjust the catalog_ trash_ expire_ Second parameter
for other parameters, you can view the Chinese description of Doris Fe configuration
the significance of this parameter is that it provides a protection mechanism. After deleting the database (Table/partition), you can use this catalog_ trash_ expire_ Use time recover stmt to recover it within the second
this parameter specifies the maximum data retention time. After a period of time, the data will be permanently deleted
this is for protection. I'm afraid someone deleted the data and regretted that it was too late to recover the data
because someone deleted the table, some table partitions were deleted, but the be commitment stuck in the recycle area
Source code analysis


Isexpire () in the erasepartition() method uses this parameter to determine whether a partition can be deleted, of course, it must be greater than a minimum deletion delay time mineraselatency (10min)
solve
Set the parameter
catalog_ trash_ expire_ Second (the default value is 86400, 1 day)
set a small point. After the partition data to be recycled expires, the decommission can be completed
Follow up questions
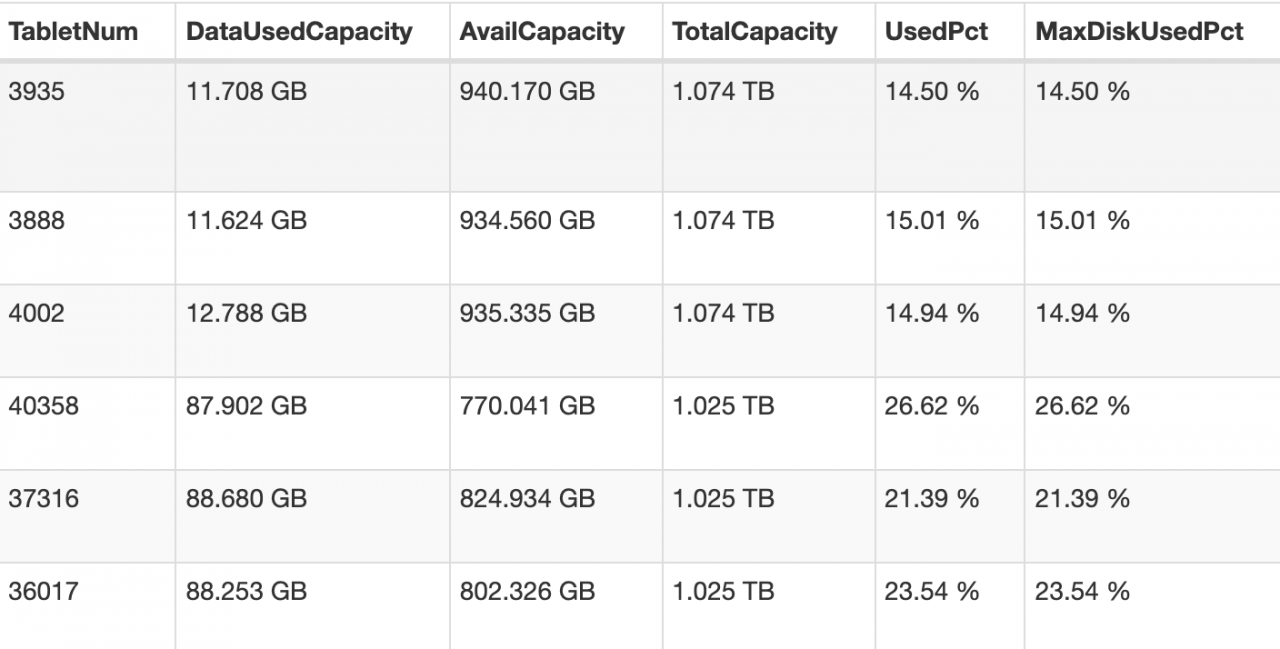
After the parameter is adjusted small, 2 of the three offline nodes have been successfully offline, but another be node is stuck in the state of 2 remaining tablets
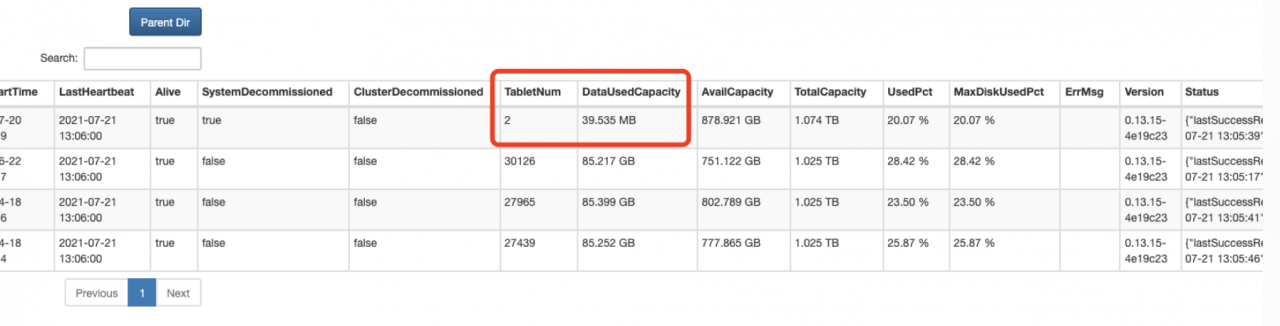
terms of settlement
CANCEL DECOMMISSION BACKEND "be_host-1:9050";
Wait for show proc ‘/ statistical’; After the unhealthy tablet in is reduced to 0, you can go offline again. Of course, you can also try to execute the offline command without waiting for the unhealthy tablet to be reduced to 0
alter system decommission backend "be_host-1:9050"
Solve the problem that WSL occupies too much C disk
It can be installed to other disks
Download Ubuntu installation package
Manually download Windows Subsystem for Linux (WSL) Distros | Microsoft Docs
Change the suffix (zip) and unzip it to another disk.
Open Ubuntu *. Exe and install it
Something went wrong
one
Error 0x800701bc WSL 2 ??????????????????two
Error 0x80370102
The first problem is that the windows service required by WSL is not enabled
Solution
Start the corresponding service in settings
The following services need to be enabled: 1. Hyper-V 2. Virtual machine platform 3. Windows subsystem for Linux
PS: windows11 setting steps, Application – & gt; Optional function (pull to the bottom) – & gt; More windows services
The second problem is that the required files are not installed when wsl1 is upgraded to wsl2
Solution
Download the installation package and install it.
https://wslstorestorage.blob.core.windows.net/wslblob/wsl_ update_ x64.msi
When installing in other paths, the boot subsystem is the root user. If you don’t want to start WSL, the default is the root user. You can follow the steps below.
1. Add a new user,
sudo add username2. Grant permission (nothing can be done without permission)
sudo usermod -a -G adm username

sudo usermod -a -G sudo username
3. Default user configuration for Ubuntu
.\ubuntu2004.exe config --default-user usernameIf the author enters PowerShell under the installation directory, the absolute path can be used for configuration without entering the installation directory.
ModuleNotFoundError: No module named ‘sklearn.datasets.samples_generator‘
No module named ‘sklearn.datasets.samples_ generator’
Causes and solutions of error reporting
Problem reporting error
from sklearn.datasets.samples_generator import make_blobs
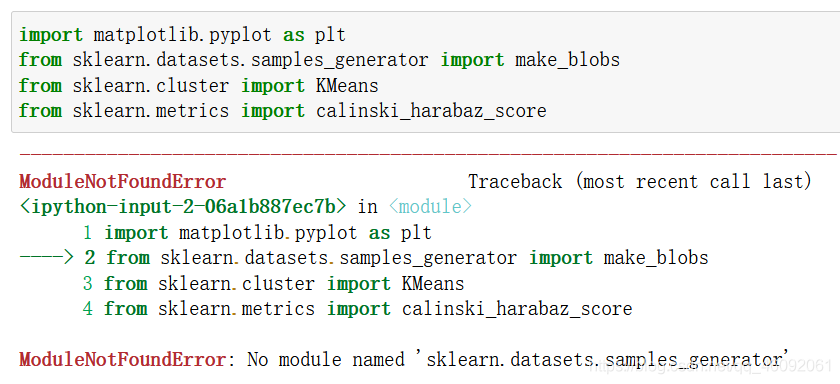
reason
samples_ The generator module has been removed in the new version of scikit learn .
samples_ The corresponding classes/functions in the generator module can be imported directly from sklearn. Datasets .
resolvent
Method 1:
Import make directly from sklearn. Datasets _ blobs
from sklearn.datasets import make_blobs
Method 2:
Version problem, reduce version
pip install scikit-learn==0.22.1
Reference: link
come on
thank you
work hard
ImportError: cannot import name ‘calinski_harabaz_score‘ from ‘sklearn.metrics‘
ImportError
Problem solving
problem
from sklearn.metrics import calinski_harabaz_score
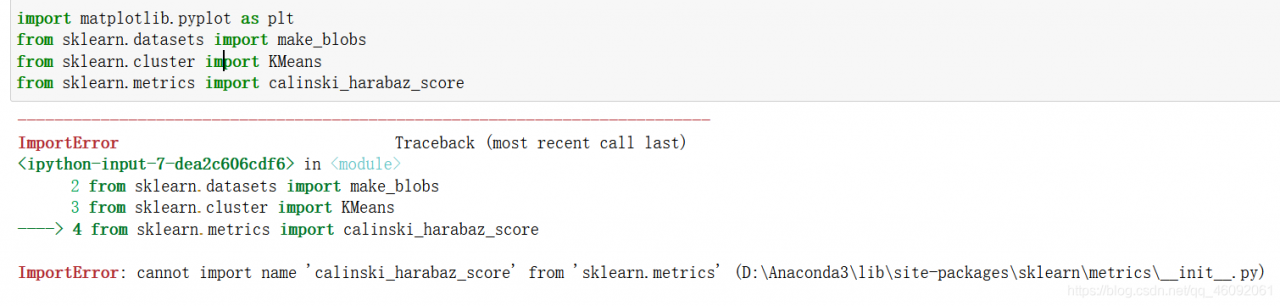
solve
Upgrade scikit learn , this function was recently added.
or
from sklearn.metrics import calinski_harabasz_score
It’s done!
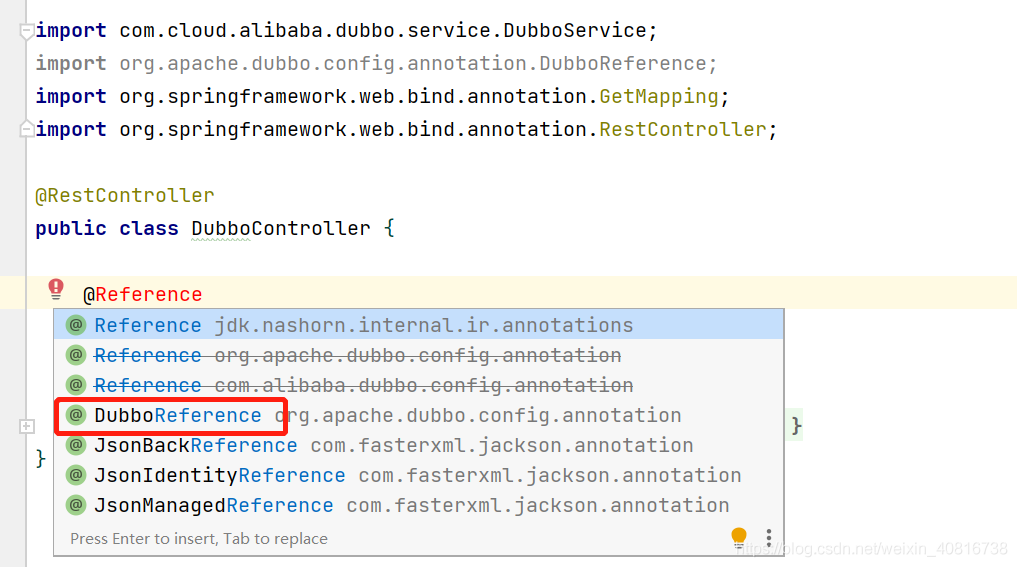
Try not to use @reference after using Dubbo, which may cause conflicts
Try not to use @ reference after using Dubbo, which may cause conflicts
the latest version of Dubbo is 2.7.8, and @ reference has been replaced with @ Dubbo reference
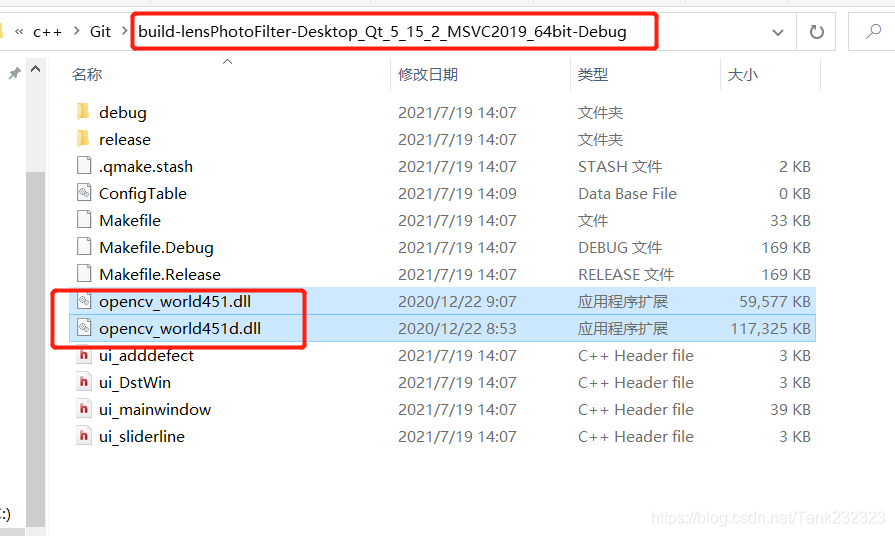
The. Exe crashed program ends abnormally when the QT project is copied to the new environment
Tip: if the project has been successfully compiled and run on a computer, the code of the project itself is OK
Based on such preconditions, the problem should be directly located in the direction of environment configuration.
The third-party library I use this time is opencv:
1. Include the opencv path in the project pro file and add the corresponding library file
INCLUDEPATH += D:/openCV/opencv/build/include

LIBS += D:/openCV/opencv/build/x64/vc15/lib/opencv_world451.lib
LIBS += D:/openCV/opencv/build/x64/vc15/lib/opencv_world451d.lib
2. Find the corresponding. DLL file from the opencv installation path and copy it to the running program path generated by the project
The too many open files solution appears in stream classes such as files.list
Problem scenario
In the background code of the blog, the design without database is adopted, and all information is based on the file system. When it comes to traversing some file information, the java.nio.file.files class and files.list are used for traversal. However, for stream methods such as files.list, if the resource is not closed, an error of too many open files will appear over time.
Solution
Use try with resource to automatically free resources.
Not improved:
...
Files.list(path).forEach(...)
...
Improved writing:
try (Stream<Path> fileList = Files.list(path)) {
    fileList.forEach(...)
} catch (Exception a) {
    ......
}
In this way, the open files will be automatically closed when using files.list to prevent errors. Similarly, it can also be used on other classes that inherit autoclosable, and subsequent problems will be sorted out.
Conclusion
The efficiency and rationality of the code still need to be considered, otherwise the preliminary test can’t see the problem, and it’s too late to regret for a long time.
The spring boot project directly replaces the referenced jar package
Shiro was used in an old spring boot project. Recently, Shiro broke a security vulnerability. So we need to upgrade the Shiro version in the project. However, this project was developed by former employees a long time ago, and the source code can no longer be found. So try to upgrade Shiro by replacing jar directly.
Wrong attempt
Usually, HTML can be replaced directly. JS can directly open WinRAR and replace the file directly. I thought jar packages can also be replaced directly. If you find that the jar is directly replaced, an error will be reported.
The error information is as follows:
java -jar spring-zs-1.0-update.jar                                                          [18:02:05]
Exception in thread "main" java.lang.IllegalStateException: Unable to open nested entry 'BOOT-INF/lib/shiro-web-1.5.3.jar'. It has been compressed and nested jar files must be stored without compression. Please check the mechanism used to create your executable jar file
	at org.springframework.boot.loader.jar.JarFile.createJarFileFromFileEntry(JarFile.java:285)
	at org.springframework.boot.loader.jar.JarFile.createJarFileFromEntry(JarFile.java:260)
	at org.springframework.boot.loader.jar.JarFile.getNestedJarFile(JarFile.java:248)
	at org.springframework.boot.loader.jar.JarFile.getNestedJarFile(JarFile.java:237)
	at org.springframework.boot.loader.archive.JarFileArchive.getNestedArchive(JarFileArchive.java:103)
	at org.springframework.boot.loader.archive.JarFileArchive.getNestedArchives(JarFileArchive.java:87)
	at org.springframework.boot.loader.ExecutableArchiveLauncher.getClassPathArchives(ExecutableArchiveLauncher.java:72)
	at org.springframework.boot.loader.Launcher.launch(Launcher.java:49)
	at org.springframework.boot.loader.JarLauncher.main(JarLauncher.java:51)
Correct steps
Unpack through jar command
My project jar name is spring-zs-1.0. Jar
jar -xvf spring-zs-1.0.jar
After decompression, replace the jar package in./boot-inf/lib directory. I replaced Shiro — 1.2.2.jar with Shiro — 1.5.3.jar
Repackage
jar -cfM0 new.jar ./
This will generate a new jar package!
If you also use MacOS system, you should pay attention to one thing. The MacOS system will automatically generate
. DS in some directories_ Store files, so you should delete these hidden. DS files before repackaging_ Store, otherwise an error will be reported.
reference resources
https://blog.csdn.net/weixin_ 45417347/article/details/101539040
[XMR] Could NOT find HWLOC (missing: HWLOC_LIBRARY HWLOC_INCLUDE_DIR)
【XMR】Could NOT find HWLOC (missing: HWLOC_ LIBRARY HWLOC_ INCLUDE_ DIR
Analysis and solution of error reporting details
Error reporting details
After installing centos8.4 minimal , compile xmrig mining program without pumping, and execute:
cmake .. -DCMAKE_BUILD_TYPE=Release -DUV_LIBRARY=/usr/lib64/libuv.a
Error after compilation:
-- The C compiler identification is GNU 8.4.1
-- The CXX compiler identification is GNU 8.4.1
-- Detecting C compiler ABI info
-- Detecting C compiler ABI info - done
-- Check for working C compiler: /usr/bin/cc - skipped
-- Detecting C compile features
-- Detecting C compile features - done
-- Detecting CXX compiler ABI info
-- Detecting CXX compiler ABI info - done
-- Check for working CXX compiler: /usr/bin/c++ - skipped
-- Detecting CXX compile features
-- Detecting CXX compile features - done
-- Looking for syslog.h
-- Looking for syslog.h - found
CMake Error at /usr/share/cmake/Modules/FindPackageHandleStandardArgs.cmake:165 (message):
  Could NOT find HWLOC (missing: HWLOC_LIBRARY HWLOC_INCLUDE_DIR)
Call Stack (most recent call first):
  /usr/share/cmake/Modules/FindPackageHandleStandardArgs.cmake:458 (_FPHSA_FAILURE_MESSAGE)
  cmake/FindHWLOC.cmake:25 (find_package_handle_standard_args)
  src/backend/cpu/cpu.cmake:30 (find_package)
  src/backend/backend.cmake:1 (include)
  CMakeLists.txt:37 (include)

-- Configuring incomplete, errors occurred!
See also "/root/xmrig/build/CMakeFiles/CMakeOutput.log".
Problem analysis
The error message is very clear. The hwloc module cannot be found.
terms of settlement
The solution is simple: install the hwloc module. Unfortunately, centos8.4 minimal can’t be installed directly through Yum at present. You can only download the source code and compile it yourself.
First, we download the hwloc module code:
git clone https://github.com/open-mpi/hwloc.git
Then enter the hwloc source code directory and execute the compilation and installation statement:
./autogen.sh
./configure
make
make install
Then execute the cmake statement
cmake .. -DCMAKE_BUILD_TYPE=Release -DUV_LIBRARY=/usr/lib64/libuv.a
Able to execute successfully:
-- The C compiler identification is GNU 8.4.1
-- The CXX compiler identification is GNU 8.4.1
-- Detecting C compiler ABI info
-- Detecting C compiler ABI info - done
-- Check for working C compiler: /usr/bin/cc - skipped
-- Detecting C compile features
-- Detecting C compile features - done
-- Detecting CXX compiler ABI info
-- Detecting CXX compiler ABI info - done
-- Check for working CXX compiler: /usr/bin/c++ - skipped
-- Detecting CXX compile features
-- Detecting CXX compile features - done
-- Looking for syslog.h
-- Looking for syslog.h - found
-- Found HWLOC: /usr/local/lib/libhwloc.so
-- Found UV: /usr/lib64/libuv.a
-- Looking for __builtin___clear_cache
-- Looking for __builtin___clear_cache - found
-- WITH_MSR=ON
-- argon2: detecting feature 'sse2'...
-- Performing Test FEATURE_sse2_NOFLAG
-- Performing Test FEATURE_sse2_NOFLAG - Success
-- argon2: feature 'sse2' detected!
-- argon2: detecting feature 'ssse3'...
-- Performing Test FEATURE_ssse3_NOFLAG
-- Performing Test FEATURE_ssse3_NOFLAG - Failed
-- Performing Test FEATURE_ssse3_FLAG
-- Performing Test FEATURE_ssse3_FLAG - Success
-- argon2: feature 'ssse3' detected!
-- argon2: detecting feature 'xop'...
-- Performing Test FEATURE_xop_NOFLAG
-- Performing Test FEATURE_xop_NOFLAG - Failed
-- Performing Test FEATURE_xop_FLAG
-- Performing Test FEATURE_xop_FLAG - Success
-- argon2: feature 'xop' detected!
-- argon2: detecting feature 'avx2'...
-- Performing Test FEATURE_avx2_NOFLAG
-- Performing Test FEATURE_avx2_NOFLAG - Failed
-- Performing Test FEATURE_avx2_FLAG
-- Performing Test FEATURE_avx2_FLAG - Success
-- argon2: feature 'avx2' detected!
-- argon2: detecting feature 'avx512f'...
-- Performing Test FEATURE_avx512f_NOFLAG
-- Performing Test FEATURE_avx512f_NOFLAG - Failed
-- Performing Test FEATURE_avx512f_FLAG
-- Performing Test FEATURE_avx512f_FLAG - Success
-- argon2: feature 'avx512f' detected!
-- Found OpenSSL: /usr/lib64/libcrypto.so (found version "1.1.1g")
-- The ASM compiler identification is GNU
-- Found assembler: /usr/bin/cc
-- Configuring done
-- Generating done
-- Build files have been written to: /root/xmrig-base/build
Postscript
If you have any questions, please leave a message below.
Visual studio encountered an ambiguous printf
Article catalog
Code a pile of red, no error.
When this happens to visual studio,
Author’s solution:
1. Set using namespace STD
2. Save the cpp file after deletion,
3. Add using namespace STD
4. Save the cpp file.
Don’t ask me why, anyway, the red wavy line has disappeared!