[Solved] Custom components with click events do not work

Question
Why we add a click event to a div and it works, but when we add a click event to a custom component and click on the area where the bigProductCard is located, it does not trigger the click method?

The reason
It’s simple, the div adds a click event to the native html tag, the browser listens to the user’s mouse click, and then through vue’s processing, the start click callback function;

For custom components, we know from the vue source code that v-on actually ties a this.$on(‘click’, func) event to the child component instance, which is a fake listener that the browser won’t help us handle because it’s essentially just a this.$on(‘click’) event tied to the child component instance; when the child $emit(‘click’) will call the func in this.$on(‘click’,func) when the subcomponent departs from this.$emit(‘click’) at some point;

That’s all;


Solution:
Find a div in the subcomponent’s template, add a @click event, which the browser will help us listen to, and then listen to the callback function when this.$emit(click) is called, so that this.$on(‘click’,func) of the placeholder vnode can be called;

Electron: How to Use BrowserWindow to Create a Window

Create a window using the BrowserWindow module

// In the main process.
const BrowserWindow = require('electron').BrowserWindow;

// Or in the renderer process.
const BrowserWindow = require('electron').remote.BrowserWindow;

// Create window
function createWindow (){
    const win = new BrowserWindow({ 
        width: 800, 
        height: 600, 
        show: false, // Whether to show the window when it is created, default is true
        backgroundColor: '#363f48', // the background color of the window
    });

    win.loadURL('html/index.html')
}
createWindow()

Instance methods
win.destroy()
Forces the window to close, unload and beforeunload will not trigger and close will not trigger, but it guarantees that close will trigger.

win.close()
tries to close the window, which has the same effect as if the user had clicked the close button. Although the page may not close, see the close event.

win.focus()
The window gets focus.

win.isFocused()
Returns a boolean, whether the window has the focus.

win.show()
Show and give focus to the window.

win.showInactive()
Show the window but not give it focus.

win.hide()
Hide the window.

win.isVisible()
Returns boolean, whether the window is visible or not.

win.maximize()
Maximize the window.

win.unmaximize()
Unmaximize the window.

Python Selenium Common Keyboard Controls

Keyboard events
The previous send_keys() method is used to simulate keyboard input; the keys() class provides methods for almost all keys on the keyboard, and key combinations are also possible.

Commonly used keyboard operations are as follows.

send_keys(Keys.BACK_SPACE) Delete key (BackSpace)
send_keys(Keys.SPACE) Space key (Space)
send_keys(Keys.TAB) Tabulation key (Tab)
send_keys(Keys.ESCAPE) Return key (Esc)
send_keys(Keys.ENTER) Enter key (Enter)
send_keys(Keys.CONTROL,’a’) Select All (Ctrl+A)
send_keys(Keys.CONTTROL,’c’) Copy (Ctrl+C)
send_keys(Keys.CONTTROL,’x’) Cut (Ctrl+X)
send_keys(Keys.CONTTROL,’v’) Paste (Ctrl+V)
send_keys(Keys.F1) Keyboard F1
……
send_keys(Keys.F12) Keyboard F12

Keys.BACK_SPACE: Back Space key (BackSpace)
Keys.TAB: Tab key (Tab)
Keys.ENTER: Enter key (Enter)
SHIFT: Case conversion key (Shift)
Keys.CONTROL: Control key (Ctrl)
Keys.ALT: ALT key (Alt)
Keys.ESCAPE: Return key (Esc)
Keys.SPACE: Space bar (Space)
Keys.PAGE_UP: Page up key (Page Up)
PAGE_DOWN: page down key (Page Down)
Keys.END: End of line key (End)
Keys.
LEFT: left arrow key (Left)
Keys.UP: Arrow keys up (Up)
Keys.RIGHT: arrow key right (Right)
DOWN: Down arrow key (Down)
INSERT: Insert key (Insert)
DELETE: Delete key (Delete)
NUMPAD0 ~ NUMPAD9: numeric keys 1-9
F1 ~ F12: F1 – F12 keys
(Keys.CONTROL, ‘a’): key combination Control+a, select all
(Keys.CONTROL, ‘c’): key combination Control+c, copy
(Keys.CONTROL, ‘x’): key combination Control+x, cut
(Keys.CONTROL, ‘v’): key combination Control+v, Paste

How to Solve Vue Command Not Work Issue in win7_64

question

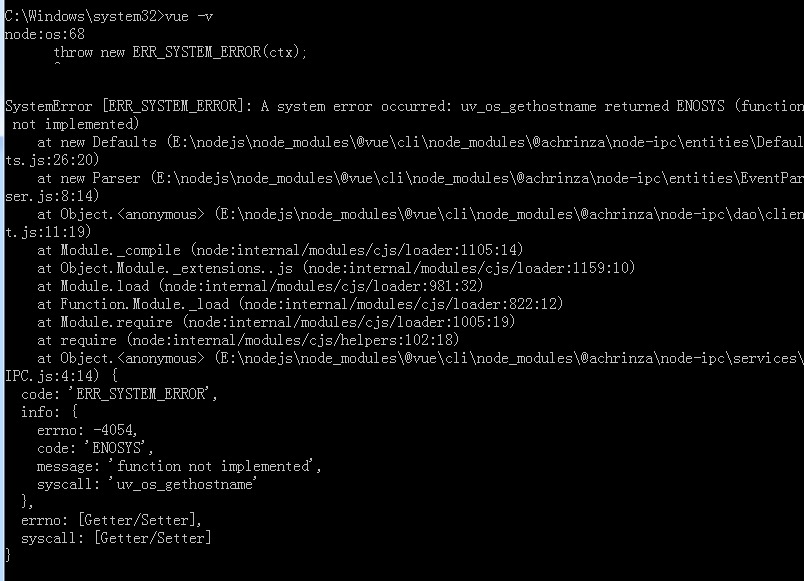
After win7_64 installs vue, the vue command execution returns:

errno: -4054,
code: ‘ENOSYS’,
message: ‘function not implemented’,
syscall: ‘uv_os_gethostname’


Solution :

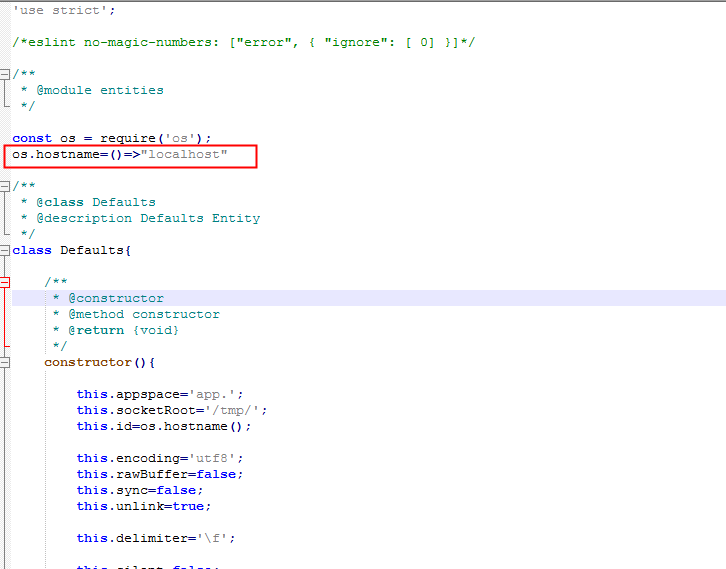
Find the error entry file: 

node_modules\@vue\cli\node_modules\@achrinza\node-ipc\entities\Defaults.js,

Add os.hostname=()=>”localhost”


> then the vue command is available


refer to:

https://dev.to/napster/fix-vercel-error-a-system-error-occurred-uvosgethostname-returned-enosys-function-not-implemented-5da6

Docker: How to build a rabbitmq image cluster

Ordinary cluster:
The queue Queue we created at this time, its metadata (mainly some configuration information of Queue) will be synchronized in all RabbitMQ instances, but the messages in the queue will only exist on one RabbitMQ instance, not will be synchronized to other queues.

When we consume a message, if it is connected to another instance, then that instance will locate the location of the Queue through metadata, then access the instance where the Queue is located, and pull the data and send it to the consumer.

This kind of cluster can improve the message throughput of RabbitMQ, but it cannot guarantee high availability, because once a RabbitMQ instance hangs, the message cannot be accessed. If the message queue is persistent, it can continue after the RabbitMQ instance is restored. Accessed; if the message queue is not persisted, the message is lost.

Mirrored cluster : It is based on the normal mode, and the required queue is made into a mirrored queue, which exists in multiple nodes to achieve high availability (HA). This mode solves the above problems. Broker will actively synchronize message entities between mirror nodes, and there is no need to temporarily pull data when the consumer fetches data. The side effects of this mode are also obvious. In addition to reducing system performance, if there are too many mirrored queues and a large number of messages entering, the network bandwidth inside the cluster will be greatly consumed. Generally, mirror mode is recommended for scenarios with high reliability requirements.

Node type :

  • RAM node: The memory node stores all the metadata definitions of queues, switches, bindings, users, permissions and vhosts in memory. The benefit is that operations such as switch and queue declarations can be made faster.
  • Disk node: Store metadata on disk. A single-node system only allows disk-type nodes to prevent system configuration information from being lost when RabbitMQ is restarted.

RabbitMQ requires at least one disk node in the cluster, all other nodes can be memory nodes, and when a node joins or leaves the cluster, it must notify at least one disk node of the change. If the only disk node in the cluster crashes, the cluster can still keep running, but no other operations (add, delete, modify, check) can be performed until the node recovers. To ensure the reliability of cluster information, or when you are not sure whether to use disk nodes or memory nodes, it is recommended to use disk nodes directly.

1. Build the RabbitMq operating environment

Operating environment: centos7, build two rabbitmq nodes through docker.

1. Query the rabbitmq image through search

docker search rabbitmq

2. Pull the latest official image of rabbitmq through pull.
It is better to bring the version with the tag of management. Otherwise, the latest latest is pulled, and the web management page cannot be displayed in full, and an overview: management only mode will be prompted.

docker pull rabbitmq:3.8.25-management

3. Create the container

docker run -d --name rabbitmq1 -p 5672:5672 -p 15672:15672 --hostname myRabbit1 
-e RABBITMQ_DEFAULT_VHOST=my_vhost1  -e RABBITMQ_DEFAULT_USER=admin 
-e RABBITMQ_DEFAULT_PASS=admin a4eb038c2ecb

–name: container name

-p: endpoint mapping

–hostname: node name of rabbitmq

-e RABBITMQ_DEFAULT_VHOST: virtual host name

-e RABBITMQ_DEFAULT_USER: login account

-e RABBITMQ_DEFAULT_PASS: Login password

a4eb038c2ecb is the mirror id, replace it according to your own situation.

4. Start the management page
Our image does not open the web management page by default, so we enter the container startup through the exec command. The environment of this image is centos

[root@moyu ~]# docker exec -it 639a151c5440 /bin/bash
root@myRabbit:/# rabbitmq-plugins enable rabbitmq_management

Access http://localhost:15672/ in the browser to open it, and another rabbitmq does the same, the difference is that the ports are changed to 5673 and 15673, etc., and when creating a container, use –link to connect to the first rabbitmq node (or Create a bridged network connection), as follows

docker run -d --name rabbitmq2 -p 5673:5672 -p 15673:15672 --hostname myRabbit2 
-e RABBITMQ_DEFAULT_VHOST=my_vhost2  -e RABBITMQ_DEFAULT_USER=admin 
-e RABBITMQ_DEFAULT_PASS=admin --link rabbitmq1:myRabbit1 a4eb038c2ecb

5. Set erlang cookie
The erlang cookie can be set by the parameter -e RABBITMQ_ERLANG_COOKIE when running the container, but it is now expired and deprecated.

We first check the running log of the container through the docker logs command, and look for the home dir parameter as follows

[root@moyu ~]# docker logs rabbitmq1
//.....
  Starting broker...2021-11-17 02:19:55.859245+00:00 [info] <0.222.0>
2021-11-17 02:19:55.859245+00:00 [info] <0.222.0>  node           : rabbit@myRabbit1
2021-11-17 02:19:55.859245+00:00 [info] <0.222.0>  home dir       : /var/lib/rabbitmq
2021-11-17 02:19:55.859245+00:00 [info] <0.222.0>  config file(s) : /etc/rabbitmq/conf.d/10-default-guest-user.conf
2021-11-17 02:19:55.859245+00:00 [info] <0.222.0>                 : /etc/rabbitmq/conf.d/management_agent.disable_metrics_collector.conf
2021-11-17 02:19:55.859245+00:00 [info] <0.222.0>  cookie hash    : Aed9pjd9vYWw3hng7Gjmkg==
2021-11-17 02:19:55.859245+00:00 [info] <0.222.0>  log(s)         : /var/log/rabbitmq/rabbit@myRabbit1_upgrade.log
2021-11-17 02:19:55.859245+00:00 [info] <0.222.0>                 : <stdout>
2021-11-17 02:19:55.859245+00:00 [info] <0.222.0>  database dir   : /var/lib/rabbitmq/mnesia/rabbit@myRabbit1

So the .erlang.cookie file is under this path, we can see this file when we enter the container

root@myRabbit1:~# ls -a /var/lib/rabbitmq
.  ..  .bash_history  .erlang.cookie  mnesia

Let’s set the permissions of the erlang cookie and run the following code in the container. If the permissions are not enough, the subsequent operations will report an error

chmod 600 /var/lib/rabbitmq/.erlang.cookie

After that, we copy the .erlang.cookie file in rabbitmq1 to the physical machine through the docker cp command and then copy it to the container of rabbitmq2. The copy command between the physical machine and the container is as follows:

The container copies files to the physical machine: docker cp Container name: Container directory
Physical machine directory Physical machine copies files to the container: docker cp Physical machine directory Container name: Container directory
The specific code is as follows:

docker cp rabbitmq1:/var/lib/rabbitmq/  d:\workspace\
docker cp d:\workspace\rabbitmq\.erlang.cookie rabbitmq2:/var/lib/rabbitmq/

After copying, the rabbitmq2 container needs to be restarted, otherwise the following error will be reported when the rabbitmqctl command is executed:

[error] Cookie file /var/lib/rabbitmq/.erlang.cookie must be accessible by owner only

Normal cluster mode

After restarting, enter the container and add the node of rabbitmq2 to rabbitmq1 to create a common cluster, and execute the following codes respectively:

rabbitmqctl stop_app
rabbitmqctl reset
rabbitmqctl join_cluster --ram rabbit@myRabbit1    //myRabbitmq1 is the hostname of rabbitmq in rabbitmq1 container
rabbitmqctl start_app

After that, we can see two nodes on the web management page.
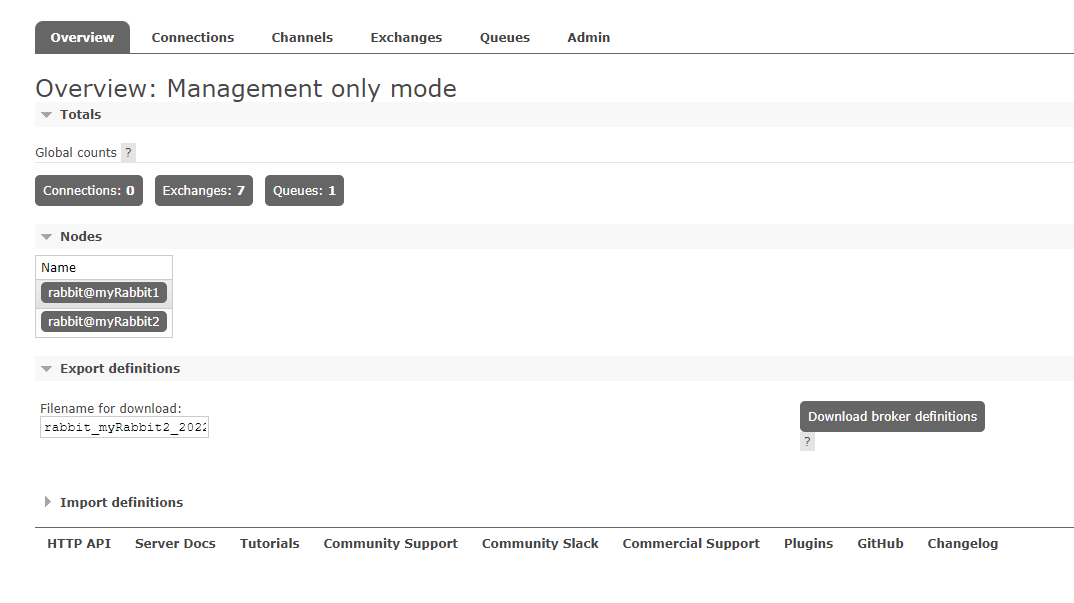
Create a queue at any node, and another node will also generate the same queue. And it can be found that the vhost of rabbitmq2 has changed from my_vhost2 to my_vhost1, which is the same as rabbitmq.

3. Mirror Mode

The mirror mode is to enter the rabbitmq1 container on the basis of the normal mode and enter the following command:

rabbitmqctl set_policy -p my_vhost1 ha-all "^" '{"ha-mode":"all"}' --apply-to all

The specific format is

rabbitmqctl set_policy [-p Vhost] Name Pattern Definition [Priority]
-p Vhost: Optional parameter, set for the queue under the specified vhost
Name: the name of the policy
Pattern: Matching pattern of the queue (regular expression)
Definition: definition of the mirror, including three parts ha-mode, ha-params, ha-sync-mode
        ha-mode: specifies the pattern of the mirror queue, valid values are all/exactly/nodes
            all: means mirroring on all nodes in the cluster
            exactly: means mirroring on a specified number of nodes, the number of nodes is specified by ha-params
            nodes: means mirroring on the specified nodes, the node names are specified by ha-params
        ha-params: as a parameter, as a supplement to ha-mode
        ha-sync-mode: the way to synchronize messages in the queue, valid values are automatic and manual
priority: optional parameter, the priority of the policy

rabbitmqctl set_policy ha-all "^" '{"ha-mode":"all"}' --apply-to all

Or log in to the rabbitmq management page –> Admin –> Policies –> Add / update a policy
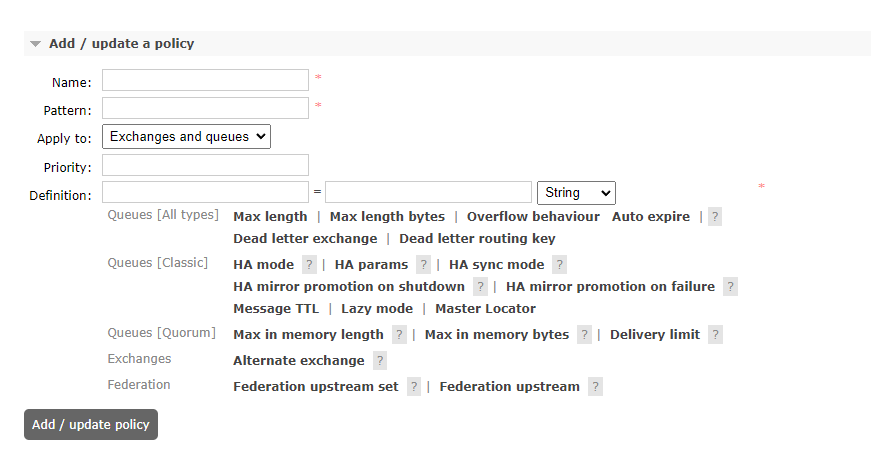
name: policy name

Pattern: ^ matcher, only one means match all. message refers to the name of the queue starting with the synchronization “message”

Definition: ha-mode=all is a matching type, which is divided into 3 modes: all (representing all queues)
Priority: Priority, first sorted according to priority, the higher the value, the higher the priority; the same priority is sorted according to the creation time , the later it is created, the higher the priority.

Briefly explain the difference between Operator Policy and User Policy:

  • Operator Policy is for service providers or corporate infrastructure departments to set certain general rules that need to be enforced
  • User Policy is a set of rules for business applications

Operator Policy and User Policy will be combined and applied to the queue. In order to prevent the coverage of some key attributes of the queue by the Operator Policy, such as the Dead Letter Exchange of the dead letter queue exchange, resulting in unexpected results of business applications, the Operator Policy only supports expire, message -ttl, max-length, max-length-bytes4 parameters.

How to Use Printf in HAL Library

1. Include header files

#include "stdio.h"

2. Redefine the serial port

int fputc( int ch, FILE * f) 
{ 
 while ((USART1->SR & 0X40 ) == 0 ); // Send in a loop until the sending is complete 
 USART1->DR = (uint8_t) ch;
  return ch; 
}

3. If only the first two steps are completed, the emulator can be used to run, but the program cannot run by itself. Also add the following code

#pragma import(__use_no_semihosting)
void _sys_exit(int x)
{
    x = x;
}
struct __FILE
{
    int handle;
    /* Whatever you require here. If the only file you are using is */
    /* standard output using printf() for debugging, no file handling */
    /* is required. */
};

FILE __stdout;    /* FILE is typedef’ d in stdio.h. */

This setting can avoid using the LIB library

C#: How to Get details of the directory where the currently running program is located

1.asp.net webform

  1.1 Use “Request.PhysicalApplicationPath to get the physical path of the virtual directory where the site is located, and finally include “\”;

2. In c# winform
  2.1 “Application.StartupPath”: Get the path of the directory where the current application is located, excluding “\” at the end;
  2.2 “Application.ExecutablePath”: Get the path of the current application file, including the name of the file;
  2.3 “AppDomain.CurrentDomain.BaseDirectory”: Get the path of the directory where the current application is located, including “\” at the end;
  2.4 “System.Threading.Thread.GetDomain().BaseDirectory”: Get the path of the directory where the current application is located, including “\” at the end;
  2.5 “Environment.CurrentDirectory”: Get the path of the current application, without “\” at the end;
  2.6 “System.IO.Directory.GetCurrentDirectory”: Get the path of the current application, excluding “\” at the end;
3. c# windows service service
  3.1 “AppDomain.CurrentDomain.BaseDirectory” or “System.Threading.Thread.GetDomain().BaseDirectory”;
  3.2 “Environment.CurrentDirectory” and “System.IO.Directory.GetCurrentDirectory” will get the path to the “system32” directory;
       Note : If you want to use “Application.StartupPath” or “Application.ExecutablePath”
       You need to manually add a reference to “System.Windows.Forms.dll” and declare the reference with “using System.Windows.Forms” at the beginning of the program;
4. Obtain the system installation directory in the uninstaller:
  4.1System.Reflection.Assembly curPath = System.Reflection.Assembly.GetExecutingAssembly();
              string path=curPath.Location;//Get the path of the installer class SetupLibrary file, get the directory where the file path is located to get the directory of the installer;
 4.2System.Diagnostics.StackFrame f = new System.Diagnostics.StackFrame(1);
              MethodBase mb = f.GetMethod();
              System.Web.HttpContext.Current.Response.Write(mb.DeclaringType.ToString()); Get the information of the calling class, you can know the situation of the subclass from the parent class

Python: How to Create List by Comprehension (Example Codes)

A list comprehension

List comprehensions generate list objects with the following syntax:

'''
[expression for item in iterable object]
or
[expression for item in iterable object if conditional judgment]
'''

example

l1 = [x for x in range(5)]
print(l1)       # [0, 1, 2, 3, 4]

l2 = [x*2 for x in range(1,5)]
print(l2)       # [2, 4, 6, 8]

l3 = [x*2 for x in range(1,100) if x % 5 == 0]
print(l3)       # [10, 20, 30, 40, 50, 60, 70, 80, 90, 100, 110, 120, 130, 140, 150, 160, 170, 180, 190]

l4 = [x for x in "abcdefghij"]
print(l4)       # ['a', 'b', 'c', 'd', 'e', 'f', 'g', 'h', 'i', 'j']

l5 = [(row,col) for row in range(3) for col in range(1,4)]
print(l5)  # [(0, 1), (0, 2), (0, 3), (1, 1), (1, 2), (1, 3), (2, 1), (2, 2), (2, 3)]
for l6 in l5:
    print(l6)

2. Dictionary comprehension

Dictionary comprehension generates a dictionary object, the syntax is as follows:

'''
{key:value for expressions in iterable objects}
Dictionary derivatives can also add if and multiple for loops
'''

example

# Count the number of occurrences of each character in the string
text = "i love liangxiaoxin,i can fall in love liangxiaoxin all the time."
count_dict = {d : text.count(d) for d in text}
print(count_dict)   # {'i': 10, ' ': 10, 'l': 8, 'o': 4, 'v': 2, 'e': 4, 'a': 7, 'n': 6, 'g': 2, 'x': 4, ',': 1, 'c': 1, 'f': 1, 't': 2, 'h': 1, 'm': 1, '.': 1}

Three, set derivation

Set comprehension generates a set, which is similar to the syntax format of list comprehension. The syntax is as follows:

'''
{ expression for item in iterable object}
or
{expression for item in iterable object if condition}
'''

example

s = {x for x in range(100) if x % 7 == 0}
print(s)    # {0, 98, 35, 70, 7, 42, 77, 14, 49, 84, 21, 56, 91, 28, 63}

Fourth, the generator derivation

Tuples have no comprehensions. Tuple comprehensions generate a generator object.
An iterator can only be run once. The first iteration can get the data, and the second iteration will not display the data.

example

t1 = (x*2 for x in range(1,100) if x % 9 == 0)
print(t1)     # <generator object <genexpr> at 0x00000257B30D69E8>
print(list(t1))    # [18, 36, 54, 72, 90, 108, 126, 144, 162, 180, 198]
print(tuple(t1))   # ()

t2 = (x*2 for x in range(1,100) if x % 9 == 0)
for t in t2:
    print(t,end="\t")    # 18    36    54    72    90    108    126    144    162    180    198

MQTT Host name verification failure (SSL) [How to Solve]

Error Messages:

mosquitto_pub -d -h 192.168.1.10 -p 1883 -t hello -m 123 --cafile ~/cacert.pem
Client null sending CONNECT
Error: host name verification failed.
OpenSSL Error[0]: error:1416F086:SSL routines:tls_process_server_certificate:certificate verify failed
Error: Protocol error


Solution:

Add an option: –insecure

mosquitto_pub -d -h 192.168.1.10 -p 1883 -t hello -m 123 --cafile ~/cacert.pem --insecure
Client null sending CONNECT
Client null received CONNACK (0)
Client null sending PUBLISH (d0, q0, r0, m1, 'hello', ... (3 bytes))
Client null sending DISCONNECT

Reference:

https://community.home-assistant.io/t/mqtt-host-name-verification-failure-ssl/337356

Windows Core Audio APIs: How to Progress Loopback Recording and Generate WAV File

Example Code as below:

#include <iostream>
#include <fstream>
#include <vector>

#include <mmdeviceapi.h>
#include <combaseapi.h>
#include <atlbase.h>
#include <Functiondiscoverykeys_devpkey.h>
#include <Audioclient.h>
#include <Audiopolicy.h>

// Use the RAII technique to automatically call CoUninitialize
class CoInitializeGuard {
public:
    CoInitializeGuard()
    {
        _hr = CoInitializeEx(nullptr, COINIT::COINIT_MULTITHREADED);
    }

    ~CoInitializeGuard()
    {
        if (_hr == S_OK || _hr == S_FALSE) {
            CoUninitialize();
        }
    }

    HRESULT result() const { return _hr; }

private:
    HRESULT _hr;
};

constexpr inline void exit_on_failed(HRESULT hr);
void printEndpoints(CComPtr<IMMDeviceCollection> pColletion);
std::string wchars_to_mbs(const wchar_t* s);

int main()
{
    HRESULT hr{};

    CoInitializeGuard coInitializeGuard;
    exit_on_failed(coInitializeGuard.result());

    // COM objects are wrapped in CComPtr, which will automatically call Release
    // COM interface allocated heap variables are wrapped in CComHeapPtr, which automatically calls CoTaskMemFree
    CComPtr<IMMDeviceEnumerator> pEnumerator;
    hr = pEnumerator.CoCreateInstance(__uuidof(MMDeviceEnumerator));
    exit_on_failed(hr);

    // Print all available audio devices
    //CComPtr<IMMDeviceCollection> pColletion;
    //hr = pEnumerator->EnumAudioEndpoints(eRender, DEVICE_STATE_ACTIVE, &pColletion);
    //exit_on_failed(hr);
    //printEndpoints(pColletion);

    // Using the default Audio Endpoint, eRender indicates an audio playback device, not a recording device
    CComPtr<IMMDevice> pEndpoint;
    hr = pEnumerator->GetDefaultAudioEndpoint(eRender, eConsole, &pEndpoint);
    exit_on_failed(hr);

    // Print out the name of the playback device, which may contain Chinese
    CComPtr<IPropertyStore> pProps;
    hr = pEndpoint->OpenPropertyStore(STGM_READ, &pProps);
    exit_on_failed(hr);
    PROPVARIANT varName;
    PropVariantInit(&varName);
    hr = pProps->GetValue(PKEY_Device_FriendlyName, &varName);
    exit_on_failed(hr);
    std::cout << "select audio endpoint: " << wchars_to_mbs(varName.pwszVal) << std::endl;
    PropVariantClear(&varName);

    // Get IAudioClient object from IMMDevice object 
    CComPtr<IAudioClient> pAudioClient;
    hr = pEndpoint->Activate(__uuidof(IAudioClient), CLSCTX_ALL, nullptr, (void**)&pAudioClient);
    exit_on_failed(hr);

    // Get audio playback device format information
    CComHeapPtr<WAVEFORMATEX> pDeviceFormat;
    pAudioClient->GetMixFormat(&pDeviceFormat);

    constexpr int REFTIMES_PER_SEC = 10000000;      // 1 reference_time = 100ns
    constexpr int REFTIMES_PER_MILLISEC = 10000;

    // Initialize the IAudioClient object
    const REFERENCE_TIME hnsRequestedDuration = 2 * REFTIMES_PER_SEC; // 1s
    hr = pAudioClient->Initialize(AUDCLNT_SHAREMODE_SHARED, AUDCLNT_STREAMFLAGS_LOOPBACK, hnsRequestedDuration, 0, pDeviceFormat, nullptr);
    exit_on_failed(hr);

    // Get buffer size
    UINT32 bufferFrameCount{};
    hr = pAudioClient->GetBufferSize(&bufferFrameCount);
    exit_on_failed(hr);

    // Get the IAudioCaptureClient object from the IAudioClient object, which means that the audio playback device is treated as a recording device
    CComPtr<IAudioCaptureClient> pCaptureClient;
    hr = pAudioClient->GetService(__uuidof(IAudioCaptureClient), (void**)&pCaptureClient);
    exit_on_failed(hr);
    
    // Start recording
    hr = pAudioClient->Start();
    exit_on_failed(hr);

    const REFERENCE_TIME hnsActualDuration = (long long)REFTIMES_PER_SEC * bufferFrameCount / pDeviceFormat->nSamplesPerSec;

    std::ofstream ofile("./out.wav", std::ios::binary);
    if (!ofile) {
        exit(-1);
    }

    // Write various header information

    constexpr UINT32 sizePlaceholder{};
    // master RIFF chunk
    ofile.write("RIFF", 4);
    ofile.write((const char*)&sizePlaceholder, 4);
    ofile.write("WAVE", 4);
    // 12

    // fmt chunk
    ofile.write("fmt ", 4);
    UINT32 fmt_ckSize = sizeof(WAVEFORMATEX) + pDeviceFormat->cbSize;
    ofile.write((const char*)&fmt_ckSize, 4);
    {
        auto p = pDeviceFormat.Detach();
        ofile.write((const char*)p, fmt_ckSize);
        pDeviceFormat.Attach(p);
    }
    // 8 + fmt_ckSize

    // fact chunk
    bool has_fact_chunt = pDeviceFormat->wFormatTag != WAVE_FORMAT_PCM;
    if (has_fact_chunt) {
        ofile.write("fact", 4);
        UINT32 fact_ckSize = 4;
        ofile.write((const char*)&fact_ckSize, 4);
        DWORD dwSampleLength{};
        ofile.write((const char*)&dwSampleLength, 4);
    }
    // 12

    // data chunk
    ofile.write("data", 4);
    ofile.write((const char*)&sizePlaceholder, 4);

    UINT32 data_ckSize = 0; // samples data 的大小
    UINT32 frame_count = 0; // Frame Rate

    constexpr int max_duration = 60;    // Recording 60s
    int seconds{}; // the time that has been recorded

    time_t t_begin = time(NULL);

    // UINT32 
    do {
        // sleep for a certain time to prevent high CPU usage
        Sleep(9);

        BYTE* pData{}; // samples data
        UINT32 numFramesAvailable{}; // how many frames are available in the buffer
        DWORD dwFlags{};

        hr = pCaptureClient->GetBuffer(&pData, &numFramesAvailable, &dwFlags, NULL, NULL);
        exit_on_failed(hr);

        int frame_bytes = pDeviceFormat->nChannels * pDeviceFormat->wBitsPerSample / 8;
        int count = numFramesAvailable * frame_bytes;
        ofile.write((const char*)pData, count);
        data_ckSize += count;
        frame_count += numFramesAvailable;
        seconds = frame_count / pDeviceFormat->nSamplesPerSec;
        std::cout << "numFramesAvailable: " << numFramesAvailable << " seconds: " << seconds << std::endl;

        hr = pCaptureClient->ReleaseBuffer(numFramesAvailable);
        exit_on_failed(hr);

    } while (seconds < max_duration);

    // Detect how long it actually took, actual time - max_duration = delay
    time_t t_end = time(NULL);
    std::cout << "use wall clock: " << t_end - t_begin << "s" << std::endl;

    if (data_ckSize % 2) {
        ofile.put(0);
        ++data_ckSize;
    }

    UINT32 wave_ckSize = 4 + (8 + fmt_ckSize) + (8 + data_ckSize);
    ofile.seekp(4);
    ofile.write((const char*)&wave_ckSize, 4);

    if (has_fact_chunt) {
        ofile.seekp(12 + (8 + fmt_ckSize) + 8);
        ofile.write((const char*)&frame_count, 4);
    }

    ofile.seekp(12 + (8 + fmt_ckSize) + 12 + 4);
    ofile.write((const char*)&data_ckSize, 4);

    ofile.close();

    //All COM objects and Heaps are automatically released
}

void printEndpoints(CComPtr<IMMDeviceCollection> pColletion)
{
    HRESULT hr{};

    UINT count{};
    hr = pColletion->GetCount(&count);
    exit_on_failed(hr);

    for (UINT i = 0; i < count; ++i) {
        CComPtr<IMMDevice> pEndpoint;
        hr = pColletion->Item(i, &pEndpoint);
        exit_on_failed(hr);

        CComHeapPtr<WCHAR> pwszID;
        hr = pEndpoint->GetId(&pwszID);
        exit_on_failed(hr);

        CComPtr<IPropertyStore> pProps;
        hr = pEndpoint->OpenPropertyStore(STGM_READ, &pProps);
        exit_on_failed(hr);

        PROPVARIANT varName;
        PropVariantInit(&varName);
        hr = pProps->GetValue(PKEY_Device_FriendlyName, &varName);
        exit_on_failed(hr);

        std::cout << wchars_to_mbs(varName.pwszVal) << std::endl;

        PropVariantClear(&varName);
    }
}

constexpr inline void exit_on_failed(HRESULT hr) {
    if (FAILED(hr)) {
        exit(-1);
    }
}

// Chinese characters will have encoding problems, all converted to narrow characters
std::string wchars_to_mbs(const wchar_t* src)
{
    UINT cp = GetACP();
    int ccWideChar = (int)wcslen(src);
    int n = WideCharToMultiByte(cp, 0, src, ccWideChar, 0, 0, 0, 0);

    std::vector<char> buf(n);
    WideCharToMultiByte(cp, 0, src, ccWideChar, buf.data(), (int)buf.size(), 0, 0);
    std::string dst(buf.data(), buf.size());
    return dst;
}

Reference:

COM Coding Practices
Audio File Format Specifications
Core Audio APIs
Loopback Recording

[Solved] Android Studio Error: Error:Execution failed for task’:app:mergeDebugResources’

Error:

Error:Execution failed for task’:app:mergeDebugResources’


Reason:

The image I added does not meet the review requirements of Android Studio, add two lines of code to disable the review


Solution:

Add the following codes in build.gradle of the app directory.

android {
.......
aaptOptions.cruncherEnabled = false
aaptOptions.useNewCruncher = false
.......
}

[Solved] URIError: Failed to decode param ‘/%3C%=%20BASE_URL%20%3Estatic/index.%3C%=%20VUE_APP_INDEX_CSS_HASH%20%3E.css’

Preface: When I run the vue+uniapp project to the browser, it throws the above error

The error is reported as follows

URIError: Failed to decode param '/%3C%=%20BASE_URL%20%3Estatic/index.%3C%=%20VUE_APP_INDEX_CSS_HASH%20%3E.css'


Reason: The project run path cannot be recognized by uniapp, specifically it should be a path setting problem, my problem here is that the [base path to run] in the web configuration options field in the manifest.json file configuration is written wrong.

Solution: Modify the path to the correct one and run it again.