Category Archives: Linux

[FAILED] Failed to start Raise network interfaces

[FAILED] Failed to start Raise network interfaces. 

The following error occurred during startup. Linux and windows cannot communicate. The reason may be that DHCP and static IP conflict. Use the ifconfig command to check that there is only IPv6 address but no IPv4 address.


Solution:

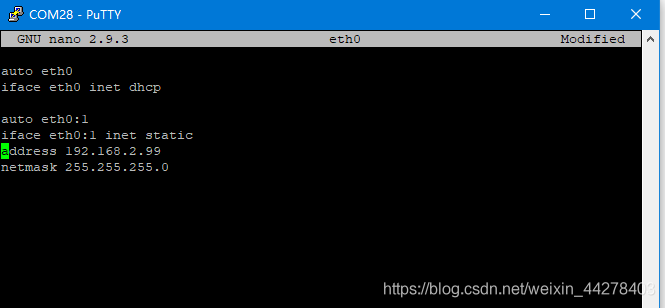
Modify the following file: /etc/network/interfaces.d/eth0, remove static IP settings or DHCP settings:
for example:

remove DHCP and replace it with:

auto eth0
iface eth0 inet static
address 192.168.2.99
netmask 255.255.255.0

Restart and the problem is solved.

[Solved] Virtual Machine Boot-up Error: failed to recover intents

The system boots up and enters rescue mode, reporting the following error.

Generating "/run/initramfs/rdsosreport.txt"
Entering emergency mode. Exit the shell to continue.
Tupe "journalctl" to view sustem logs.
You might want to save "/run/initramfs/rdsosreport.txt" to a USB stick or /boot after mounting them and attach it to a bug report.


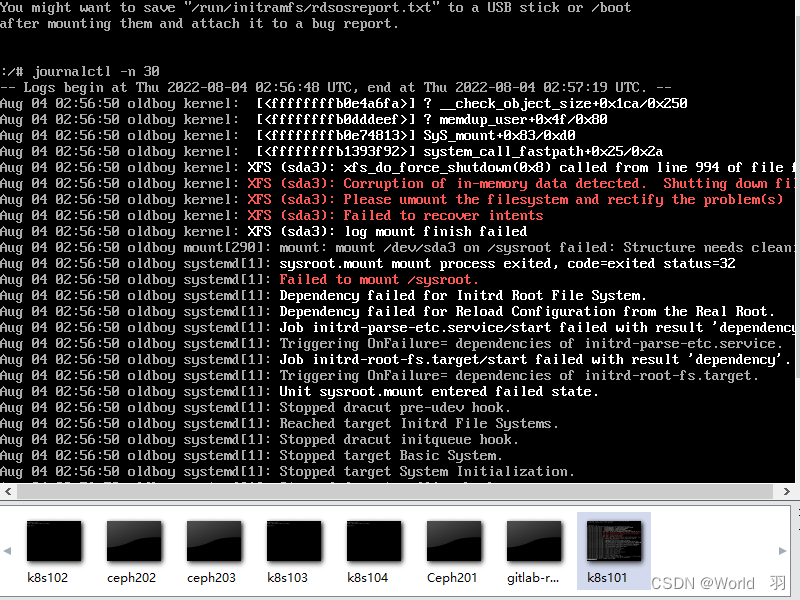
View the system log via journalctl -n 30 as follows.

Solution:
umount /dev/sda3 //If you do not enter rescue mode, you need to first umount, then repair
xfs_repair -v -L /dev/sda3
reboot


[Solved] Docker Download Mirror Error: Cannot connect to the Docker daemon at…

If you want to download an image with docker, you will report an error

cannot connect to the docker daemon at unix:///var/run/docker.sock. Is the docker daemon running?

cause analysis: maybe docker did not exit normally last time, so docker did not start normally, and the docker process could not be found in the corresponding /var/run/ path.

Solution:
enter the command

systemctl start docker.service

Then you can download

[Solved] SSH connect Error: “WARNING: REMOTE HOST IDENTIFICATION HAS CHANGED“

1. Problem description

When testing the connectivity of the host with the Ping module of ansible, the host 192.168.18.80 is pinged for the first time, but there is something wrong with the host. Take it offline, replace it with a new one, and then Ping 192.168.18.80 again. The following error message appears:

[root@server ~]# ansible all -m ping
192.168.18.80 | UNREACHABLE! => {
    "changed": false,
    "msg": "Failed to connect to the host via ssh: @@@@@@@@@@@@@@@@@@@@@@@@@@@@@@@@@@@@@@@@@@@@@@@@@@@@@@@@@@@\r\n@    WARNING: REMOTE HOST IDENTIFICATION HAS CHANGED!     @\r\n@@@@@@@@@@@@@@@@@@@@@@@@@@@@@@@@@@@@@@@@@@@@@@@@@@@@@@@@@@@\r\nIT IS POSSIBLE THAT SOMEONE IS DOING SOMETHING NASTY!\r\nSomeone could be eavesdropping on you right now (man-in-the-middle attack)!\r\nIt is also possible that a host key has just been changed.\r\nThe fingerprint for the ECDSA key sent by the remote host is\nSHA256:zbEO7l6AqnhvNiZvVoy5KcYGHrn10CJw0ul169LeyHU.\r\nPlease contact your system administrator.\r\nAdd correct host key in /root/.ssh/known_hosts to get rid of this message.\r\nOffending ECDSA key in /root/.ssh/known_hosts:2\r\nPassword authentication is disabled to avoid man-in-the-middle attacks.\r\nKeyboard-interactive authentication is disabled to avoid man-in-the-middle attacks.\r\[email protected]: Permission denied (publickey,gssapi-keyex,gssapi-with-mic,password).",
    "unreachable": true
}

When SSH is used for remote connection, the following error occurs

[root@server ~]# ssh 192.168.18.80
@@@@@@@@@@@@@@@@@@@@@@@@@@@@@@@@@@@@@@@@@@@@@@@@@@@@@@@@@@@
@    WARNING: REMOTE HOST IDENTIFICATION HAS CHANGED!     @
@@@@@@@@@@@@@@@@@@@@@@@@@@@@@@@@@@@@@@@@@@@@@@@@@@@@@@@@@@@
IT IS POSSIBLE THAT SOMEONE IS DOING SOMETHING NASTY!
Someone could be eavesdropping on you right now (man-in-the-middle attack)!
It is also possible that a host key has just been changed.
The fingerprint for the ECDSA key sent by the remote host is
SHA256:zbEO7l6AqnhvNiZvVoy5KcYGHrn10CJw0ul169LeyHU.
Please contact your system administrator.
Add correct host key in /root/.ssh/known_hosts to get rid of this message.
Offending ECDSA key in /root/.ssh/known_hosts:2
ECDSA host key for 192.168.18.80 has changed and you have requested strict checking.
Host key verification failed.


2. Cause of problem

The identity of the SSH Remote Connection host is defaultly saved in ~/.ssh/known_hosts, each time you visit, you will check whether the host ID is the same. If not, you will be prompted with an error or warning to prevent man in the middle attacks.


3. Solution

Delete the information of the corresponding IP line in ~/.ssh/known_hosts, as shown in the following figure

[root@server ~]# vim  ~/.ssh/known_hosts
192.168.18.99 ecdsa-sha2-nistp256 AAAAE2VjZHNhLXNoYTItbmlzdHAyNTYAAAAIbmlzdHAyNTYAAABBBGEsej5rHzUx+GX65oiHKfOqDqFP2OdNhb0i80Hns0b2TObWTQMvscKjaryuh2oZbq+Esekhn98HXDNc30aEjzA=
192.168.18.199 ecdsa-sha2-nistp256 AAAAE2VjZHNhLXNoYTItbmlzdHAyNTYAAAAIbmlzdHAyNTYAAABBBHhaJ4VDE3HxK1AcsHNac4MTjv4IUauTLazQDwgh6lhCIt0qN5Zjj0+rh+isAZYOXdBp4S8K5p/YkTXalmU0CHQ=
192.168.18.80 ecdsa-sha2-nistp256 AAAAE2VjZHNhLXNoYTItbmlzdHAyNTYAAAAIbmlzdHAyNTYAAABBBHKpwuBsqrI1ogpSvLkJKJpKcXIO49sJJH3gJmykHWOp3cqfekCpXIppiEzhKslxgFEmd971DILXrpPguDEQ3UE=

Linux: How to Solve pyperclip Module Error

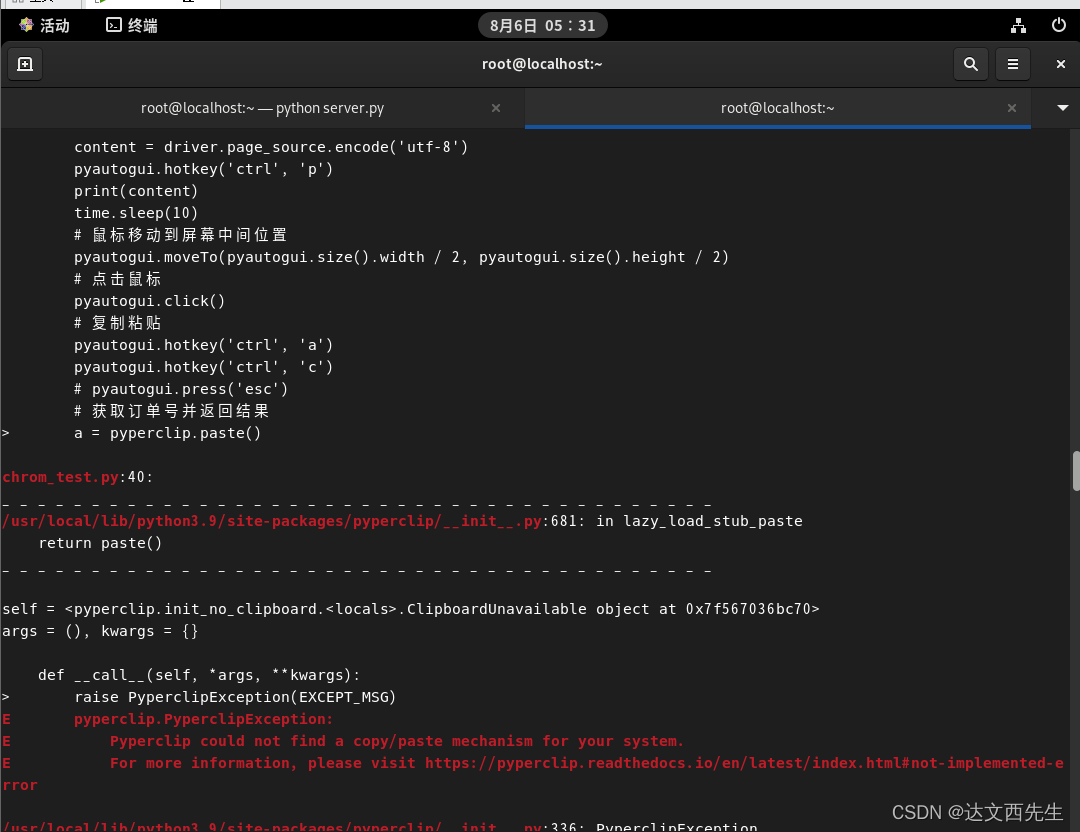
When pyperclip is used, the error message is as follows:

xclip needs to be installed
Step 1: install the epel repository

# yum install epel-release.noarch
             or
# dnf install epel-release

Step 2: install xclip from the EPEL repository

# dnf install xclip
Last metadata expiration check: 0:06:09 ago on Mon 07 Feb 2022 10:39:39 AM IST.
Dependencies resolved.
=============================================================================================================================================================
 Package                             Architecture                         Version                                   Repository                          Size
=============================================================================================================================================================
Installing:
 xclip                               x86_64                               0.13-8.el8                                epel                                35 k

Transaction Summary
=============================================================================================================================================================
Install  1 Package

After installation, you can use the pyperclip module normally.

Ubuntu18.04 Install ROS Error: rosdep update [How to Solve]

In the installation of ros for rosdep update often reported errors, there is a way to 100% success, solved by modifying the download source files, a total of 5 files, here is a record.

1) open sources_list.py

sudo gedit /usr/lib/python2.7/dist-packages/rosdep2/sources_list.py

1.1 add a line between lines 310 and 311

url = 'https://ghproxy.com/'+url

After adding, it is shown in the following figure.

1.2 Modify line 72 and add after the equal sign

'https://ghproxy.com/' + 

After modification, it is shown in the following figure.

After modification, save and exit.

2) open gbpdistro_support.py

sudo gedit /usr/lib/python2.7/dist-packages/rosdep2/gbpdistro_support.py

2.1 Modify line 36 to add

'https://ghproxy.com/' + 

After modification, it is shown in the following figure.

2.2 modify 204 lines and add the same contents as 2.1

After modification, see the following figure.

After modification, save and exit.

3) open rep3.py

sudo gedit /usr/lib/python2.7/dist-packages/rosdep2/rep3.py

Modify line 39 and add the same content as 2.1, namely

'https://ghproxy.com/' + 

After modification, it is shown in the following figure.

After modification, save and exit.

(4) open __init__.py

sudo gedit /usr/lib/python2.7/dist-packages/rosdistro/__init__.py

Line 68, add the same as 2.1, namely

'https://ghproxy.com/' + 

After modification, it is shown in the following figure.

After modification, save and exit.

5 open github.py

sudo gedit /usr/lib/python2.7/dist-packages/rosdistro/manifest_provider/github.py

Amend line 68 to add

'https://ghproxy.com/' + 

After modification, it is shown in the following figure.

After modification, save and exit.

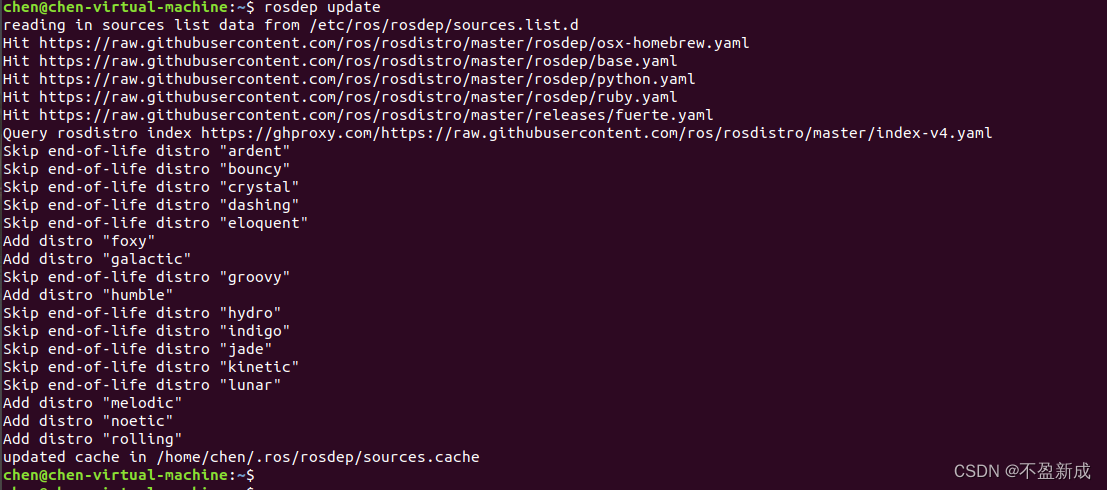
After all the modifications are saved, execute rosdep update. After the update is completed, see the following figure:
[Solved] Nginx Startup Error: directive is not allowed here in

Problem scenario

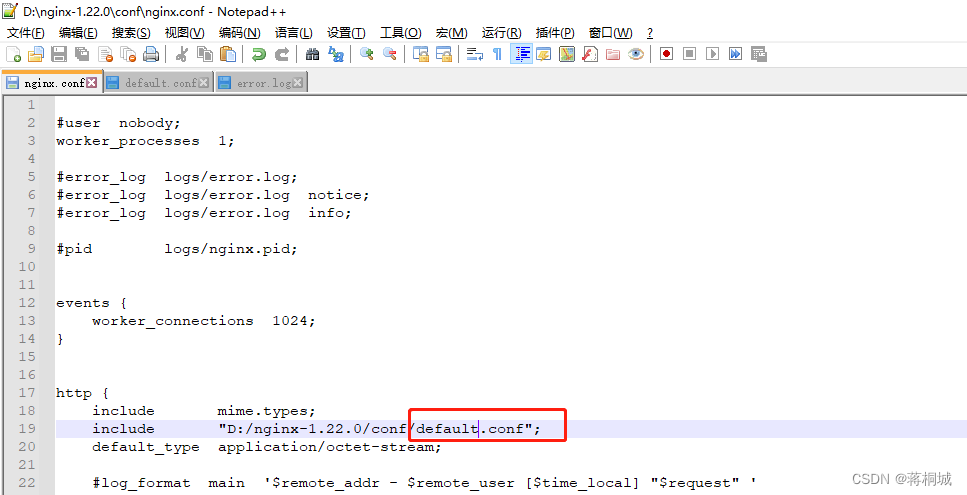
In the Linux system, the conf folder is provided in the nginx installation package by default and the configuration file of nginx.conf includes the configuration articles in this folder by default.

I use the windows system this time, and also configures the include folder through the example. However, for the convenience of the figure, the include folder and the folder of nginx.conf file are consistent.

Analyze and solve:

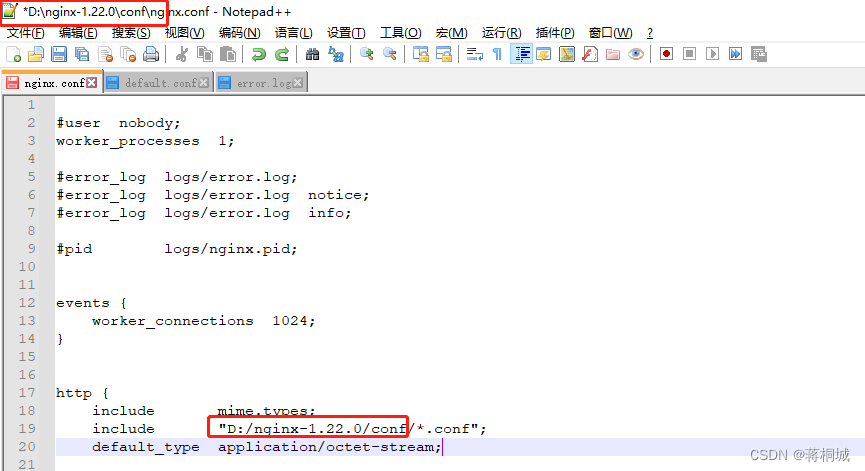
Nginx error log prompt:

“worker_processes” directive is not allowed here in D:/nginx-1.22.0/conf/nginx. conf:3

After deleting the worker_processes instruction, an error is reported that other instructions are not allowed.

Later, it was found that the use of wildcards in include led to the inclusion of yourself. You can modify the include method.

[Solved] openssl error: libcrypto.so.1.0.0: cannot open shared object file: Error 40

Problem Description: start to execute OpenSSL and report an error:

openssl

openssl: error while loading shared libraries: libcrypto.so.1.0.0: cannot open shared object file: No such file or directory

Then find the corresponding file through the search instruction, and soft connect it

find/-name libcrypto.so.1.0.0    find files
/opt/acb/lib/libcrypto.so.1.0.0   search the outcome
ln -s libcrypto.so.1.0.0 /usr/lib64/  soft connect

However, it is found that the implementation of OpenSSL still reports errors, as follows

openssl
openssl: error while loading shared libraries: libcrypto.so.1.0.0: cannot open shared object file: Error 40

Check libcrypto.so.1.0.0 that reported error, and find that libcrypto.so.1.0.0 is also a soft connection

lrwxrwxrwx 1 splunk root      15 Jan  9  2020 libssl.so -> libssl.so.1.0.0
-r-xr-xr-x 2 splunk root  485304 Jan  9  2020 libssl.so.1.0.0

The solution is to connect the source file directly and solve the problem

ln -s libcrypto.so /usr/lib64/libcrypto.so.1.0.0

[Solved] error while loading shared libraries: libjson.so.0: cannot open shared object file: No such file or

error while loading shared libraries: libjson.so.0: cannot open shared object file: No such file or

Solution:

sudo vim  /etc/ld.so.conf

Add /usr/local/lib to the file, which is the path is libjson.so.0 located

include /etc/ld.so.conf.d/*.conf 
/usr/local/lib

Finally, the terminal inputs sudo ldconfig

[Solved] Error (suppressible): (vsim-12110) All optimizations are disabled because the -novopt option is in effect…

Questasim Error(vsim-12110)

Questasim simulation optimization acceleration problem (object no signal, could not see waveform)

Makefile script:

Compilation error:

Solution:

Remove -novopt, which is no longer used in modelsim after version 10.7, so as long as you do not use -novopt, no error will be reported. So how can we see the signal and see the waveform while using optimization?

Here I modify modelsim.ini

Find modelsim.ini file address

Modify VoptFlow = 1

In addition, you can replace -novopt with -voptargs= “+acc”

[Solved] Readiness probe failed: calico/node is not ready: BIRD is not ready: Error querying BIRD: unable to

Cluster calico deployed by kuberadm runs incorrectly

report errors:

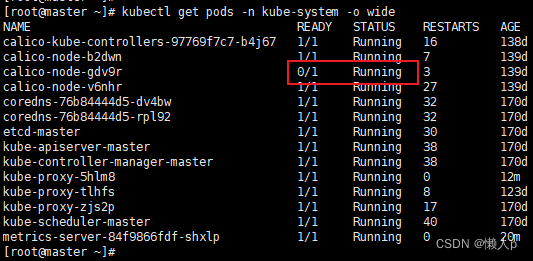
1, check calico

kubectl get pods -n kube-system

Calico-node 0/1 Running

2. check the log

kubectl describe calico-node-gdv9r -n kube-system

Calico error:
Readiness probe failed: calico/node is not ready: BIRD is not ready: Error querying BIRD: unable to connect to BIRDv4 socket: dial unix /var/run/bird/bird.ctl: connect: no such file or directory

Solution:

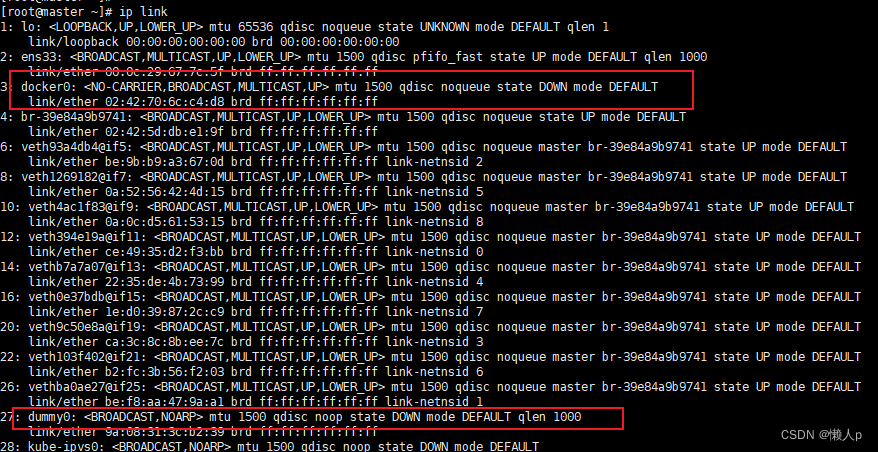
1. Remove the DOWN NIC/interface that Docker and Calico errors.

ip link docker0

2, delete Calico pod (pod will be rebuilt and run by k8s cluster after deletion)

kubectl delete pod calico-node-gdv9r -n kube-system

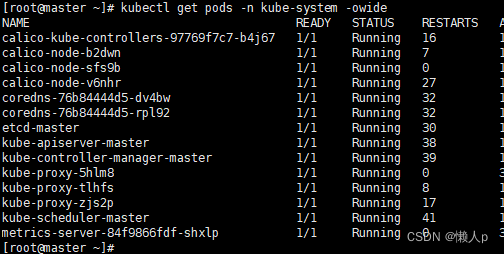
3, check Calico again and find it is normal</ font>

kubectl get pods -n kube-system