How to Solve Linux Error: -bash: unzip: command not found
Problem:
Unzip the .zip file under Linux and report an error
-bash: unzip: command not foundSolution:
yum install unzip zipHow to Solve Linux Error: -bash: unzip: command not found
Problem:
Unzip the .zip file under Linux and report an error
-bash: unzip: command not foundSolution:
yum install unzip zipWhen installing dependencies using the apt-get install directive, an error is reported as follows
dpkg: error processing tex-common (--configure):
 subprocess installed post-installation script returned error exit status 1
Errors were encountered while processing:
 tex-common
E: Sub-process /usr/bin/dpkg returned an error code (1)
The solution is a three-step process:
The first step
sudo mv /var/lib/dpkg/info /var/lib/dpkg/info.bak //First rename the info folder
sudo mkdir /var/lib/dpkg/info // Create a new info folder again
sudo apt-get update
The second step
apt-get -f install xxx  //Here xxx is replaced by the software to be installed
sudo mv /var/lib/dpkg/info/* /var/lib/dpkg/info.bak
The third step
sudo rm -rf /var/lib/dpkg/info //Delete the new info folder you created
sudo mv /var/lib/dpkg/info.bak /var/lib/dpkg/info // change the name of the previous info folder back
So far the installation problem has been solved!
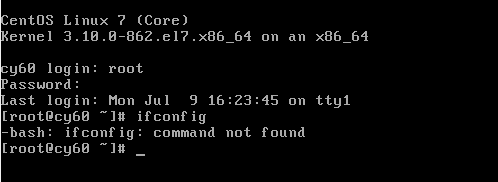
1. Problem: I just installed centos7 at the minimum and want to check the local IP address. Then run ifconfig, and an error popped up as a result.
2. Troubleshooting: First of all, we understand whether it is caused by not turning on the network card? We can check through the following 3 methods;
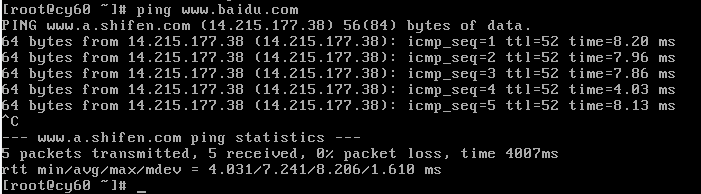
1) Ping Baidu to find out whether the network card is enabled
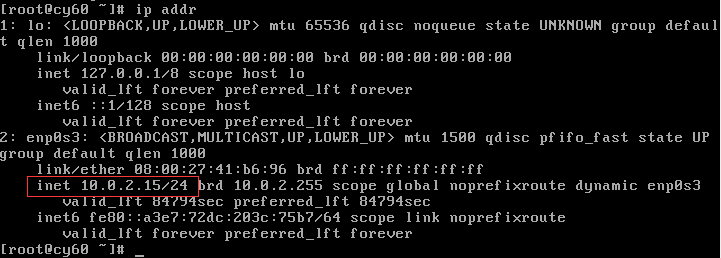
2) Confirm whether the network card is enabled by entering ip addr to check whether the IP address can be obtained
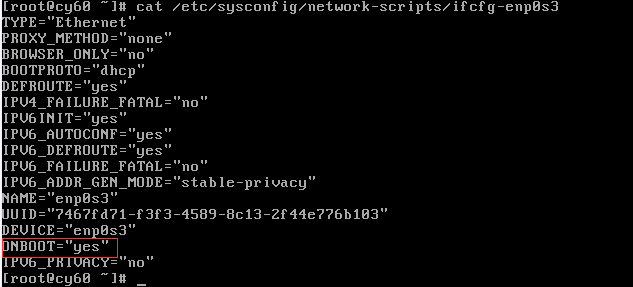
3) Through cat /etc/sysconfig/network-scripts/ifcfg-enp0s3 (ifcfg-enp0s3 is the name of the network card, different machines are different.) Whether NBOOT is turned on (meaning whether the network card is turned on).
3. Conclusion of troubleshooting
1) If it can be pinged, it means that the network card is enabled and can obtain an IP address to access the Internet. (If not, you can use vi /etc/sysconfig/network-scripts/ifcfg-enp0s3 to change ONBOOT to yes. Change BOOTPROTO to dhcp, or to obtain the IP address manually, see Centos7 network configuration for details) Note: After modification Need to restart the network card (command: service network restart)
2) The obtained IP address can be checked through ip addr, which proves that the network card is enabled. If you can’t get it, please modify the network configuration file. Note: You need to restart the network card after modification (command: service network restart)
3) Check whether the network card is enabled through cat /etc/sysconfig/network-scripts/ifcfg-enp0s3, if not, use vi /etc/sysconfig/network-scripts/ifcfg-enp0s3 to modify the network configuration file.
Summary: At this time, it can be determined that ifconfig related tools are not installed.
4. Use yum provides ifconfig to check which package to improve ifconfig, and install it.
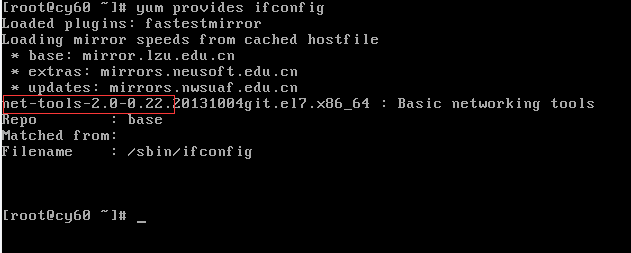
Then execute yum install net-tools

Then enter: ifconfig command to test
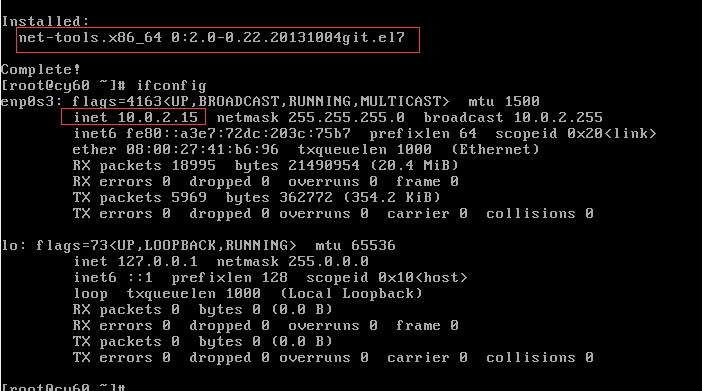
The version of the net-tools package can be displayed here, and the information related to the IP address can be viewed.
Use the command
lsof -i:port number
Then see the process number, just kill the process directly
kill -9 Process number

nginx startup error
nginx: [error] open() "/usr/local/nginx/nginx.pid" failed (2: No such file or directory)
Solution: Find the folder directory of your nginx.conf, and then run this
nginx -c /usr/local/etc/nginx/nginx.conf
Run again
nginx -s reload
That’s it
websocket: the client is not using the websocket protocol: 'upgrade' token not found in 'Connection' head
WebSocketThis problem occurs when the reverse proxy or load balancer is not delivering the request correctly.
Nginx plus the following analysis
proxy_http_version 1.1;
proxy_set_header Upgrade $http_upgrade;
proxy_set_header Connection upgrade
Apache plus the following analysis
 <Location /ws>
     ProxyPass ws://localhost:8000
     ProxyPassReverse ws://localhost:8000/
</Location>[[email protected] config]# su – mform
Last login: Mon Apr 16 14:08:05 CST 2018 on pts/4
su: failed to execute /bin/bash: Resource temporarily unavailable
[[email protected] config]#
[[email protected] config]#
[[email protected] config]# egrep -v “$|#” /etc/security/limits.d/20-nproc.conf
soft nproc 4096
root soft nproc unlimited
[[email protected] config]# su – mform
Last login: Mon Apr 16 14:16:25 CST 2018 on pts/4
su: failed to execute /bin/bash: Resource temporarily unavailable
[[email protected] config]#
[[email protected] config]#
[[email protected] config]#
#change the default numble 4096 to 8192
[[email protected] config]# vim /etc/security/limits.d/20-nproc. conf
[[email protected] config]# egrep -v “$|#” /etc/security/limits.d/20-nproc.conf
soft nproc 8192
root soft nproc unlimited
[[email protected] config]# su – mform
Last login: Mon Apr 16 14:16:49 CST 2018 on pt s/4
[[email protected] ~]$ id
uid=1002(mform) gid=1003(mform) groups=1003(mform)
The target user has too many processes or threads.
alone without each process limit Linux threads, just on the system process of the total limit
(thread is essentially on Linux has Shared address space of the process),
to check the number of threads:
the cat/proc/sys/kernel/threads – Max
to increase the number of threads:
echo 100000 > /proc/sys/kernel/threads-max
There is also a limit to the number of processes (and threads) that a single user can create, ulimit/getrlimit details about these limits.
Fixed issue: The boot entry for /etc/rc.local file configuration does not work
Start by looking at the contents of the /etc/rc.local file to find the cause of the problem.
[root@localhost ~]# cat /etc/rc.local
#!/bin/bash
# THIS FILE IS ADDED FOR COMPATIBILITY PURPOSES
#**这This file was added for compatibility**
# It is highly advisable to create own systemd services or udev rules
# to run scripts during boot instead of using this file.
#** It is highly advisable to create your own systemd services or udev rules to run scripts during boot instead of using this file. ***
# In contrast to previous versions due to parallel execution during boot
# This script will NOT be run after all other services.
#** In contrast to previous versions due to parallel execution during boot # this script will NOT be run after all other services. **Please note that you must run 'parallel execution during boot'.
# Please note that you must run 'chmod +x /etc/rc.d/rc.local' to ensure
# that this script will be executed during boot.
#** Please note that you must run 'chmod +x /etc/rc.d/rc.local' to ensure # that this script will be executed during boot.
touch /var/lock/subsys/local
#**Create the file /var/lock/subsys/local**
According to the prompt, it may not execute because the file permissions are insufficient. So, first look at the permissions for the /etc/rc.local file.
[root@localhost ~]# ll /etc/rc.local
-rw-r--r--. 1 root root 13 Apr 21 23:06 /etc/rc.local -> rc.d/rc.local
/etc/rc.d/rc.local = /etc/rc.local = /etc/rc.local = /etc/rc.local = /etc/rc.local = /etc/rc.local = /etc/rc.local = /etc/rc.local = /etc/rc.local
[root@localhost ~]# chmod +x /etc/rc.d/rc.local
[root@localhost ~]# ll /etc/rc.d/rc.local
-rwxr-xr-x. 1 root root 13 Apr  21 23:06 /etc/rc.d/rc.local
After restarting the server, I found that the boot items set in the /etc/rc.local file are working properly.
This error is usually caused by multiple ssh key verifications. Too many keys cause the server to refuse to accept the authentication request.
By -vparameters, output detailed process. You will find the authentication key you provided, the server refused the link, and prompted an exception: “Too many authentication failures for [user]”.
ssh-add -D
This is usually caused by inadvertently offering multiple ssh keys to the server. The server will reject any key after too many keys have been offered.
You can see this for yourself by adding the -v flag to your ssh command to get verbose output. You will see that a bunch of keys are offered, until the server rejects the connection saying: “Too many authentication failures for [user]”. Without verbose mode, you will only see the ambiguous message “Connection reset by peer”.
To prevent irrelevant keys from being offered, you have to explicitly specify this in every host entry in the ~/.ssh/config file by adding IdentitiesOnly like so:
Host www.somehost.com
  IdentityFile ~/.ssh/key_for_somehost_rsa
  IdentitiesOnly yes
  Port 22
If you use the ssh-agent, it helps to run ssh-add -D to clear the identities.
If you are not using any ssh hosts configuration, you have to explicitly specify the correct key in the ssh command like so:
ssh -i some_id_rsa -o 'IdentitiesOnly yes' them@there:/path/
Note: the ‘IdentitiesOnly yes’ parameter needed to be between quotes.
or
ssh -i some_id_rsa -o IdentitiesOnly=yes them@there:/path/
Git Push stuck in ‘writing objects’
How to Solve this issue?
Solution:git config --global http.postBuffer 524288000