Category Archives: How to Install

Mydumper Install Error: None of the required ‘glib-2.0’/’gthread-2.0’ found

mydumper official website: https://launchpad.net/mydumper

After downloading, installation error:

[root@localhost local]# cd mydumper-0.6.2
[root@localhost mydumper-0.6.2]#
[root@localhost mydumper-0.6.2]# ls
binlog.c  CMakeCache.txt  common.h     docs             g_unix_signal.h  myloader.c  Processing  server_detect.c
binlog.h  CMakeFiles      config.h     Finished         mydumper.c       myloader.h  README      server_detect.h
cmake     CMakeLists.txt  config.h.in  g_unix_signal.c  mydumper.h       Package     Running
[root@localhost mydumper-0.6.2]# cmake .
-- The CXX compiler identification is GNU 4.4.7
-- Check for working CXX compiler: /usr/bin/c++
-- Check for working CXX compiler: /usr/bin/c++ -- works
-- Detecting CXX compiler ABI info
-- Detecting CXX compiler ABI info - done
-- Using mysql-config: /usr/local/mysql/bin/mysql_config
-- Found MySQL: /usr/local/mysql/include, /usr/local/mysql/lib/libmysqlclient.so;/usr/lib/libpthread.so;/usr/lib/libm.so;/usr/lib/librt.so;/usr/lib/libdl.so
-- checking for one of the modules 'glib-2.0'
CMake Error at /usr/share/cmake/Modules/FindPkgConfig.cmake:363 (message):
  None of the required 'glib-2.0' found
Call Stack (most recent call first):
  cmake/modules/FindGLIB2.cmake:10 (pkg_search_module)
  CMakeLists.txt:10 (find_package)


-- checking for one of the modules 'gthread-2.0'
CMake Error at /usr/share/cmake/Modules/FindPkgConfig.cmake:363 (message):
  None of the required 'gthread-2.0' found
Call Stack (most recent call first):
  cmake/modules/FindGLIB2.cmake:11 (pkg_search_module)
  CMakeLists.txt:10 (find_package)


CMake Warning at docs/CMakeLists.txt:9 (message):
  Unable to find Sphinx documentation generator


- ------------------------------------------------
-- MYSQL_CONFIG = /usr/local/mysql/bin/mysql_config
-- CMAKE_INSTALL_PREFIX = /usr/local
-- BUILD_DOCS = ON
-- WITH_BINLOG = OFF
-- RUN_CPPCHECK = OFF
-- Change a values with: cmake -D<Variable>=<Value>
- ------------------------------------------------
--
CMake Error: The following variables are used in this project, but they are set to NOTFOUND.
Please set them or make sure they are set and tested correctly in the CMake files:
GLIB2_LIBRARIES (ADVANCED)
    linked by target "mydumper" in directory /usr/local/mydumper-0.6.2
    linked by target "myloader" in directory /usr/local/mydumper-0.6.2
GTHREAD2_LIBRARIES (ADVANCED)
    linked by target "mydumper" in directory /usr/local/mydumper-0.6.2
    linked by target "myloader" in directory /usr/local/mydumper-0.6.2

-- Configuring incomplete, errors occurred!
See also "/usr/local/mydumper-0.6.2/CMakeFiles/CMakeOutput.log".
See also "/usr/local/mydumper-0.6.2/CMakeFiles/CMakeError.log".

cmake. Error:

None of the required 'glib-2.0' found
None of the required 'gthread-2.0' found

I searched the Internet but didn’t find a solution, so I had to go to the official website to find a solution:

https://answers.launchpad.net/mydumper/+faq/349

Run:
 cmake .
 make

One needs to install development versions of required libaries (MySQL, GLib, ZLib, PCRE):
NOTE: you must use the correspondent mysql devel package.

* Ubuntu or Debian: apt-get install libglib2.0-dev libmysqlclient15-dev zlib1g-dev libpcre3-dev libssl-dev
* Fedora, RedHat and CentOS: yum install glib2-devel mysql-devel zlib-devel pcre-devel openssl-devel
* openSUSE: zypper install glib2-devel libmysqlclient-devel pcre-devel zlib-devel
* MacOSX: port install glib2 mysql5 pcre pkgconfig cmake
 (You may want to run 'port select mysql mysql5' afterwards)

One has to make sure, that pkg-config, mysql_config, pcre-config are all in $PATH

Binlog dump is disabled by default to compile with it you need to add -DWITH_BINLOG=ON to cmake options

Obviously you need compiler and make packages too :)

You can see that you need to install dependencies:

Fedora, RedHat and CentOS: yum install glib2-devel mysql-devel zlib-devel pcre-devel openssl-devel

So follow the instructions to install:

[root@localhost mydumper-0.6.2]# yum install glib2-devel mysql-devel zlib-devel pcre-devel openssl-devel
Loaded plugins: fastestmirror, refresh-packagekit, security
Setting up Install Process
Loading mirror speeds from cached hostfile
 * c6-media:
Package mysql-devel-5.1.73-3.el6_5.i686 already installed and latest version
Package zlib-devel-1.2.3-29.el6.i686 already installed and latest version
Package pcre-devel-7.8-6.el6.i686 already installed and latest version
Package openssl-devel-1.0.1e-30.el6.i686 already installed and latest version
Resolving Dependencies
--> Running transaction check
---> Package glib2-devel.i686 0:2.28.8-4.el6 will be installed
--> Finished Dependency Resolution

Dependencies Resolved

==========================================================================================================================================
 Package                            Arch                        Version                             Repository                       Size
==========================================================================================================================================
Installing:
 glib2-devel                        i686                        2.28.8-4.el6                        c6-media                        298 k

Transaction Summary
==========================================================================================================================================
Install       1 Package(s)

Total download size: 298 k
Installed size: 1.5 M
Is this ok [y/N]: y
Downloading Packages:
Running rpm_check_debug
Running Transaction Test
Transaction Test Succeeded
Running Transaction
  Installing : glib2-devel-2.28.8-4.el6.i686                                                                                          1/1
Unable to connect to dbus
  Verifying  : glib2-devel-2.28.8-4.el6.i686                                                                                          1/1

Installed:
  glib2-devel.i686 0:2.28.8-4.el6

Complete!

Then compile and install mydumper:

[root@localhost mydumper-0.6.2]# cmake .
-- Using mysql-config: /usr/local/mysql/bin/mysql_config
-- Found MySQL: /usr/local/mysql/include, /usr/local/mysql/lib/libmysqlclient.so;/usr/lib/libpthread.so;/usr/lib/libm.so;/usr/lib/librt.so;/usr/lib/libdl.so
-- checking for one of the modules 'glib-2.0'
-- checking for one of the modules 'gthread-2.0'

CMake Warning at docs/CMakeLists.txt:9 (message):
  Unable to find Sphinx documentation generator


- ------------------------------------------------
-- MYSQL_CONFIG = /usr/local/mysql/bin/mysql_config
-- CMAKE_INSTALL_PREFIX = /usr/local
-- BUILD_DOCS = ON
-- WITH_BINLOG = OFF
-- RUN_CPPCHECK = OFF
-- Change a values with: cmake -D<Variable>=<Value>
- ------------------------------------------------
-
-- Configuring done
-- Generating done
-- Build files have been written to: /usr/local/mydumper-0.6.2
[root@localhost mydumper-0.6.2]# echo $?
0
[root@localhost mydumper-0.6.2]# make
Scanning dependencies of target mydumper
[ 25%] Building C object CMakeFiles/mydumper.dir/mydumper.c.o
[ 50%] Building C object CMakeFiles/mydumper.dir/server_detect.c.o
[ 75%] Building C object CMakeFiles/mydumper.dir/g_unix_signal.c.o
Linking C executable mydumper
[ 75%] Built target mydumper
Scanning dependencies of target myloader
[100%] Building C object CMakeFiles/myloader.dir/myloader.c.o
Linking C executable myloader
[100%] Built target myloader
[root@localhost mydumper-0.6.2]# make install
[ 75%] Built target mydumper
[100%] Built target myloader
Install the project...
-- Install configuration: ""
-- Installing: /usr/local/bin/mydumper
-- Removed runtime path from "/usr/local/bin/mydumper"
-- Installing: /usr/local/bin/myloader
-- Removed runtime path from "/usr/local/bin/myloader"

Successful installation. But an error was reported during execution:

[root@localhost mydumper-0.6.2]# mydumper --help
mydumper: error while loading shared libraries: libmysqlclient.so.18: cannot open shared object file: No such file or directory

Solution:

[root@localhost mydumper-0.6.2]# ldd /usr/local/bin/mydumper
        linux-gate.so.1 =>  (0x00f91000)
        libmysqlclient.so.18 => not found
        libpthread.so.0 => /lib/libpthread.so.0 (0x006fc000)
        libm.so.6 => /lib/libm.so.6 (0x0072b000)
        librt.so.1 => /lib/librt.so.1 (0x00720000)
        libdl.so.2 => /lib/libdl.so.2 (0x00719000)
        libglib-2.0.so.0 => /lib/libglib-2.0.so.0 (0x00757000)
        libgthread-2.0.so.0 => /lib/libgthread-2.0.so.0 (0x00918000)
        libpcre.so.0 => /lib/libpcre.so.0 (0x021a8000)
        libz.so.1 => /lib/libz.so.1 (0x002ea000)
        libc.so.6 => /lib/libc.so.6 (0x00564000)
        /lib/ld-linux.so.2 (0x0053e000)
[root@localhost mydumper-0.6.2]#  LD_DEBUG=libs /usr/local/bin/mydumper -v
      2707:     find library=libmysqlclient.so.18 [0]; searching
      2707:      search cache=/etc/ld.so.cache
      2707:      search path=/lib/tls/i686/sse2:/lib/tls/i686:/lib/tls/sse2:/lib/tls:/lib/i686/sse2:/lib/i686:/lib/sse2:/lib:/usr/lib/tls /i686/sse2:/usr/lib/tls/i686:/usr/lib/tls/sse2:/usr/lib/tls:/usr/lib/i686/sse2:/usr/lib/i686:/usr/lib/sse2:/usr/lib             (system s earch path)
      2707:       trying file=/lib/tls/i686/sse2/libmysqlclient.so.18
      2707:       trying file=/lib/tls/i686/libmysqlclient.so.18
      2707:       trying file=/lib/tls/sse2/libmysqlclient.so.18
      2707:       trying file=/lib/tls/libmysqlclient.so.18
      2707:       trying file=/lib/i686/sse2/libmysqlclient.so.18
      2707:       trying file=/lib/i686/libmysqlclient.so.18
      2707:       trying file=/lib/sse2/libmysqlclient.so.18
      2707:       trying file=/lib/libmysqlclient.so.18
      2707:       trying file=/usr/lib/tls/i686/sse2/libmysqlclient.so.18
      2707:       trying file=/usr/lib/tls/i686/libmysqlclient.so.18
      2707:       trying file=/usr/lib/tls/sse2/libmysqlclient.so.18
      2707:       trying file=/usr/lib/tls/libmysqlclient.so.18
      2707:       trying file=/usr/lib/i686/sse2/libmysqlclient.so.18
      2707:       trying file=/usr/lib/i686/libmysqlclient.so.18
      2707:       trying file=/usr/lib/sse2/libmysqlclient.so.18
      2707:       trying file=/usr/lib/libmysqlclient.so.18

Libmysqlclient.so. 18 not found

[root@localhost mydumper-0.6.2]# locate libmysqlclient.so.18
/usr/local/mysql-5.6.26-linux-glibc2.5-i686/lib/libmysqlclient.so.18
/usr/local/mysql-5.6.26-linux-glibc2.5-i686/lib/libmysqlclient.so.18.1.0
[root@localhost mydumper-0.6.2]# ll /usr/local/mysql-5.6.26-linux-glibc2.5-i686/lib/libmysqlclient.so.18
lrwxrwxrwx. 1 root mysql 24 Aug 13 14:18 /usr/local/mysql-5.6.26-linux-glibc2.5-i686/lib/libmysqlclient.so.18 -> libmysqlclient.so.18.1.0

Then copy /usr/ local/mysql- 5.6. 26-linux-glibc2. 5-i686/lib/libmysqlclient.so. 18.1. 0 to /usr/lib/ Kinoshita:

[root@localhost mydumper-0.6.2]# cp /usr/local/mysql-5.6.26-linux-glibc2.5-i686/lib/libmysqlclient.so.18.1.0 /usr/lib/libmysqlclient.so.18
[root@localhost mydumper-0.6.2]# ldd /usr/local/bin/mydumper                                                                                      linux-gate.so.1 =>  (0x00805000)
        libmysqlclient.so.18 => /usr/lib/libmysqlclient.so.18 (0x0019f000)
        libpthread.so.0 => /lib/libpthread.so.0 (0x006fc000)
        libm.so.6 => /lib/libm.so.6 (0x0072b000)
        librt.so.1 => /lib/librt.so.1 (0x00720000)
        libdl.so.2 => /lib/libdl.so.2 (0x00719000)
        libglib-2.0.so.0 => /lib/libglib-2.0.so.0 (0x0055e000)
        libgthread-2.0.so.0 => /lib/libgthread-2.0.so.0 (0x00918000)
        libpcre.so.0 => /lib/libpcre.so.0 (0x021a8000)
        libz.so.1 => /lib/libz.so.1 (0x0067b000)
        libc.so.6 => /lib/libc.so.6 (0x0091d000)
        libstdc++.so.6 => /usr/lib/libstdc++.so.6 (0x07b14000)
        libgcc_s.so.1 => /lib/libgcc_s.so.1 (0x0068f000)
        /lib/ld-linux.so.2 (0x0053e000)

test:

[root@localhost mydumper-0.6.2]# mydumper --help
Usage:
  mydumper [OPTION...] multi-threaded MySQL dumping

Help Options:
  -?, --help                  Show help options

Application Options:
  -B, --database              Database to dump
  -T, --tables-list           Comma delimited table list to dump (does not exclude regex option)
  -o, --outputdir             Directory to output files to
  -s, --statement-size        Attempted size of INSERT statement in bytes, default 1000000
  -r, --rows                  Try to split tables into chunks of this many rows. This option turns off --chunk-filesize
  -F, --chunk-filesize        Split tables into chunks of this output file size. This value is in MB
  -c, --compress              Compress output files
  -e, --build-empty-files     Build dump files even if no data available from table
  -x, --regex                 Regular expression for 'db.table' matching
  -i, --ignore-engines        Comma delimited list of storage engines to ignore
  -m, --no-schemas            Do not dump table schemas with the data
  -k, --no-locks              Do not execute the temporary shared read lock.  WARNING: This will cause inconsistent backups
  --less-locking              Minimize locking time on InnoDB tables.
  -l, --long-query-guard      Set long query timer in seconds, default 60
  -K, --kill-long-queries     Kill long running queries (instead of aborting)
  -D, --daemon                Enable daemon mode
  -I, --snapshot-interval     Interval between each dump snapshot (in minutes), requires --daemon, default 60
  -L, --logfile               Log file name to use, by default stdout is used
  --tz-utc                    SET TIME_ZONE='+00:00' at top of dump to allow dumping of TIMESTAMP data when a server has data in different time zones or data is being moved between servers with different time zones, defaults to on use --skip-tz-utc to disable.
  --skip-tz-utc
  --use-savepoints            Use savepoints to reduce metadata locking issues, needs SUPER privilege
  --success-on-1146           Not increment error count and Warning instead of Critical in case of table doesn't exist
  --lock-all-tables           Use LOCK TABLE for all, instead of FTWRL
  -h, --host                  The host to connect to
  -u, --user                  Username with privileges to run the dump
  -p, --password              User password
  -P, --port                  TCP/IP port to connect to
  -S, --socket                UNIX domain socket file to use for connection
  -t, --threads               Number of threads to use, default 4
  -C, --compress-protocol     Use compression on the MySQL connection
  -V, --version               Show the program version and exit
  -v, --verbose               Verbosity of output, 0 = silent, 1 = errors, 2 = warnings, 3 = info, default 2

Get it done.

Enlightenment: The best way to solve the problem is to check the documentation and instructions on the official website.
Install MySQL ODBC connector prompt error 1918 perfect solution (non installation of VC + + library method)

Local environment:
operating system – windows7 32 bit
MYSQL version – MYSQL Ver 14.14 Distrib 5.7.25, for Win32 (AMD64)
Execution process:

    start – control panel – systems and security – management tools – data source (ODBC) wanted to add MYSQL, found that MYSQL could not be found. An error was reported during the installation of mysql-Connector-ODBc-8.0.15-Win32 (mysql 5.7 supported) on the official website.

Error contents:

Error installing ODBC driver MySQL ODBC5.3 ANSI
Driver,ODBC error 13:Unable to load MySQL ODBC5.3 ANSI Driver ODBC driver
Installation routine, because there is a system error code 126: ... \Myodbc5S.dll) cannot find the specified module.

Solutions:
Solution 1: general online solution: install Microsoft Visual C++ 2013 Redistributable Package above. Verification results: Installing mysql-Connector-ODBC still prompts for the same error message after the following three versions are installed on the machine.

Microsoft Visual C++ 2015 Redistributable Package
Microsoft Visual C++ 2013 Redistributable Package
Microsoft Visual C++ 2010 Redistributable Package

Solution 2: Replace the lower version of mysql-Connector-ODBC. Try installing mysql-connector-odbc-5.1.13-win32.msi verification solution :(the current environment has all three versions of vc++ installed) install the lower version (5.1.13) successfully! The ODBC data source manager was able to successfully create the user data source.

Installing VB6.0 under win7 (error accessing the ole Registry)

Some time ago, after the installation of vb6.0 in the flagship version of Win7, when opening the vb development environment, “OLE registry error access” (Chinese error description forgot to make a record) prompt error, after referring to the article reproduced below to install, after the completion of the installation, can normally run under Win7 vb development (I also had some small problems during the installation process, see the note in red at the end of the article), now the original article is recorded for future use.


There are thousands of legacy applications that need support, and people like me who speak VB6 need to install tools on our workstations in order to implement and test updates to these legacy applications and so on. It is also helpful when I need a quick tool to use in my daily work.

This process has been tested on Windows 7, both 32-bit and 64-bit with no problems. Here is how I installed visualbasic6 on my Windows 7 machine.

      1. Close the UAC.
      1. Insert the Visual Studio 6 CD.
      1. Exit the autorun setup.
      1. Browse to the root folder of the VS6 CD.
      1. Right-click on Setup.EXE and select Run as Administrator.
      1. For a warning about this and other program compatibility helpers, click Run Program.
      1. Click Next.
      1. Click “I accept the agreement” and then Next.
      1. Enter the name and company information and click Next.
      1. Select Custom Settings and click Next.
      1. Click Continue, and then OK.
      1. The installation will “think for itself” for about 2 minutes. You can verify the processing by launching Task Manager and checking the CPU usage of ACMSETUP.EXE.
      1. In the list of options, select the following:
      1. Microsoft Visual Basic 6.0ActiveXData AccessGraphics
      1. All other options should be unchecked. Click “Continue” and the installation process will continue.
      1. Finally, a Successful Completion dialog box will appear, where you can click Ok. At this point, Visual Basic 6 is installed.
      1. If you do not have the MSDN CD, clear the checkboxes in the next dialog box and click Next. You will receive a warning that MSDN is missing, but simply click Yes to accept it.
      1. Click Next to skip the Installshield installation. This is a very old version that you don’t want anyway.
      1. Click Next again to skip the installation of BackOffice, VSS, and SNA Server. Not required!
      1. In the next dialog box, clear the Register Now checkbox, and then click Finish

.The wizard will exit and you are done. You can find VB6 under Start, All program, Microsoft Visual Studio 6. Enjoy!

Update

You may notice that after successfully installing VB6 on Windows 7, working in the IDE is a bit slow. For example, resizing objects on a form can be a real pain.

After installing VB6, you will want to change the compatibility settings for the IDE executable.

Using Windows Explorer, browse to the location where you installed VB6. By default, the path is C:\Program Files\Microsoft Visual Studio\VB98\ Right-click on the VB6.exe program file and select properties from the context menu. click the Compatibility tab. Add a checkbox to each of the checkboxes:
Run this program in Windows XP compatibility mode (Service Pack 3) Disable visual themes Disable desktop combinations Disable display scaling High DPI settings

After changing these settings and starting the IDE, things should return to normal and the IDE should no longer be sluggish

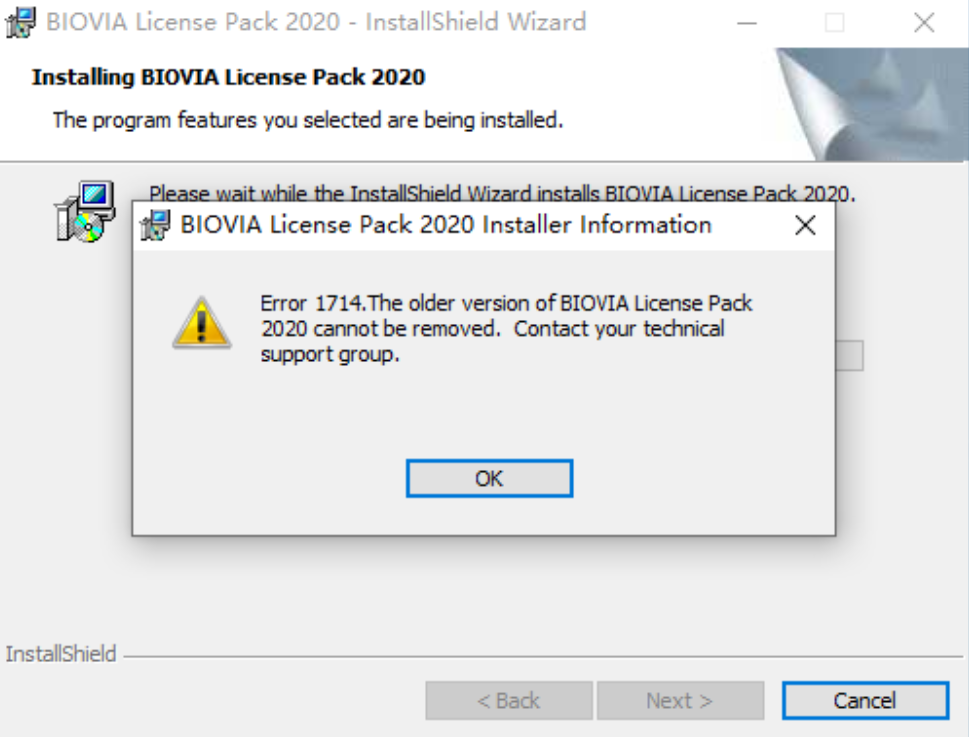
ERROR 1714. THE OLDER VERSION OF BIOVIA LICENSE PACK 2020 CANNOT BE REMOVED. CONTACT YOUR TECHNICAL SUPPORT GROUP.

The following error appears during the installation of MS2020, as shown in the following figure:

After clicking OK, the installation is complete! Finally, it can run normally under the test. I don’t know why Error 1714 is caused. Please record it for the time being. Anyone who knows it can leave a comment, thank you!

BUILD FAILED error when installing ruby ​​2.4.3

BUILD FAILED error when installing ruby ​​2.4.3

Error occurred when installing ruby ​​2.4.3 on MacOS Big Sur 11.2.2

% rbenv install 2.4.3
Downloading openssl-1.1.1k.tar.gz...
-> https://dqw8nmjcqpjn7.cloudfront.net/892a0875b9872acd04a9fde79b1f943075d5ea162415de3047c327df33fbaee5
Installing openssl-1.1.1k...
Installed openssl-1.1.1k to /Users/satou/.rbenv/versions/2.4.3

Downloading ruby-2.4.3.tar.bz2...
-> https://cache.ruby-lang.org/pub/ruby/2.4/ruby-2.4.3.tar.bz2
Installing ruby-2.4.3...

WARNING: ruby-2.4.3 is past its end of life and is now unsupported.
It no longer receives bug fixes or critical security updates.

ruby-build: using readline from homebrew

BUILD FAILED (macOS 11.2.2 using ruby-build 20210423)

Inspect or clean up the working tree at /var/folders/h3/4830l_xd6hj1msdhp0v_s3j40000gn/T/ruby-build.20210429133129.9166.uvvuHD
Results logged to /var/folders/h3/4830l_xd6hj1msdhp0v_s3j40000gn/T/ruby-build.20210429133129.9166.log

Last 10 log lines:
compiling fiber.c
linking shared-object fiber.bundle
compiling closure.c
closure.c:263:14: error: implicit declaration of function 'ffi_prep_closure' is invalid in C99 [-Werror,-Wimplicit-function-declaration]
    result = ffi_prep_closure(pcl, cif, callback, (void *)self);
             ^
1 error generated.
make[2]: *** [closure.o] Error 1
make[1]: *** [ext/fiddle/all] Error 2
make: *** [build-ext] Error 2

solve

Solved by the following command

% RUBY_CFLAGS=-DUSE_FFI_CLOSURE_ALLOC rbenv install 2.4.3  

Install the mxnet-gpu version to solve the problem of “OSError: libnccl.so.2” when importing

https://developer.nvidia.com/nccl/nccl-download Download deb file

Install the repository
For the local NCCL repository:sudo dpkg -i nccl-repo-<version>.deb

Update the APT database:sudo apt update

Use APT to install libnccl2. In addition, if you need to use NCCL to compile the application, install the libnccl-dev package at the same time.
sudo apt install libnccl2=2.9.6-1+cuda10.2 libnccl-dev=2.9.6-1+cuda10.2

[solution] install opencv3 with opencv4

Step 1: Download opencv download, the source code compilation package of opencv3. Step 2: when cmake, enter: cmake - D cmake_ INSTALL_ PREFIX=/home/username/opencv3 -D CMAKE_ BUILD_ TYPE="Rlease" -D OPENCV_ GENERATE_ Pkgconfig = on.. Step 3: compile and install

    make
    make install

Step 4: configure the environment

    sudo vi  /etc/ld.so.conf.d/opencv.conf
    input: /home/username/opencv3/lib

Step 5: configure bashrc
VI ~ /. Bashrc , and add:

    #opencv-3.4.12
    export PKG_CONFIG_PATH=${PKG_CONFIG_PATH}:/home/username/opencv3/lib/pkgconfig
    export LD_LIBRARY_PATH=${LD_LIBRARY_PATH}:./home/username/opencv3/lib

After saving, enter source ~ /. Bashrc
at this time, PKG config — modversion opencv will display 3.4.12, and opencv4 will display 4.2.0

Step 6: use opencv3
to edit CMakeLists.txt Before find (openCV required) , enter: set (cmake)_ PREFIX_ PATH "/home/username/opencv3")

Ruby Install Error running ‘requirements_osx_brew_update_system ruby-2.3.1

Operating system: macOS 10.12.1

Install Ruby 2.3.1 error

The specific error message is as follows.

chaorenbuhuifeideMacBook-Air:~ chaorenbuhuifei$ rvm install 2.3.1

Searching for binary rubies, this might take some time.

Found remote file https://rubies.travis-ci.org/osx/10.12/x86_64/ruby-2.3.1.tar.bz2

Checking requirements for osx.

Installing requirements for osx.

Updating system…….

Error running ‘requirements_osx_brew_update_system ruby-2.3.1′,

showing last 15 lines of /Users/chaorenbuhuifei/.rvm/log/1481424365_ruby-2.3.1/update_system.log

https://github.com/Homebrew/homebrew/wiki/Common-Issues

and make sure `brew update` works before continuing.’

++ rvm_pretty_print stderr

++ case “${rvm_pretty_print_flag:=auto}” in

++ case “${TERM:-dumb}” in

++ case “$1” in

++ [[ -t 2 ]]

++ return 1

++ printf %b ‘Failed to update Homebrew, follow instructions here:

https://github.com/Homebrew/homebrew/wiki/Common-Issues

and make sure `brew update` works before continuing.\n’

Failed to update Homebrew, follow instructions here:

https://github.com/Homebrew/homebrew/wiki/Common-Issues

and make sure `brew update` works before continuing.

++ return 1

Requirements installation failed with status: 1.

Error running ‘requirements_osx_brew_update_system ruby-2.3.1’


How to Solve:

Step 1:

$ brew install autoconf automake libtool pkg-config apple-gcc42 libyaml readline libxml2 libxslt libksba openssl sqlite

This method will report error

Error: No available formula with the name “apple-gcc42”

==> Searching for similarly named formulae…

Error: No similarly named formulae found.

==> Searching taps…

This formula was found in a tap:

homebrew/dupes/apple-gcc42

To install it, run:

brew install homebrew/dupes/apple-gcc42


Step 2:

$brew install homebrew/dupes/apple-gcc42


then re-install

$rvm install 2.3.1


Error in PostgreSQL installation of win10

problem

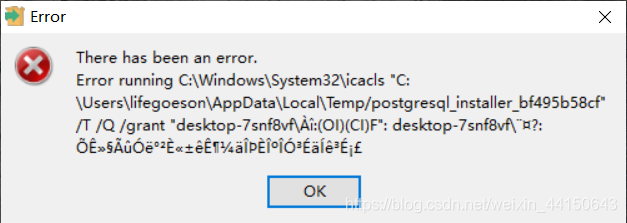
The installation of PostgreSQL in win10 reports an error. The 10, 11 and 12 versions downloaded from the official website are not available. The error is as follows

there has been an error. Error running icacls
"c:\Users\abdo\AppData\Local\Temp/postgresql_installer_b4be1776ca"/T/Q/grant: Access is denied


How to fix
install this version https://get.enterprisedb.com/postgresql/postgresql-11.2-1-windows-x64.exe

https://superuser.com/questions/1475822/postgresql-install-fail-in-windows-10-icacls-error-access-denied

Python installation of third-party libraries reported an error: “these packages do not match the hashes from the requirements file.”

Problem: an error “these packages do not match the hashes from the requirements file” appears when installing the third-party library

Reason: the download error is usually caused by the network speed problem, resulting in the corresponding hash value does not match.

Solution: when pip is needed, add the “- upgrade” parameter. Usually, the download will report an error timeout at this time, so adding a “- default timeout = 100000” is more secure (the value of timeout can vary according to the situation).

pip install --upgrade --default-timeout=100000 packagename

Later, when installing pyqt5, I encountered the same problem. I still reported an error by using the above method. After using the online method, I solved the problem

# Install pyqt5
pip install PyQt5 -i https://pypi.douban.com/simple
# Install pyqt5-tools
pip install PyQt5-tools -i http://pypi.douban.com/simple --trusted-host=pypi.douban.com

Yaml Install ERROR: Cannot uninstall ‘PyYAML’.

Error: cannot install pyyaml.

Article Directory:

1.Error cause analysis II. Final error solution

1.Error analysis

1. Start installing
I started installing yaml </ code>, using the following command:

pip install yaml

It is installed correctly and can be imported correctly from the command line, and then an error is reported when executing the program: attributeerror: module 'yaml' has no attribute 'fullloader' </ code> then I checked the version of yaml I installed:

pip show yaml   # show is version 3.12, which is too old

2. Error exploration1
check the tutorial online and say that you want to update the yaml version to 5.2 . The update method is as follows:

pip install -U PyYAML

In the process of updating, an error was reported:

ERROR: Cannot uninstall 'PyYAML'. It is a distutils installed project and thus we cannot accurately determine which files belong to it which would lead to only a partial uninstall.

And then continue to find out how to solve this problem. Most of the solutions given are: delete all the yaml files under site packages , and guess what, LZ has been deleted completely. As a result, it is still this by when installing. Are you angry or not!

3. Error exploration 2

But I had to go to pypi website to download the wheel, and then install it directly

PyYAML-5.2-cp27-cp27m-win_ amd64.whlPyYAML-5.2-cp27-cp27m-win32.whl

Then install the wheels directly:

pip install PyYAML-5.2-cp27-cp27m-win_amd64.whl
# Then it said the platform is not supported, I looked at the amd may not be supported, so I tried again 32

pip install PyYAML-5.2-cp27-cp27m-win32.whl
# Again, the platform is not supported, I'm speechless

it seems that exploration is a failure. Let's find another way!

2、 Final error resolution

Use the following installation method to solve the problem:

# it worked
pip install --ignore-installed PyYAML

Another one, I don’t test it. You can try it

pip install  --force-reinstall PyYAML

or

pip install docker-py --ignore-installed PyYAML

Reference:
1 https://github.com/pypa/pip/issues/5247
2、 https://stackoverflow.com/questions/49911550/how-to-upgrade-disutils-package-pyyaml