ImportError: numpy.core.multiarray failed to import
: ImportError: numpi.core.multiarray failed to import 2, and imporplotlib fails to import 2. Now I want to talk about the real solution!!
: ImportError: numpy.core.multiarray failed to import
PIP install -u numpy
installation error
installation error
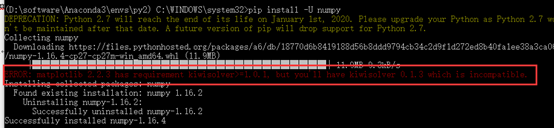
this error really took a long time, then reinstall matplotlib… The following
Ii. Reinstall Matplotlib
PIP install –upgrade matplotlib
It is much faster to use an image such as PIP install – I [mirror source link] -upgrade matplotlib
Summary of common mirror sources:
- mirror tsinghua university open source station https://mirrors.tuna.tsinghua.edu.cn/ netease open source image https://opsx.alibaba.com/mirror/ http://mirrors.163.com/ alibaba open source image stand
Still report an error after that.

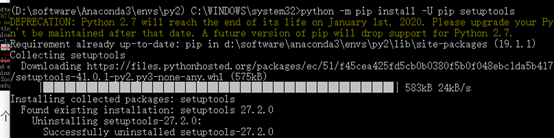
See a lot of blogs that mention python – M for installation
- first type python-m PIP install-u PIP setuptools to upgrade, or directly jump to the next step
 input python-m PIP install matplotlib for automatic installation, waiting for the completion of the installation.
TSC: Fast TSC Calibration Failed solution
For workstations
tsc : Fast TSC calibration failed

smpboot : do_boot_cpu failed(-1) to wakeup CUP#N
Error reporting shall be handled as follows:
Press F11 to enter the BIOS mode (keys may be different for each machine), set the setting to set default, save the changes and restart, the machine can restart.
Compile “failed with error code 1 solution
2, appear –record/TMP /pip-_6ys7mq9-record/install-record. TXT –single-version –compile” failed with error code 1 in…
3, this is due to the lack of virtual memory, my computer – advanced Settings – advanced – virtual memory, restart
How to Fix Gtk-Message: Failed to load module “canberra-gtk-module”
sudo apt install libcanberra-gtk-module libcanberra-gtk3-module
Sometimes just before installing a reference materials
https://askubuntu.com/questions/342202/failed-to-load-module-canberra-gtk-module-but-already-installed
How to Fix Spring Boot OTS parsing error: Failed to convert WOFF 2.0
When I was using Spring Boot, all the files related to my page were placed in the SRC /resource/ directory. After starting the project, the icon of the page (font-awesome is used) could not be used. I have checked the official document and explained as follows:
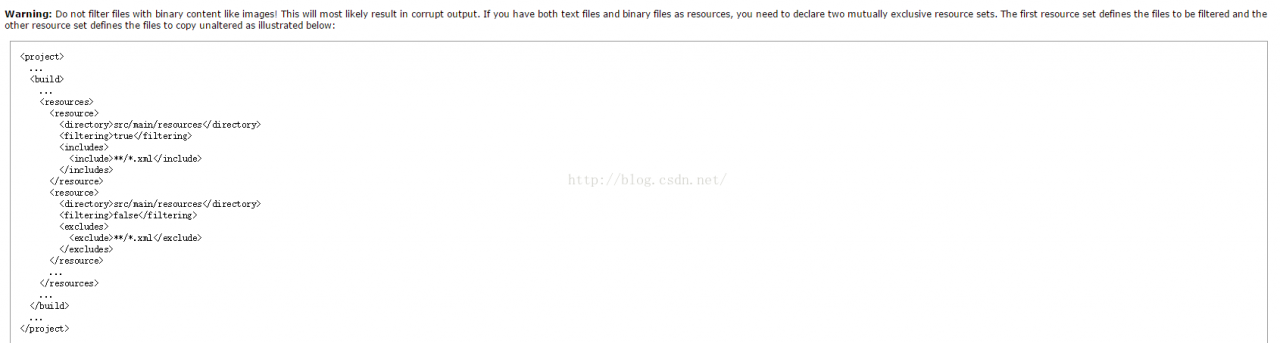 means that turning on The Filtering function using Maven’s Resource plug-in destroys files with binary content.
According to the official document needs to modify the configuration as follows (this project is an example) :
<resources>
            <resource>
                <directory>${project.basedir}/src/main/resources</directory>
                <filtering>true</filtering>
                <excludes>
                    <exclude>static/fonts/**</exclude>
                </excludes>
            </resource>
            <resource>
                <directory>${project.basedir}/src/main/resources</directory>
                <filtering>false</filtering>
                <includes>
                    <include>static/fonts/**</include>
                </includes>
            </resource>
        </resources>
Static directory part content:
After the project is compiled, the files will not be corrupted.
OpenSCManager Error 1722
Execute the following command in server A (Windows Server 2008 R2) to access the service health of remote server B (Windows Server 2003) :
sc \\servername query “servicename”
The results returned are as follows:
[SC] OpenSCManager FAILED 1722: The RPC server is unavailable.
Solution: Just restart server A. Because I really don’t know what causes it, it is OK to run the command in my native machine, but the operating system of my native machine is exactly the same as that of server A, so it should not be the setting problem of server B.
Reproduced in: https://www.cnblogs.com/yumianhu/p/3707538.html
IOS development NSURLSession/NSURLConnection HTTP load failed solution
Recently, I have been busy for the launch of the new storage app. I have been busy for nearly a month. After a period of 996, I can finally take a breath today and continue to update my blog. This paper records the problems and solutions encountered when sending a HTTPS request in iOS 9. It is hoped that through this paper, we can have a deeper understanding of the configuration of ATS.
Problem description
When developing app, I encountered the problem of sending HTTPS request in iOS 9 :
NSURLSession/NSURLConnection HTTP load failed (kCFStreamErrorDomainSSL, -9801)As we know, after , iOS 9, all network requests use HTTPS by default. If you send HTTP request, the following error will be reported. But we can allow HTTP request by setting the value of nsapptransportsecuritynsallowsarbitraryloads to be YES :
App Transport Security has blocked a cleartext HTTP (http://) resource load since it is insecure. Temporary exceptions can be configured via your app's Info.plist file.info.plist
![]()
This solves the HTTP request problem, but when I send a HTTPS request, the HTTP laod failed problem still occurs. Although the above method can also be used to solve this problem, it is not the fundamental solution.
The solution
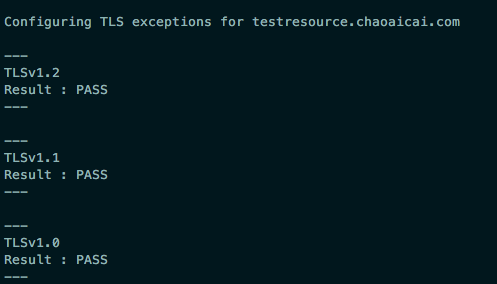
Through the analysis, doubt is TLS problem, because the 9 default need TLS1.2 iOS version to encrypt data, if the server does not support the TLS1.2 , the URLSession: task: didCompleteWithError: returns the nil error , However, the back-end development colleagues said that the server supports TLS1.0, TLS1.1 and TLS1.2, it seems that this is not the problem of TLS. Therefore, I was not assured. I used nscurl to test the test server. As expected, TLS1.2 was not supported.
# 加 --verbose 是为了显示详细的调试信息
/usr/bin/nscurl --ats-diagnostics --verbose https://testresource.chaoaicai.com
It can be seen from the output that the server only supports TLS1.0. Therefore, the colleagues in the background development were asked to test and modify, and then tested again. It was found that the server supports TLS1.2, and the network request of HTTPS is normal.
ATS exception configuration
In fact, for the server does not support TLS1.2, but the client to send HTTPS request there is another solution, is to configure ATS, set the lowest TLS version, as shown in infos.plist :
<key>NSAppTransportSecurity</key>
  <dict>
  <key>NSExceptionDomains</key>
  <dict>
    <!--你的https域名-->
    <key>testresource.chaoaicai.com</key>
    <dict>
      <!--允许子域-->
      <key>NSIncludesSubdomains</key>
      <true/>
      <!--TLS允许的最低版本号-->
      <key>NSExceptionMinimumTLSVersion</key>
      <string>TLSv1.0</string>
    </dict>
  </dict>
</dict>
Where, the specific Settings of NSExceptionDomains are described below, where ATS can be understood in more detail
NSIncludesSubdomains: is applied to the domain name, the default is NONSExceptionAllowsInsecureHTTPLoads: whether to allow HTTP requests, YES (allow), the default is NONSExceptionMinimumTLSVersion: TLS version of the lowest NSExceptionRequiresForwardSecrecy: whether to pre encryption, NO (encryption is allowed, but does not support PFS: Perfect forward secrecy), default is YESNSRequiresCertificateTransparency: the need for effective signing certificate, YES (need), the default is NO
This paper just briefly introduces how to configure ATS, and solves the problem that HTTPS cannot be accessed because the server does not support TLS1.2. It is necessary to understand the specific workflow of HTTPS and TLS, please refer to relevant materials.
The resources
# # iOS issue record about NSURLSession/NSURLConnection HTTP load failed (kCFStreamErrorDomainSSL, - 9801)
IOS 9 comes with a series of tutorials
IOS 9.0
Clean up the pits in iOS9 adaptation (graphic)
Cocoa Keys
NSURLSession/NSURLConnection HTTP load failed (kCFStreamErrorDomainSSL, -9802) on a subdomain?
Windows Realtek USB wireless network card boot failure Rtlihvs. DLL module stop problem
June 4, 2020 Update:
Another reason was found that the USB wireless network card of the chip could not be connected to the USB interface of the monitor (USB interface is provided on the AOC monitor of the blogger).
It is speculated that the network card device could not be successfully initialized due to insufficient power supply of THE USB interface on the display when the system started. In this case, the network card can only be directly inserted into the host computer.
Or buy a separate USB extension cord and place it on the desktop (it may cause signal problems if some partners plug it into the host).
Problem description
After booting up, the wireless network card does not start successfully. When entering the device manager, you can see that the network card is marked as warning. The device can be successfully activated and used by disabling and enabling the device.
The log
In the Windows system log, we can see a warning log with the event ID of 10002, which is described as follows:
WLAN Extensibility Module has stopped.

Module Path: C:\WINDOWS\system32\Rtlihvs.dll
Analysis of the
Preliminary analysis indicates that the component version is too low (the current system is Windows 10) or the driver version is too low. Through the replacement of various versions of the driver can not solve the problem. Hence Google…
To solve
Reference: WLAN Extensibility Module has failed to start-up – Microsoft Community
The solution steps are as follows:
- Win + R open
regedit registry editor; Expand and locate to HKEY_LOCAL_MACHINE\SYSTEM\CurrentControlSet\ Class\{4d36e972-e325-11ce-bfc1-08002be10318}; There are several items beginning with 00, and the sub-items Ndi are searched in turn for the presence of IHVExtensions. Its contents are roughly as follows:
[HKEY_LOCAL_MACHINE\SYSTEM\CurrentControlSet\Control\Class\{4d36e972-e325-11ce-bfc1-08002be10318}\0008\Ndi\IHVExtensions]
"ExtensibilityDLL"="%SystemRoot%\\system32\\Rtlihvs.dll"
"UIExtensibilityCLSID"="{6C2A8CCA-B2A2-4d81-A3B2-4E15F445C312}"
"GroupName"="Realtek CCX SDK IHV Service"
"AdapterOUI"=dword:0000e04c
After confirmation, right-click IHVExtensions and select export and backup to any place. Delete IHVExtensions, restart the system and confirm, Fixed!
The Spring problem Failed to read Schema Document
schema_reference.4: Failed to read schema document 'http://www.springframework.org/schema/beans/spring-beans-2.5.xsd', because 1) could not find the document; 2) the document could not be read; 3) the root element of the document is not <xsd:schema>.One solution: Cut and paste the code and save it.
Sometimes you will find that a system that has been booting up properly in the past will one day report the following error:
(plain)
view plain
The copy
- org. XML, sax SAXParseException: schema_reference. 4: Failed to read the schema document ‘http://www.springframework.org/schema/beans/spring-beans-2.0.xsd’, because 1) could not find the document. 2) The document could not be read; 3) The root element of the document is not < xsd:schema> .
Obviously, the XSD file specified in the Spring XML configuration file cannot be read, mostly due to an outage or the temporary inability to connect to the Spring official website. You can use the browser type XSD file URL, such as: http://www.springframework.org/schema/beans/spring-beans-2.0.xsd for confirmation.
There are two common online solutions to this problem. The first is simple and effective, but cumbersome: convert all spring configuration files with XSD paths in the form of urls to paths in the form of CLASspath pointing to local XSD files, for example: Classpath: org/springframework/beans/factory/XML/spring beans – 2.5 XSD, another way is to build in the native web server, according to the URL to create the corresponding folder, in a corresponding XSD file, add “127.0.0.1 www.springframework.org” in the machine hosts file. In fact, both of these approaches are “skew” approaches, and to figure this out you need to start with Spring’s XSD file loading mechanism.
First of all: You must know that Spring always tries to look up the XSD file locally when it loads the XSD file (all versions of the XSD file are already included in the Spring JAR), and if it is not found, then it will go to the URL specified path to download. This is a perfectly reasonable thing to do, and it doesn’t look like it’s downloaded from the site every time. In fact, if all of your configurations are positive, your project can be started without an error if the network is disconnected. Spring load XSD file class is PluggableSchemaResolver, you can take a look at its source to verify the above statement. In addition, you can add in log4j.xml:
[HTML]
view plain
The copy
- < The logger name = “org. Springframework. Beans. Factory. XML” & gt; & lt; Level value = “all”/& gt; & lt; /logger>
Log to see how Spring loads XSD files.
Next, the question is why Spring didn’t find the required files locally and had to go to the web site to download them. And this is a very simple question. In many Spring JARS, under the meta-INf directory, there is a Spring.schemas, this is a property file, the contents of which are like the following:
(plain)
view plain
The copy
The
- http\://www.springframework.org/schema/beans/spring-beans-2.0.xsd=org/springframework/beans/factory/xml/spring-beans-2.0.xsd http\://www.springframework.org/schema/beans/spring-beans-2.5.xsd=org/ Springframework/beans/factory/XML/spring beans – 2.5 XSD http\://www.springframework.org/schema/beans/spring-beans-3.0.xsd=org/springframework/beans/factory/xml/spring-beans-3.0.xsd…
In fact, this file is spring’s mapping of the local location path of the XSD file that Spring USES to find the XSD file locally (that is, in spring’s JAR). The reason for not finding the XSD file may be that the version of the declared XSD file does not exist locally, other than the URL typing error. In general, the new version of the spring jar package will all the past version (2.0) should be self XSD packaging, and in the spring. The schema file to add the corresponding item, the situation of the problems are often the statement USES a high version of the XSD file, such as 3.0, but rely on the spring jar package is the previous version 2.5, due to the nature not may contain 3.0 2.5 XSD file, at this time will cause the spring to XSD file target site to download, in case of broken network or target site is not available, That’s what happened.
However, in implementation development, these errors are not uncommon, and the most common cause of this problem is related to the use of a Maven packaging plug-in called “Assembly.” Many projects need to package the project together with all the JARS it depends on into a jar package, and Maven’s Assembly plug-in is designed to do this. But because the engineering often rely on many jars, and be dependent jar can rely on other jar package, so that when the project rely on to a different version of the spring, when using the assembly for packaging, can only be one version under the jars of spring. The schemas files into finally hit the jar of the bag, it’s likely missing out on some version of the XSD local map, then the article mentioned at the beginning of the error. If your project is a single JAR, you can verify that this is not the case by examining the Spring.schemas file in the resulting JAR. In this case, the solution is generally recommended to use another packaged plug-in shade, which is indeed a more excellent tool than assembly. On the processing of Spring.schemas file, shade can merge all the Spring.schemas files in all jars.
This is the mechanism by which Spring loads XSD files and the analysis of the cause of the problem. In fact, we should have our project always load a native XSD file at startup, rather than download it every time we go to the site, which requires a review of your project in the context of the above.
In this paper, the original link: http://blog.csdn.net/bluishglc/article/details/7596118, reprint please indicate the source!
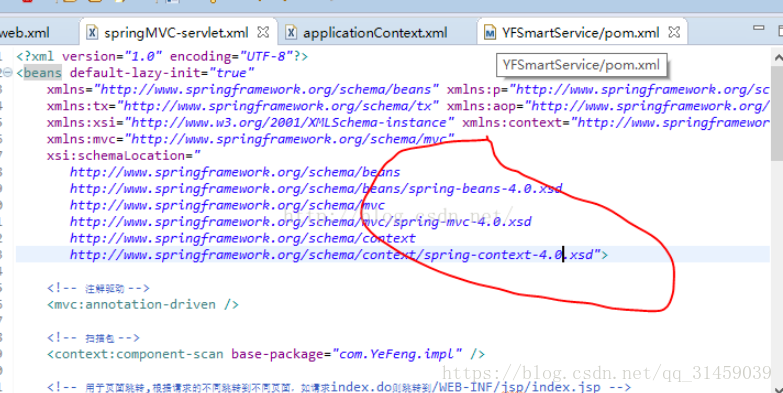
Through baidu and search, I found that it was caused by the mismatch between the version and configuration of spring That I relied on in Maven POM.xml.
I used
< in the pom.xml; spring.version> 4.0.9. RELEASE< /spring.version>
USES version 4.0, but the above is version 3.1
. Change the spring configuration in the above screenshot to 4.0, and do a clean operation at the same time, the problem is solved
The Python PIP installation module prompts the error failed to create process
The Python PIP installation module prompts the error failed to create process
(venv) F:\cxm\venv\Scripts>pip install ipython
failed to create process.
The reason:
This error was reported because python’s directory name or location has changed.
Solutions:
1. Find the directory where Python is modified and open scripts directory, as shown in the figure below. The diagram below:

2. Find the pip-script.py file, open it, and replace the following code on the first line with the path to the python. Exe you have modified:
Old:

New:

#!F:\cxm\venv\Scripts\python.exe # 变动的路径
3. You can now use the PIP installation module
http://www.chenxm.cc/post/643.html
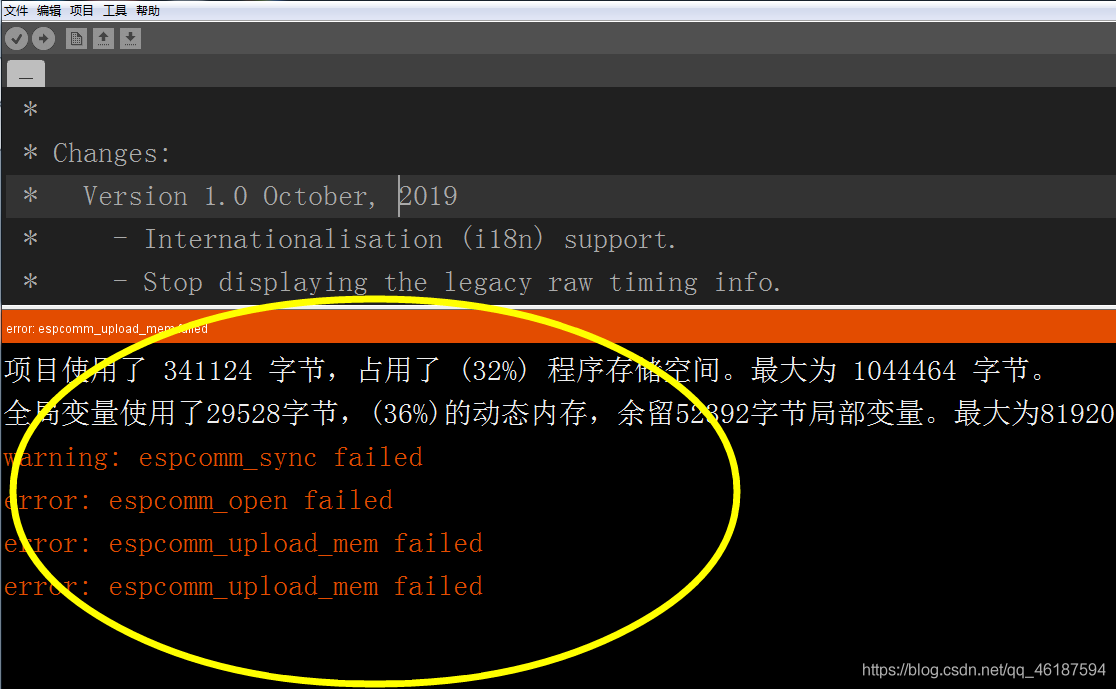
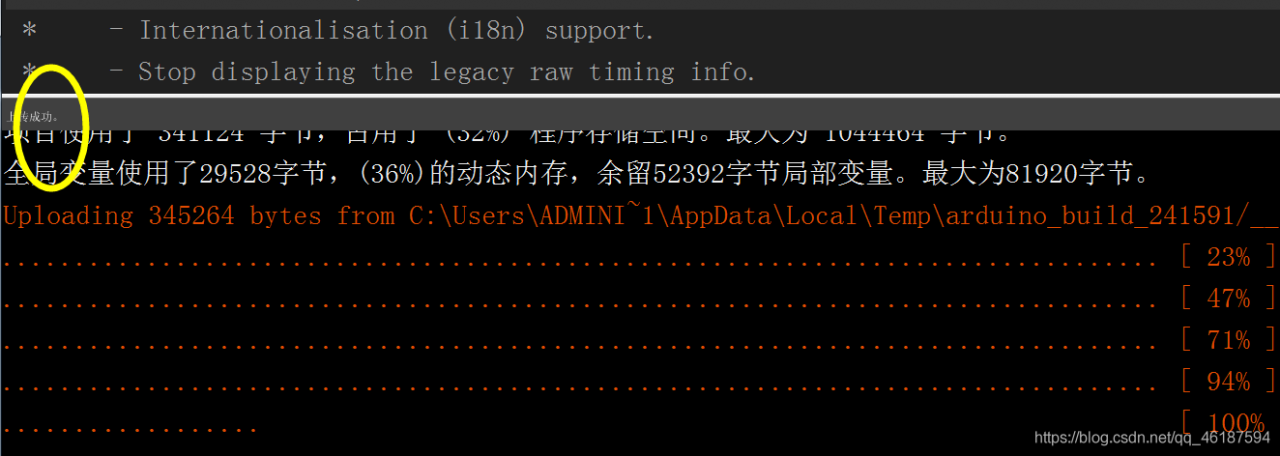
Warning: ESPCOMM_SYNC Failed Error: ESPCOMM_open Failed Error: ESPCOMM_UPLo
Warning: espcomm_sync failed
error: espcomm_open failed
error: espcomm_upload_mem failed
error: espcomm_upload_mem failed “
error: espcomm_upload_mem failed”
> 
solutions;
First, hardware
1. Check the connection
to confirm the connection is correct,
UTXD — RXD
URXD — TXD
VCC – 3.3 V
GND – GND
2. Check to see if the serial port on ESP8266 is being used by other software stations and click on the serial port monitor. If the serial port window pops up normally, it’s ok,
If you can’t pop up, check the tool — port — (select the appropriate port).
Second, other
1. Select the corresponding development board,
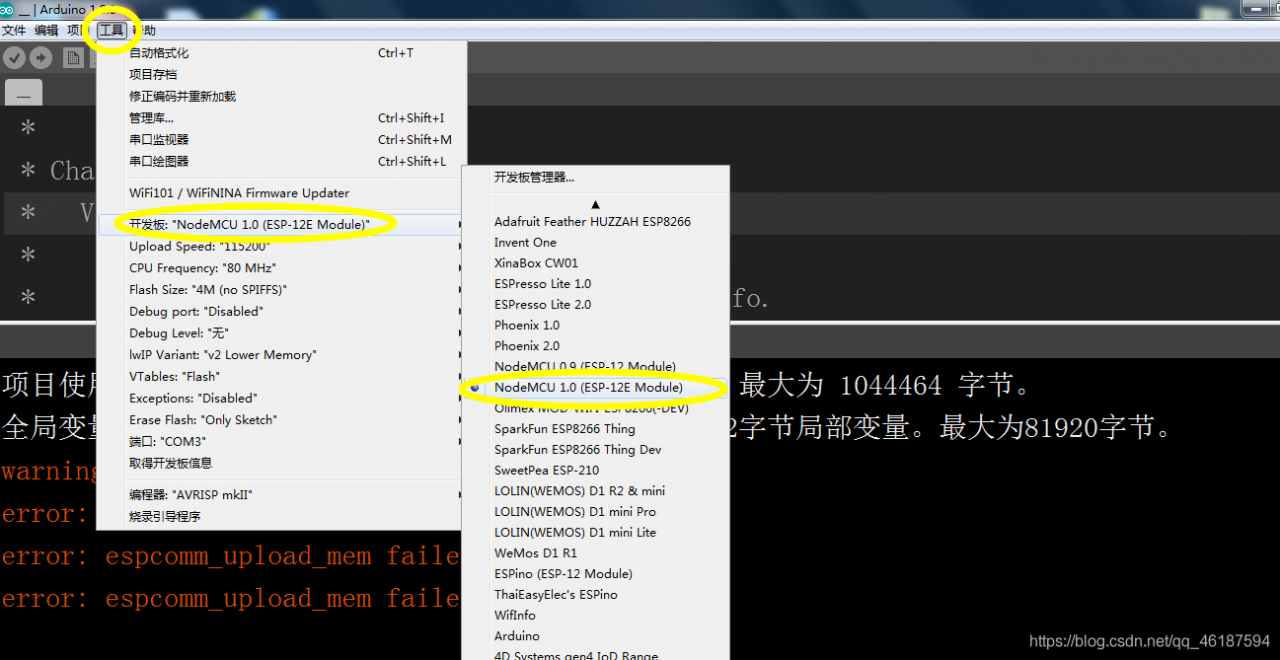
2.
Press Flash (or BOOT) not to lose, and then press the reset button to release, and then click to download, flash(or BOOT) do not loose, download the end of the release.
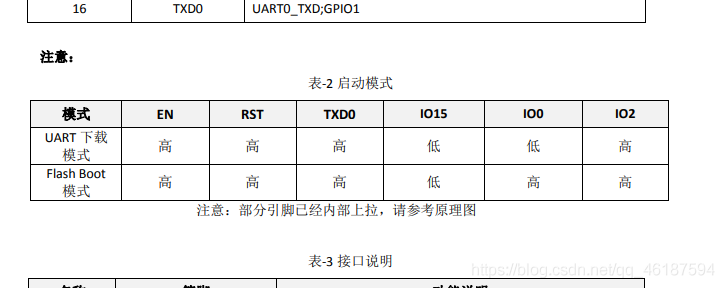
with ESP12 activation instructions
How to Fix Failed to open \EFI\BOOT\grubx64.efi Not Found
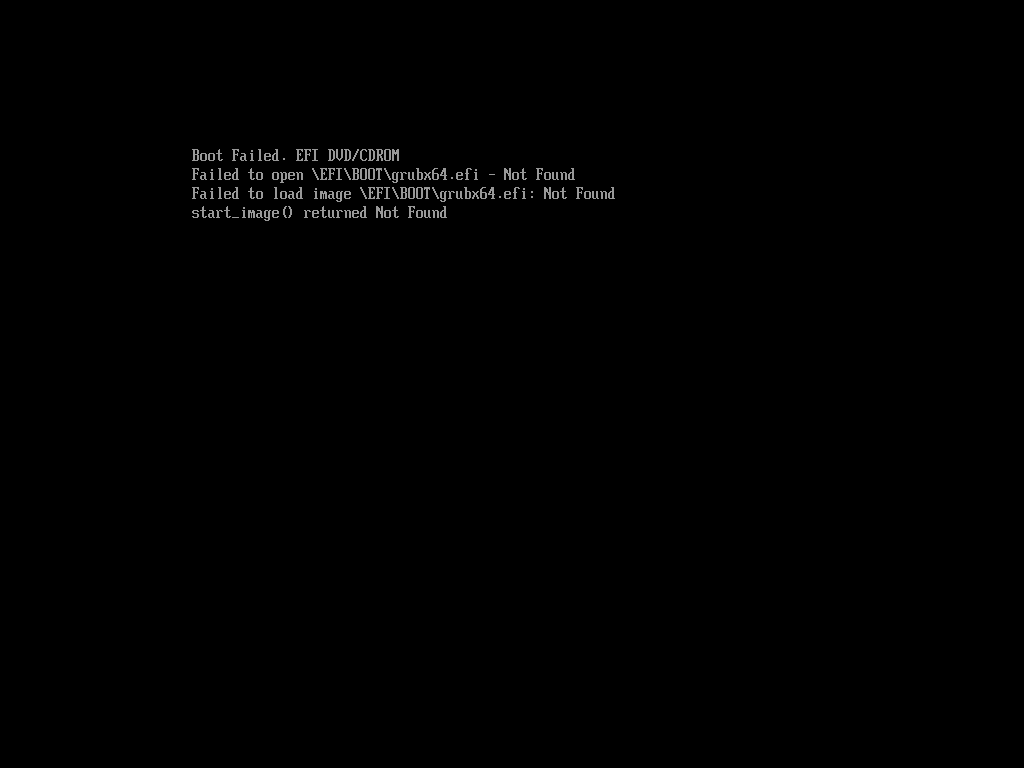
Failed to open \EFI\BOOT\grubx64.efi – Not Found
install the iso boot into the rescue system using centos 7.4.1708
cd /mnt/sysimage/boot
copy grubx64. Efi to the boot path.