PHP passes curl POST data to HTTPS, the same code, with no problems on the first server. It has been unsuccessful on the second server.
Turn on debug Mode and you find the following log.
code:
————————————————————-
Try { # 1. The init curl $ch = curl_init ();
* About to connect() to 180.101.147.89 Port8743 (#1)
* Trying 180.101.147.89…
* Connected to 180.101.147.89(180.101.147.89) Port 8743 (#1)
* NSS error -5938(PR_END_OF_FILE_ERROR)
* Encountered end of file
* Closing connection 1
————————————————————-
Found an error calling HTTPS with the curl command:
————————————————————-
[root@localhost ~]# curl https://*.*.*.*
curl: (35) Encountered end of file
————————————————————-
Reason: You need to force the SSL version. Such as:
-2, –sslv2 Use sslv2 (SSL) -3, Sslv3 Use sslv3 (SSL) –ssl-allow-beast allow security arrest to improve interop (SSL) –stderr FILE Where to redirect stderr.-means stdout –tcp-nodelay Use the ctod TCP_NODELAY option -t, –telnet-option OPT=VAL Set Telnet option –tftp-blksize VALUE Set TFTP blksize option (must be > 512) -z, –time-cond time Transfer based on a time condition -1, –tlsv1 Use => TLSv1 (SSL) – tlsv1.0 Use tlsv1.0 (SSL) – tlsv1.1 Use tlsv1.1 (SSL) – tlsv1.2 Use tlsv1.2 (SSL)
Add parameters — TLSV1 solves the problem:
[root@localhost conf.d]# curl –tlsv1 https://*.*.*.*
curl: (60) Peer’s certificate issuer hasbeen marked as not trusted by the user.
More details here: http://curl.haxx.se/docs/sslcerts.html
…
Reference: http://php.net/manual/en/function.curl-setopt.php
Select the SSL version you want:
CURLOPT_SSLVERSION
One Of CURL_SSLVERSION_DEFAULT (0), curl_ssl1 (1), curl_sslv2 (2), curl_sslv3 (3), CURL_SSLVERSION_TLSv1_0 (4), CURL_SSLVERSION_TLSv1_1 or (5) CURL_SSLVERSION_TLSv1_2 (6).
Since tlSV1 is used here, the following sentence is added to code to solve the problem:
curl_setopt($ch, CURLOPT_SSLVERSION, 1);
The original address: https://support.unity3d.com/hc/en-us/articles/206496883-What-is-CS0120-
symptoms
I got the following error on the Console:
Error CS0120: An object reference is required to access non-static member ‘__’
why
There are two situations that can cause this error, listed below:
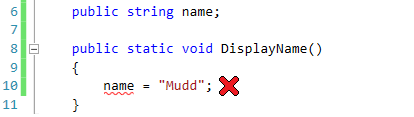
This error occurs when ol> attempts to directly reference a non-static variable in a static method.
The error message given in this example is:
Error CS0120: An object reference is required to access non-static member ‘myscript.name’
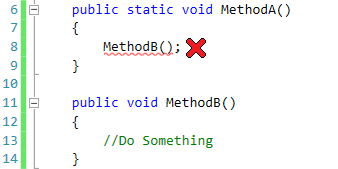
This error occurs when ol> calls another non-static method in a static method.
The error message given in this example is:
Error CS0120: An object reference is required to access non-static member ‘myscript.methodb ()’
The solution
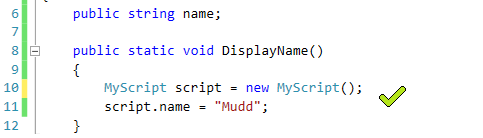
CS0120 can be resolved by creating an instance that references this non-static variable:
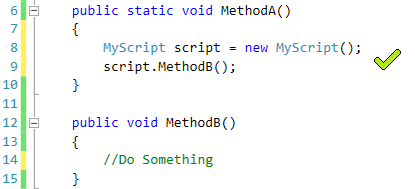
CS0120 can be resolved by creating an instance that references this non-static method:
For more information
https://msdn.microsoft.com/en-us/library/s35hcfh7.aspx
Solutions:
Directly according to the prompt to enter the BIOS setting interface to find the boot if there is an error on the prompt to press F to enter the BIOS function, will cancel it save exit will be able to enter the system normally
Yes, the input is in, but will the CPU burn off because the voltage keeps getting too high?Unknown sleep and complete
sudo docker run hello-world
docker: Error response from daemon: Get https://registry-1.docker.io/v2/: net/http: request canceled while waiting for connection (Client.Timeout exceeded while awaiting headers). See ‘docker run –help’.
Modify docker image source:
The default source of Docker is foreign official source, the download speed is slow, can be changed to domestic, speed up
Plan a
Modify or add /etc/docker/daemon.json
# vi /etc/docker/daemon.json
{
“registry-mirrors”: [“http://hub-mirror.c.163.com”]
}
systemctl restart docker.service
Scheme 2
Modified or new/etc/sysconfig/docker, additional parameters after the OPTIONS variable – registry-mirror=https://docker.mirrors.ustc.edu.cn
# vi /etc/sysconfig/docker
OPTIONS=’–selinux-enabled –log-driver=journald –registry-mirror=https://docker.mirrors.ustc.edu.cn’
Domestic source description of Docker:
Docker official China
https://registry.docker-cn.com
netease
http://hub-mirror.c.163.com
University of Science and Technology of China
https://docker.mirrors.ustc.edu.cn
Ali cloud
https://pee6w651.mirror.aliyuncs.com
Finally, I solved the problem with the following solution:
Into the/etc/docker
Check for daemon.JSON. This is the default configuration file for Docker.
If it is not new, if it is, change it.
Json [root@zengmg docker]# vi daemon. Json { “registry-mirrors”: [“https://registry.docker-cn.com”,”http://hub-mirror.c.163.com”] }
Save exit.
restart the docker service
service docker restart
Success!
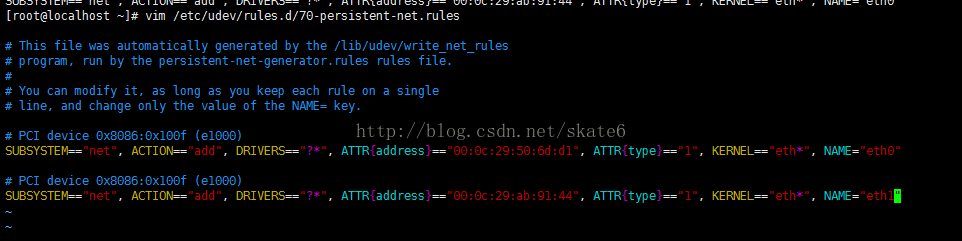
After virtual machine cloning, it was found that the network could not be connected. The network was connected by bridge mode.
network card validates service network restart
Report error Interface information device not found
check the MAC address of two virtual machines is different, this is ok.
Google last error interface information device not found detected a place in the file vim /etc/udev/rules.d/70-persistent net-net
has two lines. The first line is the network card Settings of the original virtual machine and the second is the network card Settings of the cloned machine. Remove the first line and change it to eth0.
After modification and preservation,
reboot,
B: Ping www.baidu.com will do.
Because of eth0 network configuration elsewhere.
Description:
Under Windows 7 X64, when using Windows Update to Update the system, the relevant Update defined by Windows Defender malware could not be installed, and 8050800C error was always returned. At this point, when Windows Defender updates the definition, he will also report that the definition cannot be updated.
Solutions:
The following solution source: https://social.technet.microsoft.com/Forums/en-US/7b44be83-8a2e-4e3e-a851-cbc3076e4817/error-8050800c?forum=w7itprosecurity
1. Save the following as a batch file and run it in administrator mode:
2. Manually download from here the latest definition library for the corresponding native system version of Windows Defender to install. Note: it is normal for downloaded files to run without any prompt.
3. Manually download the corresponding local system version of KB3177467 patch from here for installation.
4. Manually download the Windows Update troubleshooter from here and run it until it runs out.
5. After running all the above steps, restart the computer.
6. Open Windows Update in the control panel and repeatedly check for updates until no updates are available
Update check cannot be started (error code: 4: 0x80070005 — System level). It is likely that the Chrome update service has been disabled, so I need to adjust to manual boot.
The
run
Win + R
open
services. MSC
Google Update Service (Gupdatem), Google Update Service (GupDate)
Go to Google Update Service (Gupdatem), Google Update Service (GupDate), change to manual, and then go to update Chrome.
Transfer: http://xiedexu.cn/chrome-update-error-code-4-0x80070005-system-level%EF%BC%89.htm
Error: could not find java.dll Error: could not find Java Runtime Environment after installing the JDK before and after installing the new version.
There are two ways to do it
rename C:\Program Files (x86)\Common Files\Oracle\Java\javapath java.exe put the system variable in the Path of %JAVA_HOME%\bin; Put in front of C:\Program Files (x86)\Common Files\Oracle\Java\javapath
I saw some bloggers who said that 1 didn’t work and 2 worked, but I used 1 and 2 didn’t work, so I could try both
I’ve been focusing on the identifier “int8_t” is undefined, should actually start with the error check on the first line. is … H (474): error: #7: unrecognized token * @} will be fine once this problem is solved.
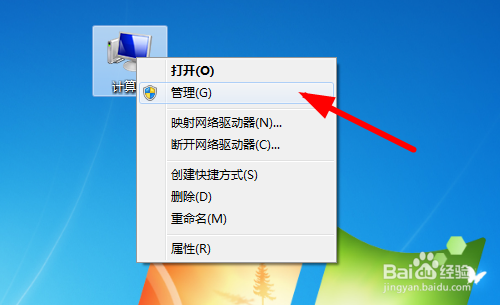
Ims Failure when using green version PS open, prompt AMT ims Failure I do not know why, only after checking can I know that a Service does not turn on but starts “FLEXnet Licensing Service” Service.
The first step
Right – click [Computer/my computer] to open and enter [Administration].
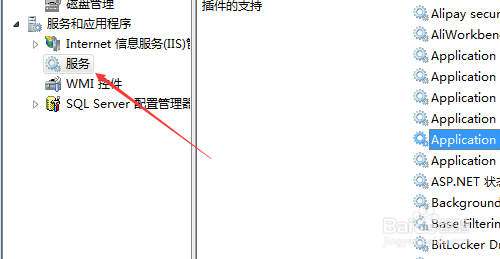
The second step
Expand services and applications into service management.
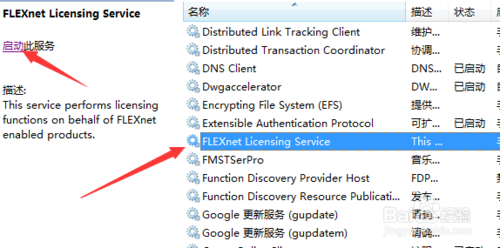
The third step
Go to FLEXnet Licensing Service in the Service and click [Start].
The other path
You can open the service by typing the command Services.msc in the run box. open the control panel and find the administration tool. open [service] in the admin tool