Category Archives: How to Fix

Solution in idea java.lang.ClassNotFoundException : org.springframework.web . context.ContextLoaderListener

Reference blog: IDEA development in Java. Lang. ClassNotFoundException: org. Springframework. Web. Context. The ContextLoaderListener error solution


Have a problem
In the process of writing a simple SpringMVC project, I tried to start the project with Tomcat, but found the following errors:

java.lang.ClassNotFoundException:org.springframework.web.context.ContextLoaderListener

Simply put, the ContextLoaderListener class cannot be found. The strange thing about
is that the SpringMVC project that I wrote before doesn’t have similar problems. ┍ ┑ ( ̄ Д  ̄)


The solution
After asking baidu, I was told to add Available Elements to the Artifact.
click File - & gt; Project Structure-> Artifacts, right-click the project name in Available Elements, and select Put into Output Root.

Then restart Tomcat, you will be able to access the page correctly! O (≧ ヾ del ≦ *)

Solution to the problem that listen TCP 0.0.0.0:3306: bind: address already in use port is occupied in Linux centos7

Problem description:
When installing the mysql container running docker in the host environment, the port is occupied

Reason analysis:
The port is occupied and cannot bind the address
Solutions:
netstat -nap look for port 3306 look at the pid that the program is running and find that it is actually occupied, remember the pid
netstat -nap | grep 3306

kill the process, here is kill 1107

Get the startup activity of Android apk

Get the Start Activity for Android APK

adb connect phone open APP

adb -s 192.168.0.11:6688 shell dumpsys window Windows | grep “mCurrent” # gets the package name of the current APP

adb shell dumpsys activity > Act.txt # gets the activity information
# on the act. TXT find android. Intent. The category. The LAUNCHER behind the name of the activity is to start the activity
Adb -s 192.168.0.11:6688 shell am start – n com. Dragon. Read/pages. Splash. SplashActivity #

Python rename renumber


# -*- coding: utf-8 -*-
import os
import numpy as np
import cv2

list_path = r"F:\project\cls\yanshen\20201209/"
g = os.walk(list_path)

test_dataset = ['%s/%s' % (i[0], j) for i in g for j in i[-1]]


for index,filename in enumerate(test_dataset):

    name = f'/{index:04d}.jpg'
    dir_name=os.path.dirname(filename)
    os.rename(filename,dir_name+name)

Filter images:

  g = os.walk(list_path)
        img_files = ['%s\\%s' % (i[0], j) for i in g if i[0].endswith('JPEGImages') for j in i[-1] if
                     j.endswith('jpg')]


Memory configuration of BIOS combat

At present, there are two kinds of SMIP and SPD, and now SMIP, soft: BMP, SMIP and SMIP are mainly configured. Relevant document SMIP.c that needs to be modified
BGA: SMT, Dimm: slot, MemoryDown: SMT must be used:

 
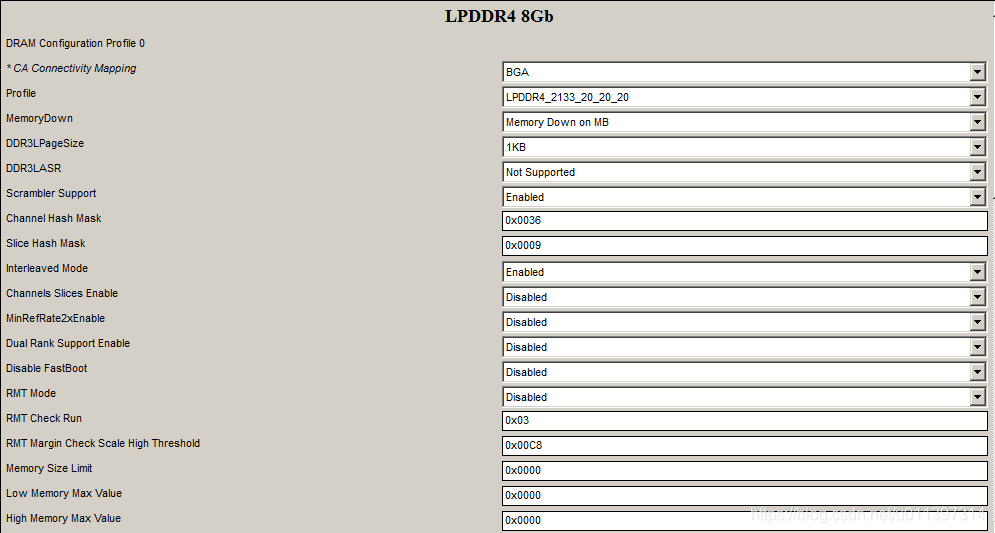
ch0 RankEnable–> Ch0 options, these options are configured according to Memory Spec and Gen, where Ch0_RankEnable:only for Memorydown relates to CS and channel
RMT mode runs edge check mode, which is likely to be a circuit problem if there is a problem. This function is opened for hardware Debug. In the macro definition, the value of Set is unchanged, and the value of option is 0 or 1
Additions, deletions and modifications of smip.c :(to be determined)
DQ Mapping for CHO to CH3:
The ch0 and ch2 corresponding to bit0~31 are DQ 8~15,0~7,24~31,16~23
The ch1 and CH3 corresponding to BIT0 ~31 are DQ 0~31
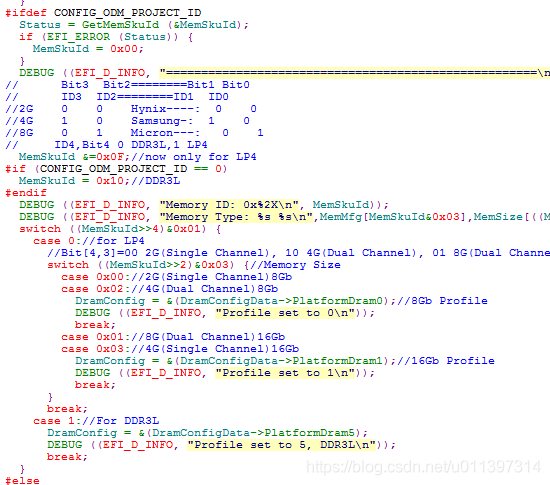
In addition, some basic information about the project.h file is collected in the project.h file. There are many sub-options in the main option in the setup interface, including BIOS vendor, BIOS Version, build time and other relevant information. However, this project.h file is generated after the build.

 
#ifdef CONFIG_ODM_PROJECT_ID
Status = GetMemSkuId (& MemSkuId);
if (EFI_ERROR (Status)) {
MemSkuId = 0x00;
}
DEBUG ((EFI_D_INFO, “=====================================================\n”));
// Bit3 Bit2========Bit1 Bit0
// ID3 ID2========ID1 ID0
//2G 0 0 Hynix—-: 0 0
//4G 1 0 Samsung-: 1 0
//8G 0 1 Micron—: 0 1
// ID4,Bit4 0 DDR3L,1 LP4
MemSkuId & =0x0F; //now only for LP4
#if (CONFIG_ODM_PROJECT_ID == 0)
MemSkuId = 0x10; //DDR3L
#endif
DEBUG ((EFI_D_INFO, “Memory ID: 0x%2X\n”, MemSkuId));
DEBUG ((EFI_D_INFO, “Memory Type: %s %s\n”,MemMfg[MemSkuId&0x03],MemSize[((MemSkuId>>2)&0x03)]));
switch ((MemSkuId> > 4)& 0x01) {
case 0://for LP4
//Bit[4,3]=00 2G(Single Channel), 10 4G(Dual Channel), 01 8G(Dual Channel),11 4G(Single Channel)
switch ((MemSkuId> > 2)& 0x03) {//Memory Size
case 0x00://2G(Single Channel)8Gb
case 0x02://4G(Dual Channel)8Gb
DramConfig = & (DramConfigData-> PlatformDram0); //8Gb Profile
DEBUG ((EFI_D_INFO, “Profile set to 0\n”));
break;
case 0x01://8G(Dual Channel)16Gb
case 0x03://4G(Single Channel)16Gb
DramConfig = & (DramConfigData-> PlatformDram1); //16Gb Profile
DEBUG ((EFI_D_INFO, “Profile set to 1\n”));
break;
}
break;
case 1://For DDR3L
DramConfig = & (DramConfigData-> PlatformDram5);
DEBUG ((EFI_D_INFO, “Profile set to 5, DDR3L\n”));
break;
}
The connections among channel, DIMM,rank, bank, CS and chip in Memory:

 
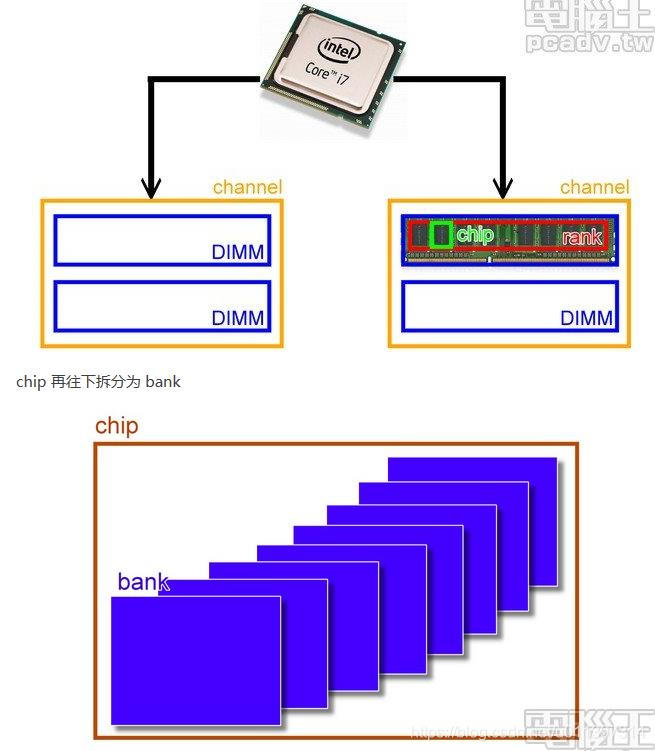
A channel corresponds to a set of memory controllers

Why namenode can’t be started and its solution

Reasons why the NameNode fails to start and solutions

Problem: After starting Hadoop, I checked with JPS and found no NameNode

The NAMenode Format creates a new NAMenodeld every time, and TMP/DFS /data contains the ID under the last format. The Namenode Format clears the data under the Namenode, but does not clean the data under the Datanode, which causes startup failure.
Solutions:

    stop running hadoop

stop -dfs.sh

    delete the file items mapped by hadoop.tmp.dir in the core-site configuration file, generally hadoop/ TMP folder

sudo rm -r tmp

    performs formatting

./bin/hdfs namenode -format

    restart

start-hdfs.sh

Modulenotfounderror: no module named ‘CV2’ – (version problem)

Ubuntu Running OpenCV project tip: ModuleNotFoundError: No Module Named ‘Cv2’
Haha, that was the problem when it was first installed. Just throw me up.
1. Reason: the versions are inconsistent
The problem is that when installing OpencV-Python, the detailed version number is appended, which makes it different from the Python environment. In addition, there will be other problems, I can’t remember exactly.
2. Solutions

    first use the instruction: PIP install opencv-python to execute once, if the .py file or so to see the next one; Just do not append the version number when installing OpencV-Python.

Error reporting of uncapped XML character


today when writing the JSP to such a mistake, Unescaped XML character,
solution is as follows:

select Editor – Inspections, and find the HTML on the right side of Malformed content of the script tag, uncheck the, click OK, and successfully solve the problem of error!

After IOS upgrade, the time control selected by the wheel will be invalid, uidatepicker

    2. If the previous style is used


datepicker.preferredDatePickerStyle = .wheels
    I don’t know if apple’s bug is wrong in both width and height


let datepicker = UIDatePicker(frame: CGRect(x: 0, y: 100, width: self.view.frame.width, height: 300))
 datepicker.preferredDatePickerStyle = .wheels  
 datepicker.backgroundColor = UIColor.yellow    
 datepicker.datePickerMode = .dateAndTime    
 self.view.addSubview(datepicker)


4. To fix this, set the frame after the datePickerMode and set it to normal
 

override init(frame: CGRect) {
        super.init(frame: frame)
        backgroundColor = .white


Server (for example: HTTP) has a large number of time_ Solutions to wait

To understand TCP several state of the students, we should all know, TCP active disconnected side will appear TIME_WAIT state, TIME_WAIT state will keep the MSL 2 time, this is mainly used to prevent, take the initiative to open a party sent to the LAST lost a FIN ACK, lead to passive passive close one LAST – ACK timer timeout retransmission FIN, avoid the TCP state of chaos. However, in the case of high server concurrency, this default mechanism may cause the server to maintain a large amount of TIME_WAIT state, resulting in a large waste of resources, which may affect subsequent connection and request processing. To solve this phenomenon, we can modify the configuration of the server. Here we take the configuration of a Linux server on Aliyun as an example.
[root@izbp1dnvbin1s4fqqr8izfz ~]# cat /etc/sysctl.conf
# sysctl settings are defined through files in
# /usr/lib/sysctl.d/, /run/sysctl.d/, and /etc/sysctl.d/.
#
# Vendors settings live in /usr/lib/sysctl.d/.
# To override a whole file, create a new file with the same in
# /etc/sysctl.d/ and put new settings there. To override
# only specific settings, add a file with a lexically later
# name in /etc/sysctl.d/ and put new settings there.
#
# For more information, see sysctl.conf(5) and sysctl.d(5).
fs.file-max = 1000000
net.core.somaxconn = 2048
net.core.rmem_default = 16777216
net.core.wmem_default = 16777216
net.core.rmem_max = 16777216
net.core.wmem_max = 16777216
net.ipv4.tcp_rmem = 4096 4096 16777216
net.ipv4.tcp_wmem = 4096 4096 16777216
net.ipv4.tcp_mem = 786432 2097152 3145728
net.ipv4.tcp_max_syn_backlog = 16384
net.core.netdev_max_backlog = 20000
net.ipv4.tcp_fin_timeout = 15
net.ipv4.tcp_tw_reuse = 1
net.ipv4.tcp_tw_recycle = 1
net.ipv4.tcp_max_orphans = 131072
net.ipv4.ip_local_port_range = 1024 65535
net.ipv4.tcp_max_tw_buckets = 40000
vm.swappiness = 0
net.ipv4.neigh.default.gc_stale_time=120
net.ipv4.conf.all.rp_filter=0
net.ipv4.conf.default.rp_filter=0
net.ipv4.conf.default.arp_announce = 2
Net. Ipv4.com.lo. Arp_announce =2
net. Ipv4.com.conf.all. Arp_announce =2
net Net ipv4.tcp_fin_TIMEOUT (FIN timeout), net ipv4.tcp_TW_reuse (time_wait state socket reuse to allow socket to be used for a new TCP connection, default 0, Net ipv4.tcp_tw_recycle(fast recovery of time-wait sockets in TCP connections, default is 0, close), and then use the /sbin/ sysctL-p command to make the configuration work.

Visionox shows app development record

Vicino display APP plays pictures and videos in turn:
1. Develop the advertisement bar to load three pictures:


The three images will be displayed in turn in the form of banner ads.
When you click the image, you will exit the APP. When you press the image long, you will load the video.

Spring integrates JUnit configuration

2. In junit unit tests, executing
junit without a main method determines which methods in the current Test class have @test annotations
junit lets annotated methods execute
. Junit doesn’t matter if we’re using the spring framework
4. When the test method executes without an IOC container, a null pointer exception is raised even when the @Autowried annotation is written
Solution:
Spring integration junit configuration
1. 2. Replace the main method with the @runwith
3 provided by Spring with an annotation provided by junit. Runner told spring, spring and ioc creation is based on XML and annotation, and show the position of
annotation-based: @ ContextConfiguration (classes = SpringConfiguration. Class)
based on the configuration file: @ ContextConfiguration (locations = “classpath: bean. XML”)