Category Archives: How to Fix

Chrome your connection is not a private connection solution

Problem: the following problems occurred when the running project was opened in chrome

This problem occurs a lot when I visit the company network, GitHub and so on. I have a headache

Your connection is not private
an attacker may try to steal your information (such as password, communication content or credit card information) from x.x.x. Learn more
net:: err_ CERT_ INVALID

Send some web addresses, limited system information and some web content to Google to help us improve the security of chrome. Privacy policy
x.x.x.x usually uses encryption technology to protect your information. When Google Chrome tried to connect to x.x.x.x this time, the website sent back abnormal wrong credentials. This may be because an attacker is trying to impersonate x.x.x, or the Wi Fi login screen interrupted the connection. Please rest assured that your information is still secure, because Google Chrome has stopped connecting without any data exchange.

You can’t access x.x.x.x at this time because this site has sent messy credentials that Google Chrome can’t handle. Network errors and attacks are usually temporary, so this page may return to normal later.


The boy taught me a move, I feel very practical

Solution: in the current page with the keyboard input “this is a safe, not in the address bar input, directly on the keyboard on the line, the page will automatically refresh into the web page.

Reason: because chrome doesn’t trust these self signed SSL certificates, for the sake of security, it directly forbids access. This is a safe command, which means that you have understood and confirmed that this is an unsafe website. If you still want to visit it, you can visit it.

11. Center text

\centerline

Syntax: centerline {text}

This is the original command of Tex for centering short text.

Center environment

Grammar:

\begin{center}

First line\\

The second line\\

\end{center}

Center environment can realize the alignment of multiple lines.

In the center environment, if the “first line” is too long, it will wrap automatically, and the text of the wrap is still center aligned, so this is a very common way.

example

Here is a very practical example. When writing a paper, you need to write a title, and it is usually stipulated that the title above is in Chinese and the title below is in English

one

two

three

four

five

six

seven

eight

nine

ten

eleven

twelve

thirteen

fourteen

fifteen

sixteen

seventeen

eighteen

\documentclass[11pt,a4paper]{article}

\usepackage{CJK}

\usepackage{type1cm}

\usepackage{times}

\newcommand{\song}{\CJKfamily{song}}

\newcommand{\xiaoer}{\fontsize{18pt}{18pt}\selectfont}

\newcommand{\xiaosan}{\fontsize{15pt}{22pt}\selectfont}

\Renewcommand {baselinestretch} {1.8}% double spacing

\begin{document}

\begin{CJK*}{GBK}{song}

\begin{center}

The shortest path algorithm: ~ classification system and research progress}} \

{Xiaoer shortest path algorithms: ~ taxonomy and advance in research}% Times New Roman, sophomore

\end{center}

\vspace{20pt}

\Centerline {Xiaosan for Quad: Lu Feng}% can be used for shorter text

\end{CJK*}

\end{document}

The results are as follows

How to empty a whole line in latex (simple and effective)

Sometimes we need to empty a line, especially when we are doing a beamer. However, it seems that latex can’t empty a whole line directly. Two consecutive “\ \” still only have the function of line feed

At present, the online version is “vSpace {*}”, which requires you to estimate the length of the space, which is very inconvenient

I found an easy way to do it

\\ \hspace*{\fill} \\

That is, line feed, fill with blank space, and then line feed, you can achieve the effect of leaving a whole line empty, this method does not need any adjustment of the environment, you can use it directly

Let’s get started with latex 05, line feed, paragraph feed, page feed, first line indent, etc

Line feed command

\\: wrap.

\\[offset]: newline, and the line spacing with the next line is the original line spacing + offset.

\Newline: same as \ \.

\Linebreak: force line break. The difference between linebreak and newline is that the current line of linebreak is aligned separately.

Segment command

\Par: segmentation.

Paging command

\Newpage: paging command.

\Clearpage: similar to the new page. When we use the CJK environment, we will add the clearpage at the end of the environment.

text-indent

The simplest way is to set the length of the parent as follows: setlength {parent} {length}. If you want to indent the first line by two Chinese characters, then set the length as follows: setlength {parent} {2em}.

If you are in CJK environment, you can indent the first line immediately after “begin {CJK} {GBK} {song}”.

By default, the first line of the first paragraph is not indented. If you want the first line of the first paragraph to be indented, you can use ﹣ usepackage {indentfirst}.

If you want a paragraph not to be indented on the first line, you can precede the paragraph with the word “no indent”.

If you want the first line of the whole article not to be indented, then: setlength {parent} {0pt}

Note: in latex, one carriage return represents a space and two carriage returns represent a segment.

Usually, in practice, we expand according to the following template:

\documentclass[12pt,a4paper]{article}

\Usepackage {CJK}% import CJK macro package

\Setlength {parskip} {10pt}% sets the interval between partial paragraphs

\begin{document}

\Begin {CJK *} {GBK} {song}% to start CJK environment

\Cjktilde% redefines “~”

\CJ kindent% set first indent

This paper reflects on the history and development of the latex Project Public License (lppl)

\No indent in late June, the tug 2010 conference was held in San Francisco to great success

\clearpage

\End {CJK *}% end CJK environment

\end{document}

\Setlength {parskip} {10pt}: the paragraph interval is the sum of ⁃ lineskip and ⁃ parskip. The value of ⁃ parskip is set here to increase the paragraph interval.

\CJ kindent: indent the first line in the CJK environment.

Latex’s mathematical formula: derivation and representation of fraction

Representation method

: fractional representation
: partial derivative sign
: normal derivative D (orthomorphic)

code effect meaning

x

y

\frac{x}{y}

YX

score

\partial

partial derivative symbol

d

t

\mathrm{d}t

DT

derivative

give an example

$$
\frac{\partial y}{\partial x_1} + \frac{\partial y}{\partial x_2} \\
\frac{\mathrm{d}y}{\mathrm{d}x_1} + \frac{\mathrm{d}y}{\mathrm{d}x_2}
$$

The display effect is as follows:
0

y

x

one

+

y

x

two

\frac{\partial y}{\partial x_ 1} + \frac{\partial y}{\partial x_ 2}

∂x1​∂y​+∂x2​∂y​

d

y

d

x

+

d

z

d

x

\frac{\mathrm{d}y}{\mathrm{d}x} + \frac{\mathrm{d}z}{\mathrm{d}x}

dxdy​+dxdz​

Greek letters in latex

Greek alphabet, we started to know it from primary school, but I still rely on the pronunciation of it. Especially in the analysis of university mathematics, there are so many Greek letters that many classical formulas are represented by Greek letters. It has naturally become an indispensable symbol in the field of mathematics, turning the complex content of mathematics into clear, easy to understand and approachable.

Today, why talk about the Greek alphabet? I have to use it when I wrote latex the day before yesterday

ε

Speaking of, what we found in Baidu Encyclopedia is

ϵ

The symbol is not what I want, and my hatred of Baidu suddenly increases several times. I found the correct way to write it from Google, including other commonly used Greek letters. By the way, I also want to introduce the upper and lower case forms of Greek letters. Think of what you want to use frequently, so write it down for subsequent use. Do enough homework to make yourself more convenient and successful. Enjoy it!


The usage of Greek letters in latex

In latex, the Greek letter should be written as a formula. In the $$sign, use the slash and the English symbol of Greek letter.

Greek letters in latex form

For ease of understanding, show how to write Greek letters in code symbols.

$\epsilon$

Results:
there was no significant difference between the two groups

ϵ


Greek alphabet

Greek lowercase and uppercase latex form Greek lowercase and uppercase latex form
latex form

α

A

\alpha A

μ

N

\mu N

β

B

\beta B

ξ

Ξ

\xi \Xi

γ

Γ

\gamma \Gamma o O o O

δ

Δ

\delta \ Delta

π

Π

\pi \Pi

ϵ

ε

E

\epsilon \varepsilon E

ρ

ϱ

P

\rho \varrho P

ζ

Z

\zeta Z

σ

Σ

\sigma \Sigma

η

H

\eta H

τ

T

\tau T

θ

ϑ

Θ

\theta \vartheta \Theta

υ

Υ

\upsilon \Upsilon

ι

I

\iota I

ϕ

φ

Φ

\phi \varphi \Phi

κ

K

\kappa K

χ

X

\chi X

λ

Λ

\lambda \Lambda

ψ

Ψ

\psi \Psi

μ

M

\mu M

ω

Ω

\omega \Omega

The usage of Greek alphabet in other programming languages

In other programming languages, the implicit latex method is used

$\Psi$

If it’s a formula, it’s used the same way.

Binary tree traversal (preorder, middle order, postorder, hierarchy traversal, depth first, breadth first)

Binary tree is a very important data structure, many other data structures are based on the evolution of binary tree. For binary tree, there are depth traversal and breadth traversal. Depth traversal has three traversal methods: preorder, middle order and postorder. Breadth traversal is what we usually call level traversal. Because the definition of tree itself is a recursive definition, it is not only easy to understand but also very concise to use the recursive method to realize the three traversal of tree. For breadth traversal, it needs the support of other data structures, such as heap. Therefore, for a piece of code, readability is sometimes more important than the efficiency of the code itself.

The four main traversal ideas are as follows

Preorder traversal: root node — & gt; left subtree — & gt; right subtree

Middle order traversal: left subtree — & gt; root node — & gt; right subtree

Postorder traversal: left subtree — & gt; right subtree — & gt; root node

Level traversal: just traverse by level

For example, find the following binary tree traversal

Preorder traversal: 1.2.4.5.7.8.3.6

Middle order traversal: 4 ﹣ 2 ﹣ 7 ﹣ 5 ﹣ 8 ﹣ 1 ﹣ 3 ﹣ 6

Postorder traversal: 4 ﹣ 7 ﹣ 8 ﹣ 5 ﹣ 2 ﹣ 6 ﹣ 3 ﹣ 1

Level traversal: 1 ﹣ 2 ﹣ 3 ﹣ 4 ﹣ 5 ﹣ 6 ﹣ 7 ﹣ 8

1、 Preorder traversal

1) According to the traversal idea mentioned above: root node — & gt; left subtree — & gt; right subtree, it is easy to write recursive version:

public void preOrderTraverse1(TreeNode root) {
		if (root != null) {
			System.out.print(root.val+"  ");
			preOrderTraverse1(root.left);
			preOrderTraverse1(root.right);
		}
	}

2) Now let’s talk about the non recursive version:

According to the order of preorder traversal, first visit the root node, then visit the left and right subtree. Therefore, for any node, the first part is to access it directly, and then repeat the above steps when judging whether the left subtree is empty or not until it is empty. If it is empty, you need to access the right subtree. Note that after accessing the left child, you need to access the right child in turn. Therefore, you need the support of stack as a data structure. For any node, the specific steps are as follows:

a) Access it, and put the node into the stack, and set the current node as the left child;

b) Judge whether the node node is empty. If it is empty, take out the top node of the stack and leave the stack, and set the right child as the current node; otherwise, repeat step a) until the current node is empty or the stack is empty (it can be found that the nodes in the stack are stored just to access the right child)

The code is as follows:

public void preOrderTraverse2(TreeNode root) {
		LinkedList<TreeNode> stack = new LinkedList<>();
		TreeNode pNode = root;
		while (pNode != null || !stack.isEmpty()) {
			if (pNode != null) {
				System.out.print(pNode.val+"  ");
				stack.push(pNode);
				pNode = pNode.left;
			} else { //pNode == null && !stack.isEmpty()
				TreeNode node = stack.pop();
				pNode = node.right;
			}
		}
	}

2、 Middle order traversal

1) According to the above traversal idea: left subtree — & gt; root node — & gt; right subtree, it is easy to write recursive version:

public void inOrderTraverse1(TreeNode root) {
		if (root != null) {
			inOrderTraverse1(root.left);
			System.out.print(root.val+"  ");
			inOrderTraverse1(root.right);
		}
	}

2) non recursive implementation, with the explanation of the preceding order, the middle order is relatively simple, the same reason. It’s just that the order of access is moved to the time of stack exit. The code is as follows:

public void inOrderTraverse2(TreeNode root) {
		LinkedList<TreeNode> stack = new LinkedList<>();
		TreeNode pNode = root;
		while (pNode != null || !stack.isEmpty()) {
			if (pNode != null) {
				stack.push(pNode);
				pNode = pNode.left;
			} else { //pNode == null && !stack.isEmpty()
				TreeNode node = stack.pop();
				System.out.print(node.val+"  ");
				pNode = node.right;
			}
		}
	}

3、 Postorder traversal

1) According to the traversal idea mentioned above: left subtree — & gt; right subtree — & gt; root node, it is easy to write recursive version:

public void postOrderTraverse1(TreeNode root) {
		if (root != null) {
			postOrderTraverse1(root.left);
			postOrderTraverse1(root.right);
			System.out.print(root.val+"  ");
		}
	}

2) Non recursive code, not to write

4、 Level traversal

Hierarchy traversal code is relatively simple, just need a queue, first add the root node in the queue. Then, for any node, when it is out of the queue, it can be accessed. At the same time, if the left child and the right child are not empty, enter the queue. The code is as follows:

public void levelTraverse(TreeNode root) {
		if (root == null) {
			return;
		}
		LinkedList<TreeNode> queue = new LinkedList<>();
		queue.offer(root);
		while (!queue.isEmpty()) {
			TreeNode node = queue.poll();
			System.out.print(node.val+"  ");
			if (node.left != null) {
				queue.offer(node.left);
			}
			if (node.right != null) {
				queue.offer(node.right);
			}
		}
	}

5、 Depth first traversal

In fact, depth traversal is the pre order, middle order and post order above. But in order to ensure that it corresponds to breadth first traversal, it is also written here. The code is also easy to understand. In fact, it is preorder traversal. The code is as follows:
0

public void depthOrderTraverse(TreeNode root) {
		if (root == null) {
			return;
		}
		LinkedList<TreeNode> stack = new LinkedList<>();
		stack.push(root);
		while (!stack.isEmpty()) {
			TreeNode node = stack.pop();
			System.out.print(node.val+"  ");
			if (node.right != null) {
				stack.push(node.right);
			}
			if (node.left != null) {
				stack.push(node.left);
			}
		}
	}

Finally finished!

The command Du – h — max depth = 1 in Linux

Du [- abcdhhklmssx] [- L & lt; symbolic link & gt;] [- X & lt; file & gt;] [– block size] [– exclude = & lt; directory or file & gt;] [– max depth = & lt; directory level & gt;] [– help] [– version] [directory or file]

Common parameters:

-A or – all displays disk usage for each specified file, or for each file in the directory.

-B or – bytes displays the size of the directory or file in bytes.

-C or – total displays not only the size of the directory or file, but also the sum of all the directories or files.

-D or – dereference args displays the source file size of the specified symbolic connection.

-H or – human readable in units of K, m and G to improve the readability of information.

-H or – Si is the same as – H, but K, m and G are converted to 1000 instead of 1024.

-K or – kilobytes in 1024 bytes.

-L or – count links repeatedly calculate the file of hardware connection.

-L & lt; symbolic connection & gt; or – dereference & lt; symbolic connection & gt; displays the source file size of the symbolic connection specified in the options.

-M or – megabytes in 1MB.

-S or – summarize displays only the total, the size of the current directory.

-S or – separate dirs displays the size of each directory, excluding the size of its subdirectories.

-X or – one file Xsystem is based on the file system at the beginning of processing. If there are other different file system directories, they will be omitted.

-X & lt; file & gt; or – exclude from = & lt; file & gt; specify a directory or file in & lt; file & gt.

– exclude = & lt; directory or file & gt; skips the specified directory or file.

– max depth = & lt; the number of directory layers & gt; is ignored when the number of directory layers exceeds the specified number.

– help displays help.

– version displays the version information.

1 & gt; to display the disk usage of a directory tree and each subtree

du /home/linux

This shows the number of disk blocks in the / home / Linux directory and each subdirectory.

2 & gt; to display the disk usage of a directory tree and each subtree in 1024 bytes

du -k /home/linux

This shows the number of 1024 byte disk blocks in the / home / Linux directory and each subdirectory.

3 & gt; displays the disk usage of a directory tree and each subtree in MB

du -m /home/linux

This shows the number of MB disk blocks in the / home / Linux directory and each subdirectory.

4 & gt; displays the disk usage of a directory tree and each subtree in GB

du -g /home/linux

This shows the number of GB disk blocks in the / home / Linux directory and each subdirectory.

5 & gt; view the size of all directories and subdirectories under the current directory:

du -h .

“.” represents the current directory. It can also be changed to a clear path

-H means to display in the humanized form of K, m and G

6 & gt; view the size of the user directory in the current directory, and do not want to see other directories and their subdirectories:

du -sh user

-S means to summarize, that is, only one summarized value is listed

du -h –max-depth=0 user

–Max depth = n means only to drill down to the n-th level directory. If it is set to 0, it means not to drill down to the subdirectory.

7 & gt; list the sizes of all directories and files in the user directory and its subdirectories:

du -ah user

-A means including directory and file

a

8 & gt; lists the size of the directory in the current directory whose name does not include the XYZ string:

du -h –exclude=’*xyz*’

9 & gt; want to list more information about the size of the user directory and subdirectories in one screen:

du -0h user

-0 (zero bar) indicates that the information of each directory listed is directly output to the next directory instead of newline.

10 & gt; displays all disk usage for only one directory tree

du -s /home/linux

11 & gt; view the size of each folder: Du – h — max depth = 1

To view the specified directory:

The code is as follows: where / path represents the path

du -h --max-depth=1 /path

The details are as follows:

root@ubuntu4146:~# du -h --max-depth=1 /data/
1.1G	/data/gitlabDataa
8.0K	/data/test
241G	/data/gitlabData
809G	/data/home
15G	/data/OpenGrok
16K	/data/lost+found
1.1T	/data/

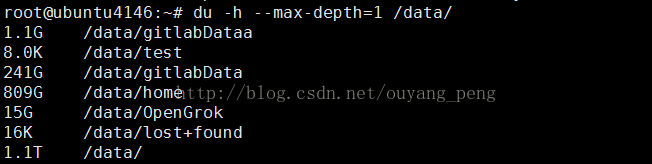
We find that the / data / home / directory takes up the most, so we can continue to see which directory takes up the most, as follows:

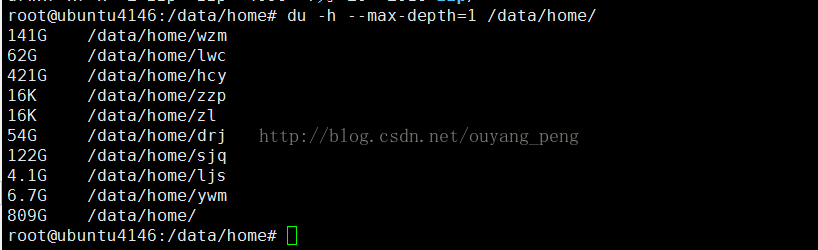
root@ubuntu4146:/data/home# du -h --max-depth=1 /data/home/
141G	/data/home/wzm
62G	/data/home/lwc
421G	/data/home/hcy
16K	/data/home/zzp
16K	/data/home/zl
54G	/data/home/drj
122G	/data/home/sjq
4.1G	/data/home/ljs
6.7G	/data/home/ywm
809G	/data/home/
root@ubuntu4146:/data/home# 

Author: Ouyang Peng welcome to reprint, share with others is the source of progress!

Please keep the original address: http://blog.csdn.net/ouyang_ peng/article/details/10414499

Division in Python

In the C / C + + language, the division of integer number will be carried out (rounding off the decimal part). For example, int a = 15 / 10; the result of a is 1.

The same is true in Java, so when dividing two int data and returning a floating-point data, you need to force type conversion. For example, float a = (float) BGC, where B and C are int data.

Python is divided into three kinds of division: traditional division, precise division and floor division.

Traditional division

If it is an integer division, perform the floor division, if it is a floating-point division, perform the precise division.

>>>1/2
0
>>>1.0/2.0
0.5

Precise division

Division always returns the real quotient, whether the operands are integer or floating-point. Execute from__ future__ The import division directive can do this.

>>>from __future__ import division
>>>1/2
0.5
>>>1.0/2.0
0.5

Floor removal

Starting from Python 2.2, an operator / / is added to perform floor Division: / / division. Regardless of the numeric type of the operands, the decimal part is always discarded and the nearest number in the number sequence smaller than the real quotient is returned.

>>>1//2
0
>>>1.0//2
0
>>>-1//2.0
-1

Built in function divmod()
divmod (a, b), return (A / / B, a% B)

>>>divmod(1,2)
(0,1)
>>>divmod(3.14159,1.5)
(2.0,0.4159000000000002)
>>>5+6j//3+2j
2+0j
>>>5+6j%3+2j
-1+2j
>>>divmod(5+6j,3+2j)
((2+0j),(-1+2j))

=

Latex wave line~

Generally speaking, latex has two ways to make wave line

1. In mathematical mode

$\sim$

2. In text mode

\textasciitilde

The wavy line in mathematical mode is larger than that in text mode.

The usage of several integer functions in MATLAB (fix, floor, ceil, round)

There are the following integer functions in Matlab: fix, floor, ceil, round, and their differences are as follows


Fix: round in the direction of 0

>>fix(2.8) = 2
>>fix(-2.8) = -2

Floor: round in the direction of negative infinity

>>floor(2.8) = 2
>>floor(-2.8) = -3

Ceil: round in the direction of positive infinity

>>ceil(2.8) = 3
>>ceil(-2.8) = -2

Round: round to the nearest integer

>>round(2.8) = 3
>>round(-2.8) = -3