Category Archives: How to Fix

Ccache: failed to create / home

Ccache: failed to create/home cause: the user name has been modified before, but the home directory of the original user name has not been modified, resulting in this problem.

Solution: use the command sudo GEDIT/etc/passwd to change the original user’s home directory name to the current user name

User name: X: uid: GID: remarks: home directory path: shell path

That is, modify the home directory path

Failed to resolve: com.github

Error after running someone else’s Demo:

Failed to resolve: com.github.yangjie10930:EpMedia:v0.8.2

Solutions:
1 in project build.gradle Join in

allprojects {
    repositories {
        jcenter()
        maven { url "https://jitpack.io" }
    }
}

Full version

buildscript {
    repositories {
        jcenter()
    }
    dependencies {
        classpath 'com.android.tools.build:gradle:2.3.3'

        // NOTE: Do not place your application dependencies here; they belong
        // in the individual module build.gradle files
    }
}

allprojects {
    repositories {
        jcenter()
        maven { url "https://jitpack.io" }
    }
}

task clean(type: Delete) {
    delete rootProject.buildDir
}

2 add in module

 compile ('com.github.yangjie10930:EpMedia:v0.8.2'){
        transitive = true
    }

Full version

apply plugin: 'com.android.application'

android {
    compileSdkVersion 25
    buildToolsVersion "25.0.0"
    defaultConfig {
        applicationId "com.joe.epmediademo"
        minSdkVersion 18
        targetSdkVersion 25
        versionCode 1
        versionName "1.0"
        testInstrumentationRunner "android.support.test.runner.AndroidJUnitRunner"
    }
    buildTypes {
        release {
            minifyEnabled false
            proguardFiles getDefaultProguardFile('proguard-android.txt'), 'proguard-rules.pro'
        }
    }


}

dependencies {
    compile fileTree(dir: 'libs', include: ['*.jar'])
    compile 'com.android.support:appcompat-v7:25.1.0'
    compile 'com.android.support:support-v4:25.1.0'
    compile 'com.android.support.constraint:constraint-layout:1.0.2'
    compile ('com.github.yangjie10930:EpMedia:v0.8.2'){
        transitive = true
    }
    testCompile 'junit:junit:4.12'
}

Failed to resolve: failed to resolve

Failed to resolve: failed to resolve*


Background: some time ago, I did a PDF reading function, but when I introduced the remote warehouse dependency package, Android studio always reported errors. Failed to resolve: * well, I don’t need to say much nonsense. I’ll post the process of my solution for the reference of workers.


Premise: delete gradle.properties Then file – & gt; setting – & gt; proxy (search) – & gt; noproxy.
1.
2. Add the address of Alibaba cloud Maven warehouse in Android studio. As shown in the following figure:

3.

Solve the problem of prompt “failed to sync branch” when using Git

When an empty git project is created and a large number of local files are copied in, and you want to do any git operation, you will be reported
as soon as possible

failed to sync this branch
You might need to open a shell and debug the state of this repo.

Maybe you’ll follow the instructions

debug xxx

But it doesn’t work

The actual reason is that there is no initialization

Do it in the current directory

git init

It’s OK

Android foundation error failed to install


Blog from: http://blog.csdn.net/liuxian13183 , reprint and indicate the source! All Rights Reserved ! 


Android error: Failed to install *.apk on device *: timeout

There are several common solutions to this problem

PS: Item 9 is most commonly used

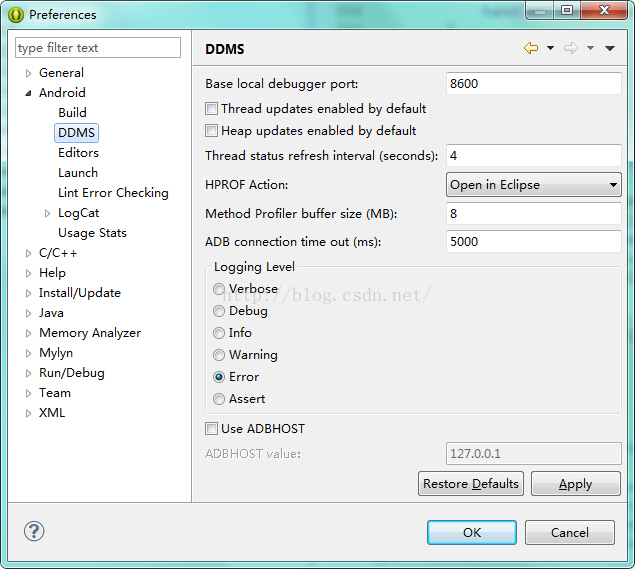
1. Set the DDMS of ADB from 5000 to 10000


2. ADB kill server ADB start server
3. Replace a new data cable
4. Restart the mobile phone
5. Do not plug the mobile phone with USB3.0 socket
6. Uninstall the application and reload it with eclipse
7. Modify the connection port between USB and computer in eclipse preferences


8. Restart the computer


9、netstat -a -n -o |findstr “5037” 

Enter the above command on the command line. In the windows task manager process, find PID 5037 but not adb.exe Yes, kill it. Common ones are tadb.exe , AndroidServer.exe Wait, and then restart eclipse

Or combine the above methods.


In addition, the solution is as follows:

You can configure the environment variables for the SDK at that time. Remember to configure both tools and platform tools!


The earlier problems of eclipse are mentioned above, but now we have switched to Android studio. Let’s talk about some problems about not installing eclipse

Time: August 9, 2017

Model: Hongmi 4x

Question: delete_ FAILED_ INTERNAL_ ERROR Error while Installing APKs

Solution process:

1. Check “install unknown source” in mobile phone settings security, the attempt is invalid

2. Find other applications enabled with port 5037, no

3. In the mobile developer settings, open “USB install”, the attempt is invalid

Solution:

1. In developer mode, turn off the “start MIUI optimization” – the reason may be that Xiaomi has intercepted the ADB installation command.

2. Shut down Android studio’s instantrun – the reason may be that Xiaomi doesn’t support the APK method of cutting instantrun

The ultimate solution.

1: Use the ADB command to connect the mobile phone and computer for development http://blog.csdn.net/xiabing082/article/details/54376461

Note: before using the ADB command, use the data cable to establish a connection between the computer and the mobile phone.

2: Using Android studio’s ADB WiFi plug-in, the mobile phone and the computer are in the same LAN. After connecting the computer for the first time, use the plug-in to connect the mobile phone, and select the option with IP (this is the virtual connection mode of the plug-in), so it has nothing to do with the local device. You can use it safely.

Failed to configure a DataSource

When using spring cloud, we first create a parent project, and then add Eureka server module and SMS module, which run normally. Finally, after adding the payment module (mybatis and MySQL need to be integrated), the Eureka server module and SMS module report an error:

Description:

Failed to configure a DataSource: 'url' attribute is not specified and no embedded datasource could be configured.

Reason: Failed to determine a suitable driver class


Action:

Consider the following:
	If you want an embedded database (H2, HSQL or Derby), please put it on the classpath.
	If you have database settings to be loaded from a particular profile you may need to activate it (no profiles are currently active).

After investigation, because mybatis jar package is introduced:

<dependency>
            <groupId>org.mybatis.spring.boot</groupId>
            <artifactId>mybatis-spring-boot-starter</artifactId>
            <version>1.3.1</version>
</dependency>

Spring boot will load by default org.springframework.boot . autoconfigure.jdbc.DataSourceAutoConfiguration and the datasourceautoconfiguration class uses the @ configuration annotation to inject datasource into spring Bean, and because there is no configuration information about datasource in the project (Eureka server module and SMS module), when spring creates datasource bean, it will report an error due to lack of relevant information.

terms of settlement:

1. Add exclude to the @ springbootapplication annotation to release the automatic loading of datasourceautoconfiguration.

@EnableEurekaServer
@SpringBootApplication(exclude = DataSourceAutoConfiguration.class)
public class EurekaServerApplication {

	public static void main(String[] args) {
		SpringApplication.run(EurekaServerApplication.class, args);
	}
}

2. In the pom.xml The common jar dependencies of all sub modules are stored in the file, and the non common dependencies are stored in the file of each module itself pom.xml It is stated in the document. The advantage of this method is that the dependence of each module will not interfere with each other.

Failed to execute stage ‘setup validation’: cannot locate gluster packages

The author focuses on Java, architecture, Linux, applet, crawler, automation and other technologies. During the working period, I sorted out some information with tears, searched the way of programmer experts on wechat, and replied to keywords such as Java, hacker, crawler, applet and interview to get information for free.

catalog

1、 There is a problem

2、 Analyze the problem

3、 Problem solving

1. Install ovirt corresponding source

2. Forced update package

3. Install ovirt engine

OK, GAME OVER!


I. Problems

Today, after creating the host on ovirt, the installation failed. After checking the event, we found the following error:

An error has occurred during installation of Host hostGluster: Failed to execute stage ‘Setup validation’: Cannot locate gluster packages, possible cause is incorrect channels.

2、 Analyze the problem

The host needs to join the cluster, and the host joining the cluster must manually add the source of ovirt to operate!

3、 Problem solving

1. Install ovirt corresponding source

[ root@ovirt ~]# yum install https://resources.ovirt.org/pub/yum-repo/ovirt-release43.rpm

2. Forced update package

[ root@ovirt-test-04 ~]# yum update -y

3. Install ovirt engine

[ root@ovirt-test-04 ~]# yum install ovirt-engine -y

OK, GAME OVER!


The author focuses on Java, architecture, Linux, applet, crawler, automation and other technologies. During the working period, I sorted out some information with tears, searched the way of programmer experts on wechat, and replied to keywords such as Java, hacker, crawler, applet and interview to get information for free.

Failed to talk to init day

When using WSL in the morning, an error was reported:

root@PC0:/home/zhang# systemctl start ssh.service
System has not been booted with systemd as init system (PID 1). Can't operate.

This error report is easy to solve. The solution is to use Service :

root@PC0:/home/zhang# service ssh status
 * sshd is running

Then I try to shut down:

root@sidanzhang-PC0:/home/zhang# poweroff
System has not been booted with systemd as init system (PID 1). Can't operate.
Failed to talk to init daemon.

True pit, shut down all report wrong.
According to this answer: rebooting Ubuntu on windows without rebooting windows?- super user
the solution is to open a new window of PowerShell and run the command:

wsl --shutdown

If your win10 system has not been updated, the administrator can run the following command:

net stop LxssManager

Elasticsearch cluster cannot be started. The following prompt fails to send join request to master appears

[node-2] failed to send join request to master [{node-1}{WbcP0pC_T32jWpYvu5is1A}{2_LCVHx1QEaBZYZ7XQEkMg}{10.10.11.200}{10.10.11.200:9300}], reason [RemoteTransportException[[node-1][10.10.11.200:9300][internal:discovery/zen/join]]; nested: IllegalArgumentException[can't add node {node-2}{WbcP0pC_T32jWpYvu5is1A}{p-HCgFLvSFaTynjKSeqXyA}{10.10.11.200}{10.10.11.200:9301}, found existing node {node-1}{WbcP0pC_T32jWpYvu5is1A}{2_LCVHx1QEaBZYZ7XQEkMg}{10.10.11.200}{10.10.11.200:9300} with the same id but is a different node instance]; ]

The reason is: because the copied elasticsearch folder contains the node data of instance 1 in the data file, you need to clear the file under the data file of instance 2.

Delete all the files in the ES cluster data database folder

https://blog.csdn.net/gamer_ gyt/article/details/59077189

Some processing experiences of failed to notify build listener

When writing a demo, there is a problem as follows:

Failed to notify build listener.

When searching on the Internet, it’s all about the current gradle problem. What is the specific problem?I found one of the Blogs:

https://blog.csdn.net/Evan_ L/article/details/87368075

What I’m saying is that the current gradle version supported by Android studio may not be consistent with the version you expect to use in your project and development tools.

So how do we check?We can carry out the following steps:

1. Check the gradle version you expect to use, and enter gradlew – V in terminal in Android studio. (if you have configured gradle environment, enter gradle – V in CMD) as shown in the figure below:

You can see that my version number here is 5.1.1.

2. Check the gradle version supported by your current Android studio. The location is the gradle folder in your Android studio directory. As shown in the figure:

You can see that I support 4.6 here. So to sum up, my initial judgment is that my expected gradle version is too high. So I need to make my gradle version a little lower to meet the needs of my android studio. How to change it

Here, just change your gradle version to the latest version supported by Android studio. After the change, remember to change the version number of the gradle plug-in, otherwise there will be problems. As shown in the figure:

Remember that the version number of the plug-in here must be changed to correspond to the version number of gradle. The specific corresponding relationship can be viewed on Android’s official website. Here is a link:

https://developer.android.google.cn/studio/releases/gradle-plugin.html#updating-plugin

Then, after the version number is mapped, you may need to change some dependent version numbers. Just follow the prompts. I can only say that’s how my problem was solved. I hope I can help you. Of course, what I said may not be right. I hope Daniel can see it and don’t laugh at us.

If you find that there may be something wrong with my blog, you can check this:

https://blog.csdn.net/qq_ 21397217/article/details/65630730