Category Archives: How to Fix

Error: (- 215: assertion failed)

Error: (- 215: assertion failed)

Source code:

import cv2

img = cv2.imread('D:\Work\study\jaffe\train\happy\KA.HA1.29.tiff')
cv2.namedWindow("Image")
cv2.imshow('Image', img)
cv2.waitKey (0)

Error:
traceback (most recent call last):
file “d”:/work/study/study_ cv.py ”, line 6, in
cv2.imshow(‘Image’, img)
cv2.error: OpenCV(3.4.2) C:\Miniconda3\conda-bld\opencv-suite_ 1534379934306\work\modules\highgui\src\ window.cpp:356 : error: (-215:Assertion failed) size.width&gt ;0 && size.height&gt ;0 in function ‘cv::imshow’

Reason:
it can be seen from pychar that

here is understood as escape character

Correction:

import cv2

img = cv2.imread('D:\Work\study\jaffe\\train\happy\KA.HA1.29.tiff')
cv2.namedWindow("Image")
cv2.imshow('Image', img)
cv2.waitKey (0)

Error: Microsoft Visual C + + 14.0 is required. Get it with “Microsoft Visual C”++

The error is as follows:

error: Microsoft Visual C++ 14.0 is required. Get it with “Microsoft Visual C++ Build Tools”: https://visualstudio.microsoft.com/downloads/

    —————————————-
Command “e:\soft\python3.6_ x64\ python.exe -u -c “import setuptools, tokenize;__ file__ =’C:\\Users\\RJ-TR19\\AppData\\Local\\Temp\\pip-build-q2fmqstd\\pycrypto\\ setup.py ‘;f=getattr(tokenize, ‘open’,
 open)(__ file__ );code=f.read().replace(‘\r\n’, ‘\n’);f.close();exec(compile(code, __ file__ , ‘exec’))” install –record C:\Users\RJ-TR19\AppData\Local\Temp\pip-dchg89ka-record\install- record.txt —
single-version-externally-managed –compile” failed with error code 1 in C:\Users\RJ-TR19\AppData\Local\Temp\pip-build-q2fmqstd\pycrypto\

The last pycrypto instruction is missing the package and needs to be installed

Method 1: choose according to the situation. This method is not very recommended. Otherwise, you have to download a file to install every time you can’t run into it

1. Download pycrypto-2.6.1-cp36-cp36m-win_ Amd64.whl file (the file is currently backed up in your own system)

Copy the file to the local Python installation package e:// soft/Python 3.6_ Then open the CMD window in the scripts directory and run the

pip install pycryptosat‑0.2.0‑cp36‑cp36m‑win_amd64.whl

2. Access to other plug-ins https://www.lfd.uci.edu/~gohlke/pythonlibs/ Search inside to find the version, install the same way

Download Microsoft Visual C + + 14.0

Choose the default way to install, the computer does not need to restart, directly PIP install the required plug-ins on the line

Address: https://download.csdn.net/download/weixin_ 41996632/12264862

NPM report error: eperm: operation not permitted, unlink… Solution and clear cache_ modules

Due to domestic and foreign environmental factors, NPM install often has various problems, especially “error: eperm: operation not permitted, unlink…” This is a mistake.

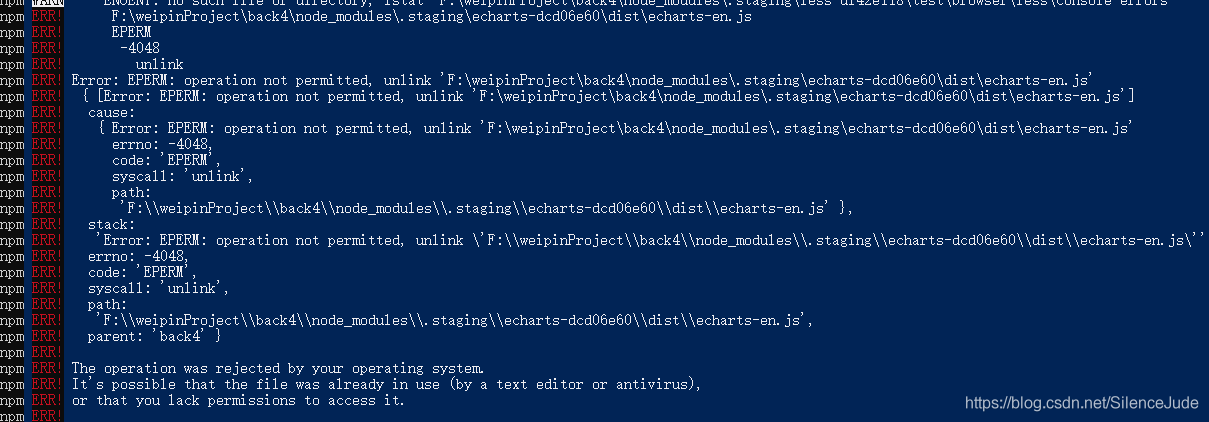
This error is misleading because of the error information, which leads to a lot of solutions proposed on the Internet, such as setting permissions and entering as an administrator.
In fact, the reason for this error is that the network is unstable, resulting in incomplete or error downloading of NPM package. What, your home’s 100m optical fiber network is flying fast?But the server is foreign, so it should be slow when it is slow.
After an error, most people will NPM install again, and the NPM install command will not take the initiative to clear the last installed package. However, the package you installed last time is incomplete, and there is a dependency relationship between packages. As a result, errors will naturally occur.

Therefore, in order to solve this problem, you should clear the last installed package. If you want to clear it completely, you generally need the following two steps:

Delete all files in node modules. Clear the NPM cache.


There are two ways to delete the node modules file:
1. Right click to delete it directly. The disadvantage is that the deletion speed is very slow when there are too many dependencies.
2. Install rimraf to delete [wall crack recommended, speed of light].

Install (Global install recommended)

npm install -g rimraf

Use:
first in node_ The folder where the modules are located. And then directly input:

rimraf node_ modules


There are two ways to clear the NPM cache:
the first one is to delete the cache file directly, and delete the file of C: (users \ \ user name. Npmrc).
The second is to execute: NPM cache clean — force, which also achieves the purpose of clearing cache files.

Nailing dd.httpRequest report errors error:12

Record: nailing enterprise internal application dd.httpRequest report errors error:12

Error: the emulator on the PC can be accessed normally, but after it is released online, it will be prompted that error:12 Network error
the company requires the development of nailing add in program, I choose the enterprise internal program, the background is Java, the front end is e application
because I have intranet penetration, so I use it locally!
Both the background and the front end download the demo directly from the official website,
in the index.js The path of a URL in is domain + ‘/ Login’

let domain = "	http://sellzys.natapp4.cc";
let url = domain + '/login';

But in dd.httpRequest In the call of

dd.httpRequest({
                    url: url,
                    method: 'POST',
                    data:{
                      authCode:res.authCode
                    },

Cannot write URL
need to write directly

dd.httpRequest({
                    url: 'http://sellzys.natapp4.cc/login',
                    method: 'POST',
                    data:{
                      authCode:res.authCode
                    },

I don’t know the specific reason. I just changed the URL to a path and passed it

Error failed to compile with 1 errors

The specific errors are as follows:


94% asset optimization

 ERROR  Failed to compile with 1 errors                                                                                     14:27:08

This dependency was not found:

* !!vue-style-loader!css-loader?{“sourceMap”:true}!../../../node_ modules/vue-loader/lib/style-compiler/index?{“vue”:true,”id”:”data-v-59d9138a”,”scoped”:false,”hasInlineConfig”:false}!stylus-loader?{“sourceMap”:true}!../../../node_ modules/vue-loader/lib/selector?type=styles&index=0!./ List.vue in ./src/pages/list/ List.vue

To install it, you can run: npm install –save !!vue-style-loader!css-loader?{“sourceMap”:true}!../../../node_ modules/vue-loader/lib/style-compiler/index?{“vue”:true,”id”:”data-v-59d9138a”,”scoped”:false,”hasInlineConfig”:false}!stylus-loader?{“sourceMap”:true}!../../../node_ modules/vue-loader/lib/selector?type=styles&index=0!./ List.vue

My mistake here is because I added a wrong specification in the process of creating a single file component:

Right

Error creating bean with name ‘datasource’ defined in class path resource

Use idea to create a new spring boot project, do nothing, create a new controller, and then start to report an error

Exception encountered during context initialization – cancelling refresh attempt: org.springframework.beans . factory.BeanCreationException : Error creating bean with name ‘dataSource’ defined in class path resource [org/springframework/boot/autoconfigure/jdbc/DataSourceConfiguration$ Hikari.class ]: Bean instantiation via factory method failed; nested exception is org.springframework.beans .BeanInstantiationException: Failed to instantiate [ com.zaxxer.hikari .HikariDataSource]: Factory method ‘dataSource’ threw exception; nested exception is org.springframework.boot . autoconfigure.jdbc.DataSourceProperties $DataSourceBeanCreationException: Failed to determine a suitable driver class


Reason: spring boot will load by default org.springframework.boot . autoconfigure.jdbc.DataSourceAutoConfiguration class

Because there is no configuration information related to datasource in the new spring boot project, an error is reported as soon as it is started

Add the following to the application class:

@EnableAutoConfiguration(exclude={DataSou rceAutoConfiguration.class })


Or configure the datasource information and complete the configuration file

Error creating bean with name ‘sqlsessionfactory’ defined in class path resource…..

The unit test code is as follows:
after running, the console reports an error

Caused by: org.springframework.beans . factory.BeanCreationException : Error creating bean with name ‘sqlSessionFactory’ defined in class path resource [ applicationContext.xml ]: Invocation of init method failed; nested exception is org.springframework.core .NestedIOException: Failed to parse mapping resource: ‘file [D:\eclipse2019_ jdk\2019xiangmu\television\target\classes\mapper\ AdminMapper.xml ]’; nested exception is org.apache.ibatis . builder.BuilderException : Error parsing Mapper XML. The XML location is ‘file [D:\eclipse2019_ jdk\2019xiangmu\television\target\classes\mapper\ AdminMapper.xml ]’. Cause: java.lang.IllegalArgumentException : Result Maps collection already contains value for com.syn.television . dao.AdminMapper.BaseResultMap

And my spring configuration file is

after searching on the Internet, I learned from it https://www.cnblogs.com/hfx123/p/9685721.html
After annotating , it runs successfully (I don’t quite understand the specific reasons now)

I also hope that the God passing by can give you your understanding.

MySQL server PID file could not be found!

Error content:

ERROR! MySQL server PID file could not be found!

Error report screenshot:

MySQL version 8.0


Additional:

https://blog.csdn.net/qq_ 31708763/article/details/104375300

Adding configuration files to MySQL on MAC my.cnf : https://blog.csdn.net/qq_ 31708763/article/details/104357798

Spring AOP is an error creating bean with name

Some error messages are as follows:

Warning: exception encoded during context initialization – canceling refresh attempt: org.springframework.beans . factory.BeanCreationException : Error creating bean with name ‘duke’ defined in class path resource [com/springinaction/springidol/spring- idol.xml ]

The reason for this problem is that the necessary jar package is missing aspectjweaver.jar , just download it.

Please click here for the download interface of aspectjweaver

Here’s how to download it:

Select the version you need. Here, select version 1.9.1. After entering, as shown in the figure below, click the box on the way to download the responding jar package, and finally pour it into the project.