To upgrade anaconda, you need to upgrade CONDA first
conda update conda
conda update anaconda
conda update anaconda-navigator    //update the latest version of anaconda-navigator
conda update xxx #Update xxx file packageTo upgrade anaconda, you need to upgrade CONDA first
conda update conda
conda update anaconda
conda update anaconda-navigator //update the latest version of anaconda-navigator
conda update xxx #Update xxx file packageThe official account of WeChat

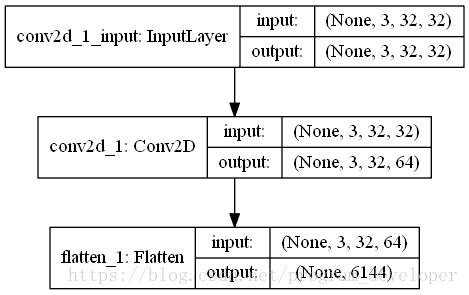
Flatten layer is implemented in Keras.layers.core . flatten() class.
effect:
Flatten layer is used to “flatten” the input, that is, to make the multi-dimensional input one-dimensional. It is often used in the transition from convolution layer to fully connected layer. Flatten does not affect the size of the batch.
example:
from keras.models import Sequential
from keras.layers.core import Flatten
from keras.layers.convolutional import Convolution2D
from keras.utils.vis_utils import plot_model


model = Sequential()
model.add(Convolution2D(64,3,3,border_mode="same",input_shape=(3,32,32)))
# now:model.output_shape==(None,64,32,32)

model.add(Flatten())
# now: model.output_shape==(None,65536)

plot_model(model, to_file='Flatten.png', show_shapes=True)
In order to better understand the function of flatten layer, I visualize this neural network, as shown in the figure below:
Nail callback has been reporting errors
java.lang.IllegalArgumentException : Last encoded character (before the paddings if any) is a valid base 64 alphabet but not a possible value. Expected the discarded bits to be zero.
at org.apache.commons . codec.binary.Base64 .validateCharacter(Base64. java:803 ) ~[commons-codec-1.14.jar!/:1.14]
at org.apache.commons . codec.binary.Base64 .decode(Base64. java:482 ) ~[commons-codec-1.14.jar!/:1.14]
at org.apache.commons . codec.binary.BaseNCodec .decode( BaseNCodec.java:481 ) ~[commons-codec-1.14.jar!/:1.14]
at org.apache.commons . codec.binary.BaseNCodec .decode( BaseNCodec.java:465 ) ~[commons-codec-1.14.jar!/:1.14]
at org.apache.commons . codec.binary.Base64 .decodeBase64(Base64. java:699 ) ~[commons-codec-1.14.jar!/:1.14]
at com.dingtalk.oapi . lib.aes.DingTalkEncryptor .<init>( DingTalkEncryptor.java:61 ) ~[lippi-oapi-encrpt-0.0.1.jar!/:?]
Before debugging OK, I put it online. After thinking about it, I only upgraded springboot recently, from 2.1.6 to 2.3.0, and then rolled back the version. As expected, the parsing was successful, and no error was reported. I found that the upgrade of Base64 package from commons-codec-1.11 to commons-codec-1.13 was caused by adding a verification code
Then introduce commons-codec-1.11 into POM to solve the problem
preface
Use the following command to query DNS in Linux system
dig baidu.com @114.114.114.114
Or use the default DNS server to query
nslookup baidu.com
The following methods may not all work, but you can always find one that works
1.network-manager and networking
In some Linux operating systems, such as the specific version of Ubuntu, DNS is managed by network manager.
In these systems, you need to run the command:
sudo service network-manager restart
In other systems, you can use the following command:
sudo service networking restart
2.ubuntu
In Ubuntu 12.04, you can try the following command:
sudo kill -HUP $(pgrep dnsmasq)
In Ubuntu 16.04 and Debian 9, you can refresh DNS with the following command
sudo systemd-resolve --statistics
On Ubuntu 17.04 and later, use the following command:
sudo systemd-resolve --flush-caches
3 /etc/ resolv.conf
/etc/ resolv.conf This file stores the address of the DNS server. Directly modifying this file can only temporarily change the default DNS address and restore the settings after restart.
You can modify this file directly for temporary use
# Dynamic resolv.conf(5) file for glibc resolver(3) generated by resolvconf(8)
#     DO NOT EDIT THIS FILE BY HAND -- YOUR CHANGES WILL BE OVERWRITTEN
nameserver 8.8.8.8
After modification, Ping or NSLOOKUP again will get the IP address from the new DNS server
for the method of permanent modification, see how do I add a DNS server via resolv.conf?
4.nscd
NSCD is a good DNS caching service. Use the following command to install it:
apt install nscd #debian ubuntu
If you have NSCD installed on your Linux system, you can use the following command to refresh DNS:
sudo /etc/init.d/nscd restart
Resources:
How do I clear the DNS cache?
flush DNS cache in Ubuntu
In UNIX and UNIX like operating systems, the crontab command is often used to set the instructions to be executed periodically, which can also be understood as setting the timing task.
Sometimes the timing task in crontab is not executed successfully. What’s the reason?At this time, we need to go to the log to analyze it. How to view the log records of crontab?
1. linux
Look at/var/log/ cron.log This file can be viewed with tail – F/var/log/cron
2. unix
In the/var/spool/cron/tmp file, there are croutxxx001864 TMP files. You can see the tasks being executed from these files.
3. Mail task
In the/var/spool/mail/root file, there is a record of crontab execution log. Use tail – F/var/spool/mail/root to view the latest crontab execution.
A friend asked about whether the crontab of Linux has been executed or not. He has also written some shell scripts for basic backup. Combined with his own actual production environment, he briefly describes how to analyze whether the crontab is executed correctly through the cron execution log.
For example, Oracle users under the server have the following scheduled tasks
[oracle@localhost6 ~]$ crontab -l
00 1 * * 0 /home/oracle/backup/hollyipcc.sh
00 1 1 * * /home/oracle/backup/hollyreport_hollycrm.sh
The planned tasks of the system will be in/var/log first
[root@localhost ~]# cd /var/log/
[root@localhost log]# less cron
Sep 22 04:22:01 localhost crond[32556]: (root) CMD (run-parts /etc/cron.weekly)
Sep 22 04:22:01 localhost anacron[32560]: Updated timestamp for job `cron.weekly' to 2013-09-22
Sep 22 05:01:01 localhost crond[22768]: (root) CMD (run-parts /etc/cron.hourly)
Sep 22 06:01:01 localhost crond[25522]: (root) CMD (run-parts /etc/cron.hourly)
Sep 22 07:01:01 localhost crond[28255]: (root) CMD (run-parts /etc/cron.hourly)
Sep 22 08:01:01 localhost crond[30982]: (root) CMD (run-parts /etc/cron.hourly)
The above/var/log/cron will only record whether some planned scripts have been executed, but Linux will send email to the user every time to check whether the specific execution is correct and some information in the process of script execution.
As mentioned above, Linux will send an email to/var/spool/mail
[root@localhost6 log]# cd /var/spool/mail/
[root@localhost6 mail]# less oracle
Date: Sun, 25 Aug 2013 01:00:01 +0800
Message-Id: <[email protected]>
From: [email protected] (Cron Daemon)
To: [email protected]
Subject: Cron /home/oracle/backup/hollyipcc.sh
Content-Type: text/plain; charset=UTF-8
Auto-Submitted: auto-generated
X-Cron-Env:
X-Cron-Env:
X-Cron-Env:
X-Cron-Env:
X-Cron-Env:

backup hollyipcc

Export: Release 10.2.0.4.0 - Production on Sunday, 25 August, 2013 1:00:02

Copyright (c) 2003, 2007, Oracle. All rights reserved.

Connected to: Oracle Database 10g Enterprise Edition Release 10.2.0.4.0 - Production
With the Partitioning, OLAP, Data Mining and Real Application Testing options
Starting "SYSTEM"."SYS_EXPORT_SCHEMA_01": system/******** dumpfile=hollyipcc_20130825.dmp logfile=hollyipcc_20130825.log directory
=back schemas=hollyipcc parfile=/home/oracle/backup/parfile.par
Estimate in progress using BLOCKS method...
Processing object type SCHEMA_EXPORT/TABLE/TABLE_DATA
Total estimation using BLOCKS method: 5.932 GB
Processing object type SCHEMA_EXPORT/TABLE/TABLE
Processing object type SCHEMA_EXPORT/TABLE/GRANT/OWNER_GRANT/OBJECT_GRANT
Processing object type SCHEMA_EXPORT/TABLE/INDEX/INDEX
Processing object type SCHEMA_EXPORT/TABLE/CONSTRAINT/CONSTRAINT
Processing object type SCHEMA_EXPORT/TABLE/INDEX/STATISTICS/INDEX_STATISTICS
Processing object type SCHEMA_EXPORT/TABLE/STATISTICS/TABLE_STATISTICS
. . exported "HOLLYIPCC"."BASE_CONTACTSTATE_BAK":"P201203" 1.389 GB 15716014 rows
At this point, we can well judge whether the crontab script is executed, whether it is correct in the process of execution, and some error information. I hope this can help some friends understand the principle of crontab and diagnose the problems of crontab.
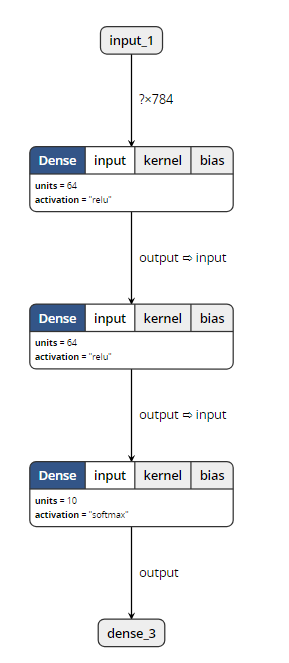
Today, we did an experiment on the model saved by keras, hoping to help you understand the differences between the models saved by keras.
We know that the model of keras is usually saved as a file with the suffix H5, such as final_ model.h5。 The same H5 file uses save () and save_ The effect of weight () is different.
We use MNIST, the most common data set in the universe, to do this experiment
inputs = Input(shape=(784, ))
x = Dense(64, activation='relu')(inputs)
x = Dense(64, activation='relu')(x)
y = Dense(10, activation='softmax')(x)

model = Model(inputs=inputs, outputs=y)
Then, import MNIST data for training, and save the model in two ways. Here, I also save the untrained model, as follows:
from keras.models import Model
from keras.layers import Input, Dense
from keras.datasets import mnist
from keras.utils import np_utils
(x_train, y_train), (x_test, y_test) = mnist.load_data()
x_train=x_train.reshape(x_train.shape[0],-1)/255.0
x_test=x_test.reshape(x_test.shape[0],-1)/255.0
y_train=np_utils.to_categorical(y_train,num_classes=10)
y_test=np_utils.to_categorical(y_test,num_classes=10)
inputs = Input(shape=(784, ))
x = Dense(64, activation='relu')(inputs)
x = Dense(64, activation='relu')(x)
y = Dense(10, activation='softmax')(x)
model = Model(inputs=inputs, outputs=y)
model.save('m1.h5')
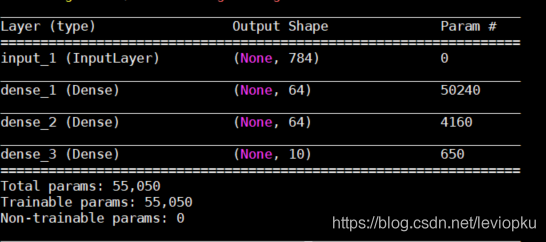
model.summary()
model.compile(loss='categorical_crossentropy', optimizer='sgd', metrics=['accuracy'])
model.fit(x_train, y_train, batch_size=32, epochs=10)
#loss,accuracy=model.evaluate(x_test,y_test)
model.save('m2.h5')
model.save_weights('m3.h5')
As you can see, I have saved m1.h5, m2.h5 and m3.h5 files. So, let’s see what’s the difference between these three things. First, look at the size:

M2 represents the result of the model saved by save (), which not only keeps the graph structure of the model, but also saves the parameters of the model. So it’s the biggest.
M1 represents the result of the model before training saved by save (). It saves the graph structure of the model, but it should not save the initialization parameters of the model, so its size is much smaller than m2.
M3 means save_ Weights () saves the results of the model. It only saves the parameters of the model, but it does not save the graph structure of the model. So it’s much smaller than m2.
Through the visualization tool, we found that: (open M1 and M2 can show the following structure)
When opening m3, the visualization tool reported an error. So it can be proved that save_ Weights () does not contain model structure information.
Loading model
The model files saved by two different methods also need different loading methods.
from keras.models import load_model

model = load_model('m1.h5')
#model = load_model('m2.h5')
#model = load_model('m3.h5')
model.summary()
Only when loading m3. H5, this code will report an error. Other outputs are as follows:
It can be seen that only the H5 file saved by save() can be downloaded directly_ Model () open!
So, how can we open the saved parameter (M3. H5)?
This is a little more complicated. Because m3 does not contain model structure information, we need to describe the model structure again before loading m3, as follows:
from keras.models import Model
from keras.layers import Input, Dense


inputs = Input(shape=(784, ))
x = Dense(64, activation='relu')(inputs)
x = Dense(64, activation='relu')(x)
y = Dense(10, activation='softmax')(x)

model = Model(inputs=inputs, outputs=y)
model.load_weights('m3.h5')
The above m3 into M1 and M2 is no problem! It can be seen that the model saved by save () has obvious advantages except that it takes up more memory. Therefore, in the case of no lack of hard disk space, it is recommended that you use save () to save more.
be careful! If you want to load_ Weights (), you must ensure that the calculation structure with parameters described by you is completely consistent with that in H5 file! What is parametric computing structure?Just fill in the parameter pit. We changed the above non parametric structure and found that H5 files can still be loaded successfully. For example, changing softmax to relu does not affect the loading.
For save() and save() of keras_ No problem at all
When docking with a third party, it’s very common for us to return JSON with many parameter fields, so it must take a lot of time for us to manually create JavaBeans. Bloggers have found many tools on the Internet that can automatically generate JavaBeans through JSON. Here’s a brief introduction to the plug-in gsonformat in IntelliJ idea.
1. What is gson format
As plug-in to convert JSON data format to JavaBean object.
2. Shortcut key: Ctrl + Alt + s, or settings — & gt; plugs — & gt; enter gsonformat install plugins
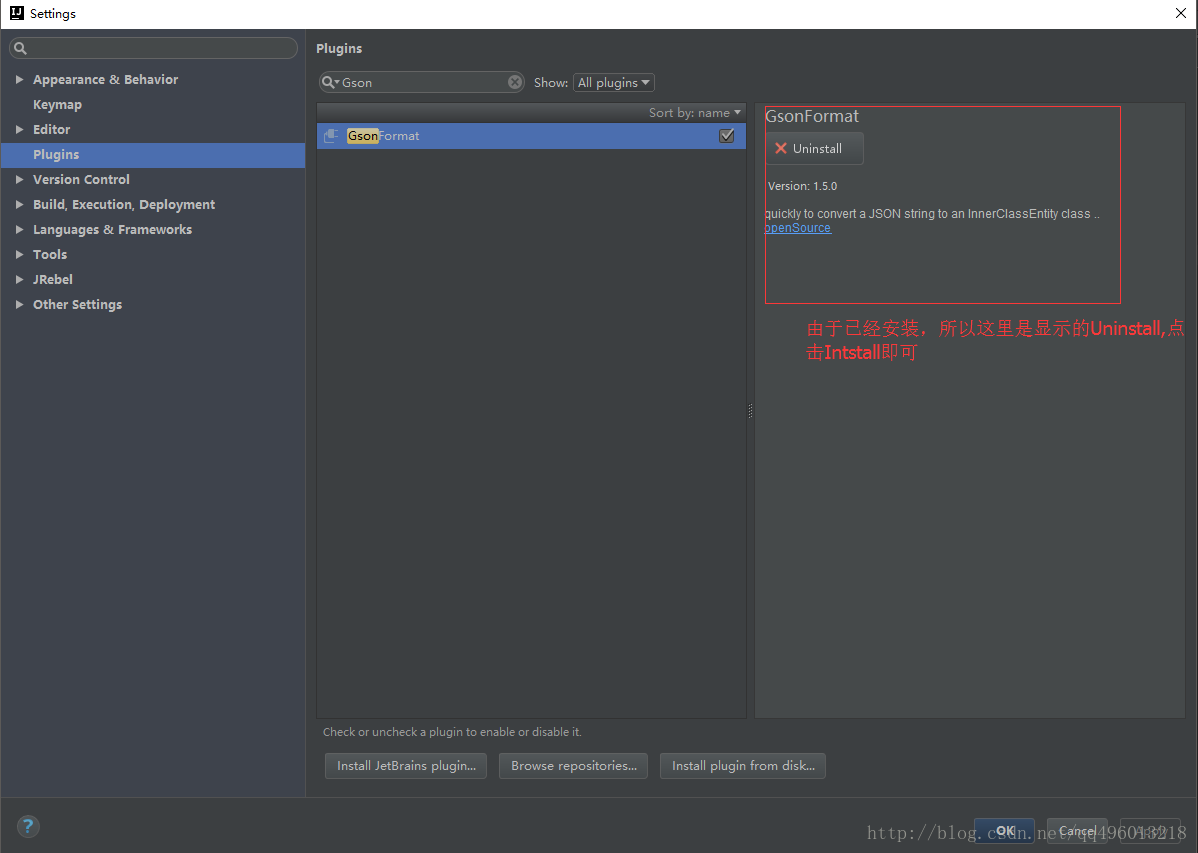
After the installation is completed, restart IntelliJ idea. First, you need a new class file, and then press Alt + insert to select gsonformat, or Alt + s to pop up the box and enter the string data in JSON format.
Sk learn provides the function of scrambling the data set. Stratifiedsufflesplit() is a very practical function. Before the data set is divided, scrambling operation is the first step. Otherwise, it is easy to produce over fitting and the generalization ability of the model will be reduced.
sklearn.model_selection.StratifiedShuffleSplit(n_splits=10, test_size=’default’, train_size=None, random_state=None)Parameters
n_ splits
It is the number of training data divided into train/test pairs, which can be set according to needs. The default value is 10
Parameter test_ Size and train_ Size is used to set the proportion of train and test in the train/test pair.
Note: Train_ num≥2,test_ num≥2 ;test_ size+train_ Size can be less than 1*
Parameter ﹣ random_ State control is to randomly scramble samples
Function action description
1. It generates a specified number of independent train/test data sets and divides the data sets into n groups.
2. Firstly, the samples are randomly scrambled, and then the train/test pairs are divided according to the set parameters.
3. Each group division created by it will ensure the same analogy proportion of each group. That is to say, if the proportion of the first group of training data categories is 2:1, then each group of the following categories will meet this proportion. Code example:
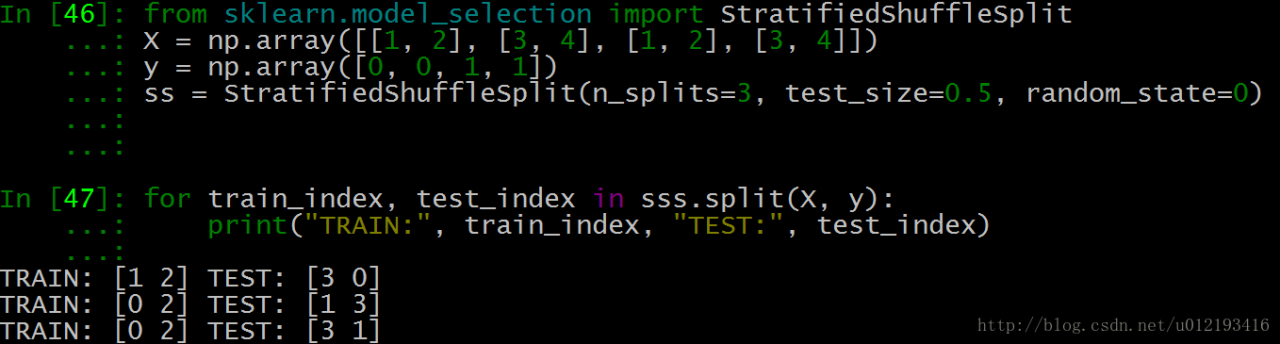
As shown in the above test data, each group of Index Y and index 3 are generated.
test_ Size = 0.5, which means half of the test and training data, and the index values of train and test are 2
n_ Splits = 3, there are three sets of index values
We take the last set of index values:

Training set 0 is [1,2], the second is [1,2], and the tag is the corresponding 0,1
The third test set is [3,4], the first is [3,4], and the tag corresponds to 1,0
When the primary key is imported, a large number of errors will be reported.
Query:
INSERT INTO `FNDCN_ MNG ` values (787390578, 1, ‘Yang Ming’, 95585, ‘2015-06-08′,’prospectus’, 80100, null, ‘1’, null, ‘3’, 2015-06-29 ‘, null,’ 1 ‘,’yang Ming, master of Central University of Finance and economics, 14 years of banking and fund experience. He worked as a credit officer, trader and risk manager in Bank of Shanghai. In October 2004, he joined Huaan Fund Management Co., Ltd. as a researcher of research and development department. Since June 2013, he has been the fund manager of Huaan strategic preferred equity fund. He has been the senior director of investment research since June 2014. ‘, ‘2015-11-09 12:33:58’, ‘2016-01-06 21:34:41’, ‘2015-12-31 12:14:18’, ‘JY’, ‘488969752640’, NULL, NULL, NULL, NULL)
Error occured at:2016-02-16 15:23:41
Line no.:220
Error Code: 1062 – Duplicate entry ‘95585-80100-2015-06-29 00:00:00-1–1’ for key ‘IDX_ FNDCN_ MNG’
Solution 1:
Set the primary key to grow automatically. You can manually set the related table ID to self growing in the database.
As shown in the figure:

Continue to import normal.
Solution 2:
Problem Description: if the SQL is imported separately, the following error will be reported:
1 queries executed, 0 success, 1 errors, 0 warnings
Query: insert into ` fndcn_ MNG ` values (787192513, 1, ‘Dingjin’, 150150, ‘2015-12-28’, ‘prospectus’, 80100, null,’ 1 ‘, null,’ 3 ‘, 20
Error code: 1062
Duplicate entry ‘787192513’ for key ‘PRIMARY’
After checking, the primary key generation strategy is: @ generatedvalue (strategy)= GenerationType.IDENTITY )No problem.
Delete the table with import error;
Create a new table to import data;
My problem is in the database: in the database, the primary key is not set to grow automatically. Set the primary key of the existing table to grow automatically. The SQL statement is as follows:
alter table course change course_ id course_ id int(10) not null auto_ increment ;
Then use SQL script to import the required data, which can also easily locate errors.
order of the day
1. Convert MP3 to WAV
ffmpeg -i input.mp3 -acodec pcm_ s16le -ac 1 -ar 8000 output.wav
2. Convert m4a to wav
ffmpeg -i input.m4a -acodec pcm_ s16le -ac 1 -ar 8000 output.wav
3. Conversion between wav and PCM
ffmpeg – iinput.wav -f s16le -ar 8000 -acodec pcm_ s16le output.raw
4. PCM to WAV
ffmpeg -f s16le -ar 8000-ac 1 -acodec pcm_ s16le -i input.raw output.wav
Note:
– acodec PCM_ s16le pcm_ S16le 16bits encoder
– F s16le is saved in 16bits PCM format
– AC 1 mono
– AR 8000 sampling rate
Ffmpeg installation configuration see blog:
https://blog.csdn.net/qq_ 39516859/article/details/81843419
This method can be used to delete a file with a suffix in a folder. Of course, the format of the file name can be defined by yourself, not necessarily by specifying a suffix, but by specifying a prefix, etc.
From: drizzle and glimmer
Method 1
Find Directory – name “*. ABC” | xargs RM
command is a bit dangerous, you can first execute the first half to see if it is the file you want to delete, and then execute the whole
method 2:
find. – name ‘*. Exe’ – type F – print – exec RM – RF {} \;
(1) “.” means to search recursively from the current directory
(2) “- name ‘*. Exe'” to search by name, all the folders or files ending with. Exe should be found
(3) “- type F” the type of search is file
(4) “- print” the directory name of the output search file
(5) The most important thing is – exec. The – exec option is followed by a command to be executed, which means that the command will be executed for the found file or directory.
The exec option is followed by the command or script to be executed, followed by a pair of {}, a space and a \, and finally a semicolon
Linux command — exec of find command
Example 1: the LS – L command is placed in the – exec option of the find command. Example 2: find the files whose change time is before n days in the directory and delete them. Example 3: find the files whose change time is before n days in the directory and delete them. Give a prompt before deleting. Example 4: grep is used in – exec Command instance 5: find the file and move to the specified directory instance 6: execute CP command with exec option
We often use the find query file. After querying, we will do some common operations, such as deleting RM – RF. At this time, we don’t want to use the pipe character, so we can use exec to solve this problem.
Exec explains:
-The exec parameter is followed by a command, such as RM – F, whose termination is marked by a semicolon. Therefore, the semicolon after this command is indispensable. Considering that the semicolon has different meanings in different systems, a backslash is added in front of it.
The curly brackets represent the file name found by find.
When using find, as long as you write the desired operation in a file, you can use exec to cooperate with find search, which is very convenient. In some operating systems, only the – exec option is allowed to execute commands such as LS or LS – L. Most users use some options to find old files and delete them. It is suggested that before the RM command is executed to delete a file, it is better to use the LS command to check that they are the files to be deleted. The exec option is followed by the command or script to be executed, followed by a pair of {}, a space and a \, and finally a semicolon. In order to use the exec option, you must also use the print option. If you verify the find command, you will find that the command only outputs the relative path and file name from the current path.
Example 1: the LS – L command is placed in the – exec option of the find command
1. Command:
find. – type F – exec LS – L {}; the find command matches all the ordinary files in the current directory and lists them with the LS – L command in the – exec option.
This command is a bit of a pit, but it’s really easy to use. It’s because I received a prompt when I entered: find omitted the – exec parameter
2. Solution:
(1) pay attention to a pair of {}, a space and a \, and finally a semicolon
(2) use “;” ‘;’ in; to arouse them.
Example 2: search the directory for the files whose change time is n days ago and delete them
1. Command:
find . -type f -mtime +14 -exec rm {} ;
Before deleting files in any way in the shell, you should check the corresponding files first, and be careful. When using commands such as MV or RM,
you can use the – exec option security mode, which will prompt you before operating on each matched file.
Example 3: find the files whose change time is n days ago in the directory and delete them. Give a prompt before deleting them
1. Command:
find . -name “*.log” -mtime +5 -ok rm {} ;
Find all the files in the current directory that end with. Log and have been changed for more than 5 days, delete them, and give a prompt before deleting them. Press y to confirm and N to cancel.
Example 4: using grep command in – Exec
1. Command:
find /etc -name “passwd” -exec grep “root” {} ;
Any form of command can be used in the – exec option. In the above example, we use the grep command. The find command first matches all the files named “passwd”, and then executes the grep command to see if there is a root user in these files.
Example 5: find the file and move it to the specified directory
1. Command:
find . -name “*.log” -exec mv {} … ; //… Is the path name
Example 6: executing CP command with exec option
1. Command:
find . -name “*.log” -exec cp {} test3 ;
I’m not careful. Test3 is a directory, otherwise CP won’t go in.