Author Archives: Robins

Android Studio – add configuration for Android studio

The following errors occurred:

  Obviously, the ADB is connected to the device, and the gradle compilation has passed, but the device cannot be loaded.

Later, after many attempts, it was found that the SDK version of Android studio just downloaded was too high, so we can choose a lower version.

  After removing the √ in front of 31, I selected the Android 8.0 version. After installation, it will be bound.

Execution repackage of goal org.springframework.boot:spring-boot-maven-plugin:2.4.0:repackage failed

When spring boot performs the packaging operation, the following errors are reported:

Execution default of goal org.springframework.boot:spring-boot-maven-plugin:XXXX RELEASE:repackage failed: Unable to find main class

The root cause is that in my project scenario,

Only the – boot sub module as shown in the figure produces executable jar packages. Other modules do not need to be executable. In my root POM, spring boot helps me add the following build strategy by default

< build>
        & lt; plugins>
            & lt; plugin>
                & lt; groupId> org.springframework.boot
                & lt; artifactId> spring-boot-maven-plugin
            & lt;/ plugin>
        & lt;/ plugins>
    & lt;/ build>

The solution is relatively simple, that is, remove the build part of the Spirng boot for all modules and put it into the sub module you need to package. Here is the API service boot module, Other modules do not need to produce executable jars.
————–
copyright notice: This article is an original article of CSDN blogger “@ within” and follows the CC 4.0 by-sa copyright agreement. Please attach the source link of the original text and this notice for reprint
original link: https://blog.csdn.net/qq_ 41264674/article/details/106539584

[HMR] Waiting for update signal from WDS…

  The console displays [HMR] waiting for update signal from WDS

Solution:

1. Find the following documents

node_ modules/webpack/hot/log.js

2. Comment out the following codes

module.exports = function(level, msg) {
	// if (shouldLog(level)) {
	// 	if (level === "info") {
	// 		console.log(msg);
	// 	} else if (level === "warning") {
	// 		console.warn(msg);
	// 	} else if (level === "error") {
	// 		console.error(msg);
	// 	}
	// }
};

Dbsql occurs when configuring SAP ATC during SCI check_DUPLICATE_KEY_ERROR

Description:
when configuring SAP ATC and executing related notes, there are SCI related checks and configurations. When SCI clicks check, there is dbsql_ DUPLICATE_ KEY_ Error report

Error content:
category ABAP programming error
runtime errors dbsql_ DUPLICATE_ KEY_ ERROR
Except. CX_ SY_ OPEN_ SQL_ DB
ABAP Program CL_ SATC_ CI_ CF_ TOOL============CP
Application Component BC-DWB-TOO-ATF

Version: SAP s/4 Hana 2020
SAP_ BASIS 755 SP1

Solution:
execute SAP note first:
2763282 – fkkbix_ BIP: Runtime error DBSQL_ DUPLICATE_ KEY_ ERROR (CX_ SY_ OPEN_ SQL_ DB) during insert on DFKKBIX_ BIP_ CH

If the above notes cannot be executed, it means that your version is already relatively high.
you can directly execute the program:
SATC_ AC_ CLEANUP

Try again after that, and SCI will come out to check the results

Cannot open include file: ‘io.h‘: No such file or directory

Scenario:

When doing assignment 2 of cs231n, the job provides fast_ Layers.py file provides the fast implementation of forward propagation and back propagation of CNN convolution layer, in which the python module is used.


Problem Description:

Run “Python setup.py build” on the command line_ Ext — inplace “an error of” cannot open include file: ‘io. H’: no such file or directory “is reported to configure the relevant environment


Solution:

1. According to the article cannot open include file: ‘io. H’: no such file or directory, it is because we lack the windows 10 SDK and MSVC (a C/C + + compiler developed by Microsoft) and need to use visual studio to install.

However, I found that I have installed these two extensions:

Open “Visual Studio installer”:


Click “modify”:                                       

  Then you can view what components you have installed in this interface:

2. In another answer, it is said to add a system variable named “include” and the value is the directory where the IO. H file in the windows 10 SDK is located, as shown in the following figure. You can search “urct \ \ io. H” on your computer to see the path.

  Run “Python setup.py build” after adding_ Ext — inplace “, there is another error:” cannot open include file: ‘basetsd. H’: no such file or directory “. Similarly, find the directory of” basetsd. H “(the file is also in the windows 10 SDK) and add it to the” include “system variable just created to solve the problem.

After solving this problem, an error appears: “link: fatal error LNK1104: cannot open file ‘Kernel32. Lib’.”. Continue to create a new system variable. The variable name is “lib” and the value is the directory of the kernel32.lib file (which is also in the windows 10 SDK). Run again and no error is reported.

The error record when docker starts Nacos, and the solution to the problem of port occupation

  Error starting userland proxy: listen tcp4 0.0.0.0:8848: bind: address already in use

The problem with this error message is that the port is occupied

View occupied port commands

netstat -tanlp

Kill the process (note that instead of killing the port, it is the port of PID)

kill 6046

This is the current solution

To mention something else, it’s actually because uploading jar package failed to start Nacos, because Tomcat failed to start. Later, docker’s Nacos is used to solve the problem. The later results are appropriate and can be used. Docker is still good, ha ha


An error is reported when the electron Vue Vue component introduces the electron

Question:

Remote module of electron introduced into Vue component:

let { remote } = require("electron");

An error is reported when the electron application starts.

solve:

1. Add window before require, that is:

let { remote } = window.require("electron");

2. Add vue.config.js file in the root directory of the project, and the configuration is as follows:

module.exports = {
    pluginOptions: {
        electronBuilder: {
            nodeIntegration: true
        }
    }
}

The above two methods can be solved.

Of course, the webpreferences property of browserwindow should also be configured correctly:

webPreferences: {
      nodeIntegration: true,
      contextIsolation: false,
      enableRemoteModule: true
    }

Oserror: [winerror 126] cannot find the specified module self_ handle = _ dlopen(self._ name, mode)

When using mask-r-cnn, oserror: [winerror 126] cannot find the specified module, in self_ handle = _ dlopen(self._ An error is reported at name, mode)
after checking, a “GEOS” is passed in the previous function_ c. DLL “DDL file, resulting in an error (or search for DDL in the error)

After inquiry, there is a problem with shapely
solution: install shapely (I installed shapely before, and I don’t know why the error is reported)

conda install -c conda-forge shapely

How to Fix No default.conf file in conf.d after Installing Nginx

In the process of learning nginx, the default.conf file in the conf.d directory cannot be found after installing nginx. The reason is that the EPEL source under the operating system is downloaded by default, which is the Fedora operating system

Scheme I

resolvent

Reinstall nginx and modify the EPEL image source address of nginx

Reinstall

sudo yum install yum-utils

Create a new nginx.repo file

sudo vim /etc/yum.repos.d/nginx.repo

add to

[nginx-stable]
name=nginx stable repo
baseurl=http://nginx.org/packages/centos/$releasever/$basearch/
gpgcheck=1
enabled=1
gpgkey=https://nginx.org/keys/nginx_signing.key
module_hotfixes=true

[nginx-mainline]
name=nginx mainline repo
baseurl=http://nginx.org/packages/mainline/centos/$releasever/$basearch/
gpgcheck=1
enabled=0
gpgkey=https://nginx.org/keys/nginx_signing.key
module_hotfixes=true

By default, a stable repository of nginx packages is used. If you want to use the mainline nginx package, run the following command:

sudo yum-config-manager --enable nginx-mainline

Installing nginx

sudo yum install nginx

This is the information I found on the Internet. I see that many people have handled this problem according to this scheme, but like me, there is still no default.conf file under scheme 1 conf.d, so you can try the second method.

Scheme II

Because the default.conf itself is a configuration file, my idea is to directly create one since there is no one, and see if it works. So I created an empty file with VI default.conf, and then found the contents of the default.conf file on the Internet and put it in.

server {
    listen       80;
    server_name  localhost;


    #charset koi8-r;
    #access_log  /var/log/nginx/host.access.log  main;

    location /mystatus {
        stub_status;
    }

    location/{
        root   /usr/share/nginx/html;
        index  index.html index.htm;
    }


    #error_page  404              /404.html;


    # redirect server error pages to the static page /50x.html
    #
    error_page   500 502 503 504  404 /50x.html;//Modify the 404 status code of the corresponding pointed to the access directory, and restart the server after modification.
    location = /50x.html {
        root   /usr/share/nginx/html;
    }


    # proxy the PHP scripts to Apache listening on 127.0.0.1:80
    #
    #location ~ \.php$ {
    #    proxy_pass   http://127.0.0.1;
    #}


    # pass the PHP scripts to FastCGI server listening on 127.0.0.1:9000
    #
    #location ~ \.php$ {
    #    root           html;
    #    fastcgi_pass   127.0.0.1:9000;
    #    fastcgi_index  index.php;
    #    fastcgi_param  SCRIPT_FILENAME  /scripts$fastcgi_script_name;
    #    include        fastcgi_params;
    #}


    # deny access to .htaccess files, if Apache's document root
    # concurs with nginx's one
    #
    #location ~ /\.ht {
    #    deny  all;
    #}
}

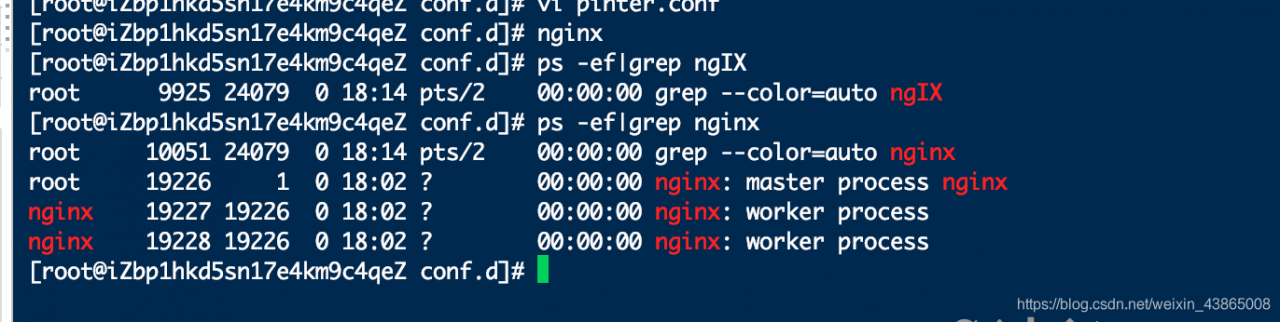
Finally, we changed the configuration according to the project requirements we deployed. Let’s also start nginx to have a look. We can see that there is no error after starting nginx, and we can also see the process of nginx, which shows that this method is feasible and simpler than scheme 1.