Author Archives: Robins

Request cannot get static resource

Today, I set up the development environment of sprintMVC+MyBatis, but I can’t load the static resource file. After checking relevant materials, I found that my web-.xml configuration is as follows, so that the DispatcherServlet will intercept all requests (.js.css…). There is no corresponding processing method in the controller, so the required files cannot be loaded

<!-- Set Spring DispatchServlet -->
    <servlet>
        <servlet-name>SpringMVC</servlet-name>
        <servlet-class>org.springframework.web.servlet.DispatcherServlet</servlet-class>
        <init-param>
            <param-name>contextConfigLocation</param-name>
            <param-value>classpath:spring/spring-mvc.xml</param-value>
        </init-param>
        <load-on-startup>1</load-on-startup>
    </servlet>
    <servlet-mapping>
        <servlet-name>SpringMVC</servlet-name>
        <url-pattern>/</url-pattern>
    </servlet-mapping>

Then change the configuration of the URl-pattern to *.do to intercept only requests from.do, and you can access the resource file

<servlet>
        <servlet-name>SpringMVC</servlet-name>
        <servlet-class>org.springframework.web.servlet.DispatcherServlet</servlet-class>
        <init-param>
            <param-name>contextConfigLocation</param-name>
            <param-value>classpath:spring/spring-mvc.xml</param-value>
        </init-param>
        <load-on-startup>1</load-on-startup>
    </servlet>
    <servlet-mapping>
        <servlet-name>SpringMVC</servlet-name>
        <url-pattern>*.do</url-pattern>
    </servlet-mapping>


The lenet model trained by Python failed to predict its own handwritten pictures

LeNet is trained with MNIST’s training set, and the code is not shown here.
directly loads the saved model

lenet = torch.load('resourses/trained_model/LeNet_trained.pkl')

Attached to the test code

print("Testing")
# Define conversion operations
# Read in the test image and transfer it to the model.
test_images = Image.open('resourses/LeNet_test/0.png')
img_to_tensor = transforms.Compose([
    transforms.Resize(32),
    transforms.Grayscale(num_output_channels=1),
    transforms.ToTensor(),
    transforms.Normalize([0.5], [0.5])])
input_images = img_to_tensor(test_images).unsqueeze(0)
# Move models and data to cuda for computation if cuda is available
USE_CUDA = torch.cuda.is_available()
if USE_CUDA:
    input_images = input_images.cuda()
    lenet = lenet.cuda()
output_data = lenet(input_images)
# Print test information
test_labels = torch.max(output_data, 1)[1].data.cpu().numpy().squeeze(0)
print(output_data)
print(test_labels)

At present, there is no correct rate according to my own picture, and I can’t find any reason. At present, the frequency of output 8 is very high.
later looked up relevant information, for the following reasons: </mark b>

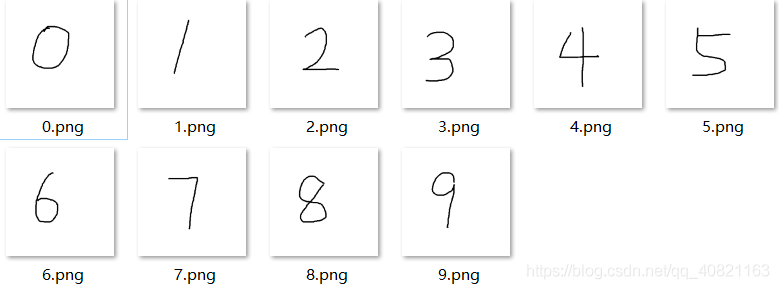
    1. parsed MNIST data set, you will find that the pictures in the data set are white words on a black background, such as:

    1. , but our custom test pictures are generally black words on a white background, such as:

    1. , so I took the custom test pictures by pixel and then re-tested
    pixel reverse code is as follows:
from PIL import Image, ImageOps	
image = Image.open('resourses/LeNet_test/0.png')
image_invert = ImageOps.invert(image)
image_invert.show()

After pixel reversal, the accuracy rate of the test reaches 50-60 percent, but the accuracy rate is still not ideal. Please refer to the following reasons

    MNIST data set contains the handwriting of foreigners. The handwriting style and habits of foreigners are slightly different from those of Chinese people, which is also a major factor affecting the accuracy of the test. But the owner of the building has not tested the correct rate of the image test after modifying the font.

Backup and recovery – rman4

RMAN manual allocation of parallel channels

The article directories
RMAN manual allocation of parallel channels 1. View data file temporary file location 2. Manual channel allocation 3. How to set parallelism to 3

1. View temporary file location of data file

RMAN> report schema;

Report of database schema for database with db_unique_name PROE

List of Permanent Datafiles
===========================
File Size(MB) Tablespace           RB segs Datafile Name
---- -------- -------------------- ------- ------------------------
1    750      SYSTEM               ***     /u01/app/oracle/oradata/proe/system01.dbf
2    600      SYSAUX               ***     /u01/app/oracle/oradata/proe/sysaux01.dbf
3    90       UNDOTBS1             ***     /u01/app/oracle/oradata/proe/undotbs01.dbf
4    6        USERS                ***     /u01/app/oracle/oradata/proe/users01.dbf
5    346      EXAMPLE              ***     /u01/app/oracle/oradata/proe/example01.dbf
6    20       TEST_1               ***     /u01/app/oracle/oradata/proe/test_1.dbf
7    100      TBS_TRAN             ***     /u01/app/oracle/oradata/proe/tbs_tran01.dbf

List of Temporary Files
=======================
File Size(MB) Tablespace           Maxsize(MB) Tempfile Name
---- -------- -------------------- ----------- --------------------
1    29       TEMP                 32767       /u01/app/oracle/oradata/proe/temp01.dbf

2. Manually assign channels

RMAN> run{
2> allocate channel ch1 device type disk format '/u01/app/backup/tbs_%U';
3> backup tablespace TBS_TRAN;
4> release channel ch1;
5> }

allocated channel: ch1
channel ch1: SID=1144 device type=DISK

Starting backup at 10-AUG-20
using channel ORA_DISK_1
channel ORA_DISK_1: starting full datafile backup set
channel ORA_DISK_1: specifying datafile(s) in backup set
input datafile file number=00007 name=/u01/app/oracle/oradata/proe/tbs_tran01.dbf
channel ORA_DISK_1: starting piece 1 at 10-AUG-20
channel ORA_DISK_1: finished piece 1 at 10-AUG-20
piece handle=/u01/app/oracle/fast_recovery_area/PROE/backupset/2020_08_10/o1_mf_nnndf_TAG20200810T140602_hm1rybq5_.bkp tag=TAG20200810T140602 comment=NONE
channel ORA_DISK_1: backup set complete, elapsed time: 00:00:01
Finished backup at 10-AUG-20

3. How to set the parallelism of 3


RMAN> run{
2> allocate channel ch1 device type disk format '/u01/app/backup1/bak1_%U';
3> allocate channel ch2 device type disk format '/u01/app/backup2/bak2_%U';
4> allocate channel ch3 device type disk format '/u01/app/backup3/bak3_%U';
5> backup 
6> (datafile 1 channel ch1)
7> (datafile 2,3 channel ch2)
8> (datafile 4,5,7,8,9,14 channel ch3);
9> release channel ch1;
10> release channel ch2;
11> release channel ch3;
12> }

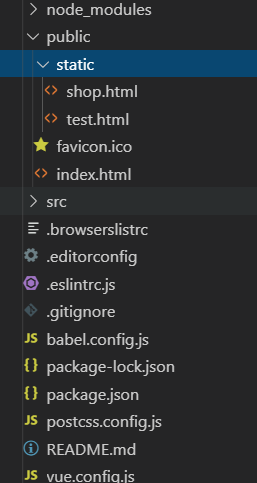
Failed to import static file of vue3 static resource. There is no static folder

When using VUe-Cli3 to create a project, you will find that there is no config folder, the only place to configure is the vue.config.js file, and there is no place to configure static resources
If your project needs to import an external JSON HTML file, you’ll need to create a new static folder yourself
Static folder cannot have the same class as SRC if the class is unreachable
You’ll need to create a static folder under public and then write a static file inside so you can access it

When you access it, it’s in a.vue file, or you can use an iframe, of course

axios.get('static/test.html',{accept: 'text/html, text/plain'}).then(function(res){
            console.log(12,res.data)
            // self.html2 = res.data
        })

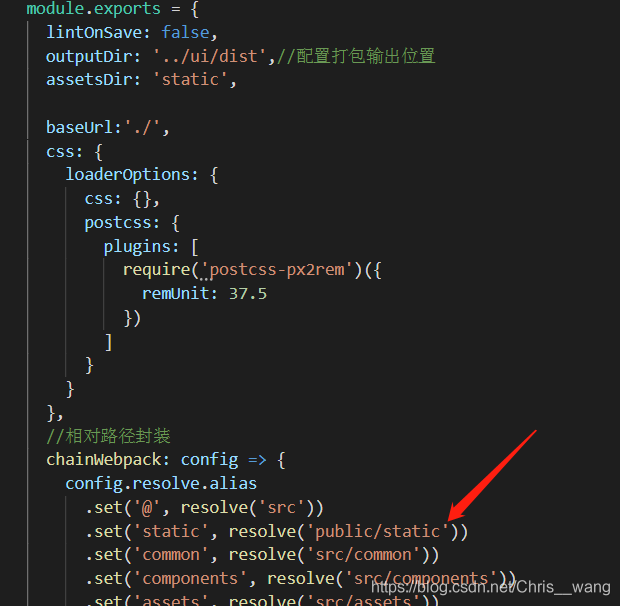
Vue. config.js will also change the configuration

Nuxt cannot find the static resource in static

Nuxt cannot find the static resource inside static reason
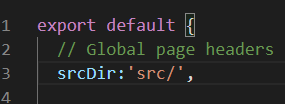
The old VUE project was migrated because the project needed it. Then follow the tutorial to create the SRC folder in Nuxt, and that’s why. Because the initial directory for srcDir is set. So I can’t find the folder outside of SRC.
Solution: Don’t put old project folders in SRC. Follow the folder location where the project was created to

Detailed explanation of UART, SPI and IIC and their differences and relations

UART, SPI, IIC and their differences and connections
UART: full duplex asynchronous serial
I2C: half duplex synchronous serial
SPI: full duplex synchronous serial
Bus synchronous or asynchronous: See if there is a clock line
The bus is serial or parallel: bit by bit transmission on the communication line is serial, and multiple data bits are parallel
1) simplex data transmission only supports data transmission in one direction; Only one party can receive or send a message at the same time, such as television or radio.
2) half duplex data transmission allows data to be transmitted in two directions, but, at a certain time, only data is allowed to be transmitted in one direction. It is actually a simplex communication with direction switching; Only one party can receive or send messages at the same time. Two-way communication can be realized. Example: Walkie-talkie.
3) full-duplex data communication allows data to be transmitted in two directions at the same time. Therefore, full-duplex communication is the combination of two simplex communication modes. It requires sending equipment and receiving equipment to have independent receiving and sending capabilities. At the same time, information can be received and sent at the same time, realizing two-way communication, for example: telephone communication.

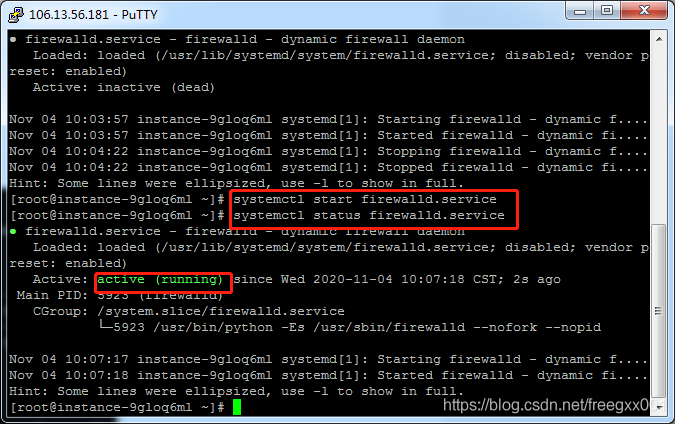
Linux turn off enable firewall command

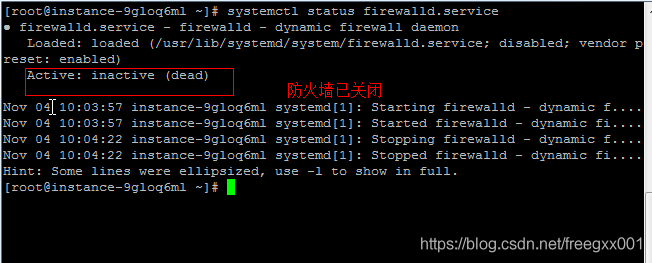
View the firewall command: SystemCTL Status Firewalld.Service
Execute the close command: SystemCTl stop firewalld.Service
Disable firewall auto-start command: SystemCTl disable Firewalld.Service
Systemctl Start Firewalld.Service
Firewall starts with the system: SystemCTL enable Firewalld.Service

Open the firewall

 
Reference blog:
https://blog.csdn.net/shubingzhuoxue/article/details/84578749

PHP big file upload problem (500m or above)

An overview,
 
A breakpoint is simply a download, which means to continue downloading a file from where it has already been downloaded. Breakpoints were not supported in previous versions of the HTTP protocol, and HTTP/1.1 has been since. The Range and content-Range headers are usually used for breakpoints. HTTP protocol itself does not support breakpoint upload, you need to implement their own.
 
Second, the Range
 
Used in the request header to specify the position of the first byte and the position of the last byte, in general format:
 
Range: For client-to-server requests, you can change a field to specify the size and unit of a download file. Byte offset starts at 0. Typical format:
Ranges: (unit=first byte Pos)-[last byte Pos]
Ranges: Bytes =4000- Download from the beginning of byte 4000 to the end of file
Ranges: Bytes =0~N to download contents in the 0-n byte range
Ranges: Bytes = M-n to download contents in the M-n byte range
Ranges: Bytes = -n to download the last N-byte content

 
1. The following points should be noted:
(1) The data interval is a closed interval with a starting value of 0, so a request like “Range: Bytes =0-1” is actually two bytes at the beginning of the request.
(2) “Range: Bytes =-200”, which does not represent the 201 bytes at the beginning of the request file, but the 200 bytes at the end of the request file.
(3) If the last Byte POS is less than the first Byte POS, then the Range request is invalid. The server needs to ignore the Range request, then respond with a 200, and send the entire file to the client.
(4) If the last Byte POS was greater than or equal to the file length, then the Range request was considered unsatisfiable and the server needed to respond to a 416, Requested Range not Satisfiable.
 
2. Example explanation:
Bytes =0-499 bytes
Bytes =500-999 bytes
Bytes =-500 bytes
Bytes =500- = range after 500 bytes
First and last bytes: Bytes =0-0,-1
Also specify a range: Bytes =500-600,601-999
 
Third, the Content – Range
 
Used in the response header to specify the insertion location of a portion of the entire entity, which also indicates the length of the entire entity. Before the server returns a partial response to the client, it must describe the extent of the response coverage and the entire entity length. General format:
 
Content-range: Bytes (Unit first Byte pos) – [Last Byte pos]/[Entity Legth]
 
4. Header examples
 
Request to download the entire file:
 
GET/test. Rar HTTP/1.1
Connection: close
Host: 116.1.219.219
Range: Bytes =0-801 // Bytes =0- Or don’t use this header
 
General normal response
 
HTTP/1.1 200 OK
The Content – Length: 801
The content-type: application/octet stream
Content-range: Bytes 0-800/801 //801: Total file size
 
The simplest breakpoint continuation implementation is as follows:
1. The client has downloaded a 1024K file, of which 512K has been downloaded
2. The network is interrupted, and the client requests the continuation of transmission. Therefore, it is necessary to declare the fragment to be continued this time in the HTTP header:
Range:bytes=512000-
This header tells the server to transfer the file from the 512K location of the file
3. The server receives the breakpoint to continue the transmission request, starting from the 512K position of the file, and adds in the HTTP header:
Content-Range:bytes 512000-/1024000
And the server should return an HTTP status code of 206 instead of 200.
However, in a real scenario, the content of the file corresponding to the URL has changed at the server side when the terminal initiates the continuation request, and the data of the continuation is definitely wrong. How to solve this problem?Obviously at this point we need a way to identify the uniqueness of the file. There is also a definition in RFC2616, such as last-modified to indicate the Last modification time of a file, so that you can determine whether any changes have been made during the continuation of the file. Also defined in RFC2616 is an ETag header that can be used to place a unique identifier for a file, such as the MD5 value of the file.
When a terminal initiates a continuation request, it should declare the IF-match or IF-modified-since fields in the HTTP header to help the server identify file changes.
In addition, there is also an IF-range header defined in RFC2616. If the terminal USES iF-range in continuation. The content in the IF-range can be the first ETag header received or the Last modification in the Last-ModFIED. When the server receives the continuation request, it verifies through the contents in the IF-range. If the verification is consistent, it returns the continuation reply of 206; If not, it returns 200. The content of the reply is all the data of the new file.

the relevant reference links: http://blog.ncmem.com/wordpress/2019/08/09/http%e6%96%ad%e7%82%b9%e7%bb%ad%e4%bc%a0/
welcome into the group to discuss: 374992201

Introduction to JIRA introduction to HP ALM

Our company’s projects currently use Jira and ALM

Introduction to Jira use INTRODUCTION to HP ALM use
1.2.1 Project Project and Issue Transaction 1.2.2 Field Field 1.2.3 Workflow 1.2.4 Screen View

The process of HP ALM2.1 ALM is divided into the following stages

A Jira
1.1 introduction of Jira
JIRA is a project and transaction tracking tool produced by Atlassian, which is widely used in defect tracking, customer service, requirements gathering, process approval, task tracking, project tracking and agile management
1.2 Basic Concepts
1.2.1 Project Project and Issue affairs
The concept of a Project is very simple. It is a “Project”. Then the first Issue under the Project is Web-1 and the second Issue is Web-2
Issue is the core of the Jira core, which is divided into the following types:
Story Story Epic Epic Improvement New Feature Bug defect Task sub-task
1.2.2 Field Field
A Story will have attributes: name, detailed description, submitter, commit time, priority, status, and so on. These properties are Field fields
1.2.3 Workflow
Tasks can have different statuses: backlog, ongoing, completed
requirements can also have different statuses: just submitted, pending review, suspended, rejected, in development, completed
Workflow is used to define the status of Issue
1. Screen view
When we create an Issue, edit an Issue, or view an Issue detail, we do so by creating a new view, editing view, or Detail View
2 HP ALM
2.1 The PROCESS of ALM is divided into the following stages
1) Specify version
2) Specify requirements
3) Plan tests
4) Perform tests
5) Tracking defects

Simple understanding and basic operation of mongodb

What is MongoDB?
MongoDB, written in C++ language, is an open source database system based on distributed file storage.
Adding more nodes guarantees server performance under high loads.
MongoDB is designed to provide scalable, high-performance data storage solutions for WEB applications.
MongoDB stores the data as a document. The data structure is composed of key values (key=> Value) pair composition. MongoDB documents are similar to JSON objects. Field values can contain other documents, arrays, and arrays of documents.
The main features
1.MongoDB is a document-oriented database, which is relatively simple and easy to operate.
2.mongo supports rich query expressions. The query directive USES JSON-like markup to easily query objects and arrays embedded in the document. 3.MongoDB allows the script to be executed on the server side. A function can be written in Javascript to be executed directly on the server side, or the definition of the function can be stored on the server side for the next direct call. 4.MongoDB supports a variety of programming languages :RUBY, PYTHON, JAVA, C++, PHP, C# and other languages.
5.MongoDB installation is simple.
You can download the installation package, in directing a website address is:
https://www.mongodb.com/download-center#community.
The syntax format of MongoDB database creation is as follows:

use DATABASE_NAME

If you want to see all the databases, you can use the show DBS command:

> show dbs
admin   0.000GB
config  0.000GB
local   0.000GB
> 

The syntax format of MongoDB database deletion is as follows:

db.dropDatabase()

The createCollection() method is used in MongoDB to create collections.
Grammar format:

db.createCollection(name, options)

The drop() method is used in MongoDB to delete collections.
Grammar format:

db.collection.drop()

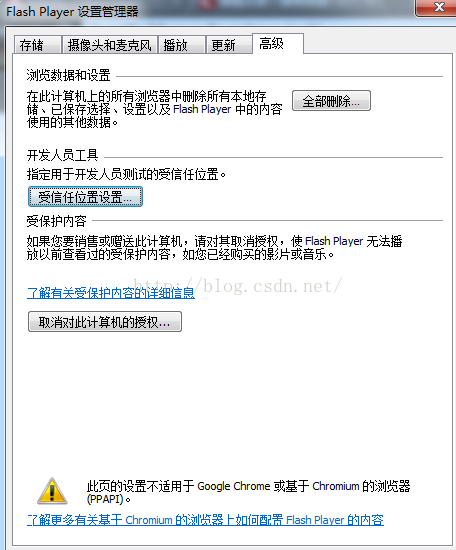
Security error: error ᦇ 2148

Security Sandbox conflict SecurityError: Error #2148:
1. The general browser this problem, is generally in the control panel -> Flash Player-> Advanced – & gt; The trusted location, add the corresponding directory or file, as shown in figure 1.

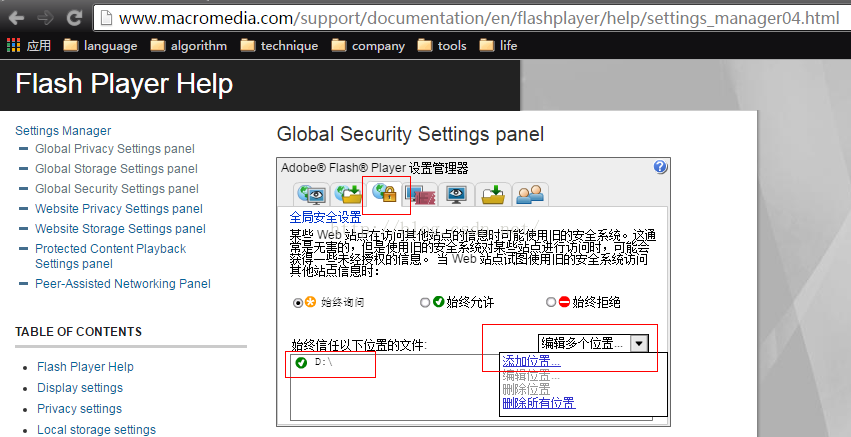
2. But the Google browser is special and you can see the “2” in the figure above, which is why. Click the blue font to open the connection. Find the following link in your browser and open it:

3. Add a trusted location (file or folder) at the location indicated in the figure below. It is ok: