Author Archives: Robins

[Solved] Spark Error: org.apache.spark.SparkException: A master URL must be set in your configuration

Error when running the project to connect to Spark:

Using Spark's default log4j profile: org/apache/spark/log4j-defaults.properties
22/10/08 21:02:10 INFO SparkContext: Running Spark version 3.0.0
22/10/08 21:02:10 ERROR SparkContext: Error initializing SparkContext.
org.apache.spark.SparkException: A master URL must be set in your configuration
	at org.apache.spark.SparkContext.<init>(SparkContext.scala:380)
	at org.apache.spark.SparkContext.<init>(SparkContext.scala:120)
	at test.wyh.wordcount.TestWordCount$.main(TestWordCount.scala:10)
	at test.wyh.wordcount.TestWordCount.main(TestWordCount.scala)
22/10/08 21:02:10 INFO SparkContext: Successfully stopped SparkContext
Exception in thread "main" org.apache.spark.SparkException: A master URL must be set in your configuration
	at org.apache.spark.SparkContext.<init>(SparkContext.scala:380)
	at org.apache.spark.SparkContext.<init>(SparkContext.scala:120)
	at test.wyh.wordcount.TestWordCount$.main(TestWordCount.scala:10)
	at test.wyh.wordcount.TestWordCount.main(TestWordCount.scala)

Process finished with exit code 1

Solution:

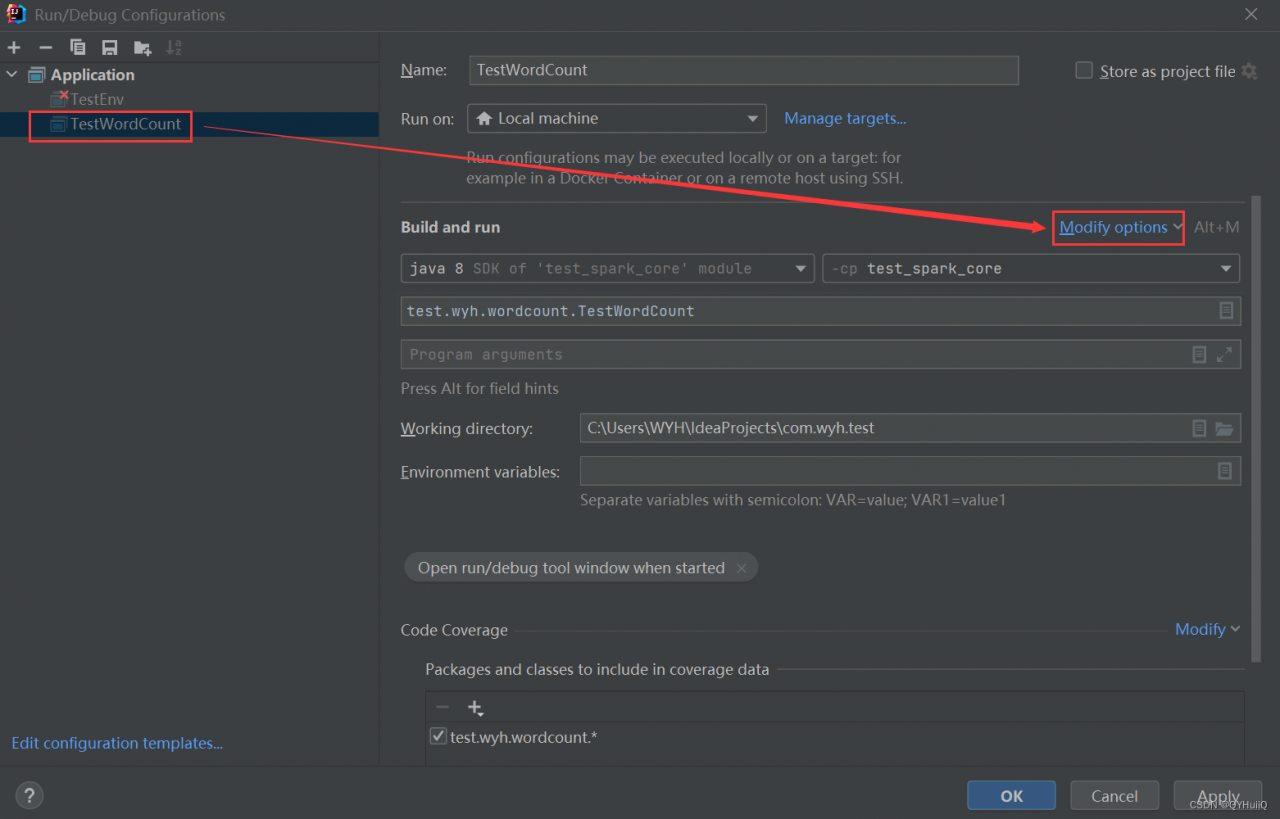
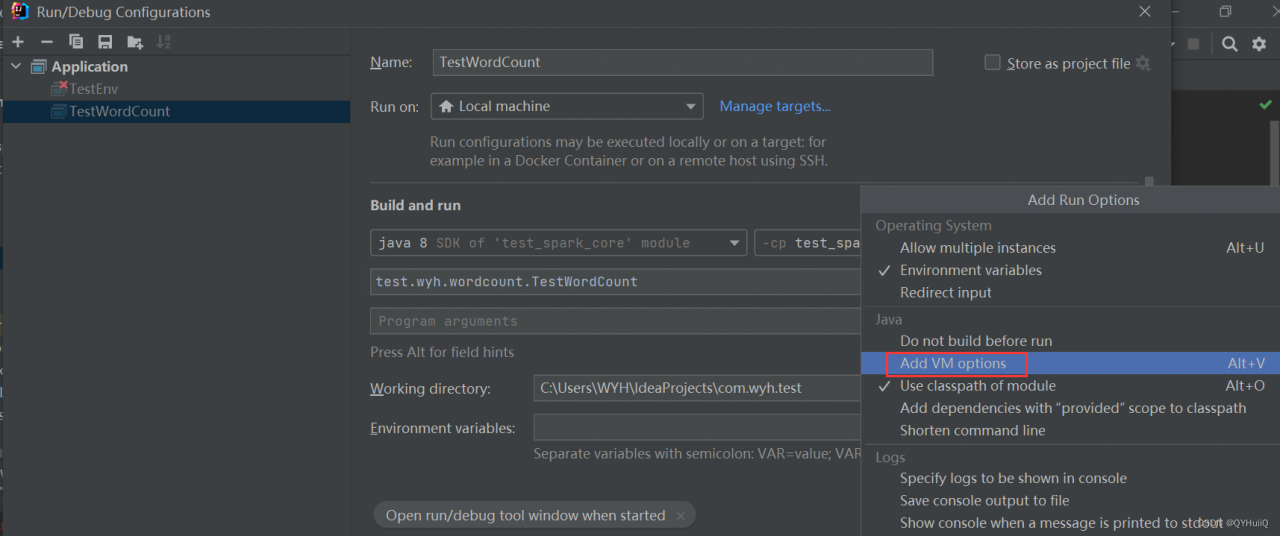
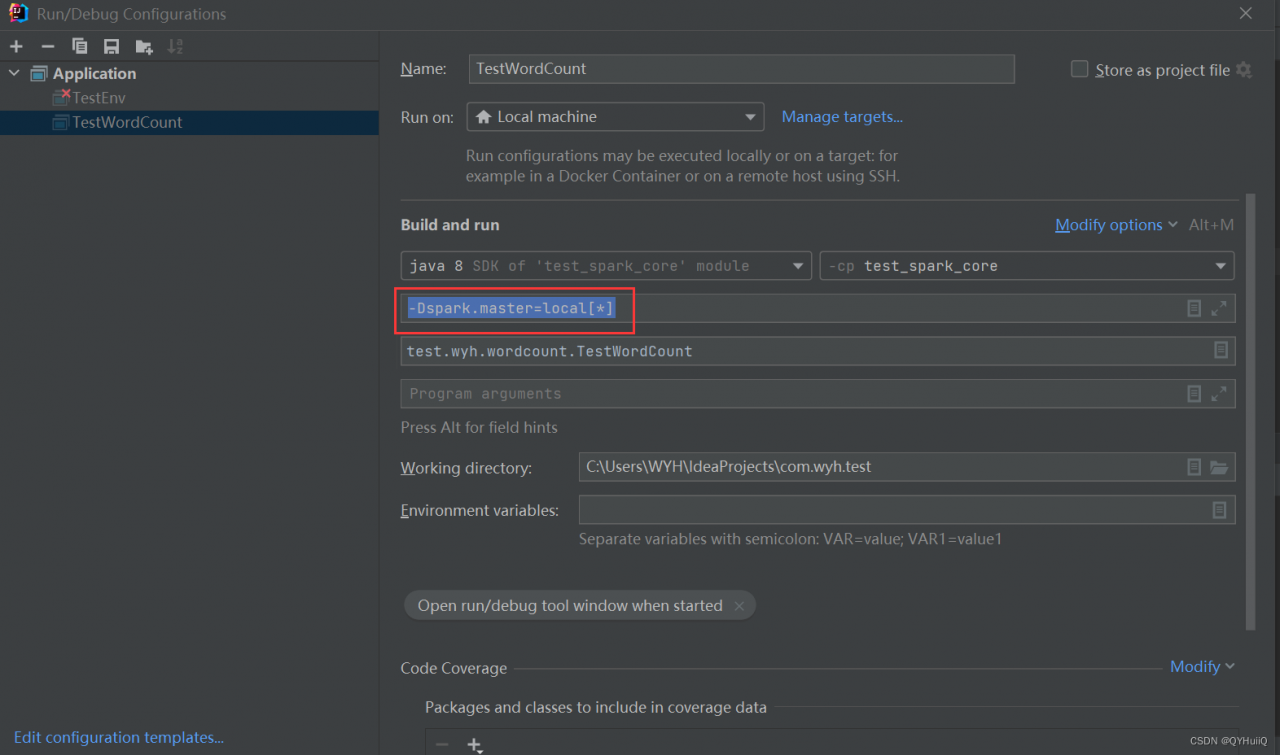
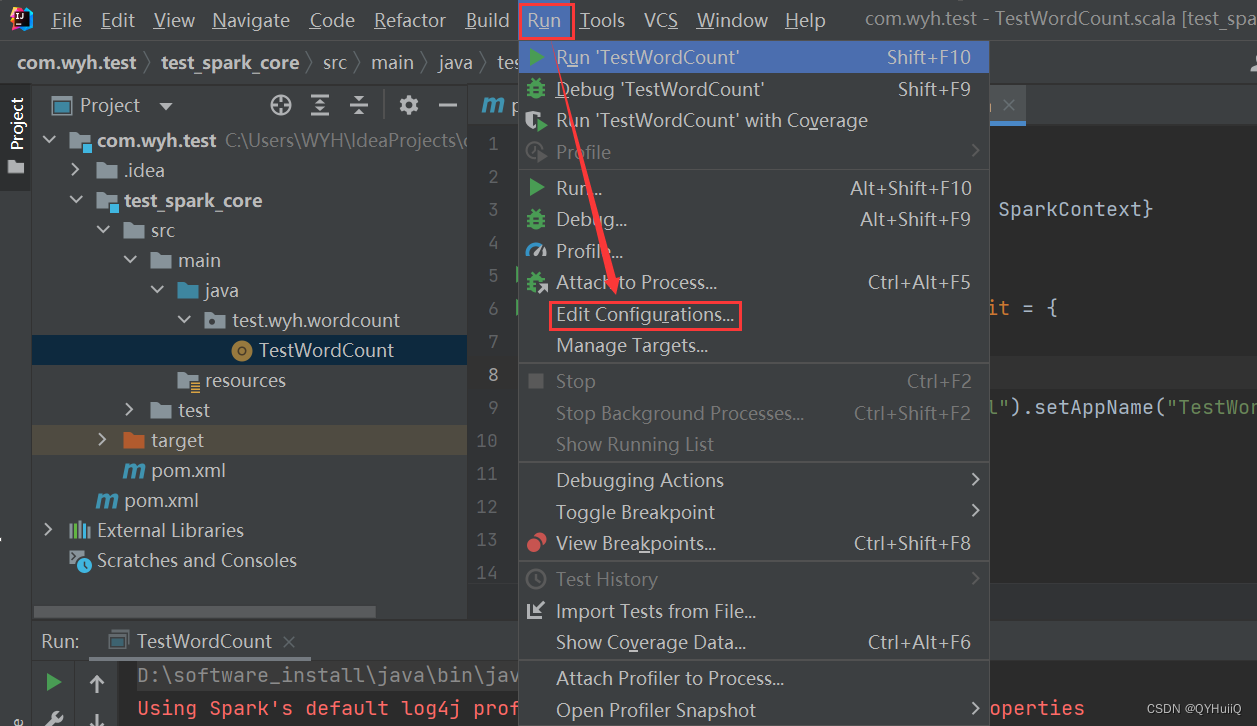
Configure the following parameters:

-Dspark.master=local[*]

Restart IDEA.

Win10 System migrate and restart error 0xc000000e [How to Solve]

Background

When migrating (cloning) the system to a new SSD and using the DiskGenius tool to complete the system migration, the last step reports an error, “Error in starting update parameters.”. When using a new solid state startup, the error 0xc000000e is reported.

Environment

Microsoft Windows [Version 10.0.19043.2006] Microsoft DiskPart Version 10.0.19041.964

Preparation

Prepare a removable storage disk (U disk, removable hard disk, pssd) with the official Win10 system installation media.

Solution:

  1. Insert a new solid state into the motherboard
  2. When booting, use the Win10 installation media disk as the boot disk, select “Repair Windows” and find the “Command Prompt”.
  3. Go to diskpart to get the disk letter and disk ID
diskpart
      1. List the attached disks, obtain the disk number of the system file, and record it as N (Number)
DISKPART> list disk

View the volume list, obtain the drive letter of the system file, mark it as C (Char)

Select the disk, and obtain the disk ID

DISKPART> select disk N
DISKPART> uniqueid disk

N is the disk number mentioned above

Exit diskpart

DISKPART> exit

If you cannot exit by typing exit on the command line, use Ctrl+c

Reassign the disk ID corresponding to the drive letter

bcdboot c:\windows /l zh-cn
bcdboot c:\windows /m {73B9D7DD-59F7-4483-8B77-EED47E457C18}

C is the drive letter C mentioned above

{73B9D7DD-59F7-4483-8B77-EED47E457C18} is the disk ID mentioned above

Close the command prompt and restart

[Solved] Android OkHttp Error: java.net.UnknownServiceException

Question

When using OkHttp to request an http address on Android 9.0 mobile phones, the following error will be reported:

java.net. UnknownServiceException: CLEARTEXT communication to **** not permitted by network security policy

The reason is that after Android 9.0, Google officially explained:

In order to ensure the security of user data and devices, Google will require encrypted connections by default for applications of the next generation Android system (Android P), which means that
Android P will prohibit apps from using all unencrypted connections. Therefore, Android devices running Android P
systems will not be able to send or receive traffic plainly in the future.

Solutions (Three Methods):

  1. APP change to https request
  2. argetSdkVersion lowered to below 27 change
  3. Network security configuration


The Third Method

Create an xml folder under the res folder, then create a network_security_config.xml file in the xml directory with the following contents:

<?xml version="1.0" encoding="utf-8"?>
<network-security-config>             
    <base-config cleartextTrafficPermitted="true" />
</network-security-config>

Add properties to the application tag under the AndroidManifest.xml file

android:networkSecurityConfig="@xml/network_security_config"

After configuration, you can access the http address.

[Solved] PySide2 Failed to Create a Graphical Python Program

Error display

This application failed to start because no Qt platform plugin could be initialized. Reinstalling the application may fix this problem.

Available platform plugins are: direct2d, minimal, offscreen, windows.

Solution:

1. Install pyside2

pip install -U pyside2

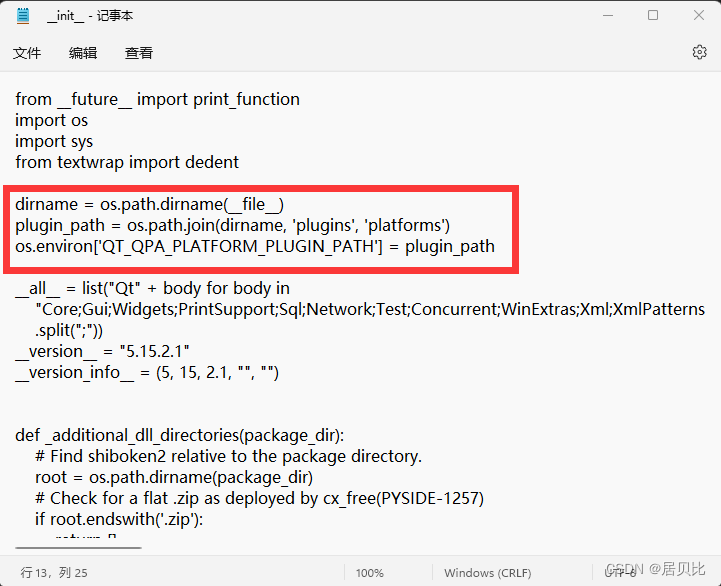
2. Find Lib\site-packages\PySide2\__init__.py in the root directory of python

3. Add the following codes:

dirname = os.path.dirname(__file__)
plugin_path = os.path.join(dirname, 'plugins', 'platforms')
os.environ['QT_QPA_PLATFORM_PLUGIN_PATH'] = plugin_path

[Solved] UE4 Android Package Error: cmd.exe failed with args

Edition:

UE4.27.2, Android Studio 4.0, Window system

Error content:

ERROR: cmd. exe failed with args /…….

Execution failed for task ‘:app:compileDebugJavaWithJavac’

> Compilation failed; see the compiler error output for details.

Solution:

This type of error reporting is general, JAVA-related error reporting, the red letter will only give cmd.exe failed with args, only search the line of error is unable to find the problem.

Error log to turn up, find * What went wrong:, the next two lines of the line is the real content of the error report.

In my personal case, the specific error is

Execution failed for task ‘:app:compileDebugJavaWithJavac’.

> Compilation failed; see the compiler error output for details.

The problem is caused by the inconsistency between the JDK version selected by UE4 and the JDK version in the system environment variable, either modify the JDK version selected by UE4 or modify the system environment variable.

The former: Edit->Project Settings->Android SDK->Location of JAVA, select the same JDK directory as your environment variable, and go to Edit->Project Settings->Android, you need to click Configure Now again.

The latter: open the system environment variables, find JAVA_HOME in the system variables, edit and modify it to the JDK version selected by UE4; find Path, double click to open it, find C:\Program Files (x86)\Common Files\Oracle\Java\javapath this line, copy the address, open it in the folder and delete the 3 JAVA files in it. Finally, open CMD and type java -version to test if the replacement has been completed.

Jupyter notebook Failed to Switch to the Virual Environment: DLL load failed python.exe could not find the entry

I. Error reporting

I originally installed Anaconda3, with python3.7 and Jupyter-notebook, and installed tf2.0 environment.

Later I created a new virtual environment tf_1 based on tf2.0 environment and installed tf.14, so that

tf1.0 and tf2.0 versions can be switched flexibly on Jupyter-notebook.

If you log in to notebook directly with cmd, see the following:
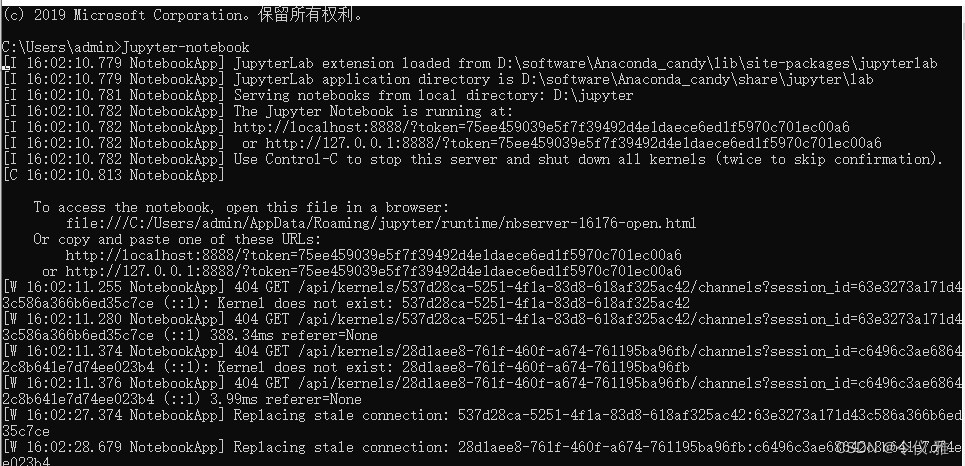
At this point, I directly create a new python3, which means that the default tf2.0 environment is Ok, as shown below:

But I new a tf_1_jjupyter is reported the following error, also open a tf2.0 version of the notebook file in the change kenerl will also report the same error.

The error is reported as follows.

ImportError: DLL load failed: The specified module could not be found
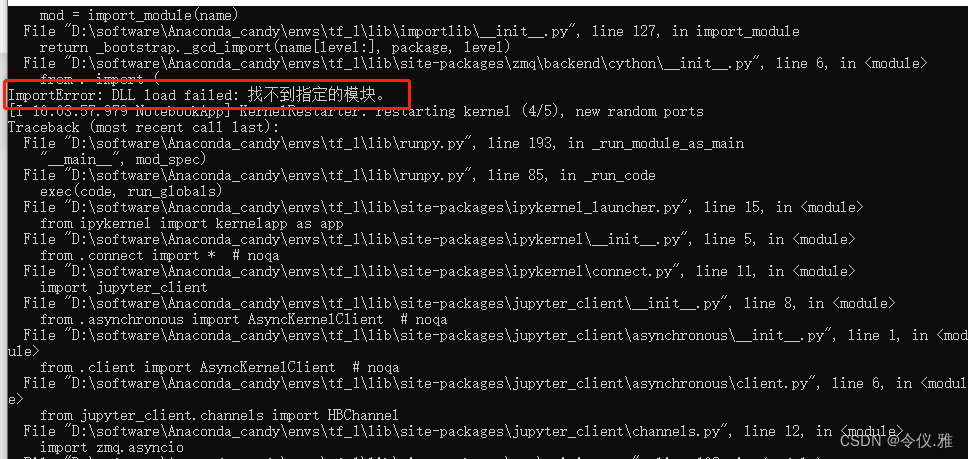
II. Solution

Solve the Jupyter notebook startup error or running code error

1. ImportError: DLL load failed : The specified module could not be found
Solution.

cmd-windows console-enter conda activate virtual environment name

For example, the name of the virtual environment here is tf_1

If you don’t remember, you can find it in the Anaconda installation directory

D:\software\Anaconda_candy\envs\tf_1

2. solve python.exe can not find the entrance can not locate the program input point
After entering the virtual environment if it still reports an error as follows.
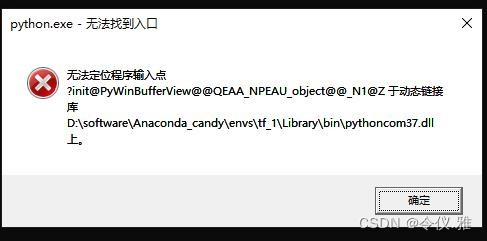
This error pops up when I enter jupyter notebook, but I can enter jupyter notebook to debug the code normally when I cross it out. Initially, I think there is a problem with the dll file. After reading some online solutions, the following is the solution:

Solution: pythoncom37.dll is a file of pywin32 located in the path Anaconda3\envs\your virtual environment\Lib\site-packages\pywin32_system32, the location of my file here is shown below.

And there is a file with the same name ythoncom37.dll in D:\python\Anaconda3\envs\tf_1\Library\binp.

After deleting this file, there will be no pop-up error!

After deleting the pythoncom37.dl file according to the file path in the pop-up box, the error is still reported as follows.

[premise conda activate tf_1 under virtual environment
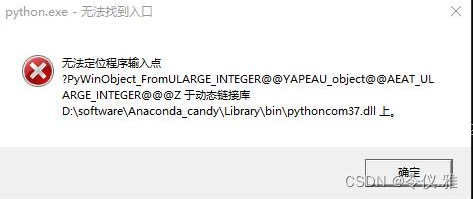
We follow the file path given in the pop-up box to find pythoncom37.dl and delete it again, and that’s the end of it.

The above solution has been successfully solved as follows.

Switching kernel in the file will also not report errors
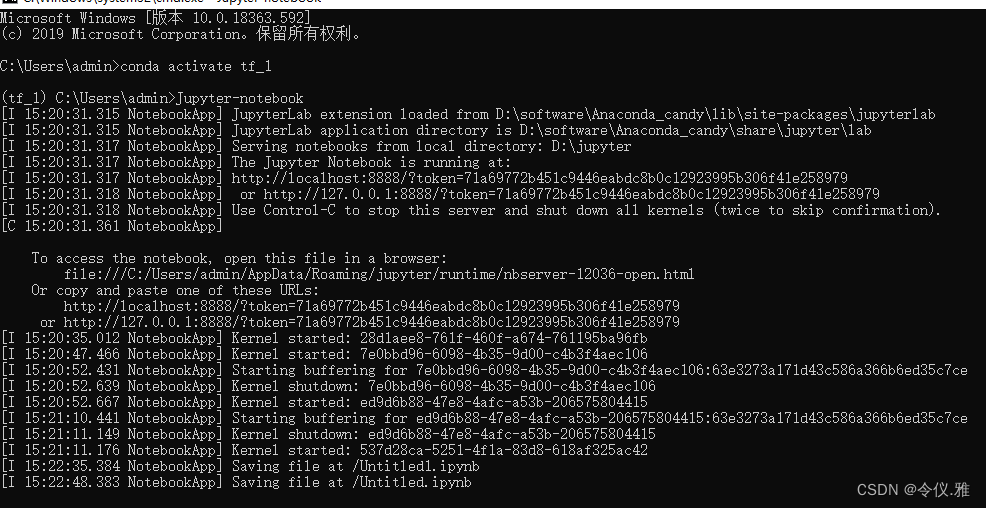
Select tf2.0 and virtual environment tf1.0 in the drop-down box by creating a new, and you can switch versions freely, or switch environments in the current file, as shown below:

[Solved] Ubuntu Compile Rust Program Error: failed to run custom build command for openssl-sys v0.9.39

Compiling Rust program in Ubuntu environment reports an error:

failed to run custom build command for openssl sys v0.9.39

Ubuntu version: 20.04

Refer to GitHub’s discussion and there are two possible solutions:

  1. sudo apt install pkg-config
  2. sudo apt install libssl-dev

I use the second method to solve this problem.

Spring Security Upgrade to Version 5.5.7, 5.6.4 or Above to Startup Error (Version incompatibility)

1. Background

Version comparison detection principle: check whether the current system version of spring-security-web is within the scope of the vulnerability version|version comparison detection results: – spring-security-web
Current installed version: 5.2.1.RELEASE
Need to upgrade to 5.5.7, 5.6.4 and above, because the pom can not find a direct reference to the location, so add the following dependencies to spring-security-web version forced to upgrade to 5.5.7

    <!-- Fix spring-security-web version vulnerability -->
    <dependency>
        <groupId>org.springframework.security</groupId>
        <artifactId>spring-security-web</artifactId>
        <version>5.5.7</version>
    </dependency>

An error is reported during startup. The error contents are as follows:

***************************
APPLICATION FAILED TO START
***************************

Description:

An attempt was made to call a method that does not exist. The attempt was made from the following location:

    org.springframework.security.web.util.matcher.OrRequestMatcher.<init>(OrRequestMatcher.java:43)

The following method did not exist:

    org.springframework.util.Assert.noNullElements(Ljava/util/Collection;Ljava/lang/String;)V

The method's class, org.springframework.util.Assert, is available from the following locations:

    jar:file:/C:/Users/sutpc/.m2/repository/org/springframework/spring-core/5.1.18.RELEASE/spring-core-5.1.18.RELEASE.jar!/org/springframework/util/Assert.class

It was loaded from the following location:

    file:/C:/Users/sutpc/.m2/repository/org/springframework/spring-core/5.1.18.RELEASE/spring-core-5.1.18.RELEASE.jar

2. Analysis of the cause

Theoretically, spring-security-web is introduced in a jar, and the version of spring-security-web is changed separately, resulting in the incompatibility of the supporting code in this jar.

3. Solutions

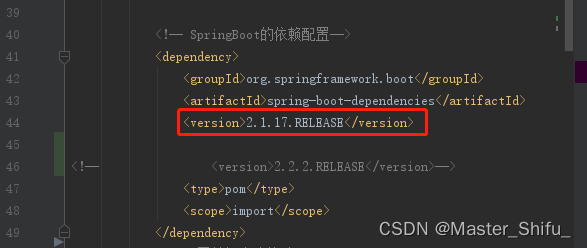
Upgrade spring-boot-dependencies from 2.1.17.RELEASE to 2.2.2.RELEASE
            <! -- SpringBoot dependency configuration-->
            <dependency>
                <groupId>org.springframework.boot</groupId>
                <artifactId>spring-boot-dependencies</artifactId>
<!--                <version>2.1.17.RELEASE</version>-->
                <version>2.2.2.RELEASE</version>
                <type>pom</type>
                <scope>import</scope>
            </dependency>
Just use the 5.5.7 mandatory override of spring-security-web at the end of the pom
        <! -- Fix spring-security-web version vulnerability -->
        <dependency>
            <groupId>org.springframework.security</groupId>
            <artifactId>spring-security-web</artifactId>
            <version>5.5.7</version>
        </dependency>

4. solution ideas:
Because a separate change in the version of spring-security-web, resulting in this jar incompatible with the code caused by the problem, so the primary problem need to find spring-security-web by which jar introduced

4.1 Query the Maven project to find out which dependency the jar package is introduced by
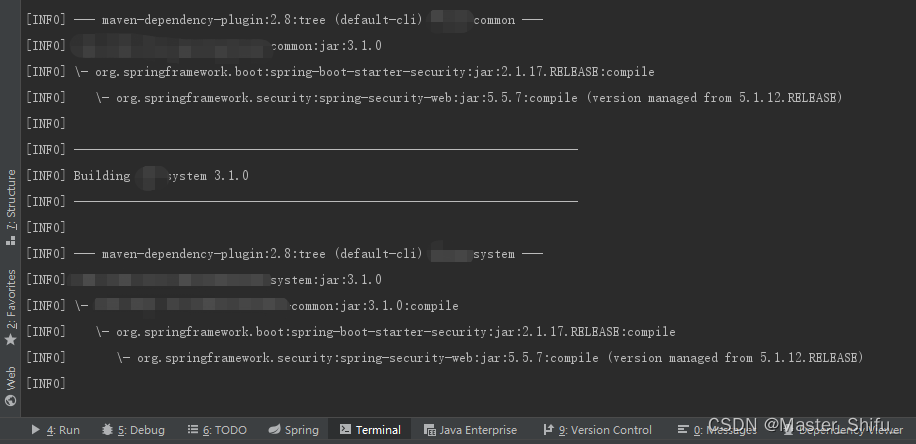
Use mvn dependency:tree directly to see the complete dependency tree of the project.

    Command format
mvn dependency:tree -Dverbose -Dincludes=Content to be queried(groupId:artifactId)

-dependency:tree:Indicates a tree-like display.
-Dverbose:Indicates that all references can be displayed, including those that are ignored because of multiple reference duplicates.
-Dincludes: you can formulate query conditions

The groupId and artifactId of spring-security-web are:

groupId: org.springframework.security
artifactId: spring-security-web
so the command is as below:
mvn dependency:tree -Dverbose -Dincludes=org.springframework.security:spring-security-web

4.2 The dependency hierarchy after execution in the idea’s Teminal is shown in the figure below

4.3spring-security-web is introduced by spring-boot-starter-security
spring-security-web is introduced by spring-boot-starter-security, version 2.1.17.RELEASE, search spring-boot-starter-security and find that it uses spring-boot- RELEASE.pom version

4.3spring-boot-starter-security version is the version that inherits spring-boot-dependencies
In the global search spring-boot-dependencies version, found really is 2.1.17.RELEASE, so far, all the dependency levels are found, that began to guess, is not spring-boot-dependencies version is too low, spring-security-web version is too high incompatible, spring-security-web version can not be adjusted down, can only upgrade the version of spring-boot-dependencies, in the maven repository to find the version of spring-boot-dependencies, level by level test, found 2.2.2. The problem is solved.

[Solved] mybatis plus Error: Invalid bound statement (not found)

Some students encountered the problem of “Invalid bound statement (not found)” when building the mybatis plus project, it is essentially that the mapper interface and the mapper.xml is not mapped.

In this case, the common problems are as follows:

1, mapper.xml inside the namespace and the actual mapper class path is not consistent.
There is a quick way to detect this is to hold down the ctrl key, and then click the package name inside the namespace, if you can jump to the corresponding class, it means there is no problem, if you use the IDEA is the same way, IDEA package name can be segmented, as long as you can point in are no problem.

2, mapper interface function name and mapper.xml inside the label id is not consistent.
This problem is also very common, the best way is to paste and copy it, so as to ensure that there is no problem.

The first point and 2 points are about spelling errors.

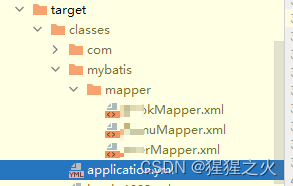
3, the build did not go in, please see if these exist below the target folder, no please rebuild

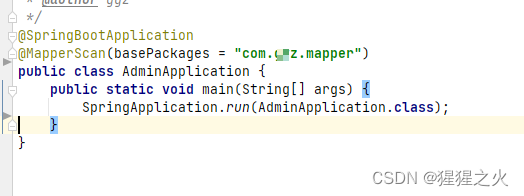
4. Check whether package scanning is added. I added it to the spring boot startup class.

5. Check whether the configuration file is written incorrectly or not

#Is this place wrongly written?

mapper-locations: classpath:mybatis/mapper/**/*.xml

Mybatis-plus can be configured as an array:

mybatis-plus:
  mapper-locations:
    - classpath:mybatis/mapper/**/*.xml

Or

mybatis-plus:
  mapper-locations: classpath:mybatis/**/*Mapper.xml

Note that the key is mapper-locations and not mapper-locations:

Other configurations:


mybatis-plus:
  global-config:
    #primary-key-type 0: "Database ID self-incrementing", 1: "User input ID", 2: "Global unique ID (numeric unique ID)", 3: "Global unique ID UUID";
    id-type: 0
    #field-strategy 0: "Ignore judgment",1: "Non-NULL judgment"),2: "Non-Null judgment"
    field-strategy: 0
    #hump-underline conversion
    db-column-underline: true
    #refresh-mapper debugging artifact
    refresh-mapper: true
    #database capital-underline conversion
    #capital-mode: true 
    #sequence interface implementation class configuration    
	#key-generator: com.baomidou.springboot.xxx 
    #logic-delete-configuration (the following 3 configurations)
    #logic-delete-value: 0 # logical-delete value (default is 1)    
	#logic-not-delete-value: 1 # logical-not-delete value (default is 0)    
	# Custom fill policy interface implementation    
	#meta-object-handler: com.zhengqing.config.   
	#custom SQL injector   
	#sql-injector: com.baomidou.springboot.xxx configuration:      
    #SQL parsing cache, multi-tenant @SqlParser annotation takes effect when enabled
    #sql-parser-cache: true
  configuration:
    # hump conversion Similar mapping from database column names to Java property hump naming  
    map-underscore-to-camel-case: true
    # Whether to enable caching
    cache-enable: false
    # If the query contains a column with a null value, MyBatis will not map this field when mapping        
	#call-setters-on-nulls: true  
    # 打印sql
    log-impl: org.apache.ibatis.logging.stdout.StdOutImpl

[Solved] libvirtd Error: virNetServerAddClient:271 : Too many active clients

error: virNetServerAddClient:271 : Too many active clients (20), dropping connection from 127.0.0.1; 0

Reason: The number of libvirt client links exceeds the maximum number allowed by libvirtd, causing new client links to be discarded
Solution: Temporary workaround: modify max_clients in /etc/libvirt/libvirtd.conf to be larger, then restart libvirtd
Long-term solution: locate the cause of client link overflow on the server

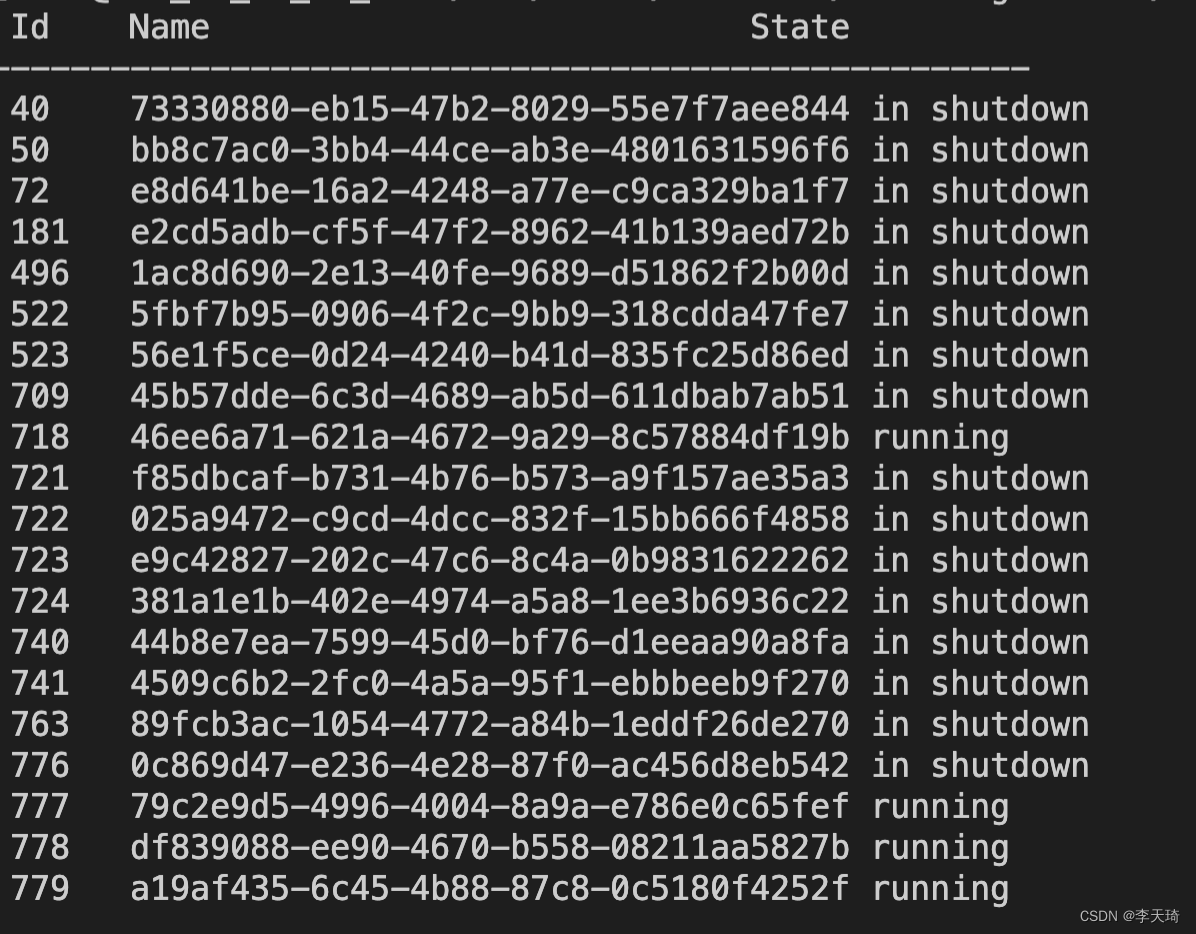
The following figure shows that the destruction of a large number of cvm sub machines on the server failed, resulting in client link overflow. The solution is to migrate the running cvm sub machines on the master machine, and then restart the master machine