Tag Archives: yolox

[Solved] ByteTrack Error: ModuleNotFoundError: No module named ‘yolox’

1. Error Message:

File "tools/demo_track.py", line 10, in <module>
from yolox.data.data_augment import preproc
ModuleNotFoundError: No module named 'yolox'

2. Reason

Although the yolox folder exists under the project file, it cannot be called without the yolox library installed.

3. Solution
3.1 Answer from the original author

First of, please make sure you decide for a version of CUDA and consistently use that; I am using 11.3 in this.
I fixed this and many other installation and compilation errors, by uninstalling and re-installing the following programs in the exact order

  1. Clone the yolox repo and unzip it
  2. Install Virtual Studio 2019 Community (https://visualstudio.microsoft.com/downloads/)
  3. Download CUDA https://developer.nvidia.com/cuda-11.3.0-download-archive (I just did express installation)
  4. Get https://docs.conda.io/en/latest/miniconda.html for your version of python
  5. Install pytorch with cuda enabled conda install pytorch torchvision cudatoolkit=11.3 -c pytorch
  6. Navigate conda to the download directory (cd yolox_path) of yolox and type in:
    pip install -r requirements.txt
    pip install pycocotools # this should get added to requirements.txt @FateScript
    pip install -v -e . # or python setup.py develop
  7. Congratulations you fixed the error, now you’ll be able to run yolox as described in Quick Start > Demo (example: python tools/demo.py video -n yolox-s -c /path/to/your/yolox_s.pth –path /path/to/your/video –conf 0.25 –nms 0.45 –tsize 640 –save_result –device [cpu/gpu] )

A couple notices:

  • You can at the time of writing this; not install above CUDA 11.3, because conda does not provide a higher version in sources to compile with pytorch
  • You can not install a higher version of Virtual Studio, because of incompability with CUDA (devs did not add support for MSVS22 yet)
  • You’re forced to install MSVS; because this repo depends on it, to be able to compile as written in step 6.
  • You can not simply uninstall conda, because it removes its CUDA compiled pytorch version and that in return breaks yolox. But I think you could most likely avoid this

In short you kept getting this error, because you couldn’t compile yolox properly or not at all.

3.2 Summary

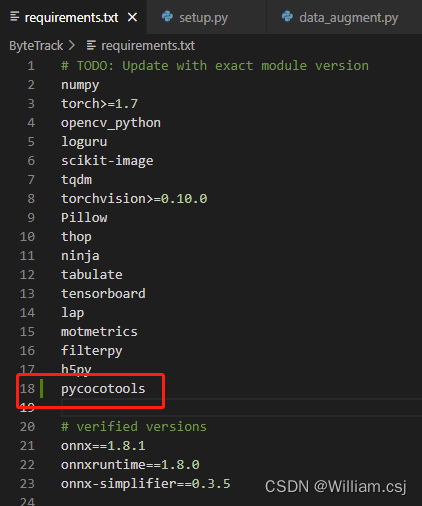
Add pycocotools in requirements.txt as below:
Run pip install -r requirements.txt

Run pip install -v -e . Or python setup.py develop command
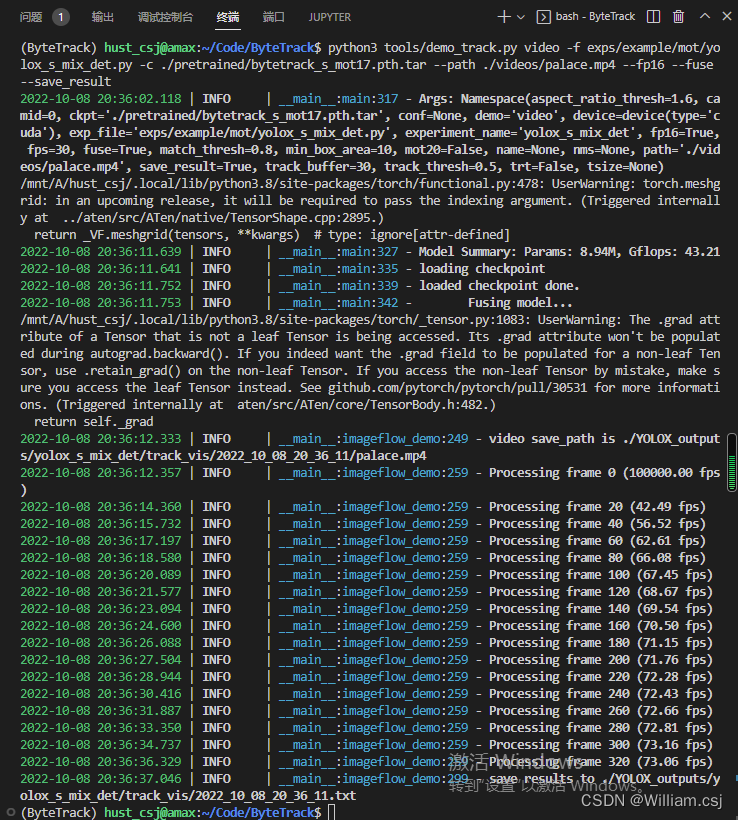
The result after running.


Run Successfully!
 

Reference:

    ModuleNotFoundError: No module named ‘yolox’ ??how can i resolve it ?please!

How to Solve Yolox Training C Disk Full Issue

0. Problem description: COCO dataset training to half suddenly interrupted, look at the C disk shows red, there is not much memory (training, generated in AppData/Temp in the temporary file too much)
As shown in the figure: as the epoch increases, the file is getting bigger and bigger (the figure is still yolox-tiny), if we use yolox-x, the C drive is directly full!

1. Problem Cause.
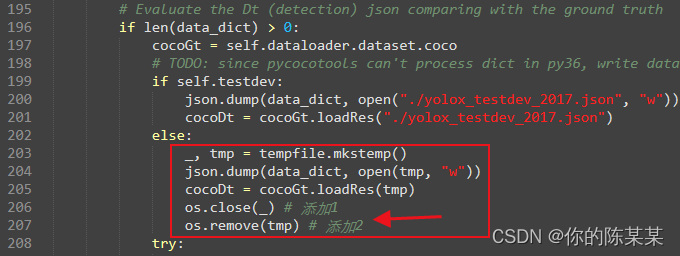
YOLOX-main/yolox/evaluators/coco_evaluator.py in line 203 or so **tempfile.mkstemp()** after creating the file, no close() and remove() operations are performed
The following figure.

2. Solution methods
(1) Method 1
As shown above, add os.close(_) and os.remove(tmp) two lines of code, directly delete the file just created after use. Note: import os module at the beginning]
(2) Method 2
The problem is already known, you can use with…as… to create, automatically delete and close the file.
(3) Method 3
If you want to keep each temporary file, and do not want to C drive blow up, then directly change the save location to a custom path.
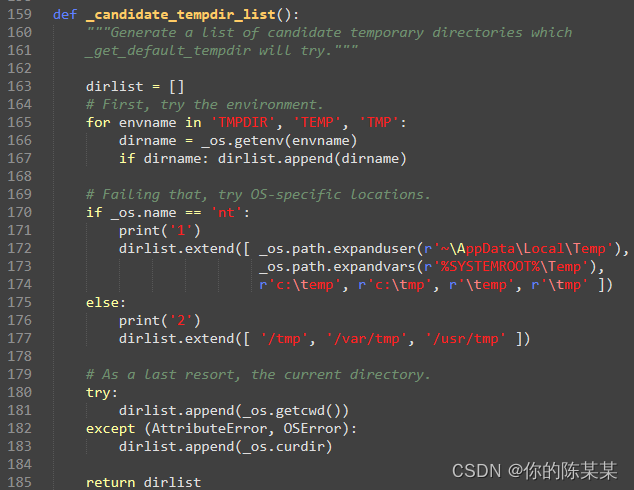
Code location: Anoconda/envs/using-environment/Lib/tempfile.py in line 159-185.
directly change the direct dirlist operation to the user-defined folder location, as follows:

(4) Method 4
Manually clean up files in temp at regular intervals
Note: VOC format dataset training, no temporary files are generated because it uses the with…as… file creation method. For details, please refer to the end of voc_evaluater.py

Error in training yolox: error in importing apex

This error is reported because you did not successfully install apex. Note ~: it is not PIP install apex

ERROR: Command errored out with exit status 1: /usr/bin/python3 -u -c 'import io, os, sys, setuptools, tokenize; sys.argv[0] = '"'"'/tmp/pip-req-build-6o4wusvf/setup.py'"'"'; __file__='"'"'/tmp/pip-req-build-6o4wusvf/setup.py'"'"';f = getattr(tokenize, '"'"'open'"'"', open)(__file__) if os.path.exists(__file__) else io.StringIO('"'"'from setuptools import setup; setup()'"'"');code = f.read().replace('"'"'\r\n'"'"', '"'"'\n'"'"');f.close();exec(compile(code, __file__, '"'"'exec'"'"'))' --cpp_ext --cuda_ext install --record /tmp/pip-record-07hjl8r1/install-record.txt --single-version-externally-managed --compile --install-headers /usr/local/include/python3.7/apex Check the logs for full command output.
Exception information:
Traceback (most recent call last):

  Processing method: Step 1: use this command to check the CUDA version supported by your machine:

nvcc --version

Step 2: use the following command to view the version of CUDA you currently have installed.

pip list

Note: when installing apex, you must ensure that the two versions are consistent. That is, if the version supported by the machine is 11.0, you can install CUDA of the corresponding torch version.

First use the following command to uninstall the original torch of your machine

!pip uninstall -y torch torchvision torchaudio

Then use the following command to install. For example, the machine here supports CUDA version 11.0

!pip install torch==1.7.1+cu110 torchvision==0.8.2+cu110 torchaudio==0.7.2 -f https://download.pytorch.org/whl/torch_stable.html

Next, install apex:

!git clone https://github.com/NVIDIA/apex
%cd apex
!pip install -v --disable-pip-version-check --no-cache-dir --global-option="--cpp_ext" --global-option="--cuda_ext" ./

The above work is completed.