Tag Archives: vscode

css-rcurlyexpected Error: css-rcurlyexpected at-rule, or selector expected, Do not use empty rulesets

● questions:

● the errors are:

css-rcurlyexpected
at-rule or selector expected
Do not use empty rulesets

But the style works normally.

● cause

1. set “vetur.validation.style”: false in setting.json,
2. add @charset “utf-8” to the first line of style;
But the main reason for this is that the page language mode is set incorrectly, just use the default .vue will be set to html mode, so it will report an error

● Solution 1:

Click in to change to Vue mode

● Solution 2:

Set the setting in setting.json to allow the system to modify the language mode of the .vue file to vue by default

"files.associations": {
   "*.vue": "vue",
 },

How to Solve Ceres library Error when compiling A-LOAM

The C++ version in the CMakeLists for direct download of the A-LOAM library is 11, as follows:

cmake_minimum_required(VERSION 2.8.3)
project(aloam_velodyne)

set(CMAKE_BUILD_TYPE "Release")
set(CMAKE_CXX_FLAGS "-std=c++11")
set(CMAKE_CXX_FLAGS_RELEASE "-O3 -Wall -g")

But Ceres 2.0 and above requires C++14 compiler, so you just need to change the C++ compiler to 14

cmake_minimum_required(VERSION 2.8.3)
project(aloam_velodyne)

set(CMAKE_BUILD_TYPE "Release")
set(CMAKE_CXX_FLAGS "-std=c++14")
set(CMAKE_CXX_FLAGS_RELEASE "-O3 -Wall -g")

Centos7.2 Install vscode Error: error while loading shared libraries: libxkbcommon.so.0: cannot open shared pro

1. I recently needed to install vscode on centos 7.2, and after installing it, I ran it and found that it kept reporting the following error

2. Using the #ldd code command, I found that libxkbcommon.so.0 is indeed missing

3. Then install libxkbcommon

yum install libxkbcommon

4. The following problems occur during operation

5. Then install NSS

yum install nss

6. Running, OK

VScode connect Remote Linux Server Error: Resolver error: Error

Problem Description
When using vscode to connect to a remote linux server ssh login suddenly fails to connect, showing Resolver error: Error


Personal solution:

1. Use other remote connection software to log in to the server, the blogger used Tabby
2. Use the command to find your own related processes: ps -ef | grep user_name
3. Find the pid of the process corresponding to .vscode, end the corresponding process: kill -9 $pid
4. vscode reconnect

Note:
For the time being, we do not know the reason for this frequent problem, but the above method can solve the connection failure problem.

vscode git error: would clobber existing tag [How to Solve]

Using vscode’s own git interface to operate pull, there may be an error about the tag would clobber existing tag, resulting in the inability to pull

Solution:

1. Type git pull directly in terminal to finish pulling the code. Although the code is pulled, the vscode git tool still does not work.
2. Type git fetch –tags -f in terminal to force the local code tag to be updated first. Then use vscode’s git tools to pull the code.

[Solved] VSCode Edit LaTeX Error: Recipe terminated with error.

Recipe terminated with error encountered while editing latex in vscode Problem handling method

Question:

After texlive is installed, the command error is displayed in tex – V in the CMD file, but the version information can be displayed normally by opening tex live command line and entering tex – V. This indicates that texlive is installed successfully but the environment variables are configured incorrectly, so the error in the title appears

it is not feasible to add environment variables directly in user variables or system variables;

Solution:

After adding the above text

in the path of the system environment variable, it seems that you don’t need to restart the computer. You can display the information of Tex-V in CMD, and then restart vscode.

VSCode Unable to find custom header file directory: fatal error: no such file or directory

The solution is as follows:

First, add the path of the folder where your header file is located in "includepath":[] of C_cpp_properties.json.

Of course, this step is only to tell the vscode header file where it is for debugging, but it is not known when GCC compiles. We know that if you use G + + main.CPP - I library_path - O main can be compiled successfully directly, so we just need to tell vscode to use our own defined commands

There are generally two methods. The first is to add “- I header_file_path” to the args key in tasks.json, as follows:

	"args": [
		"-g",
		"${workspaceFolder}\\src\\*.cpp",
		"-o",
		"${fileDirname}\\src\\${fileBasenameNoExtension}.exe",
		"-I",
		"header_file_path"
	],

But it doesn’t seem to work well in some cases.

The second method is to directly set in setting.json:

  "code-runner.executorMap": {
    "cpp": "cd $dir && g++ $fileName -o $fileNameWithoutExt -I 'header_file_path' && $dir$fileNameWithoutExt",
  }

[Solved] jar file Execute Error: power shell error: unable to access jarfile


Problem description

When using the configuration task of vscode, there are problems in executing the jar file, so there are the following solutions.

preparation

Software: vscode
environment: windows10

How to configure

1. Create a task and execute the jar file:

2. Configurable parameters must be placed later

-Dkafka.base.client.bootstrapServers=192.168.75.129:9092

How does it work

1. Run profile location

2. Find the executable file name

More

Building Java code
You can use Maven to perform multiple build lifecycle goals, including compiling project code, creating library packages (such as JAR files), and installing libraries in a local Maven dependency repository
To attempt a build, issue the following command from the command line.
mvn compile

This will run Maven and tell it to perform a compile of the target. When it is done, you should find the compiled .class file in the target/classes directory.
Since you are unlikely to want to distribute or use the .class files directly, you may want to run the package target instead:
mvn package

The package target will compile the Java code, run any tests, and package the code up in the completion target directory via an internal JAR file. the name of the JAR file will be based on the project's <artifactId> and <version>.
For example, given the previous minimal pom.xml file, the JAR file will be named kiwi-0.7.0.jar.

To execute the JAR file, run.
java -jar F:\WorkSoftware\Kafka\kiwi-0.7.0.jar -Dkafka.base.client.bootstrapServers=192.168.75.129:9092

If you change the value of <packaging> "jar" to "war", the result will be a WAR file in the target directory instead of a JAR file.

[Solved] Latex&VScode Error: I found no bibdata command//command//citation—while reading file*.aux

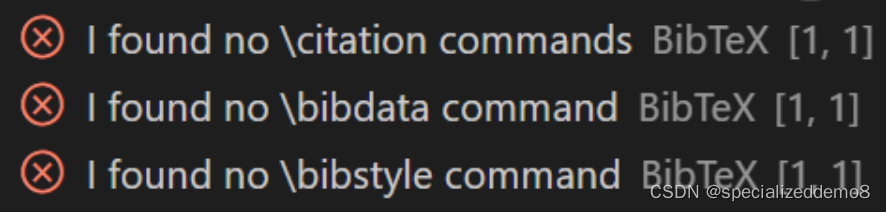
Latex& Vscode error I found no bibdata command// command// citation – while reading file * aux


Problem description

The template I use requires the compile order: Compile with: xelatex -> biber -> xelatex -> xelatex

Using various tutorials in the VScode plugin configuration json file are xelatex -> bibtex -> xelatex -> xelatex

In fact bibtex and biber are not a thing, refer to tex link

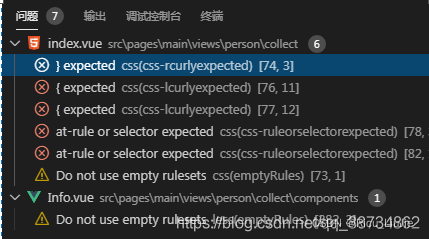
Resulting in the problem as shown

Solution:

Add the configuration for biber compilation to the setting.json configuration file in VScode’s Latex

 "latex-workshop.latex.tools": [
      
        {
            "name": "biber",
            "command": "biber",
            "args": [
                "%DOC%"
              
            ]
        }
    ],
 "latex-workshop.latex.recipes": [
     {
         "name": "xelatex -> biber -> xelatex*2",
         "tools": [
         "xelatex",
         "biber",
         "xelatex",
         "xelatex"
         ]

     }
 ],

Restart VScode and use xelatex -> biber -> xelatex*2 to compile successfully

Full Codes:

{
    "latex-workshop.latex.tools": [
        {
            "name": "latexmk",
            "command": "latexmk",
            "args": [
                "-synctex=1",
                "-interaction=nonstopmode",
                "-file-line-error",
                "-pdf",
                "%DOC%"
            ]
        },
        {
            "name": "xelatex",
            "command": "xelatex",
            "args": [
                "-synctex=1",
                "-interaction=nonstopmode",
                "-file-line-error",
                "%DOC%"
            ]
        },
        {
            "name": "pdflatex",
            "command": "pdflatex",
            "args": [
                "-synctex=1",
                "-interaction=nonstopmode",
                "-file-line-error",
                "%DOC%"
            ]
        },
        {
            "name": "bibtex",
            "command": "bibtex",
            // "command": "biber",
            "args": [
                // "%DOC%"
                "%DOCFILE%"
            ]
        },
        {
            "name": "biber",
            "command": "biber",
            // "command": "biber",
            "args": [
                "%DOC%"
              
            ]
        }
    ],
    "latex-workshop.latex.recipes": [
        {
            "name": "xelatex",
            "tools": ["xelatex"]
        },
        {
            "name": "latexmk",
            "tools": ["latexmk"]
        },
        {
            "name": "pdflatex -> bibtex",
            "tools": ["pdflatex","bibtex"]
        },
        // {
        //     "name": "pdflatex -> bibtex -> pdflatex*2",
        //     "tools": [
        //         "pdflatex",
        //         "bibtex",
        //         "pdflatex",
        //         "pdflatex"
        //     ]
        // },
        {
            "name": "xelatex -> bibtex -> xelatex*2",
            "tools": [
            "xelatex",
            "bibtex",
            "xelatex",
            "xelatex"
            ]

        },
        {
            "name": "xelatex -> biber -> xelatex*2",
            "tools": [
            "xelatex",
            "biber",
            "xelatex",
            "xelatex"
            ]

        }
    ],
    "latex-workshop.latex.clean.fileTypes": [
        "*.aux",
        "*.bbl",
        "*.blg",
        "*.idx",
        "*.ind",
        "*.lof",
        "*.lot",
        "*.out",
        "*.toc",
        "*.acn",
        "*.acr",
        "*.alg",
        "*.glg",
        "*.glo",
        "*.gls",
        "*.ist",
        "*.fls",
        "*.log",
        "*.fdb_latexmk"
    ],
    "latex-workshop.message.error.show": false,
    "latex-workshop.message.warning.show": false,

    "latex-workshop.showContextMenu": true, 
    "latex-workshop.intellisense.package.enabled": true, 
    "latex-workshop.latex.autoBuild.run": "onSave", 

}

[Solved] VUE eslint Error: Expected linebreaks to be ‘LF‘ but found ‘CRLF

The reason for this: under Windows environment, GIT will automatically identify the current system environment when we pull the code. Change the original (Linux/Unix) line feed to the corresponding system. When we submit the code, it will be converted to the remote system environment (Linux/Unix), and then install eslint. LF is used by default, so this error will be reported

Line feed format in various environments
window: CRLF (\R \n or ^m \n)
MAC: Cr (\R or ^m)
linux/Unix: LF (\n)

Solution:

1. Manually cut the CRLF at the bottom of the vscode file code into LF, which can only make eslint not report errors for the time being. But in fact, when we pull down again, GIT will automatically convert all files to CRLF, and there will still be an error message

2. Rule configuration in eslint. Turn off line feed verification in the window environment and let it automatically convert CRLF to LF when submitting (it seems that we haven’t fundamentally solved this problem)

"linkbreak-style":["off","windows"]

3. When git pulls the code, let git pull according to the line feed (LF) of the remote code, and no longer convert the format according to the system. At the same time, configure the line feed character of vscode as LF. My approach is to configure the pull format of GIT, delete the whole local original warehouse, and then pull a code remotely again. This is OK. The command is as follows:

git config –global core. Autocrlf has three configurations (depending on the situation, I chose input)

True: automatically convert CRLF to LF when pushing, and CRLF when pulling (this configuration requires configuring eslint to turn off line break verification in window environment)

git config --global core.autocrlf true

Input: CRLF is automatically converted to LF when pushing, but LF is not automatically converted to CRLF when pulling (this configuration does not need to configure eslint, and the code format is consistent with that of the remote. I use this)

git config --global core.autocrlf input

False: no matter push or pull, the original file is what it is

git config --global core.autocrlf false

Other configurations:

1. Reject submission of files containing mixed line breaks

git config --global core.safecrlf true

2. Allow submission of files containing mixed line breaks

git config --global core.safecrlf true

3. Warn when submitting files containing mixed line breaks

git config --global core.safecrlf warn

vscode deployment:

VScode debug error: configured debug type ‘Python’ is not supported

When using vscode to debug, an error is reported in the pop-up window:

Configured debug type 'python' is not supported

Refer to the reference website: https://github.com/microsoft/vscode/issues/136712

The measured solution is metaphysical, as follows:

Delete Jupiter and python in vscope extensions, and then reinstall them; Close all vscodes; (this step is very important.) Open vscode again and you can debug normally.