Tag Archives: Unity

Unity Component.isActiveAndEnabled Analysis of exact meaning

The following results are the test conclusions.

Isactive in hierachy is equivalent to whether a GameObject is active or not, which is the same as a simple understanding.

Isactive andenabled requires three conditions:

The isactiveinheerachy of

    GameObject is true, and onenable
is being or has been called

So:

    in onenable of a script, isactive andenabled is always true. In ondisable of a script, isactive andenabled is always false


Test example: place a GameObject in the scene and two scripts below. Set GameObject and scripts to be active. In the process of running the scenario, in the script that calls onenable first, you can find that your isactive andenabled is true, but another script’s isactive andenabled is false.

So: there is no script to call onenable, though gameObject.isActiveInHierachy Is true, and enabled is true, but isactive andenabled is false.


Several reasons of program flashback crash

There are many reasons for software crashes.
 
The

memory

1. Memory leak; 2. Load resource crash.
CPU 1. The program is too complicated.

software and hardware compatibility

1. The runtime environment and hardware support do not match. For example, the Android system does not match, and the software running environment is missing.

system memory recovery mechanism

1. The system will recycle foreground processes when memory is tight.

program internal mechanisms

1. Some plug-ins or code actively performs software exit when it detects an abnormal running state at runtime.

[Reprint please indicate the link of this article]

Learning notes of OpenGL — blending

Note: This document is only about the main points and some of my own new ideas. It is not a tutorial. For a tutorial, see the OpenGlLearn article.

Blending can make the object transparent.
Transparency can be achieved in two ways:
‘1’ means discard part of the fragments. In this case, there are no translucent fragments.
Two is really mixing. The current segment and the target segment are weighted according to a certain formula.
【 1 】

#version 330 core
out vec4 FragColor;

in vec2 TexCoords;

uniform sampler2D texture1;

void main()
{             
    vec4 texColor = texture(texture1, TexCoords);
    if(texColor.a < 0.1)
        discard;
    FragColor = texColor;
}

A segment that is always bright, discarded, but this if will branch logically, so that’s the efficiency…

Set the surround texture to GL_CLAMP_TO_EDGE to slightly improve the visual effect.

[2] Mixing
Enable the blend: glEnable(GL_BLEND);

GLBLENDFUNC (GL_SRC_ALPHA, GL_ONE_MINUS_SRC_ALPHA);
So source alpha and 1-source alpha
Here glblendFunc is the mixed operation setup function.
GlblendFunction Separate is a bit more subtle and allows you to set the action function for both color and Alpha separately.

Both set the source and target, how to handle RGB and alpha values.

GlblEndequation can be used to set the blending operator. In fact, the most common one is GL_FUNC_ADD


This function sets the formula to use to handle the alpha and RGB values.

The principle of mixing:
If you’ve already drawn something before mixing it (even a skybox is OK), what about wool?
When blending, the object to be drawn is the Source, and the object already drawn is the Target.
When blending, you don’t have to change anything in your Shader. The pieces will blend themselves with the drawn pieces according to the blending formula and numerical rules. Unity uses the syntax of ShaderLab to set up these functions.

An explanation of a previously encountered problem:
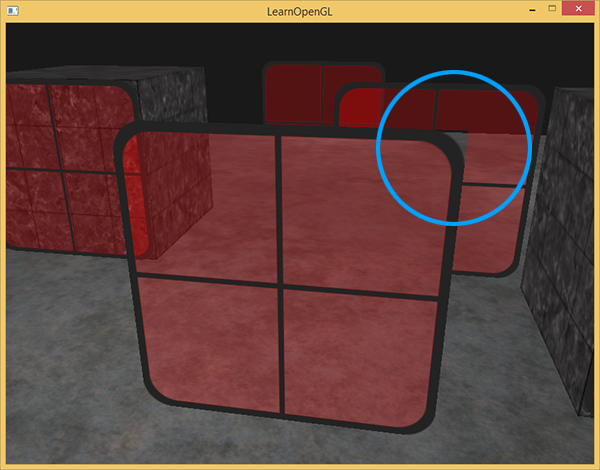
A few months ago, I had an issue with WorldCreatorPro where the trees would become translucent slices when I used Slice LOD instead of SpeedTree, which was far away from the map. At this point, the translucent area hides the terrain behind.

Now it’s easy to explain. Borrowing the graph from the Learnopengl author:


Look at the hoop:
If the previous diagram is drawn first, the transparent pixels here will also be written to the ZBuffer, since the Z-Buffer ignores Alpha.
When the object behind is drawn (whether it is transparent or not, as long as it is farther away from the object in front) the z-test fails and the corresponding pixel is discarded.

Conclusion: When Z-buffer and Blending theory are used together, it is necessary to draw distant objects first and then close ones to ensure no mistakes.
The trees we used before, even if we could sort them, it would be a terrible overhead to arrange thousands of trees in order every frame and then render them. So we could just switch to SpeedTree and use model LOD instead of map LOD, although it would be really cheap.

Method: How to use Blending correctly.

    Draw all opaque objects first. Sort all transparent objects. Draw all transparent objects in order (from far forward). In particular, you can sort by distance insertion, drawing far away first, and then drawing near.

Call unity with lightmap and light probes in shader

When writing Unity Shader, there are times when you need to write shader that can support Unity’s built-in Lightmap or Light probe. If you’re writing with Surface, you don’t have to worry about that. Unity will compile automatically, but if you’re writing with Vert& Frag writes shader, these need to add their own code to call.
Unity has a built-in lightMap call
To make the unity built-in data and various macro definitions (such as LIGHTMAP_OFF in this article) work, you need to add #pragma:
pragma multi_compile LIGHTMAP_OFF LIGHTMAP_ON
Prior to Unity5.0, there were two built-in parameters that needed to be declared. With Unity5.0, they were not required:
half4 unity_LightmapST;
sampler2D unity_Lightmap;
Lightmap is a UV2 that USES the model, so next declare uV2 in the vertex input structure:
float2 texcoord1 : TEXCOORD1;
In another vertex structure, define the UV value used to receive UV2:
ifndef LIGHTMAP_OFF
half2 uvLM : TEXCOORD4;
endif
Assign uvLM to the vert function:
ifndef LIGHTMAP_OFF
o.uvLM = v.texcoord1.xy * unity_LightmapST.xy + unity_LightmapST.zw;
endif
Then the frag function samples the lightMap map and adds it to the main color:
ifndef LIGHTMAP_OFF
fixed3 lm = DecodeLightmap (UNITY_SAMPLE_TEX2D(unity_Lightmap, i.uvLM.xy));
col.rgb*=lm;
endif
In the above code, DecodeLightmap is used to decode unity’s built-in LightMap. This is because the LightMap baked by unity is a 32-bit HDR map. On the desktop side, the code of the LightMap is RGBM, while on the mobile side, in most cases, the code of the LightMap is double-ldr, so different coding methods should be provided for different platforms. DecodeLightmap is here, it can decode the light map for different platforms
VF version code 01:
Shader “PengLu/Unlit/TextureLM” {
Properties {
_MainTex (” Base (RGB) “, 2D) = “white” {}
}
SubShader {
Tags {” RenderType “=” Opaque “}
LOD 100

Pass {  
    CGPROGRAM
        #pragma vertex vert
        #pragma fragment frag
        #pragma multi_compile_fog
        #pragma multi_compile LIGHTMAP_OFF LIGHTMAP_ON
        #include "UnityCG.cginc"

        struct appdata_t {
            float4 vertex : POSITION;
            float2 texcoord : TEXCOORD0;
            float2 texcoord1 : TEXCOORD1;
        };

        struct v2f {
            float4 vertex : SV_POSITION;
            half2 texcoord : TEXCOORD0;
            #ifndef LIGHTMAP_OFF
            half2 uvLM : TEXCOORD1;
            #endif 
            UNITY_FOG_COORDS(1)
        };

        sampler2D _MainTex;
        float4 _MainTex_ST;

        v2f vert (appdata_t v)
        {
            v2f o;
            o.vertex = mul(UNITY_MATRIX_MVP, v.vertex);
            o.texcoord = TRANSFORM_TEX(v.texcoord, _MainTex);
            #ifndef LIGHTMAP_OFF
            o.uvLM = v.texcoord1.xy * unity_LightmapST.xy + unity_LightmapST.zw;
            #endif
            UNITY_TRANSFER_FOG(o,o.vertex);
            return o;
        }

        fixed4 frag (v2f i) : SV_Target
        {
            fixed4 col = tex2D(_MainTex, i.texcoord);
            UNITY_APPLY_FOG(i.fogCoord, col);
            UNITY_OPAQUE_ALPHA(col.a);
            #ifndef LIGHTMAP_OFF
            fixed3 lm = DecodeLightmap (UNITY_SAMPLE_TEX2D(unity_Lightmap, i.uvLM.xy));
            col.rgb*=lm;
            #endif
            return col;
        }
    ENDCG
}

}
}
A call of Unity’s built-in Light Probes
In shader we call Light Probes using Half3 ShadeSH9(Half4 Normal) defined by Unity. Light Probes lighting USES a simulation called Sphere Harmonic, or SH, so in ShadeSH9 the normal in a world coordinate is needed to determine the Light on the surface of the object.
First we define a parameter SHLighting in the vertex output structure:
fixed3 SHLighting : COLOR;
Then assign it to a vertex function:
float3 worldNormal = mul((float3x3)_Object2World, v.normal); Get normal in world coordinates
o.SHLighting= ShadeSH9(float4(worldNormal,1)) ;
VF version code 02:
Shader “PengLu/Unlit/TextureLM” {
Properties {
_MainTex (” Base (RGB) “, 2D) = “white” {}
_SHLightingScale(” LightProbe influence scale “,float) = 1
}
SubShader {
Tags {” Queue “=” Geometry “” LightMode” = “ForwardBase” “RenderType” = “Opaque”}
LOD 100

Pass {  
    CGPROGRAM
        #pragma vertex vert
        #pragma fragment frag
        #pragma multi_compile_fog

        #include "UnityCG.cginc"


        struct v2f {
            float4 vertex : SV_POSITION;
            half2 texcoord : TEXCOORD0;
            fixed3  SHLighting : COLOR;
            UNITY_FOG_COORDS(1)
        };

        sampler2D _MainTex;
        float4 _MainTex_ST;
        float _SHLightingScale;

        v2f vert (appdata_base v)
        {
            v2f o;
            o.vertex = mul(UNITY_MATRIX_MVP, v.vertex);
            o.texcoord = TRANSFORM_TEX(v.texcoord, _MainTex);
            float3 worldNormal = mul((float3x3)_Object2World, v.normal);
            o.SHLighting= ShadeSH9(float4(worldNormal,1)) ;
                            UNITY_TRANSFER_FOG(o,o.vertex);
            return o;
        }

        fixed4 frag (v2f i) : SV_Target
        {
            fixed4 col = tex2D(_MainTex, i.texcoord);
            col.rgb*=i.SHLighting;
            UNITY_APPLY_FOG(i.fogCoord, col);
            UNITY_OPAQUE_ALPHA(col.a);

            return col*_SHLightingScale;
        }
    ENDCG
}

}
}
Unity learning — stop coroutine

The StopCoroutine method is similar to the StartCoroutine method, with two overloads.
void StopCoroutine(string methodName)
void StopCoroutine(IEnumerator routine)
this method can either pass in the methodName of the coroutine method as a parameter of type string or of type IEnumerator. Next, the StopCoroutine method is used:

using System.Collections;
using System.Collections.Generic;
using UnityEngine;

public class StopCoroutine : MonoBehaviour {

    IEnumerator DoSomething(float someParameter)
    {
        print("DoSomething Loop");
        yield return null;
    }
     IEnumerator Start()
    {
        StartCoroutine("DoSomething",2.0f);
        yield return new  WaitForSeconds(1);
        StopCoroutine("DoSomething");
    }
}

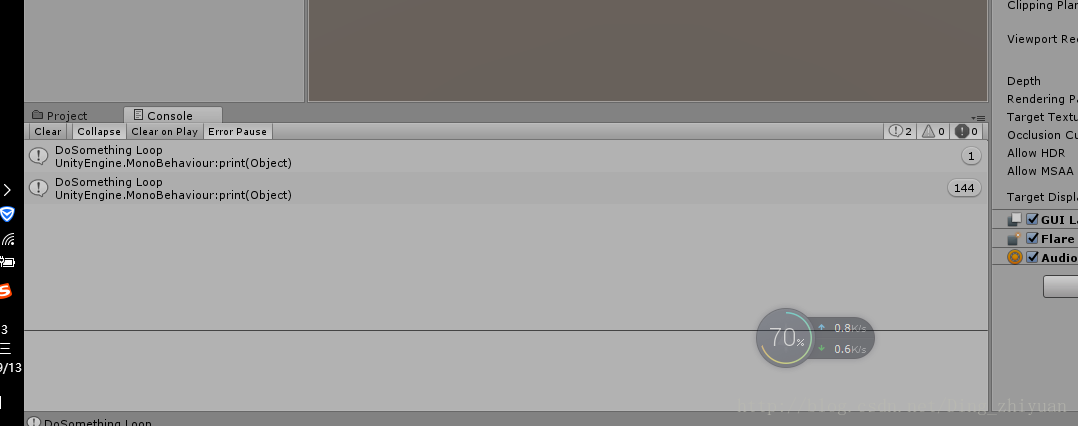
This code opens a coroutine called DoSomething, which, if run continuously, prints out the phrase “DoSomething Loop”. So after waiting a second, the code stops the coroutine when it executes on the StopCoroutine line.

note: this is when the StopCoroutine method is not used

note: this is when the method is used
The StopCoroutine method can only stop the same coroutine in the same game script with the same Chinese name and string parameter passed in, and cannot affect the coroutine opened in other scripts. The StopCoroutine method, meanwhile, can only StopCoroutine that was started with an overloaded version of StartCoroutine’s string argument.

Create game scene in unity_ Creating a beat em up game in unity

Create game scenes in Unity
Learn how to use Unity to create a 3D Beat Em Up game in this full tutorial from Awesome Tuts.
Learn how to create a 3D Beat Em Up game using Unity in the full tutorial on Awesome Tuts.
This tutorial covers everything you need to know to make a basic Beat Em Up game. You are even provided the 3D assets!
This tutorial covers everything you need to know to make a basic Beat Em Up game. You even get a 3D resource!
Here are the topics covered in the course:
The following topics are covered in this course:
According to the Animations, it is important to create a single Character Animation Script so that the players can’t Attack the shaping of Our Player To detect And deal with Damage to Character Animation Delegate Script, The Enemy Movement Script is configured to create Player Attack Points For Detecting And Dealing Damage to The Health Script Create healthy Script Knocking Down Enemy With Combos use combination Down Enemy Adding Sound FX In The Game In The Game To add Sound effects Camera Shake FX Camera vibration effect Enemy Attack Points And ‘Dealing Damage To Player attacking Enemy And The Enemy To The harm of The Player Manager Manager Script Script The Enemy Displaying the Health Stats With the UI using the UI display Health status
You can watch the full video on the freeCodeCamp.org YouTube Channel (4.5 Hour Watch).
You can watch the full video (4.5 hours) on the freeCodeCamp.org YouTube channel.

Translated from: https://www.freecodecamp.org/news/create-a-beat-em-up-game-in-unity/

Create game scenes in Unity

Unity Cursor Lock& Camera Lock

Functional requirements:
When the menu pops up, the camera is locked and the mouse is displayed; when the menu is closed, the mouse is hidden;
Video tutorial (over the wall required) :
https://www.youtube.com/watch?v=nMgk72JSxz8& list=PLPV2KyIb3jR5PhGqsO7G4PsbEC_Al-kPZ& index=27
The code is as follows:
using UnityStandardAssets.Characters.FirstPerson; // The header file needs to be added camera first person
If (Input. GetKeyDown (KeyCode. B))
{
PauseMenu. SetActive (! PauseMenu.activeSelf);
}// press B to switch the backpack
If (pausemenu.activeself)
{
cursor.visible = true;
if (cursorlockstate == CursorLockMode.Locked)
{
curb.lockstate = CursorLockMode.None; .
}
aaaa GetComponent< RigidbodyFirstPersonController> ().mouseLook.XSensitivity = 0;
aaaa. GetComponent< RigidbodyFirstPersonController> ().mouseLook.YSensitivity = 0;
}// when the backpack is opened, the mouse will display, do not lock, the camera will lock; RigidbodyFirstPersonController script component is the camera,
The motion of the camera can be controlled by controlling XSensitivity and YSensitivity
If (! Pausemenu.activeself)
{
cursor.visible = false;
Cursor. LockState = CursorLockMode. Locked;
aaaa. GetComponent< RigidbodyFirstPersonController> ().mouseLook.XSensitivity = 2;
aaaa. GetComponent< RigidbodyFirstPersonController> ().mouseLook.YSensitivity = 2;
}// when the backpack is closed, the mouse does not show, lock, camera unlock

Unity development memo 000025: error cs0433: the type ‘task’ exists in both ‘xxx’ and ‘YYY’

After Bolt 1.4.0F3 was added to Unity2019 version, the following error appeared:
The Library \ PackageCache \ [email protected] \ Scripts \ Editor \ TMP_PackageUtilities cs (310) : error CS0433: The type ‘Task’ exists in both ‘system.threading, Version=1.0.2856.102, Culture=neutral, PublicKeyToken= 31Bf3856AD364e35’ and ‘mscorlib, Version=4.0.0.0, Culture=neutral, PublicKeyToken=b77a5c561934e089’
After careful study, I guess this is a third-party plug-in compatibility problem with the Unity version.
The Unity update was so fast that some third-party plug-ins couldn’t keep up.
Fortunately, Bolt 1.4.4 was downloaded and re-imported Unity2019, and the problem was solved.
It seems that in both learning and development, it is better for the average coder not to use the latest version of Unity. It does bring you new features, but it also brings you new bugs!
 
Old head class: https://edu.csdn.net/lecturer/3617
How do You dynamically load a texture projection for the Projector

Fatal error in GC getthreadcontext failed bug exception.

Fatal Error in GC GetThreadContext Failed
PC – unity5.3.4 c# exe Windows
Don’t talk nonsense. A variety of online answers are antivirus software off. But requirements do not allow others to be closed.
You can only start with code.  
Discovery: Open a thread. This thread while doesn’t sleep. Or sleep too little. This thread is missing the time cache.
All longer sleep times. Done!

The reasons for the following errors occurred when opening the webgl project of unity

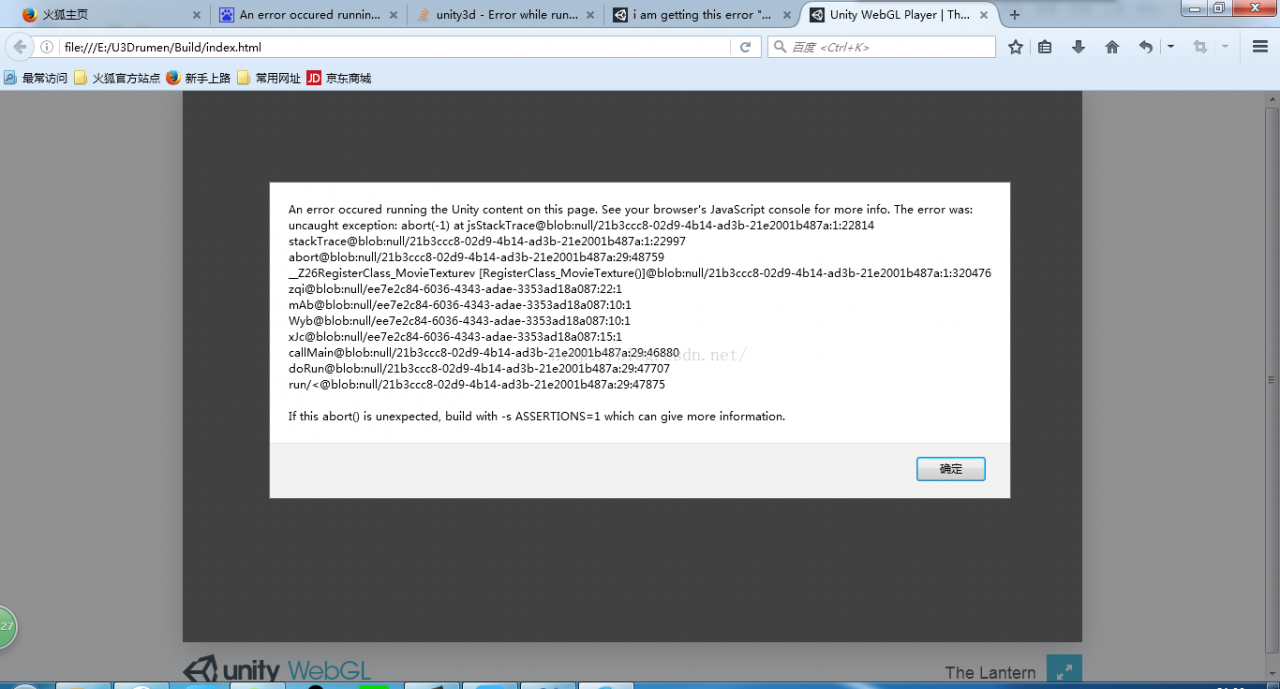
Two days ago, I tried to export the webGL project of U3D. I opened it with Firefox browser, but it could not be opened. The following error occurred:

An error occured running the Unity content on this page. See your browser’s JavaScript console for more info. The error was:

uncaught exception: abort(-1) at jsStackTrace@blob:null/21b3ccc8-02d9-4b14-ad3b-21e2001b487a:1:22814

stackTrace@blob:null/21b3ccc8-02d9-4b14-ad3b-21e2001b487a:1:22997

abort@blob:null/21b3ccc8-02d9-4b14-ad3b-21e2001b487a:29:48759

__Z26RegisterClass_MovieTexturev [RegisterClass_MovieTexture()]@blob:null/21b3ccc8-02d9-4b14-ad3b-21e2001b487a:1:320476

zqi@blob:null/ee7e2c84-6036-4343-adae-3353ad18a087:22:1

mAb@blob:null/ee7e2c84-6036-4343-adae-3353ad18a087:10:1

Wyb@blob:null/ee7e2c84-6036-4343-adae-3353ad18a087:10:1

xJc@blob:null/ee7e2c84-6036-4343-adae-3353ad18a087:15:1

callMain@blob:null/21b3ccc8-02d9-4b14-ad3b-21e2001b487a:29:46880

doRun@blob:null/21b3ccc8-02d9-4b14-ad3b-21e2001b487a:29:47707

run/< @blob:null/21b3ccc8-02d9-4b14-ad3b-21e2001b487a:29:47875

If this abort() is unexpected, build with -s ASSERTIONS=1 which can give more information.

I thought some Settings of webGL or Firefox might have been modified by accident, but they still can’t be reinstalled. There is no same answer on the Internet, and the q&A is all over the UK, which makes me die.

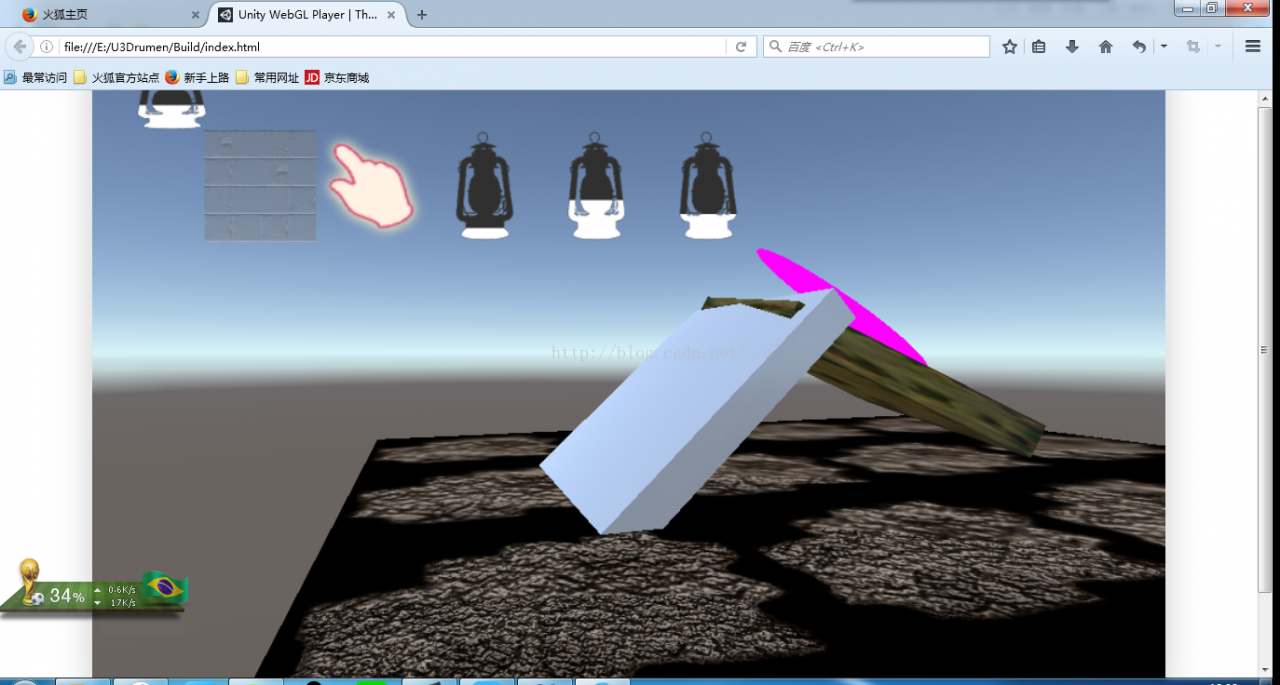
Later looked at the mistake carefully, suddenly found the key sentence! ___registerclass_movietexturev [RegisterClass_MovieTexture()] @BLOB: NULL/21B3CCC8-02D9-4B14-ad3B-21E2001B487A :1:320476. So movieTexture is a little bit familiar. If I go back to my project, I find a folder called MovieTexture that contains a few.mp4 video files. Delete all the videos in it, export it again, open it normally, solve it successfully!

Conclusion:
1. This time, it may be because webGL cannot recognize the video files, so it can be solved by deleting all the video files in the project.
2. The problem is with the error message, so take a look at that and if you find a sentence that’s most relevant to your project, that should be the one that makes the error, like my project movieTexture.