Tag Archives: solution

Spring MVC uses Ajax to submit requests asynchronously to complete login

Submit the form asynchronously with Ajax, log in and return the JSON data.

1、 Effect
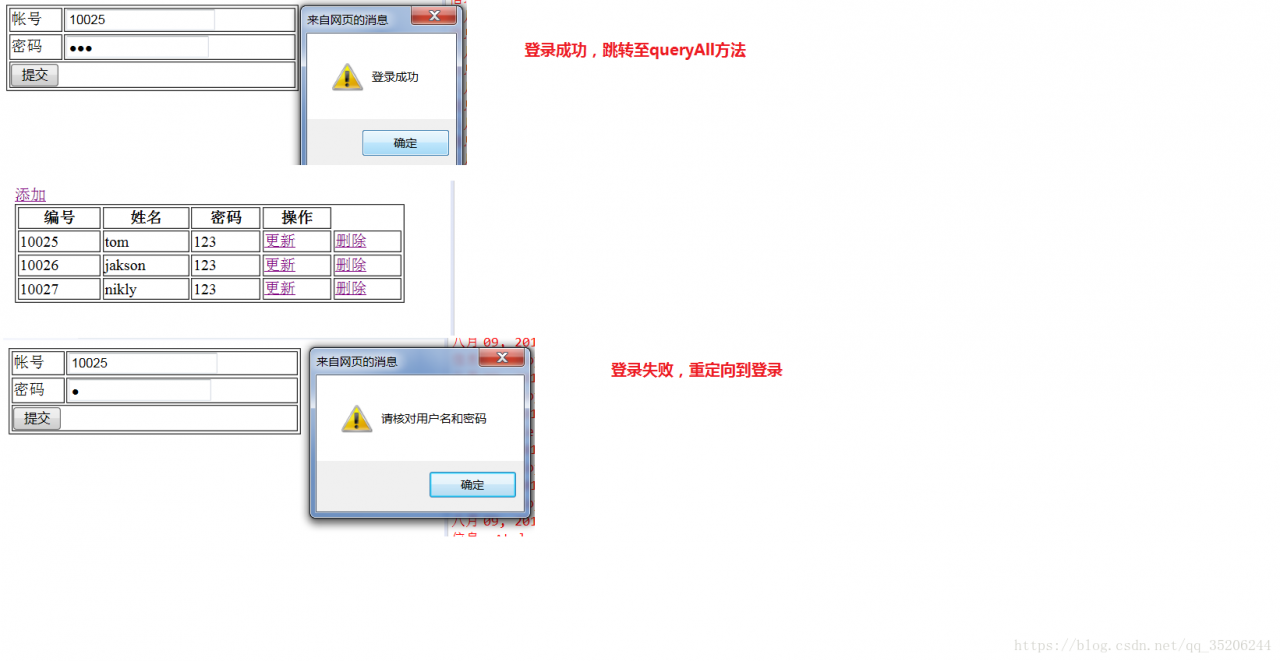
2、 Configuration

springmvc.xml

<?xml version="1.0" encoding="UTF-8"?>
<beans xmlns="http://www.springframework.org/schema/beans"
    xmlns:xsi="http://www.w3.org/2001/XMLSchema-instance" 
    xmlns:p="http://www.springframework.org/schema/p"
    xmlns:mvc="http://www.springframework.org/schema/mvc" 
    xmlns:context="http://www.springframework.org/schema/context"
    xsi:schemaLocation="
        http://www.springframework.org/schema/beans
        http://www.springframework.org/schema/beans/spring-beans.xsd
        http://www.springframework.org/schema/mvc
        http://www.springframework.org/schema/mvc/spring-mvc.xsd
        http://www.springframework.org/schema/context
        http://www.springframework.org/schema/context/spring-context.xsd">

    <context:component-scan base-package="com.it.springmvc" />

    <mvc:annotation-driven></mvc:annotation-driven>
    <bean id="jspViewResolver"
        class="org.springframework.web.servlet.view.InternalResourceViewResolver">
        <property name="viewClass"
            value="org.springframework.web.servlet.view.JstlView" />
        <property name="prefix" value="/WEB-INF/jsp/" />
        <property name="suffix" value=".jsp" />
    </bean>
    <mvc:default-servlet-handler/>

</beans>

web.xml

<?xml version="1.0" encoding="UTF-8"?>
<web-app xmlns:xsi="http://www.w3.org/2001/XMLSchema-instance"  
xmlns="http://java.sun.com/xml/ns/javaee" 
xsi:schemaLocation="http://java.sun.com/xml/ns/javaee 
http://java.sun.com/xml/ns/javaee/web-app_3_0.xsd" id="WebApp_ID" 
version="3.0">
  <display-name>springMVC</display-name>
  <welcome-file-list>
    <welcome-file>index.html</welcome-file>
    <welcome-file>index.htm</welcome-file>
    <welcome-file>index.jsp</welcome-file>
    <welcome-file>default.html</welcome-file>
    <welcome-file>default.htm</welcome-file>
    <welcome-file>default.jsp</welcome-file>
  </welcome-file-list>
  <servlet>
      <servlet-name>example</servlet-name>
      <servlet-class>org.springframework.web.servlet.DispatcherServlet</servlet-class>
        <init-param>
            <param-name>contextConfigLocation</param-name>
            <param-value>WEB-INF/springmvc.xml</param-value>
        </init-param>
        <load-on-startup>1</load-on-startup>
    </servlet>

    <servlet-mapping>
        <servlet-name>example</servlet-name>
        <url-pattern>/</url-pattern>
    </servlet-mapping>


</web-app>

Controller

PersonController.java

package com.it.springmvc.controller;

import java.util.ArrayList;
import java.util.List;

import org.springframework.stereotype.Controller;
import org.springframework.web.bind.annotation.RequestMapping;
import org.springframework.web.bind.annotation.RequestMethod;
import org.springframework.web.bind.annotation.ResponseBody;
import org.springframework.web.servlet.ModelAndView;

import com.it.springmvc.entity.Person;

@Controller
public class PersonController {
    @RequestMapping(value="/toLogin",method=RequestMethod.GET)
    public String toLogin(){
        return "login";
    }

    @RequestMapping(value="/login",method=RequestMethod.POST)
    public String login(Person person){
        if(10025==person.getPid()&&"123".equals(person.getPwd())){
            return "redirect:queryAll";
        }else{
            return "login";
        }
    }
    @RequestMapping(value="/queryAll",method=RequestMethod.GET)
    public ModelAndView queryAll(){
        ModelAndView mav=new ModelAndView("show");
        List<Person> list=new ArrayList<Person>();
        list.add(new Person(10025, "tom", "123"));
        list.add(new Person(10026, "jakson", "123"));
        list.add(new Person(10027, "nikly", "123"));
        mav.addObject("list", list);
        return mav;
    }
    @RequestMapping("/ajax")
    @ResponseBody
    public Object ajax(Person person){
        System.out.println(person.getPid()+person.getPwd());
        if(10025==person.getPid()&&"123".equals(person.getPwd())){
            return "{\"flag\":true}";
        }else{
            return "{\"flag\":false}";

        }

    }

}

1.2.2.

Index.jsp

<body>
<%
response.sendRedirect("toLogin");
%>
</body>

login.jsp

<%@ page language="java" contentType="text/html; charset=utf-8"
    pageEncoding="utf-8"%>
<!DOCTYPE html PUBLIC "-//W3C//DTD HTML 4.01 Transitional//EN" 
"http://www.w3.org/TR/html4/loose.dtd">
<html>
<head>
<meta http-equiv="Content-Type" content="text/html; charset=utf-8">
<title>Insert title here</title>
</head>
<script type="text/javascript" src="js/jquery-3.2.1.min.js"></script>
<script type="text/javascript">
$(function(){
    $("#sub").click(function(){
        $.post("ajax",$("form").serialize(),function(data){
            //alert(data.flag);
              if(data.flag){
                alert("Login success");
                location.href="queryAll";
            }else{
                alert("please recheck your usename and password");
            } 
        },'json');
    })
})
</script>
<body>
<form  method="post">
    <table border="1" width="300px">
        <tr>
            <td>usename</td>
            <td><input type="text" name="pid"/></td>
        </tr>
        <tr>
            <td>password</td>
            <td><input type="password" name="pwd"/></td>
        </tr>
        <tr>            
            <!-- <td colspan="2"><input type="submit" value="submit"/></td> -->
            <td colspan="2"><input type="button" value="submit" id="sub"/></td>
        </tr>
    </table>
</form>

</body>
</html>

show.jsp

<%@ page language="java" contentType="text/html; charset=utf-8"
    pageEncoding="utf-8"%>
<%@ taglib prefix="c" uri="http://java.sun.com/jsp/jstl/core" %>
<!DOCTYPE html PUBLIC "-//W3C//DTD HTML 4.01 Transitional//EN" 
"http://www.w3.org/TR/html4/loose.dtd">
<html>
<head>
<meta http-equiv="Content-Type" content="text/html; charset=utf-8">
<title>Insert title here</title>
</head>
<body>
<a href="toAdd">Add</a>
<table border="1" width="400px">
    <tr>
        <th>NUM</th>
        <th>name</th>
        <th>password</th>
        <th>Act</th>
    </tr>
    <c:forEach var="person" items="${list}">
        <tr>
            <td>${person.pid }</td>
            <td>${person.pname }</td>
            <td>${person.pwd }</td>
            <td><a href="">Update</a></td>
            <td><a href="">DEL</a></td>

        </tr>
    </c:forEach>
</table>
</body>
</html>
Solution: the solution to the wrong connection of rosdep init or rosdep update

If the prompt is error: unable to process source https://raw.githubusercontent.com/ros/rosdistro/master/rosdep/xxxxx Such errors, while ensuring that their machine can be on the premise of Baidu, at this time may be due to raw.githubusercontent.com The website has been blocked.
The solution is to modify the hosts file and add the IP address of the website

#Open the hosts file
sudo gedit /etc/hosts
#Add at the end of the file
151.101.84.133 raw.githubusercontent.com
#Save and quit and try again

Try again

Solution: pairing Bluetooth devices with win10 and Linux dual systems

preface

My computer is equipped with windows (win10) and Linux (Ubuntu 18.04) dual systems. I usually use Logitech’s wireless keyboard, but I find that every time I switch the system, although I have paired before, I can’t connect successfully. You must delete the paired device and re link it every time. Occasionally there will be device delete unsuccessful, very angry. So I want to connect (pair) two systems with one Bluetooth device once and for all.

Device deletion failed

Solution: (reprint, delete)

1. Download the repair tool and complete the installation with the default options. To prevent link failure, attach Baidu network disk link
2. Open shell, input btpair – u from the command line, and press enter to execute
3. Wait, and you will find that the paired bluetooth device has been successfully and completely deleted


Solution: (reprint, delete)

Basic steps:

1. First pair Bluetooth mouse under Linux (used to generate configuration file)
2. Switch to pair Bluetooth mouse under windows (used to read pairing information)
3. Modify pairing information under Linux to be consistent with that under windows

Of course, you can also do the opposite. The pairing information under windows is consistent with that under Linux, but it is not recommended.

Reading Bluetooth pairing information in Windows

The Bluetooth pairing information of windows is stored in the registry

HKEY_LOCAL_MACHINE\SYSTEM\CurrentControlSet\Services\BTHPORT\Parameters\Keys\<本机蓝牙 MAC>\<鼠标蓝牙 MAC>

The MAC address does not have a separator, and the system permission is required to access it. I found two ways to read this part of information. (I used the first way)

use psexec.exe Start with system permissions regedit.exe
psexec.exe </ code> can be downloaded from this page to PSTools.zip ), will PSTools.zip In PsExec.exe Or psexec64.exe (here I copy it directly to Windows/system32), and run CMD with administrator privileges (also in Windows/system32), and then Enter the following command to start regedit.exe :

psexec64.exe -si regedit

Then we can view the corresponding key value in the registry editor, and we can also export it: (my length is like this)

Windows Registry Editor Version 5.00

[HKEY_LOCAL_MACHINE\SYSTEM\CurrentControlSet\Services\BTHPORT\Parameters\Keys\58fb842d509f]
"34885dd2457f"=hex:cf,a0,fc,2d,50,b3,f0,4a,93,8b,36,da,81,bb,5b,5e

Modifying Bluetooth pairing information under Linux

The pairing information of Bluetooth devices under Linux is stored in the/var/lib/Bluetooth/& lt; local Bluetooth MAC & gt; directory, such as/var/lib/Bluetooth/60:57: XX: XX: XX: XX. The letters in the MAC address are all uppercase and contain colon separator.

Enter the directory: (of course, it’s more convenient to click directly)

sudo su
cd /var/lib/bluetooth/60:57:XX:XX:XX:XX

You can see the paired bluetooth devices in the system:

root@nanpuyue-pc:/var/lib/bluetooth/60:57:XX:XX:XX:XX# ls -l
All 24
drwx------ 2 root root  4096 3月  13 19:48 4C:57:XX:XX:XX:XX
drwx------ 2 root root 12288 3月  13 22:38 cache
drwxr-xr-x 2 root root  4096 3月  13 21:52 EB:50:XX:XX:XX:XX
-rw------- 1 root root    69 3月   9 13:21 settings

Enter the directory of Bluetooth mouse we want to configure:

cd EB:50:XX:XX:XX:XX

What we need to modify is the info file in this directory. Take mine as an example, the file is as follows (it has been modified here. We only need to change the key into the key in the registry exported under windows. Specifically, delete the comma in win and change the lowercase to uppercase)

[General]
Name=Keyboard K380
Class=0x000540
SupportedTechnologies=BR/EDR;
Trusted=true
Blocked=false
Services=00001000-0000-1000-8000-00805f9b34fb;00001124-0000-1000-8000-00805f9b34fb;00001200-0000-1000-8000-00805f9b34fb;

[LinkKey]
Key=CFA0FC2D50B3F04A938B36DA81BB5B5E
Type=5
PINLength=0

[DeviceID]
Source=2
Vendor=1133
Product=45890
Version=16897

Reset computer

Visual Studio 2012 error C4996: ‘scanf’: This function or variable may be unsafe.

When compiling C language projects in vs 2012, if scanf function is used, the following error will be prompted during compilation:

error C4996: ‘scanf’: This function or variable may be unsafe. Consider using scanf_ s instead. To disable deprecation, use _ CRT_ SECURE_ NO_ WARNINGS. See online help for details.

The reason is that visual c + + 2012 uses more secure run time library routines. New security CRT functions_ S “suffix), see:

Security enhanced version of CRT function

Here is a solution to this problem

Method 1: replace the old function with the new security CRT functions.

Method 2: use the following methods to block this warning:

1. Define the following macro in the precompiled header file StdAfx. H

#define _ CRT_ SECURE_ NO_ DEPRECATE

2. Or declare “param warning”( disable:4996 )

3. Change the definition of preprocessing

Project – & gt; properties – & gt; configuration properties – & gt; C/C + + – & gt; preprocessor – & gt; preprocessor definition, add:

_ CRT_ SECURE_ NO_ DEPRECATE

Method 3: Method 2 does not use a more secure CRT function, which is obviously not a good recommended method. However, we do not want to change the function names one by one. Here is a simpler method:

In the precompiled header file StdAfx. H (also before any header file is included), define the following macro:

#define _ CRT_ SECURE_ CPP_ OVERLOAD_ STANDARD_ NAMES 1

When linking, the old function will be automatically replaced with security CRT functions.

Note: Although this method uses a new function, it can’t eliminate the warning (see the red letter for the reason). You have to use method 2 (-_ -)。 In fact, the following two sentences should be added to the precompiled header file StdAfx. H:

#define _ CRT_ SECURE_ NO_ DEPRECATE

#define _ CRT_ SECURE_ CPP_ OVERLOAD_ STANDARD_ NAMES 1


Error reason explanation:

This kind of Microsoft’s warning is mainly due to the fact that many functions in the C library do not carry out parameter detection (including cross-border functions). Microsoft is worried that using these functions will cause memory exceptions, so it rewrites the functions with the same functions, and the rewritten functions carry out parameter detection. It will be safer and more convenient to use these new functions. You don’t need to memorize these rewritten functions, because the compiler will tell you the corresponding security function when it gives a warning for each function. You can get it by checking the warning information, and check MSDN for details when you use it.

VMware this host does not support 64 bit solutions

environment

VMware version: 14.1.3
operating system: win10 x64

terms of settlement

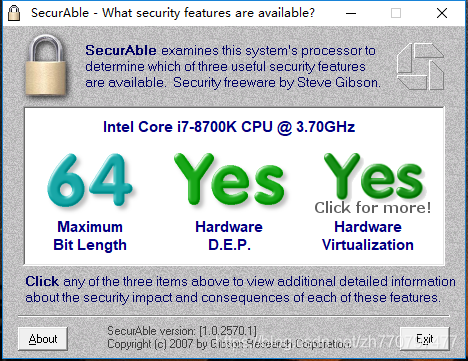
Enter the BIOS to confirm the Intel (R) virtualization technology status. Please set the disabled status to enabled. Remove the Hyper-V status from the control panel (i.e. cancel the check of Hyper-V). If the above steps are all done or not, run the CMD program, execute Bcdedit/set hypervisorlaunchtype off, and restart the computer. (that’s my problem) in addition, you can use the following tools to check whether the computer hardware supports virtualization:
to check whether the computer hardware supports virtualization https://www.grc.com/securable.htm
After startup, it is shown in the following figure:

Modifying SVN user name and password in eclipse

Sometimes in development, some code is submitted by a public computer. Eclipse has no special function to switch SVN accounts. The solution is obtained by consulting the data

1. Check what SVN interface you are using in eclipse
Windows & gt; preference & gt; team & gt; SVN # SVN interface (bottom right)

2. If you are using javahl, Find the following directory and delete the files in the auth directory.
Windows 7
C: (users) \ “your user name” \ \ appdata/roaming/subversion/auth \
XP
C: (documents and settings) \ “your user name” \ \ “application data (hidden folder) \” subversion/auth “

3, Find the following directory and delete the. Keyring file.
[eclipse] “configuration” org.eclipse . core.runtime  

Tomcat start error touch under Linux

Touch: unable to touch/usr/local/tomcat6.0/logs/ catalina.out ”: there is no file or directory

Tomcat startup error:

[ root@rhel bin]# ./ startup.sh
Using CATALINA_ BASE: /usr/local/tomcat6.0
Using CATALINA_ HOME: /usr/local/tomcat6.0
Using CATALINA_ TMPDIR: /usr/local/tomcat6.0/temp
Using JRE_ Home:/usr/local/JDK/JRE
touch: cannot touch “/ usr/local/tomcat6.0/logs/ catalina.out ”: no file or directory
/usr/local/Tomcat/bin/ catalina.sh : line 310: /usr/local/tomcat6.0/logs/ catalina.out : without that file or directory
// prompt that/usr/local/tomcat6.0/logs cannot be created/ Catalina.out This is a file because there is no logs directory;

Solution:
just create a logs directory
MKDIR/usr/local/tomcat7.0.19/logs

Convert Tencent video QLV format to MP4 format

QLV format video is not so easy to deal with, it seems to be an encryption format, trying to change. QLV to. MP4 or. Flv is useless, using format factory and other conversion software conversion is not recognized at all. But this does not mean that there is no way. In fact, the real way is not to use any tools

1, we want to show hidden files. In the computer folder option, display the hidden files, folders and drives; 2. Enter the program cache folder of the video, and under the folder of “vodcache” hidden attribute, you can see many. TDL files, which are segmented files of the video; 3. In the search bar of Windows Start button, type “CMD”, confirm and enter, and enter e: Enter, and then enter the command “copy/b *. TDL 1. MP4” to merge these *. TDL files (the file name can be set by yourself), and you will soon get a MP4 format video file.

After testing, this MP4 file is an ordinary video file, which can play normally.

Copy/b *. TDL 1.mp4 there is space in the middle of the command here, which needs to be noted.

Solution: the network can be recovered only when the Ubuntu broadband is disconnected

If you set the broadband connection in /etc/network/interfaces , sometimes you need to disconnect the network for some work operations. At this time, you will find that when you want to reconnect the network, you can't connect successfully as we wish, you can only manually restart the network service or restart the computer

Command to restart the network service manually:

sudo service network-manager restart

perhaps

sudo systemctl restart NetworkManager.service

For the convenience of future operation, you can create a reconnect in the home directory_ network.sh The contents are as follows

#!/bin/bash
sudo service network-manager restart

Then run the command sudo Chmod + X connect_ network.sh grant executable permission
after the network is disconnected, you only need to run ./reconnect on the terminal_ network.sh , you can connect to the network again