Writing:
{
  "config": {
    "chainId": 666,
    "homesteadBlock": 0,
    "eip150Block": 0,
    "eip150Hash": "0x0000000000000000000000000000000000000000000000000000000000000000",
    "eip155Block": 0,
    "eip158Block": 0,
    "byzantiumBlock": 0,
    "constantinopleBlock": 0,
    "petersburgBlock": 0,
    "istanbulBlock": 0,
    "ethash": {}
  },
  "nonce": "0x0",
  "timestamp": "0x5ddf8f3e",
  "extraData": "0x0000000000000000000000000000000000000000000000000000000000000000",
  "gasLimit": "0x47b760",
  "difficulty": "0x00002",
  "mixHash": "0x0000000000000000000000000000000000000000000000000000000000000000",
  "coinbase": "0x0000000000000000000000000000000000000000",
  "alloc": { },
  "number": "0x0",
  "gasUsed": "0x0",
  "parentHash": "0x0000000000000000000000000000000000000000000000000000000000000000"
}
Save, run, geth Genesis init Genesis. Json
If I write the initial block with a short negative code, I get an error:
Fatal: Failed to write genesis block: unsupported fork ordering: eip150Block not enabled, but eip155Block enabled at 0
VIDEOIO ERROR: V4L: can’t open camera by index 0
1, problem description: using opencv to call the raspberry PI camera [cv2.videocapture (0)], when running the program, said can not open the camera.
2. Solution:
I looked for a method on the Internet, said to change 0 to -1, I changed, after the change, the system still said can not find the camera, let alone open.
and then I’m going to do the camera test and say
https://www.raspber rypi.org/documentation/configuration/camera.md
raspistill -v -o test.jpgfound that raspberry PI can take photos normally, indicating that there is no problem with the installation interface.
and search on the Internet, said to run the program to enter the following statement, that is, the raspberry PI system’s camera is ok, but opencv can not call. It can be called using this statement.
sudo modprobe bcm2835-v4l2
yes, the camera can be turned on after you type in this statement, but the screen will be bar by bar, for whatever reason, that’s not settled yet. Is the refresh too fast?
###############################################
https://blog.csdn.net/u012005313/article/details/70244747#C0, that’s a great blog
raspberry PI can call the camera and show the stripe instead of the original image, because the following two parameters mess up, comment out, it will work properly
# Set camera resolution
camera.set(cv2.cap_prop_frame_width, 620)
camera.set(cv2.cap_prop_frame_height, 480)
picamera.exc.PiCameraMMALError: Failed to enable connection: Out of resource
raspberry PI camera occupation problem and solution
when using Python and PiCamera to take a photo/video, if
is not in time
camera.close()
When
runs again, an error may occur:
picamera.exc.PiCameraMMALError: Failed to enable connection: Out of resource
solution:
just find and kill the process where the Camera is.
step1: ps -u
find the corresponding python PID, such as 14255
step2: kill 14255
step3: re-run, problem solved
How to login raspberry pie
HDMI
video cable connected to the monitor
2. Serial port
device crack
default, raspberry PI serial port and bluetooth connection.
try to disconnect the bluetooth connection and use the serial port for data communication
a. Watch the start process of raspberry PI, the character
b. serial login raspberry PI
usb-ttl connection raspberry PI serial
1. Please read the instructions carefully connection corresponds to a serial port
the corresponding pins connect to raspberries TXD and RXD (GPIO14 and 15), as shown in figure:
source: https://pinout.xyz/pinout/uart

modify the system configuration, Enable serial login raspberry PI
1. Open the “config.txt” file in the SD kagan directory, add the following to the end and save.
dtoverlay=pi3-miniuart-bt
this stops the bluetooth and removes the use of the serial port.
2. Then change the root directory “cmdlin.txt”, replace all the contents with the following contents, just in case, please backup the original contents of this file first.
dwc_otg.lpm_enable=0 console=tty1 console=serial0,115200 root=/dev/mmcblk0p2 rootfstype=ext4 elevator=deadline fsck.repair=yes rootwait
configuration changes are complete.
default PI
default password: raspberry
3. 1. Let raspberry PI into the network
input command:
sudo nano /etc/wpa_supplicant/wpa_supplicant. Conf
add wireless network configuration information to file :
ctrl_interface=DIR=/var/run/wpa_supplicant GROUP=netdev
update_config=1
country=CN
network = {
ssid = “of your wireless network name”
PSK = “password”
key_mgmt = WPA wpa2-psk
}
network = {
ssid =
“name your other wireless networks” PSK = “password”
key_mgmt = WPA wpa2-psk
}

can set up multiple WIFI information. Press Ctrl+O to write save, Press Enter to confirm, and Ctrl+X to exit.
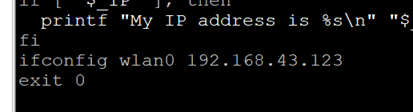
2. The IP address of the fixed raspberries pie
sudo nano/etc/rc. Local
3. 2.3.3.1 open SSH function
sudo raspi-config
select the fifth option, then select the second option, and OK is completed
if the configuration fails, check the following method:
input command:
sudo raspi-config
select the second option, then select wifi option, then CN CHINA. Enter, then enter the hot spot name, then enter the password, and restart.
sudo apt-get install XRDP (download remote desktop service)
open remote desktop connection, connect XRDP