Tag Archives: linux

Ubutnu’s idea input method candidate box can’t follow the cursor

Problem orientation
In fact, the specific issue of the official seven years ago (reference), but the more pit is that the official has not solved the problem. Simply put, a bug in the JRE running environment of IDEA causes the input method to be unable to locate the mouse position. Therefore, we need to modify the running code of JetBrainsRuntime to fix this problem.
The solution

Modify JetBrainsRuntime

    Download the modified JRE environment
https://pan.baidu.com/s/1S6cEKQS9w9dKqCrlO4QJwg
Extract code: 21MR

    Change the startup environment for IDEA

Change your own JRE directory

/home/ XXX /idea-2020.1/bin/idea.shhome/XXX /idea-2020.1/bin/idea.sh

port IDEA_JDK=/home/ XXX /idea-2020.1/java-11.0.7-jetbrain.>r> export IDEA_JDK=/home/ XXX /idea-2020.1/java-11.0.7-jetbrain
Appendix:
JetBrainsRuntime

About Using SSH connection for Linux server

About using SSH to connect to the LIUNX server

Step 1

Generate the key on the server side

ssh-keygen -t rsa
Step 2

Add the public key to the server authorization file

id_rsa.pub >> authorized_keys
Step 3
cat id_rsa

Copy the private key to window, create a new text document and paste it. Use putty-gen to generate the private key *.ppk for putty

Step 4

Connection -> when using PuTTY Connection; SSH -> Auth Click Browse to select the generated *.ppk and then click Open

Linux update Python method and error handling

ModulenotsError: No module named ‘_ctypes’ make: *** [inst3all] error 1
Install the libffi-devel dependency, then recompile and install python3.7.1.

yum -y install libffi-devel 

Execute the command to install again.
2. After installing Python, execute the version commands separately

$python -V
$Python3 -V


To use the new version, you need to link to the new version of Python (see the Python path, under /usr/bin. You can see the Python link is Python 2.7.

$ls -al /usr/bin | grep python

Rename the original Python soft link:

 $mv /usr/bin/python /usr/bin/python.bak

Link Python to Python 3:

$ln -s /usr/local/bin/python3 /usr/bin/python


3. YUM cannot be used after changing the version
The terminal input yum list and report an error

$yum list
File "/usr/bin/yum", line 30
    except KeyboardInterrupt, e:

SyntaxError: invalid syntax

Modify /usr/bin/yum and /usr/libexec/urlgrabber-ext-down to #! The/usr/bin/python to #! /usr/bin/python2.7 = /usr/bin/python2.7 = /usr/bin/python2.7

$vi /usr/bin/yum
$vi /usr/libexec/urlgrabber-ext-down

 
4. If you do not have root access, you will need to update the PIP after you update Python. Installation steps are as follows:
Download address: https://pypi.org/project/pip/#files
Install command: pip3 install – install – option = “– prefix =/GPFS/home/chengqy/soft/path” PIP – 20.1.1 – py2. Py3 – none – any. WHL
 

Linux Installation Error Handling

The Repository WandiscoSVN is listed more than once in the configuration
http://opensource.wandisco.com/centos/6/svn-1.7/RPMS/x86_64/repodata/repomd.xml: [Errno 14] PYCURL ERROR 6 – “Cant’t resolve host ‘openSource.wandisco.com ‘”

Error: Cannot retrieve repository metadata (repomd.xml) for repository: wandiscosvn. Please verify its path and try again
Error: Cannot retrieve repository metadata (repomd.xml) for repository: WandiscoSVN

In the domain name server configuration. Add an 8.8.8.8 and you’ll be fine:

# vi /etc/resolv.conf

# Generated by NetworkManager
nameserver 8.8.8.8

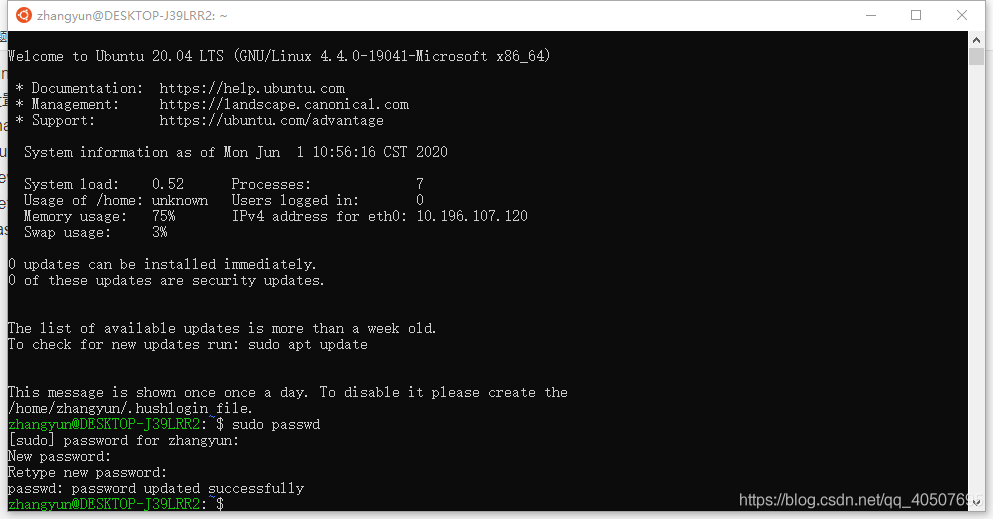
Setting the root password of windows 10 Ubuntu subsystem

Windows 10 installs the Ubuntu subsystem. When it is opened for the first time, it will let the user set his or her own user name and password, but this newly created user is not root user.
>

> Here’s how:
zhangyun@DESKTOP-J39LRR2:~$sudo passwd
sudo] password for zhangyun:
n>assword:
Retype>password:
passwd:
4 passwd: password updated successfully

Centos-7 set boot to enter the text interface (not enter the graphical interface)

Centos-7 Settings Boot to the text interface (not to the graphical interface)
: /etc/inittab = /etc/inittab = /etc/inittab = /etc/inittab = /etc/inittab = /etc/inittab = /etc/inittab = /etc/inittab

# Default runlevel. The runlevels used are:
#   0 - halt (Do NOT set initdefault to this)
#   1 - Single user mode
#   2 - Multiuser, without NFS (The same as 3, if you do not have networking)
#   3 - Full multiuser mode
#   4 - unused
#   5 - X11
#   6 - reboot (Do NOT set initdefault to this)
#
id:3:initdefault:

This file does not look the same in centos-6 as it does in centos-7:

[root@localhost ~]# uname -a
Linux localhost.localdomain 3.10.0-327.el7.x86_64 #1 SMP Thu Nov 19 22:10:57 UTC 2015 x86_64 x86_64 x86_64 GNU/Linux
[root@localhost ~]# ll /etc/inittab
-rw-r--r--. 1 root root 511 Nov 19  2015 /etc/inittab
[root@localhost ~]# cat /etc/inittab 
# inittab is no longer used when using systemd.
#
# ADDING CONFIGURATION HERE WILL HAVE NO EFFECT ON YOUR SYSTEM.
#
# Ctrl-Alt-Delete is handled by /usr/lib/systemd/system/ctrl-alt-del.target
#
# systemd uses 'targets' instead of runlevels. By default, there are two main targets:
#
# multi-user.target: analogous to runlevel 3
# graphical.target: analogous to runlevel 5
#
# To view current default target, run:
# systemctl get-default
#
# To set a default target, run:
# systemctl set-default TARGET.target
#

There is no place to set the level.
In fact, in Centos-7, you can directly enter the text interface without entering the graphical interface by using the command setup:

[root@localhost ~]# which systemctl
/usr/bin/systemctl

You can use your own man systemctl, but don’t go too far
Here is how to set it:

[root@localhost ~]# systemctl get-default
graphical.target
[root@localhost ~]# systemctl set-default multi-user.target
Removed symlink /etc/systemd/system/default.target.
Created symlink from /etc/systemd/system/default.target to /usr/lib/systemd/system/multi-user.target.
[root@localhost ~]# systemctl get-default
multi-user.target

Systemctl get-default is used to get the current default target.
use systemctl set – the default can be set the default target, the target can be graphical, target, multi – user. Target.
Well, that’s basically it, reboot and you’ll go straight to the text interface.
Reference source

Installation of k8s Helm

Do this after mv linux-amd64/tiller /usr/local/bin/tiller
order
lm init
Kubeadm init
– apiserver – advertise – address = 10.0.2.130
– image – repository registry.cn-hangzhou.aliyuncs.com/google_containers
– kubernetes – version v1.17.3
– service – cidr = 10.96.0.0/16
– pod – network – cidr = 10.244.0.0/16
consider cidr IP

Boot / etc/ rc.local What about invalidity? resolvent

Linux boot /etc/rc.local failure problem to provide three ways to solve the boot can not start the rc.local file problem, need friends refer to the following.

/etc/rc.local = /etc/rc.local

1, echo /etc/rc.local>

1, echo /etc/rc.local>; > /etc/profile & & Source /etc/profile

2>eboot

br>

2, reboot

echo /etc/rc.local>
echo /etc/rc.local> > ~/.bash_profile & & The source/etc/profile
Third:
in the/etc/rc3. D increase a startup scripts directory, and then restart the test, the content is as follows:

cat /etc/rc3.d/StartDefautRoute.sh

#! /bin/bash

# [email protected]

route add default gateway 192.168.1.1 dev xenbr0

Some commands cannot be executed in /etc/rc.local
To add a service that automatically runs when the system is started, simply add it to the /etc/rc.local script file. When the command or program is running without a path, for example:


#! /bin/bash
Distccd –user nobody –allow 10.10.98.0/24 –log-file=/var/log/distcc.log –verbose –daemon
loadavg-s 10.10.98.20>; /dev/null 2> & 1

Note that the distccd, loadavg commands are stored in /usr/local/bin/
When the system executes these commands, it will report an error and cannot execute properly!
Because the PATH environment variable was not fully initialized when the rc.local script was executed, the directory /usr/local/bin/ was added to the PATH environment variable only after /etc/profile was executed.

Executing commands in /usr/local/bin/directory in /etc/rc.local requires absolute path.

Centos7 via / etc/ rc.local File configurator boot

Sh
[root@localhost ~]# vi start.sh
start exe
c>usr /dragon/tedr
./ ser>
Local
[root@localhost ~]# vi rc.local
uch /var/lock/subsys/local
nohup sh /usr/dragon/tedr/start.sh > /dev/null 2& > 1 &
Note: & amp; : Represents background execution
Local
[root@localhost ~]# chmod +x /etc/rc.d/rc.local
root@localhost ~]# ll /etc/rc.d/rc.local
[root@localhost ~]# ll /etc/rc.d/rc.local

[root@localhost ~]# reboot
root@localhost ~]# ps-a
[root@localhost ~]# reboot
[root@localhost ~]# ps-a