Tag Archives: linux

[Solved] curl error while loading shared libraries libcrypto.so.1.0.0

Curl: error while loading shared libraries: libcrypto.So.1.0.0 solution

1 problem description

When executing curl command, the following error message is reported:

curl: error while loading shared libraries: libcrypto.so.1.0.0: cannot open shared object file: No such file or directory

Error message:

Find various schemes on the Internet, mainly as follows:

1. Reinstall curl 2. Update libcrypto

All the methods have been tried, but they have not been solved.

Finally, the solution is as follows: in curl command, establish target soft link.

The specific scheme is as follows:

2 solution

Basic idea.
Looking in the development machine, inside libcrypto.so.1.0.0 is already installed. According to the error report, this is because the curl command cannot find the dependency libcrypto.so.1.0.0
1. check the dependencies of curl command.
2. Find the missing shared library on the machine
3. Create a soft connection

2.1 using the LDD command to view dependencies

The LDD command is used to view the shared library required for the command to run. It is often used to solve some problems that the command cannot run due to the lack of a library file.

# View the absolute path of the command
which curl
# ~/anaconda3/bin/curl

Find the corresponding dependency:

ldd ~/anaconda3/bin/curl
	linux-vdso.so.1 =>  (0x00007fff666dd000)
	libcurl.so.4 => /home/work/anaconda3/bin/../lib/libcurl.so.4 (0x00007fd47e181000)
	librt.so.1 => /lib64/librt.so.1 (0x00007fd47dde2000)
	libz.so.1 => /home/work/anaconda3/bin/../lib/libz.so.1 (0x00007fd47dbcb000)
	libc.so.6 => /lib64/libc.so.6 (0x00007fd47d80a000)
	libssh2.so.1 => /home/work/anaconda3/bin/../lib/./libssh2.so.1 (0x00007fd47d5db000)
	libssl.so.1.1 => /home/work/anaconda3/bin/../lib/./libssl.so.1.1 (0x00007fd47e0da000)
	libcrypto.so.1.1 => /home/work/anaconda3/bin/../lib/./libcrypto.so.1.1 (0x00007fd47d32d000)
	libgssapi_krb5.so.2 => /home/work/anaconda3/bin/../lib/./libgssapi_krb5.so.2 (0x00007fd47e08a000)
	libkrb5.so.3 => /home/work/anaconda3/bin/../lib/./libkrb5.so.3 (0x00007fd47d251000)
	libk5crypto.so.3 => /home/work/anaconda3/bin/../lib/./libk5crypto.so.3 (0x00007fd47e06b000)
	libcom_err.so.3 => /home/work/anaconda3/bin/../lib/./libcom_err.so.3 (0x00007fd47e064000)
	libpthread.so.0 => /lib64/libpthread.so.0 (0x00007fd47d035000)
	/lib64/ld-linux-x86-64.so.2 (0x00007fd47dfea000)
	# See here that the message does not depend on
	libcrypto.so.1.0.0 (0x00007fd47cbf5000)
	libdl.so.2 => /lib64/libdl.so.2 (0x00007fd47c9f1000)
	libkrb5support.so.0 => /home/work/anaconda3/bin/../lib/././libkrb5support.so.0 (0x00007fd47e053000)
	libresolv.so.2 => /lib64/libresolv.so.2 (0x00007fd47c7d7000)

Then establish dependencies and soft links

2.2 find the missing shared library on the machine

Many shared libraries and other software may be installed automatically during installation, so you can directly find the shared libraries installed by other software and use them

# Find the missing shared library information
find ~ -name libcrypto.so.1.0.0

# The returned results are as follows.
# /home/work/anaconda3/libcrypto.so.1.0.0

2.3 establishing soft connection

Soft connect the found shared library to the Lib directory of the software installation:

# View the software installation path
which curl
# The result is as follows, the software was installed using anaconda
# ~/anaconda3/bin/curl

# Create a soft connection
ln -s /home/work/anaconda3/libcrypto.so.1.0.0 ~/anaconda3/bin/../lib/libcrypto.so.1.0.0

Note: the /home/work/anaconda3/libcrypto. So. 1.0.0 directory is the information found through Find ~ - name libcrypto. So. 1.0.0 .

The ~/anaconda3/bin /../lib/ directory is actually the bin directory under the curl directory.


Check whether the soft link is established successfully

ldd ~/anaconda3/bin/curl
	linux-vdso.so.1 =>  (0x00007fffa19e9000)
	libcurl.so.4 => /home/work/anaconda3/bin/../lib/libcurl.so.4 (0x00007fa7c5d37000)
	librt.so.1 => /lib64/librt.so.1 (0x00007fa7c5998000)
	libz.so.1 => /home/work/anaconda3/bin/../lib/libz.so.1 (0x00007fa7c5781000)
	libc.so.6 => /lib64/libc.so.6 (0x00007fa7c53c0000)
	libssh2.so.1 => /home/work/anaconda3/bin/../lib/./libssh2.so.1 (0x00007fa7c5191000)
	libssl.so.1.1 => /home/work/anaconda3/bin/../lib/./libssl.so.1.1 (0x00007fa7c5c90000)
	libcrypto.so.1.1 => /home/work/anaconda3/bin/../lib/./libcrypto.so.1.1 (0x00007fa7c4ee3000)
	libgssapi_krb5.so.2 => /home/work/anaconda3/bin/../lib/./libgssapi_krb5.so.2 (0x00007fa7c5c40000)
	libkrb5.so.3 => /home/work/anaconda3/bin/../lib/./libkrb5.so.3 (0x00007fa7c4e07000)
	libk5crypto.so.3 => /home/work/anaconda3/bin/../lib/./libk5crypto.so.3 (0x00007fa7c5c21000)
	libcom_err.so.3 => /home/work/anaconda3/bin/../lib/./libcom_err.so.3 (0x00007fa7c5c1a000)
	libpthread.so.0 => /lib64/libpthread.so.0 (0x00007fa7c4beb000)
	/lib64/ld-linux-x86-64.so.2 (0x00007fa7c5ba0000)
	# Check for successful establishment
	libcrypto.so.1.0.0 => /home/work/anaconda3/bin/../lib/././libcrypto.so.1.0.0 (0x00007fa7c47ab000)
	libdl.so.2 => /lib64/libdl.so.2 (0x00007fa7c45a7000)
	libkrb5support.so.0 => /home/work/anaconda3/bin/../lib/././libkrb5support.so.0 (0x00007fa7c5c0a000)
	libresolv.so.2 => /lib64/libresolv.so.2 (0x00007fa7c438d000)

Linux Command Error: Redis (error) NOAUTH Authentication required

The authentication problem occurs because redis has set the authentication password
after startup, enter the following command:

127.0.0.1:6379> auth yourpassword

My password is redis123

127.0.0.1:6379> set name hello
(error) NOAUTH Authentication required.
127.0.0.1:6379> (error) NOAUTH Authentication required.
(error) ERR unknown command '(error)'
127.0.0.1:6379> auth redis123
ok

Redis can be operated normally.

/usr/bin/ssh-copy-id: ERROR: No identities found [How to Solve]

Look at the problem first

ssh-keygen -t rsa
ssh-copy-id localhost
/usr/bin/ssh-copy-id: ERROR: No identities found

The RSA and rsa.pub files are generated normally, but the SSH copy ID cannot be reported:/usr/bin/SSH copy ID: error: no identities found

After a closer look, the file size is 0

[hadoop@hadoop102 .ssh]$ ll
sum 0
-rw-------. 1 hadoop hadoop 0 11月 21 21:30 authorized_keys
-rw-------. 1 hadoop hadoop 0 11月 21 21:34 id_rsa
-rw-r--r--. 1 hadoop hadoop 0 11月 21 21:34 id_rsa.pub

Look at the virtual machine disk. It has been used up

[root@hadoop102 ~]# df -lh
Filesystem      Size  Used Avail Use% Mounted on
/dev/sda2        15G   15G     0 100% /
tmpfs           2.9G     0  2.9G   0% /dev/shm
/dev/sda1        93M   38M   51M  44% /boot

To see what not to delete some files

[root@hadoop102 /]# du -sm * | sort -n
du: Cannot access "proc/129429/task/129429/fd/4": No such file or directory
du: Cannot access "proc/129429/task/129429/fdinfo/4": No such file or directory
du: Cannot access "proc/129429/fd/4": No such file or directory
du: Cannot access "proc/129429/fdinfo/4": No such file or directory
0	proc
0	selinux
0	sys
1	data
1	dev
1	home
1	lost+found
1	media
1	mnt
1	mynewdisk
1	srv
1	tmp
8	bin
16	sbin
28	lib64
30	etc
37	boot
78	app
132	root
206	lib
524	var
2241	usr
11255	opt

This is deleted

[root@hadoop102 module]# df -lh
Filesystem      Size  Used Avail Use% Mounted on
/dev/sda2        15G   14G  553M  97% /
tmpfs           2.9G     0  2.9G   0% /dev/shm
/dev/sda1        93M   38M   51M  44% /boot

Then generate the secret key, and then execute SSH copy ID.

[Solved] Harbor image replicate Error: Fetchartifacts error when collect tags for repos

Solution:

https://github.com/goharbor/harbor/issues/12003

postgresql.conf:
sudo sed 's/max_connections =.*/max_connections=999/g'

This issue is because the postgres database connection exceeded.
The default max connection is 100.
However ever it's still not working even set database.max_open_conns in harbor.yaml.
You have to also manually edit postgresql.conf like
sudo sed 's/max_connections =.*/max_connections=999/g' /data/database/postgresql.conf
and restart harbor-db

track db issue with #12124

Linux Error: [ERROR] –initialize specified but the data directory has files in it. Aborting.

[error] – initialize specified but the data directory has files in it. About.:

Problem Description:

MySQL is installed in Linux. Because it has been installed and uninstalled before, the uninstallation is not clean. When installing again, the following error occurs when initializing the password

2021-11-23T02:08:16.247240Z 0 [Warning] TIMESTAMP with implicit DEFAULT value is deprecated. Please use --explicit_defaults_for_timestamp server option (see documentation for more details).
2021-11-23T02:08:16.248753Z 0 [ERROR] --initialize specified but the data directory has files in it. Aborting.
2021-11-23T02:08:16.248780Z 0 [ERROR] Aborting

Cause analysis:

reason: the old version of MySQL software does not delete the original data file, that is, the content under the path/var/lib/MySQL/

Solution: delete all contents under the path, including files and folders.

[root@hadoop102 mysql]# rm -rf  /var/lib/mysql/

After successful execution, initialize the password:

[root@hadoop102 opt]# mysqld --initialize --user=mysql
[root@hadoop102 opt]# cat /var/log/mysqld.log
2021-11-23T02:17:47.821574Z 0 [Warning] TIMESTAMP with implicit DEFAULT value is deprecated. Please use --explicit_defaults_for_timestamp server option (see documentation for more details).
2021-11-23T02:17:47.988844Z 0 [Warning] InnoDB: New log files created, LSN=45790
2021-11-23T02:17:48.010498Z 0 [Warning] InnoDB: Creating foreign key constraint system tables.
2021-11-23T02:17:48.066559Z 0 [Warning] No existing UUID has been found, so we assume that this is the first time that this server has been started. Generating a new UUID: 8d49959d-4c03-11ec-be82-000c29bdc989.
2021-11-23T02:17:48.067296Z 0 [Warning] Gtid table is not ready to be used. Table 'mysql.gtid_executed' cannot be opened.
2021-11-23T02:17:48.067886Z 1 [Note] A temporary password is generated for root@localhost: UBX6u)ekR:kB

Because there is no data saved in my data, direct deletion will not affect subsequent tasks, but!!! If you have data, you must back it up first~


[Solved] TensorRT Error: Assertion Error in trtSmToCask: 0 (Unsupported SM.)

Error message:

E20211126 11:55:13.654 140412916315904 tensorrt.cpp:10] …/rtSafe/cuda/caskUtils.cpp (98) – Assertion Error in trtSmToCask: 0 (Unsupported SM.)

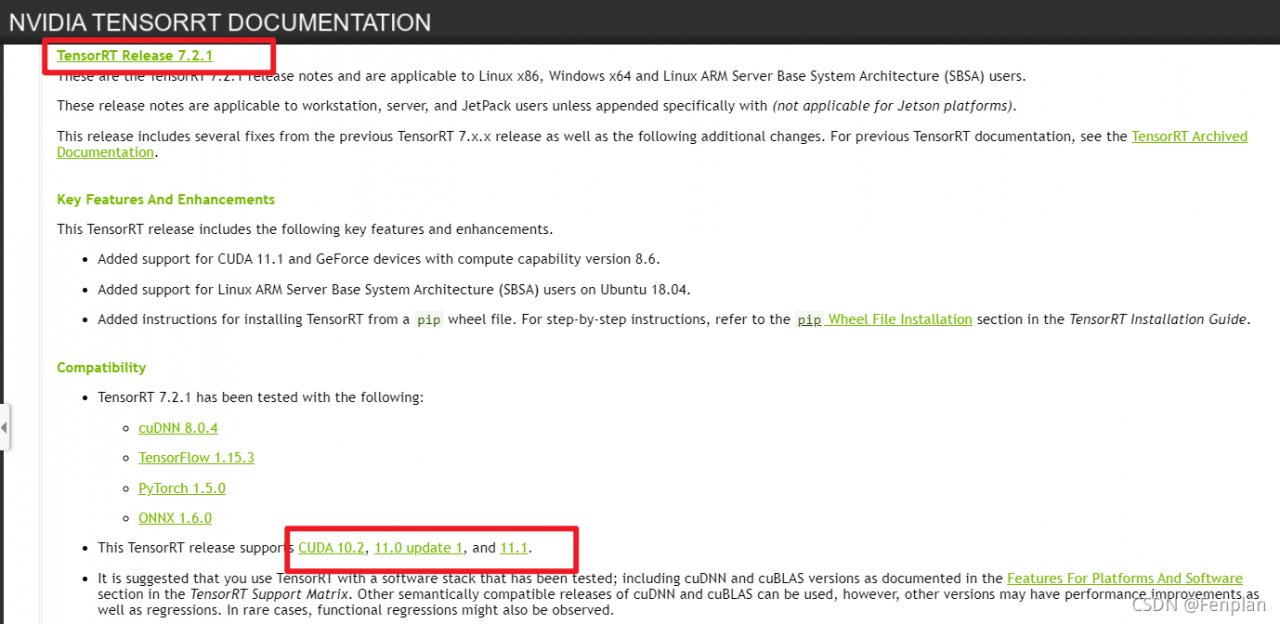
Reason: tensorrt version does not match CUDA or cudnn version. For example, the author’s tensorrt version is 7.2.1, while CUDA is the latest 11.5 version. CUDA version is too high to adapt:

Solution: reinstall CUDA or tensorrt
suggestion: reinstall CUDA because different versions of tensorrt have inconsistent codes. For example, tensorrt 7.2.1 and tensorrt 8.2.1 require that noexcept be added when rewriting virtual functions. If the amount of code is small, consider reinstalling tensorrt
attach the matching requirements of tensorrt, CUDA and cudnn versions: tensorrt release note

MYSQL:ERROR 1819 (HY000): Your password does not satisfy the current policy requirements

[root@ip-172-31-43-199 ~]# mysql -V
mysql  Ver 8.0.27 for Linux on x86_64 (MySQL Community Server - GPL)

Password policy problem exception information:
error 1819 (HY000): your password does not satisfy the current policy requirements

terms of settlement:

1. View the initial password policy of MySQL,
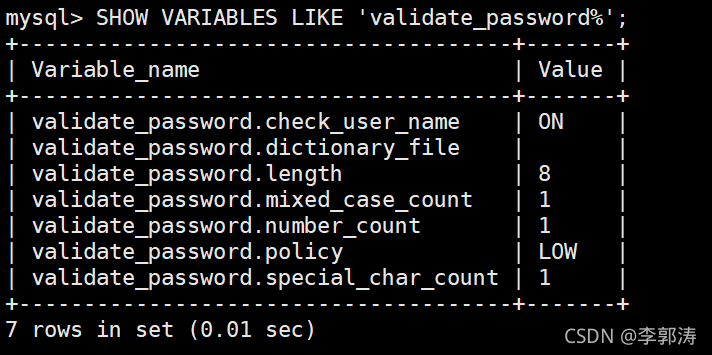
enter the statement show variables like 'validate_ password%'; view,
as shown in the following figure:
this is what I modified:

2. First, set the verification strength level of the password,
set validate_ password_ If the global parameter of policy is low,
enter the set value statement set global validate_ password.policy=LOW; to set the value,

Parameters related to MySQL password policy
1)、validate_ password_ Length the total length of the fixed password
2)、validate_ password_ dictionary_ File specifies the file path for password authentication
3)、validate_ password_ mixed_ case_ Count the total number of large/small letters in the whole password
4)、validate_ password_ number_ Count the number of Arabic numerals at least in the whole password
5)、validate_ password_ Policy specifies the strength and authentication level of the password. The default value is medium
about validate_ password_ Value of policy: 0/low: only verify the length; 1/medium: verify the length, number, case and special characters; 2/strong: verify the length, number, case, special characters and dictionary file
6)、validate_ password_ special_ char_ Count the number of special characters at least in the whole password;

Mysql5.1 password modification method:
set password for 'root' @ 'localhost' = password ('12121212 ');

https://blog.csdn.net/qq_ 39344689/article/details/89674079

[Modified] AttributeError: ‘socket‘ object has no attribute ‘ioctl‘ python linux

For beginners of python, refer to the common codes on the Internet to set the heartbeat of TCP:

def __ init__ (self, IP=”127.0.0.1″, Port=5555):

“” “initialize object” “”

self.code_mode = “utf-8”    # Transceiving data encoding/decoding format

self.IP = IP

self.Port = Port

self.my_socket =socket(AF_INET, SOCK_STREAM)   # Create socket

self.my_socket.setsockopt(SOL_SOCKET,SO_KEEPALIVE,True)

self.my_socket.ioctl(SIO_KEEPALIVE_VALS,(1,10000,1000))

Run error:

AttributeError: ‘socket’ object has no attribute ‘ioctl’

It is found that there are no exceptions marked in VSC, and the rewritten code can be automatically supplemented, indicating that socket has this function. I checked that there is no relevant wrong information on the Internet, which may be due to my lack of TCP related common sense. This is confirmed by opening the socket.ioctl definition of Python. The definition is as follows:

if sys.platform == “win32”:

def ioctl(self, __control: int, __option: int | tuple[int, int, int] | bool) -> None: …

To sum up: I write code with vs in win7 and upload it to Linux for operation, while IOCTL is only valid in window.

Under Linux, it should be changed to

self.my_socket.setsockopt(SOL_SOCKET,SO_KEEPALIVE,True)

# self.my_socket.ioctl(SIO_KEEPALIVE_VALS,(1,10000,1000))

self.my_ socket.setsockopt(IPPROTO_TCP, TCP_KEEPIDLE, 10)

self.my_socket.setsockopt(IPPROTO_TCP, TCP_KEEPINTVL, 3)

self.my_socket.setsockopt(IPPROTO_TCP, TCP_KEEPCNT, 5)

VMware: vmw_ ioctl_ Command error invalid parameter [How to Solve]

(1) First, run: roscore & rosrun gazebo_ros gazebo  Or terminal directly enter: gazebo;

(2) Error reporting: vmw_ioctl_Command error invalid parameter

Solution: write export SVGA in ~ /.Bashrc file_Vgpu10 = 0, i.e.

$ echo "export SVGA_VGPU10=0" >> ~/.bashrc

Then turn off the terminal and re-enter(1), the following may appear:

In this case, turn off the terminal, reopen the terminal and input it several times: gazebo.

[Solved] S3fs mount error: s3fs: unable to access MOUNTPOINT…

s3fs mount reports an error, prompting: s3fs: unable to access MOUNTPOINT /backup/fileserver/: Transport endpoint is not connected

s3fs appfiles.v1 /backup/fileserver/ -o passwd_file=/etc/passwd-s3fs -o url=http://192.168.12.30 -o uid=1002,gid=1002 -o use_path_request_style
Error Messages:
s3fs: unable to access MOUNTPOINT /backup/fileserver/: Transport endpoint is not connected

How to Solve this error:
1, confirm whether the network link ok.
ping 192.168.12.30
can ping through.
2, whether the port is open
telnet 192.168.12.30 80
port can be passed, that is not a network problem caused.
3, ls /backup/fileserver/
error message: ls: cannot access fileserver: Transport endpoint is not connected
It is good that there is an error, because ls will not report an error for an empty directory, but this error means that the directory is still mounted, but the link is not available.
Checking the process, the process hangs. I suspect that the process is hung, but the directory is not unmounted.
4. Manually unmount
umount /backup/fileserver/
No error is reported, good, that means the inference is correct.
5, mount test
s3fs appfiles.v1 /backup/fileserver/ -o passwd_file=/etc/passwd-s3fs -o url=http://192.168.12.30 -o uid=1002,gid=1002 -o use_path_request_ style
No error was reported, ok! The troubleshooting process is over. This means that the problem is caused by the lack of unmounting.
6, confirm whether it is mounted up:

df -hT
Filesystem Type Size Used Avail Use% Mounted on
devtmpfs devtmpfs 7.8G 0 7.8G 0% /dev
tmpfs tmpfs 7.8G 0 7.8G 0% /dev/shm
tmpfs tmpfs 7.8G 819M 7.0G 11% /run
tmpfs tmpfs 7.8G 0 7.8G 0% /sys/fs/cgroup
/dev/vda1 xfs 15G 4.8G 11G 32% /
/dev/vdb xfs 100G 4.0G 97G 4% /backup
tmpfs tmpfs 1.6G 0 1.6G 0% /run/user/0
s3fs fuse.s3fs 16E 0 16E 0% /backup/recordfiles
tmpfs tmpfs 1.6G 0 1.6G 0% /run/user/1000
s3fs fuse.s3fs 16E 0 16E 0% /backup/fileserver

Check that it is already there. Mount ok The whole process is over.

nvm npm Error: segmentation fault [How to Solve]

Background

After NVM use switches the node version, NPM reports an error segmentation fault

My solution

sudo apt autoremove npm

Note: it must be autoremove, not remove. Remove is not completely cleared

Cause guess

There is a global NPM. The configuration of the global NPM affects the configuration of the NPM version corresponding to the node installed by the NVM