Xcode error:
Could not launch “” Domain: IDEDebugSessionErrorDomain Code: 3 Failure Rea
before test has been on the iPhone, after changed the error as above.
Reason:
did not trust its own description management account when debugging a new device for the first time.
The solution:
in the description of the management and trust his account.
Tag Archives: ios
Common problems and basic concept knowledge of OpenGL
OpenGL FAQ and basic concept knowledge (continuously updated!!)
1. The concept of matrix in OpenGL, what is Model,View,Project?
We know the World in the OpenGL Matrix (World Matrix)/View Matrix (the View Matrix and Projection Matrix (the Projection matirx)
in the Model: the Matrix determine the World coordinates of a unified, mainly aimed at the Model of translation, rotation, scaling, shear, and other functions, is the Model from local space into World space.
Projection matrix is the part of the scene that we can see, with the camera/observer position and so on (set mouse movement, scroll wheel, etc.), and converts all world coordinates to View coordinates.
2. Scheduling between CPU and GPU in OpenGL
OpenGL program involves two types of processing unit CPU and GPU.
engl main program has CPU call to run, image processing part through GLSL to GPU execution.
Data transfer between CPU and GPU is divided into three steps:
1. First use the built-in OpenGL function to generate an ID number
2. According to the need for the ID number of memory types of binding, binding to be used in the receiving system after the completion of the GPU memory of the data in the “identifier” will be ready,
3. This part of memory is initialized. The initialized content is from the system memory, and this part of function is completed by the glBufferData function. After the data is submitted to the GPU dedicated memory, it is necessary to allocate the data according to the application scenarios, such as some data as vertices, some as colors, some for illumination control and so on
In addition, due to the high parallel structure of GPUs, all GPUs have high computational efficiency in processing graphics and complex algorithms. Most of the CPU area is controllers and registers, while GPUs have more ALUs, logical operational units for data processing, rather than data caching and flow control.
The concept of buffers in OpenGL
[1] Frame Buffer: A frame buffer is a combination of the following buffers. Using frame buffers allows you to render your scene into a different frame buffer, which allows you to create mirrors in the scene, or create cool effects that store data for the display.
[2] Color Buffer: Stores the color of all fragments: that is, the effect of visual output.
[3] Depth Buffer: determines which facets are occluded according to the Z value of the buffer. Automatically generated by GLFW.
[4] stencil buffer: Similar to depth testing, the template value is compared to the default value to determine whether to discard the fragment.
Data is processed in OpenGL in the following order: vertex shader – fragment shader – template test – depth test
The concept of depth testing
1. What is depth?
OpenGL will have a special area for storing Z value (the Z value on each pixel), which is the depth cache.
2. Depth Buffer Function?
In general, when we draw a graph, the later drawing overrides the previous graph, and the general drawing order is drawn from the back to the front. So there is a performance problem with the “covered part”, where the first part is covered, and all you see is the top part of the module and the bottom part of the covered part is not meaningful!
depth test appears to solve the covering problem
nction: when the depth test is turned on, the Z value will be checked. The same area close to the observer will be drawn, and other covered areas will not be drawn, regardless of the order of drawing.
3. How to use the deep cache test?
enable (GL_DEPTH_TEST);
glEnable(GL_DEPTH_TEST);
in the above code open depth test by default, the Z value under the condition of small will be overwritten
If the observer is in the positive direction of the Z axis, the Z value is close to the observer 
If the observer is in the negative direction of the z-axis, the smaller z-value is closer to the observer
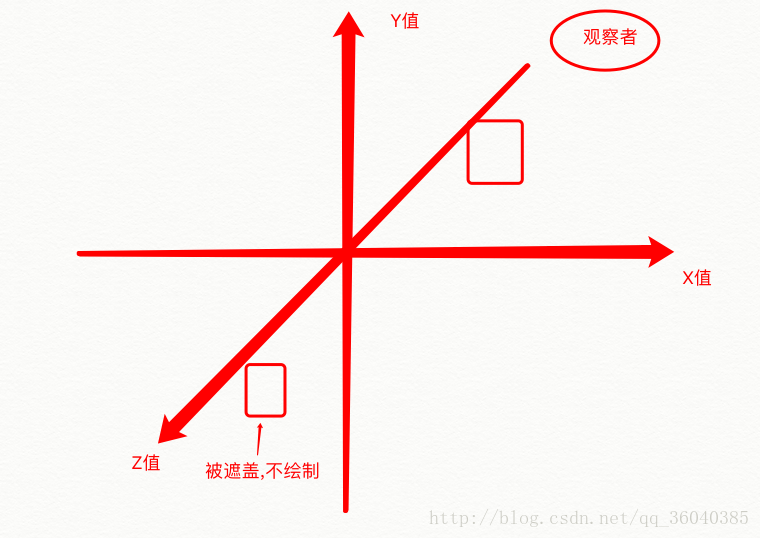
How to solve the conflict problem caused by the same depth value (same Z value)?
The first method: in the second drawing the same Z value, the tiny offset cover problems
note: must be very careful to ensure that the Z value of the gap, or like a refrigerator on the refrigerator as suspended risk
The second method is to sample the GLPolygonOffset function so that the depth value of the fragment can be adjusted so that the depth value is offset without creating a suspended emphasis
2016.11.1 OpenGL learning, black screen does not display graphics
glBufferData
(
GLenum
(
GL_ARRAY_BUFFER
),
MemoryLayout
.
size
(ofValue:
vertices
)
.
vertices
,
GLenum
(
GL_STATIC_DRAW
In SWIFT2, the sizeof method is replaced with the memoryLayout method. The memoryLayout. Size (ofValue: vertices) retrieves only one of the vertices in the array, so it needs to be multiplied by the number. GlBufferData (GLenum(GL_ARRAY_BUFFER), memorylayout.size (ofValue: vertices)*6, vertices, GLenum(GL_STATIC_DRAW))
After IOS upgrade, the time control selected by the wheel will be invalid, uidatepicker
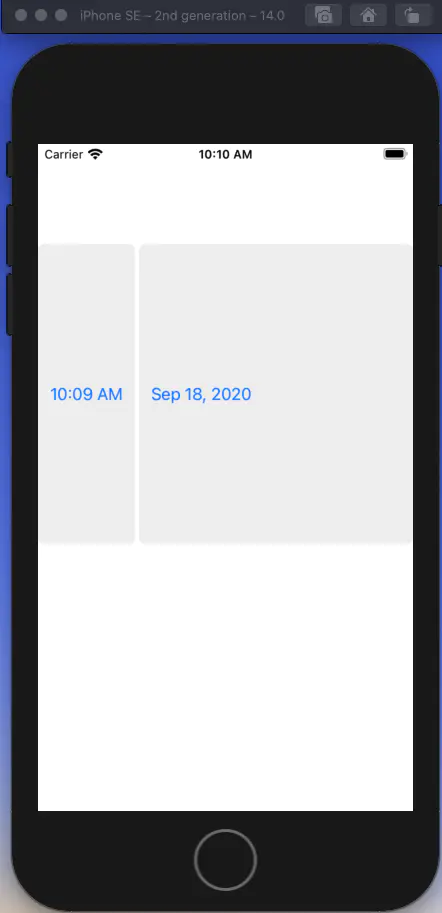 2. If the previous style is used
datepicker.preferredDatePickerStyle = .wheels
-
I don’t know if apple’s bug is wrong in both width and height
let datepicker = UIDatePicker(frame: CGRect(x: 0, y: 100, width: self.view.frame.width, height: 300))
 datepicker.preferredDatePickerStyle = .wheels
 datepicker.backgroundColor = UIColor.yellow
 datepicker.datePickerMode = .dateAndTime
 self.view.addSubview(datepicker)
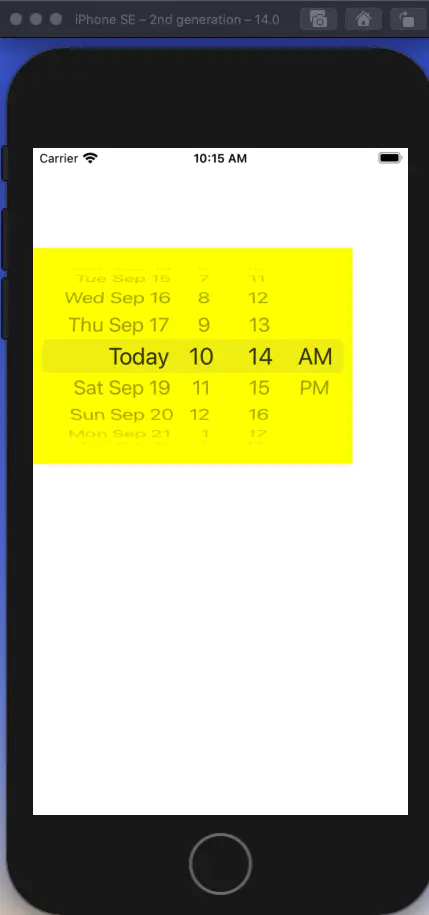
4. To fix this, set the frame after the datePickerMode and set it to normal
override init(frame: CGRect) {
        super.init(frame: frame)
        backgroundColor = .white
C / C + + rounding function ceil(), floor ()
double floor(double
x
);
float floorf(float x);
long double floorl(long double x);
double floor(double x);
double ceil(double x);
USES the floor function. Floor (x) returns the largest integer less than or equal to x.
such as: floor ten floor (10.5) = = = = (10.5) – 11
USES the ceil function. Ceil (x) returns the smallest integer greater than x.
for example: ceil(10.5) == 11 ceil(-10.5) ==-10
floor() is rounded to negative infinity, floor(-10.5) == -11;
ceil() is rounded to positive infinity, and ceil(-10.5) == -10
(ceil()) (floor) (floor)
1. /
//Test “/”
cout & lt; < “Test \”/\”!” < < endl;
cout & lt; < “7/2 =” < < 7/2 < < endl;// 3
cout & lt; < “7/2.0 =” < < 7/2.0 & lt; < endl;// 3.5
cout & lt; < “7.0/2 =” < < 7.0/2 & lt; < endl;// 3.5
cout & lt; < “7.0/2.0 =” < < 7.0/2.0 & lt; < endl;// 3.5
cout & lt; < “7/3 =” < < 7/3 < < endl;// 2
cout & lt; < endl;
2. %
//Test “%”
cout < < “Test \”%\”!” < < endl;
cout & lt; < 9%3 = “< < 9%3 < < endl;// 0
cout & lt; < “9%4 = “< < 9%4 < < endl; 1
//// cout & lt; < “9.0% 3 =” < < 9.0% 3 & lt; < endl;
// cout & lt; < 9%3.0 = “< < 9% 3.0 & lt; < endl;
cout & lt; < endl;
3. Round
//Test round()
cout < < “Test \” Round \”!” < < endl;
double dRoundA = 1.4;
double dRoundB = 1.6;
double dRoundLowA = -1.4;
double dRoundLowB = -1.6;
double dRoundLowC = 0.0;
cout & lt; < dRoundA < < ” = ” < < RoundEx(dRoundA) < < endl;// 1
cout & lt; < dRoundB < < ” = ” < < RoundEx(dRoundB) < < endl;// 2
cout & lt; < dRoundLowA < < ” = ” < < RoundEx(dRoundLowA) < < endl;// – 1
cout & lt; < dRoundLowB < < ” = ” < < RoundEx(dRoundLowB) < < endl;// – 2
cout & lt; < dRoundLowC < < ” = ” < < RoundEx(dRoundLowC) < < endl;// 0
cout & lt; < endl;
double RoundEx(const double&
{
double dIn = dInput;
if (dInput & gt; = 0.0)//???
{
return int(dIn + 0.5);
} else
{
return int (dIn 0.5);
}}
4. The ceil () take up the whole
// Test ceil () take up the whole
cout & lt; < “Test ceil() round up!” < < endl;
cout & lt; < “Ceil 1.2 =” < < The ceil (1.2) & lt; < endl;// 2
cout & lt; < “Ceil 1.8 =” < < The ceil (1.8) & lt; < endl;// 2
cout & lt; < “Ceil-1.2 =” < < The ceil (1.2) & lt; < endl;// – 1
cout & lt; < “Eil-1.8 =” < < The ceil (1.8) & lt; < endl;// – 1
cout & lt; < “Ceil 0.0 =” < < The ceil (0.0) & lt; < endl;// 0
cout & lt; < endl;
5. Floor () the whole
/down/Test floor () the whole down
cout & lt; < “Test floor() down full!” < < endl;
cout & lt; < “Floor 1.2 =” & LT; < Floor (1.2) & lt; < endl;// 1
cout & lt; < “Floor 1.8 =” < < Floor (1.8) & lt; < endl;// 1
cout & lt; < “Floor -1.2 =” < < Floor (1.2) & lt; < endl;// – 2
cout & lt; < “Floor -1.8 =” < < Floor (1.8) & lt; < endl;// – 2
cout & lt; < “Floor 0.0 =” < < Floor (0.0) & lt; < endl;// 0
cout & lt; < endl;
Summary of IOS storyboard unwind segues
Create the storyboard shown in the figure below. RedViewController pushes to YellowViewController, YellowViewController pushes to BlueViewController, and BlueViewController modal to GreenViewController. You can return RedViewController from YellowViewController and YellowViewController and RedViewController from BlueViewController. Of course, you can also go back to the BlueViewController from GreenViewController.
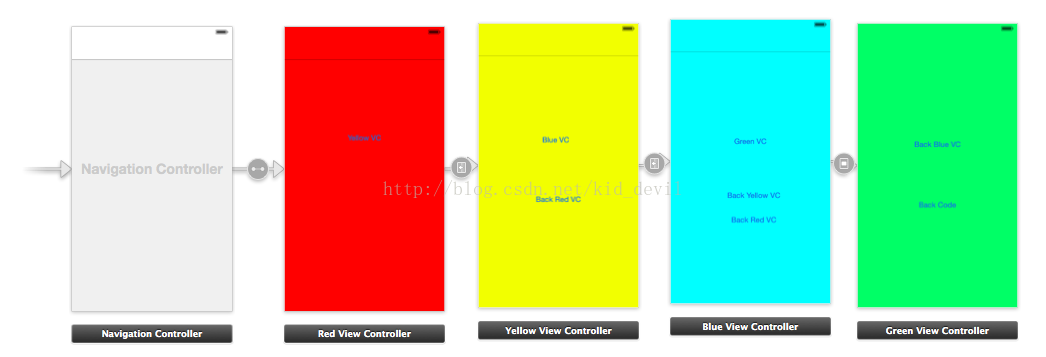
Back to the code. Since storyboard is used, the jump of push and model saves writing code, similarly, the jump of “return” also saves code.
RedViewController. M
– (IBAction)unwindSegueToRedViewController:(UIStoryboardSegue *)segue {
}
It’s important to note that the return value of this method must be an ibaction, and the argument must be a uistoryboardsegue. As for why, the following code will show.
Go back to your storyboard file and observe that the RedViewController scene has a green button below it (not because you wrote the code above, but because it’s always there).
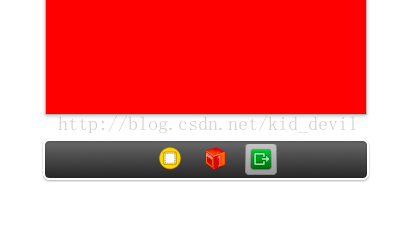
Next, right click the exit button (green button), will appear just write method unwindseguetoredviewcontroller:
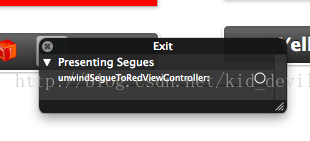
Select this method and drag and drop to the Back RedVC button on the YellowViewController.
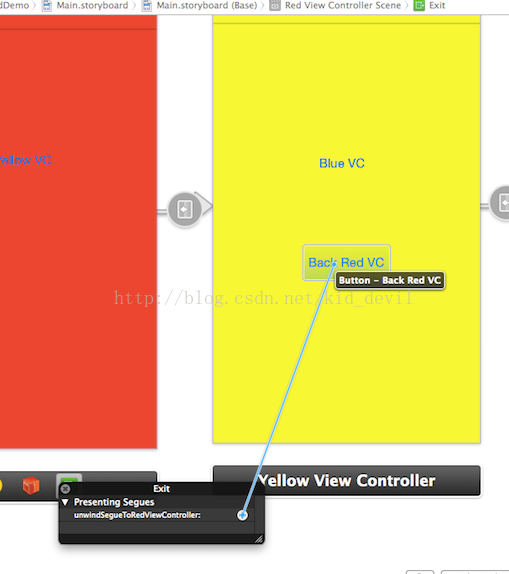
After letting go, an Action prompt appears near Back RedVC and is selected. In this way, when you click the Back Red VC button on the YellowViewController, it will jump back to the Red View Controller. Let me compile it. There’s no problem with insurance. Run the program.
Instructions required:
1. If you like from yellowviewcontroller returns to redviewcontroller, then unwind segue associated methods must be stated in redviewcontroller again, that is the example of – (inaction) unwindtoredviewcontroller (segue uistoryboardsegue *); Note the parameters and return points, and the method name is arbitrary.
2. Right click on the exit button of redviewcontroller (green button) to show the method that unwind segue can associate with, and then go to the button of yellowviewcontroller.
Similarly, the BlueViewController can be returned to the Implementation of The YellowViewController.
In YellowViewoController. M
– (IBAction)unwindToYellowViewController:(UIStoryboardSegue *)segue {
}
Right-click the Exit button of The YellowViewController to associate BlueviewControler’s Back YellowVC button.
Also need to realize from the immediate return to redviewcontroller blueviewcontroller, selected redviewcontroller exit button, select the button on the blueviewcontroller unwindtoredviewcontroller associated.
Compile it, no problem, run it, get a feel for it.
Either the YellowViewController or the BlueViewController can be returned to the RedViewController, at which point you need to make a judgment to see where the return is coming from.
- (IBAction)unwindSegueToRedViewController:(UIStoryboardSegue *)segue {

    UIViewController *sourceViewController = segue.sourceViewController;

    if ([sourceViewController isKindOfClass:[YellowViewController class]]) {
        NSLog(@"from yellow vc");
    }
    else if ([sourceViewController isKindOfClass:[BlueViewController class]]) {
        NSLog(@"from blue vc");
    }
}
And that’s why the argument to a method is a segue, where you get the source View Controller.
Now when you try push, the same thing with modal, you present the GreenViewController from the BlueviewController in modal mode.
To return, you need to write the method associated with the unwind segue in the BlueviewController:
– (IBAction)unwindToBlueViewController:(UIStoryboardSegue *)segue {
}
Associated unwindtoblueviewcontroller methods on the corresponding button.
At this point, I’m done with “back” in my storyboard, and I spend most of my time dragging and dropping controls without writing the relevant pop dismiss method at all. That’s one of the strengths of storyboard.
Is it possible to implement it in code?You can.
Select GreenViewController Scene in your storyboard, and on the left you can see the representation of the unwind segue, kind of like the DNA sequence yes, once you select it, the only representation that defines it is the greenUnwind
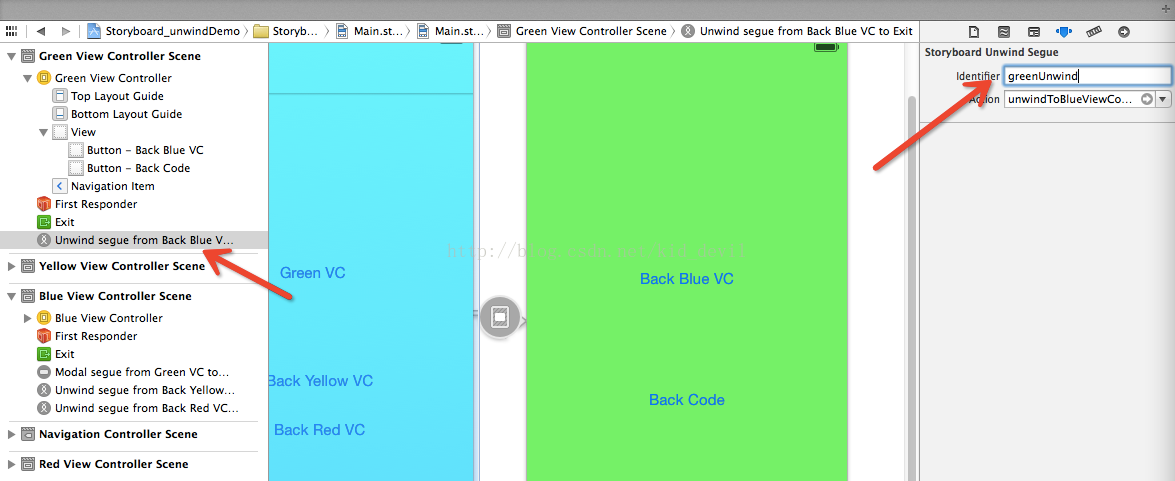
In greenviewcontroller. M
Method associated with back Code button:
- (IBAction)backCodeBtnTapped:(id)sender {

    [self performSegueWithIdentifier:@"greenUnwind" sender:self];
}
Compile, there are no errors, the program.
Program all code.
Error domain = nsurlerrordomain code = – 1001 “request timeout occurred in swift alamofire get request. ” UserInfo={NSUnderlyingErro
For this reason, I have checked for a long time. There are many posts setting timeout on the Internet. However, this GET request returns this error without timeout. Here is an introduction to encoding usage scenarios
JSONEncoding. Default is placed in HttpBody, such as post requests
2. URLEncoding. Default is concatenated address in GET, such as GET request
3. URLEncoding(destination:. MethodDependent) is a custom URLEncoding. If the value of methodDependent is in GET, HEAD, and DELETE, it will be concatenated. The other methods are in the httpBody.
4. URLEncoding(destination:.httpbody) is placed in httpBody
So I replaced the previous JSONEncoding. Default with URLEncoding. Default
Alamofire.request(url, method: .get, parameters: nil, encoding:JSONEncoding.default, headers: [“Content-Type”:”application/json”]).responseJSON { (response) in
}
Alamofire.request(url, method: .get, parameters: nil, encoding:URLEncoding.default, headers: [“Content-Type”:”application/json”]).responseJSON { (response) in
}
kCFErrorDomainCFNetwork error 306
kCFErrorDomainCFNetwork error 306 means that your web agent is not working. Make sure your HTTPS proxy Settings are correct and the proxy server is up and running if you are using one.
IOS swift error
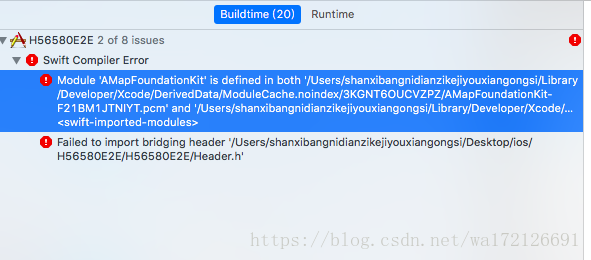
1.
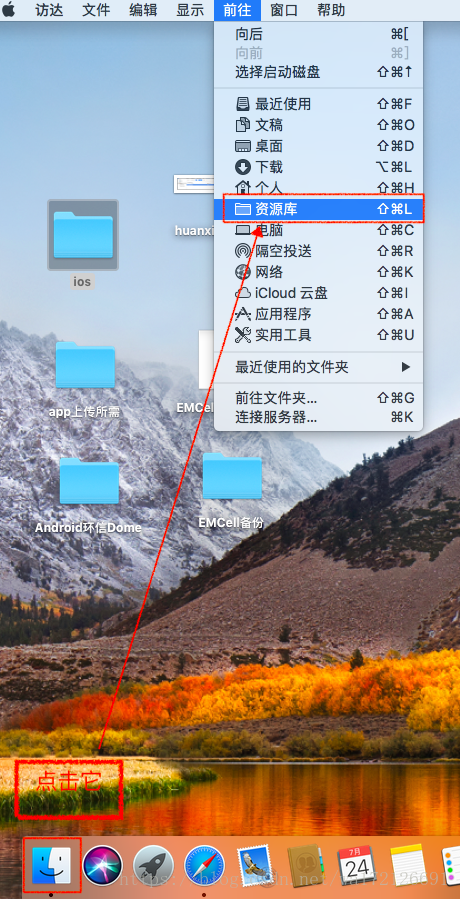
2.

3.
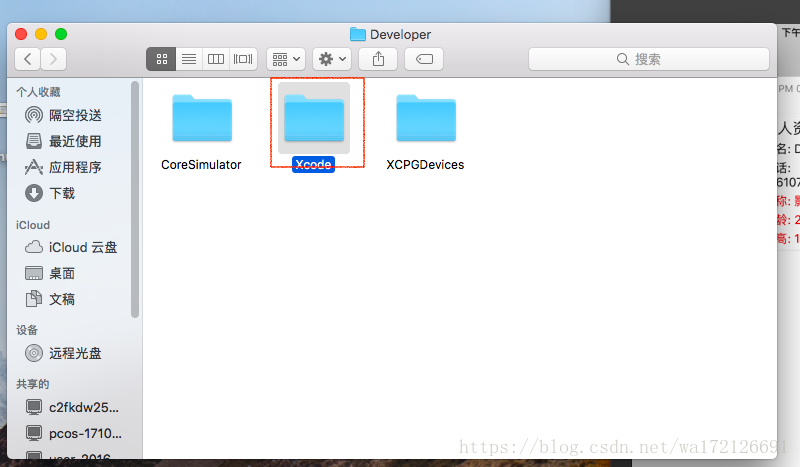
4.
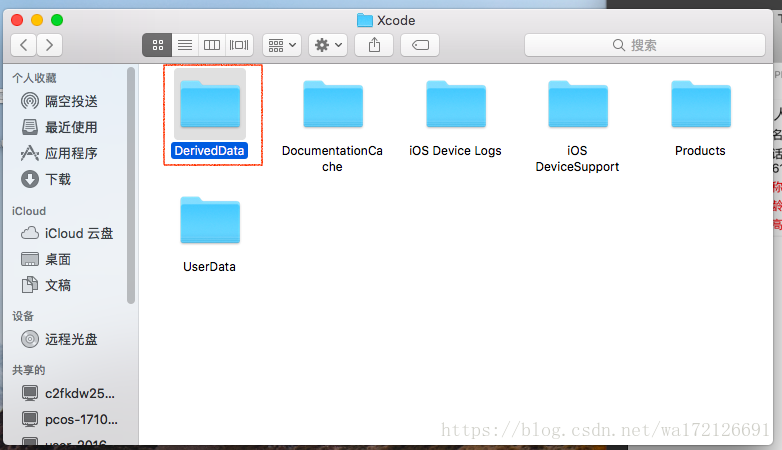
Finally, reopen the project and clear – build first
Ios-79-resolve error report apple mach-o linker (LD) error group
Apple Mach-O Linker (ld) Error Group
iOS “_OpenSSL_add_all_algorithms”, referenced from:
.
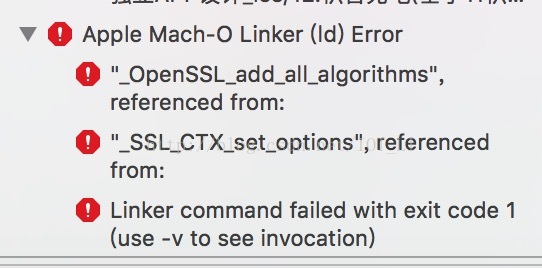
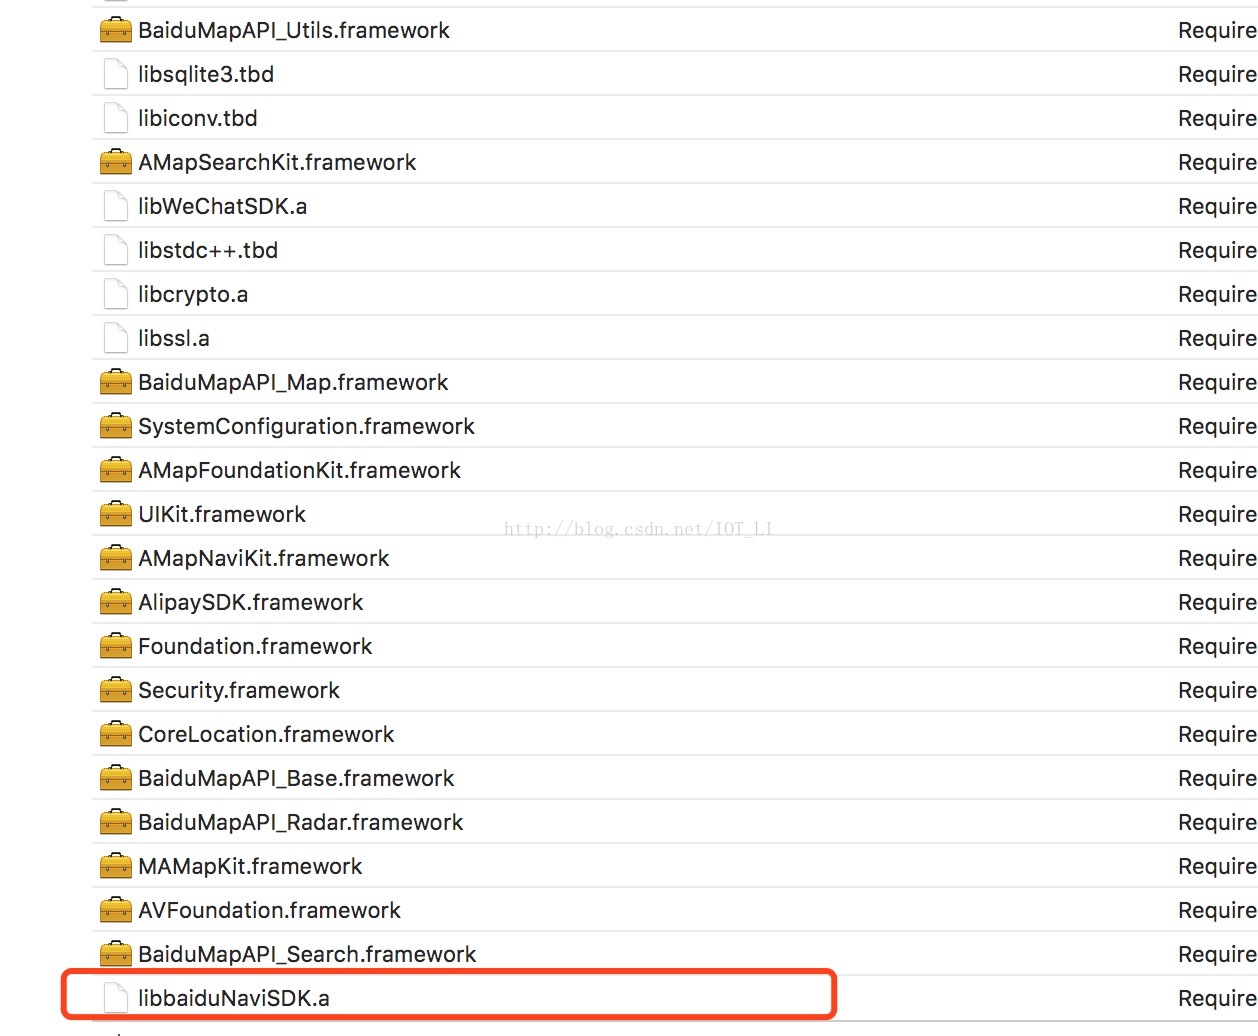
After checking the reasons, the solution is to put Baidu navigation on libbaidunavisdK.a at the bottom, as follows:
Electra Cydia impactor jailbreak error resolution: provision cpp:81 You already have a current iOS Development certificate
1. Be sure to manually import the Electra installation package in Cydia Impactor
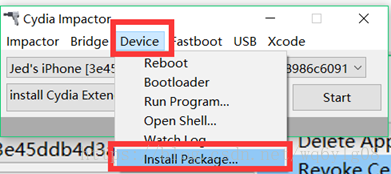
2. Enter your Apple ID and password and always confirm
Error BUG:
1.Provision cpp:81 You already have a current iOS Development certificate

Solutions:
(1) Download the old version of Cydia Impactor (0.9.43) to Revoke Certification (because the new version (0.9.44) to Revoke Certification),
Click Revoke Certification and enter the Apple ID and password that failed the last time, and finally you’ll be notified that it succeeded

Windows of the old version of Cydia Impactor (0.9.43) download address: https://cache.saurik.com/impactor/win/Impactor_0.9.43.zip
(2) Unplug and reconnect the iPhone/iPad data cable (note: this step should not be omitted; otherwise, the error will still be reported :81)
(3) Switch back to the latest CydiaImpactor (0.9.44) to jailbreak (that is, repeat the normal Electra jailbreak step above) and you will succeed this time
Problem solving of IOS apple mach-o linker error group
Second, according to common thinking logic, Comm. A should be loaded into two different static Link Binary With Libraries, and then compile the main APP. As a result, the problem occurs.
Clang: Error: Linker Command failed with exit code 1 (USE-v to see Invocation). After analysis. Modify filenames, functions, constants, etc. that may have the same name. But problems remain.
Or two files with the same name appear in the project, with duplicate or duplicate names