Tag Archives: Android

Execution failed for task ‘:app:processDebugManifest’

Import packages butterknife package appear [androidx. Core: the core: 1.0.0] AndroidManifest. XML: make haste – 86 value = (androidx. Core. App. CoreComponentFactory)

Butterknife package latest address: https://github.com/JakeWharton/butterknife
implementation ‘com. Jakewharton: butterknife: 10.0.0’
annotationProcessor ‘com. Jakewharton: butterknife – compiler: 10.0.0’

Error details
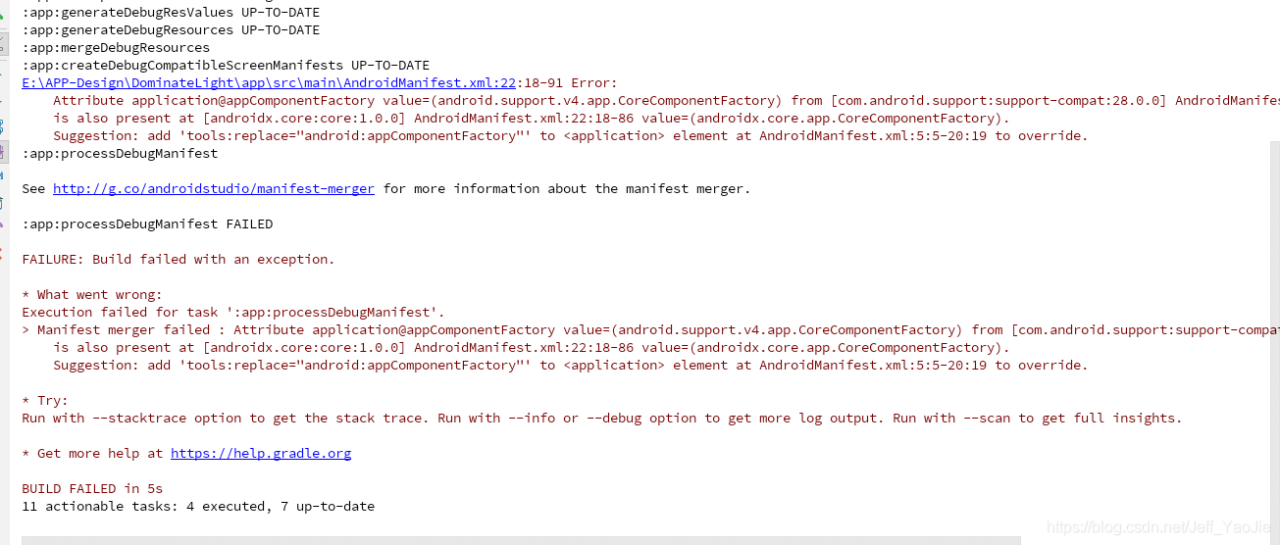
Manifest merger failed : Attribute application @ appComponentFactory value = (. Android support. The v4. App. CoreComponentFactory) from [com. Android. Support: support – compat: 28.0.0] AndroidManifest. XML: make haste – 91
is also present at [androidx. Core: the core: 1.0.0] AndroidManifest. XML: value = “- 86 (androidx. Core. App. CoreComponentFactory).
the Suggestion: Add ‘tools: replace = “android: appComponentFactory” element to the at AndroidManifest. XML: 5:5 – the sons to override.

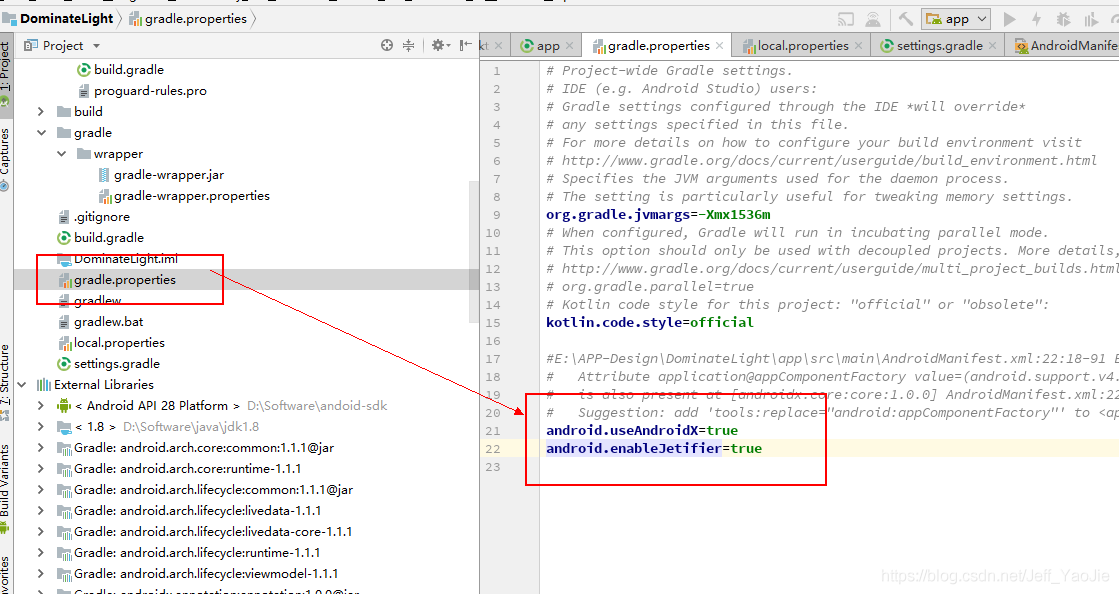
Solution 1: Add useAndroidX and enableJetifier as shown in the figure

android.useAndroidX=true
android.enableJetifier=true

Note:
this method does not need to add the classpath ‘com. Jakewharton: butterknife – gradle – plugin: 10.0.0’
but will import android. Support. V7. App. AppCompatActivity modified into import androidx. Appcompat. App. AppCompatActivity
is also all references Androidx package

Solution 2: Use the lower version of the package directly, as shown in the figure
Delete the build.Gradle plug-in at the top of the module, either one of the two below

apply plugin: ‘com.neenbedankt.android-apt’
apply plugin: ‘android-apt

The dependency in build.gradle under module is changed to :(only these two are needed)
// butterknife component injection

implementation'com.jakewharton:butterknife:8.6.0'
annotationProcessor'com.jakewharton:butterknife-compiler:8.6.0'

Note: the use of android package or the original
import android. Support. V7. App. AppCompatActivity

INSTALL_FAILED_NO_MATCHING_ABIS solution

The reason I saw this exception on the Internet was that I used Native Lib or JNI or something like that, which is just a messy package related to hardware anyway.
For example, I used an image compression package that involved JNI, and then the above exception occurred when I packaged it.
Solutions:
In the moudle build.gradle file of your app, paste the code in, note the android {} curly braces.

// 解决 native libraries 不支持cpu的体系结构。允许模拟器调试
splits {
    abi {
        enable true
        reset()
        include 'x86', 'armeabi-v7a','x86_64'
        universalApk true
    }
}
--------------------- 
作者:geekqian 
来源:CSDN 
原文:https://blog.csdn.net/geekqian/article/details/79032655 
版权声明:本文为博主原创文章,转载请附上博文链接!

This allows you to run directly into the emulator, but when you do this, multiple ApKs will be generated in the package, so comment out the above code when you release and rebuild the project to package. Remember to always rebuild projects!

Conversion to dalvik format failed with error 1 solution

Note: transfer to http://dev.wo.com.cn/docportal/doc_queryMdocDetail.action?Mdoc docindex = 6540
 
Resource description:

1. If you do not modify the Android SDK version, use the Project Clean command to work on a project.
(this process is only compatible with the lower version of the project in the higher version, not a real upgrade)

2. If the android SDK version is modified, the following steps are required:

1) modify the SDK

select project, buildpath –> configure build path —> Library delete the lower version of referenced SDK,
then add ExternalJARs, select the higher version SDK,OK, save

2) modify the classpath file

the file may have this item :< Classpathentry kind=”lib” path =” higher version address you specify “
change her to < classpathentrykind=”con”path=”com.android.ide.eclipse.adt.ANDROID_FRAMEWORK” />

3) modify androidmanifest.xml

add &lt after the application tag in the androidmanifest.xml file; uses-sdkandroid:minSdkVersion=”3″> < /uses-sdk>

4) modify default.properties (very important)

the last line of the file (not used in the previous #) target=android-3 target=android-8, save.
look again at your project and the new android2.2 project structure. 3. Many problems occurred in the development of Android Project in eclipse can be used to Project– > Clean is easy to solve.
but if it appears that the Android library cannot be found, or accidentally removed the Android library, how can you add the Android library again?

in eclipse Java Build Path can not add such as Android 2.1 defined system libraries. However, I tried to manually add android.jar in the SDK folder
, which showed a Conversion to Dalvik format failed with error 1. After playing around with
for a while, many users said that using Projectclean would solve the problem, but in my case, it was useless.

solution:

modify the project classpath file, which makes me understand, directly from other normal projects into the
< ! Note that this.classpath file is located in the Eclipse workspace hard disk location under the project directory –>
< Classpathentry kind=”lib”path =” Address of custom JAR “/>

modified to www.2cto.com
< classpathentry kind=”con”path=”com.android.ide.eclipse.adt.ANDROID_FRAMEWORK”/> .

like this refresh project, Android system library Android 2.1 is back, that error is resolved.
— — — — — — — — — — — — — — — — — — — — — — — — — — — — — — — — — — — — — — — — — — — — — — — — — — — — — — — — — — — — — — — — — — — — — — — — — — — — — — — — — — — — — — — — — — — — — — — — — — — — — — — — — — — — — — — — — — — — — — — — — —
this several days again encountered such a problem, however. The classpath file already contains the above con inside Path, then found a new method on BBS:

project -> properties -> androidlabel, check a target from the project build target list

< ! — Sometimes the error cannot be removed. At this time, please pay attention when entering project-> properties -> After android, there is a
is library item below, tick it, and then click “OK”. This is how my error was solved. At first, I could not solve it according to
above and the following methods.
(is library)
(is library)
(is library)
(is library)
; There is another case: the package conflict, please go to the project directory to remove the same package, re-import one, this is similar to the first case, but this is for other packages, not android package

solution: Java Build Path-> Libraries-> JARs and class folders on thebuild path
see if there are identical JARs some jar versions are not necessarily android JARs other library JARs can also cause such errors
last time signpost-core-1[1].2.1.1.jar and signpost-core-1.2.1.1.jar conflicts this occurs so you have to see if there are identical JARs

Compared with before is the fourth kind of situation, I’m from others that take an examination of a andengine game engine code, me to his libs folder is set as the source folder, and then put inside the jar package add to the buildpath, then came the problem of subject, checked a lot of solution, no solution, then carefully observed my question and the fourth is like, put the jar all removed, and then reload time, under this solved, ha ha, here the method summary posted, convenient viewing.
 

Failure [INSTALL_PARSE_FAILED_NO_CERTIFICATES: … has no certificates at entry AndroidManifest.xml]


For a long time, We used packer-ng-plugin and didn’t notice the difference between using Android Studio for packaging. Today, I wrote a demo and found that only one installation was successful after I typed in my signature, and the following were all installation errors: Failure [INSTALL_PARSE_FAILED_NO_CERTIFICATES: Package /data/app/vmdl924957567.tmp/base.apk has no certificates at entry AndroidManifest.xml]
Analyze and find the cause of the problem:
Possible cause: A mobile version problem?Google later found that there are actually two versions of Signature. APK Signature Scheme v2 is introduced in Android7.0, and v1 is jar Signature from JDK. I was using Android Studio3.1, and it was only through a query that I knew there was a difference between the two versions. The old version probably didn’t and didn’t notice the change very much. After all, you don’t need signature packaging every day, and you don’t need to move it once it’s configured, so you don’t notice it.
V1: It should be verified by a ZIP entry so that APK can be signed for many changes – you can move or even recompress the file.
V2: Validates all bytes of the compressed file, not a single ZIP entry, so it cannot be changed after signing (including Zipalign). Because of this, we now merge compression, tuning, and signing in one step during compilation. The benefits are obvious, more secure, and the new signature speeds up the application installation by reducing the time it takes to validate on the device (without the time-consuming process of decompressing and validating).

v1 and v2 signatures are used
It doesn’t matter if you just check the V1 signature, but won’t you use more secure authentication on 7.0
If only check V2 signature 7.0, the installation will be finished and the installation will not be displayed. If 7.0 is above, V2 verification will be used
If I check V1 and V2, all the models are ok
But I did check both of them, and I tried different combinations of them, none of them (it will tell you to pick at least one), pick one, pick two, it’s the same error, it says base APK has no signature.
I found the Stack Overflow and someone had the same problem, but it was just a simple thing to check two and solve it. After a long time, a day, uncomfortable, congestion panic, do other things to…
And changed a cell phone or the same error. Changed a demo project, changed a keystore and still got the same error!!
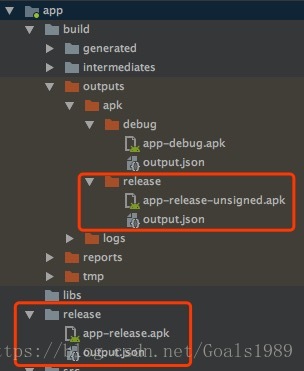
When I went back to the computer at night, I inadvertently found the difference in the screenshots in the new demo project. I used to find the signed package in the build-out-APk-Release folder, but this installation was not successful. And from the name you can see that it’s app-release-unsigned. Apk, but there is an additional release folder on the bottom, where the file is installed normally.
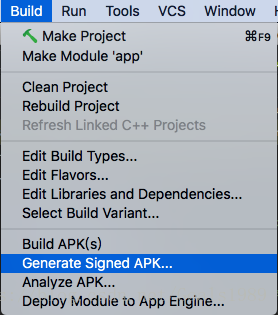
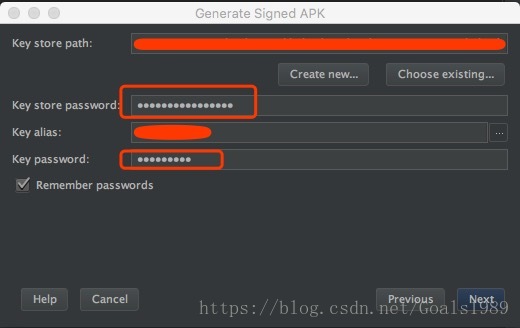
So I delete this file, and then just use 1, the command line package; Or 2, wrap it formally with Android Studio, and this folder does not appear. How strange!! I have entered various password aliases for secret keys before!! Why can’t you get a normal bag?Once before I packed a formal installation is normal ah!!
Inadvertently click on the steps to enter the signature information,!! Need you to enter the secret key information again!! After typing, use the Android Studio button again to package, or the command to package, the folder will come out. There’s a folder release in the main project, and the signature file that’s next to it is the normal app-release.apk. The installation is in order. Apk is app-release-unsigned. Apk. Unsigned, of course, will get an error.

So to summarize, the solution is this: if you type in the signature key again, put it in the official package, it will generate a folder under the main project called Release, and the app-Release.apk in the side here will be signed normally. The build-out-apk-unsigned. Apk generated at the same time will not be installed successfully. The package is not fully signed. Why this should be is not clear. I hope it can help you solve the same problem you have.
 

Andorid: Installation failed due to invalid APK file due to version mismatch

I recently upgraded Gradle, created a new project, and ran it in the simulator, only to find an error that could not be installed.
Installation failed due to invalid APK file
Check the LogCat log and get the error message from the Couldn’t Load memtrack Module.
The simulator is 8.0-API-26 and the gradle configuration is

    compileSdkVersion 28
    buildToolsVersion "28.0.3"
    defaultConfig {
        applicationId "my.study"
        minSdkVersion 19
        targetSdkVersion 28
        versionCode 1
        versionName "1.0"
        testInstrumentationRunner "android.support.test.runner.AndroidJUnitRunner"
    }

By comparison, I found that api-28 corresponds to an android9 system, while my emulator is an android8 system. The mismatch here leads to the failure of installation.
Modify targetSdkVersion=26 in Gradle configuration

    compileSdkVersion 28
    buildToolsVersion "28.0.3"
    defaultConfig {
        applicationId "my.study"
        minSdkVersion 19
        targetSdkVersion 26
        versionCode 1
        versionName "1.0"
        testInstrumentationRunner "android.support.test.runner.AndroidJUnitRunner"
    }

Problem solving.

An error is reported when starting the Android emulator: Emulator: audio: Failed to create voice `goldfish_audio_in’

After updating Android Studio to 3.5.2, the following error occurred when starting the emulator:
Emulator: audio: Failed to create voice `goldfish_audio_in’
In fact, this error does not affect our use in the future, but for me who is a little obsessive, mistakes are unforgivable and must be solved.
Solutions:
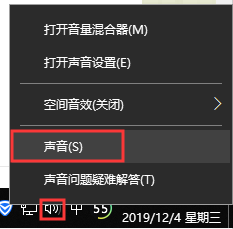
Right click on the sound icon and select Sound.

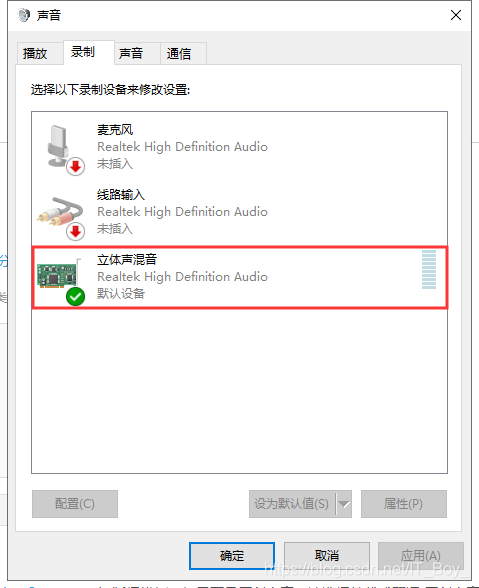
After opening the sound Settings panel, select the “Record” TAB, right-click the “Stereo Mix” and enable it, as shown in the figure below:

Open the Android emulator again, the error report disappears, and the problem is solved.

Execution failed for task ‘:app:processDebugManifest’.

using the new version of the Android Studio import project before, there will be a Execution failed for task ‘: app: processDebugManifest.’ error

* What went wrong:
Execution failed for task ‘: app: processDebugManifest’.
the Manifest merger failed: Attribute application @ appComponentFactory value = (. Android support. The v4. App. CoreComponentFactory) from [com. Android. Support: support – compat: 28.0.0] AndroidManifest. XML: make haste – 91
is also present at [androidx. Core: the core: 1.0.0-1] AndroidManifest. XML: value = “- 86 (androidx. Core. App. CoreComponentFactory).
the Suggestion: Add ‘tools: replace = “android: appComponentFactory” element to the at AndroidManifest. XML: behold – graze to override.

, modified AS provided by the androidmanifest.xml file, add the following fields —

<application

 android:appComponentFactory=""
 tools:replace="android:appComponentFactory">

if the toolsfield is not bound, a prompt appears when you hover over tools, then simply click Alt+Enter to add. Then Rebuild project, problem resolved.

How to solve the problem of requirements check failed for JDK 8 when Cordova 9.0 is built

the economy of the motherland is recovering, and people of all ethnic groups are actively engaged in the task of restoring production. As a codemaker, I have also been nervous for a long time. Recently, I have been busy with several projects, including an app, which needs to be quickly set up for preview and test, so I directly listed Cordova. However, I am surprised to step on it.

, there’s nothing wrong with building the project, it just came to me during the build:

Requirements check failed for JDK 8 ('1.8.*')! Detected version:11.0.7

Check your ANDROID_SDK_ROOT/JAVA_HOME/PATH environment variables.

indicates clearly that jdk11 does not match the required jdk8 for cordova. The reason is also clear, as the native environment was upgraded from JDK8 to JDK11 a while ago.

the problem now is that I don’t want to change java_home back to 8, because all the compiled versions of all the items on the machine have changed to jdk11, which would take me half a day to fix. (and a lot of history projects in Eclipse)

I use [email protected], which was released a year ago, but the latest cordova10 in NPM, which is still at nightly (compiled daily), is not even rc and is obviously not recommended in a production environment. In other words, Cordova9 is the latest stable edition, so I can’t expect to change the status quo by upgrading Cordova9.

also tried to set java.home in IDE (vscode), but it was useless. This setting is only valid for the Java plug-in of VSC, but it is incapable of cordova.

after many thoughts, if cordova cannot be surrendered, I will have to fall back to jdk8.

since cordova is based on nodejs, it occurs to me that all the hints should be in the clear text code. So a hard-hearted search keyword Requirements check failed for the whole project.

is actually retrieved:

in platforms/android cordova/lib/check_reqs js files in the module. Exports. The run method, related to the one and only one place!

and it says:

// Returns a promise.
module.exports.run = function () {
    return Q.all([this.check_java(), this.check_android()]).then(function (values) {
        console.log('Checking Java JDK and Android SDK versions');
        console.log('ANDROID_SDK_ROOT=' + process.env['ANDROID_SDK_ROOT'] + ' (recommended setting)');
        console.log('ANDROID_HOME=' + process.env['ANDROID_HOME'] + ' (DEPRECATED)');

        if (!String(values[0]).startsWith('1.8.')) {
            throw new CordovaError(
                'Requirements check failed for JDK 8 (\'1.8.*\')! Detected version: ' + values[0] + '\n' +
                'Check your ANDROID_SDK_ROOT/JAVA_HOME/PATH environment variables.'
            );
        }

        if (!values[1]) {
            throw new CordovaError('Requirements check failed for Android SDK! Android SDK was not detected.');
        }
    });
};

sees the 1.8 criterion, and the check_java method also makes it clear that the Java environment is being judged. So the “1.8.” directly changed to “11.”, and the compilation passed smoothly.

postscript:

first of all, I do not recommend arbitrary changes to the dependent framework source code, which will not only affect subsequent updates to the framework, but also cause unknown exceptions. But there is no way, this is only a temporary solution.

I don’t know if cordova9 has a key piece that relies only on jdk8, and I don’t know what effect jdk11 will have on cordova9, but I do think it’s clear that if you want to minimize the impact by changing one piece of code, the impact is really small.

Resolve Audio: failed to create voice ` goldfish_ Audio ‘error

starting to read the second version of the first line of code Android, according to the introduction, set up the development environment, create the first HelloWorld program, strictly follow the steps, but when the Android simulator is launched, in

android studio console

init: Could not find wglGetExtensionsStringARB!

Hax is enabled
getGLES2ExtensionString: Could not find GLES 2.x config!
Hax ram_size 0x60000000
Failed to obtain GLES 2.x extensions string!
HAX is working and emulator runs in fast virt mode.
Could not initialize emulated framebuffer
audio: Failed to create voice `goldfish_audio’
qemu-system-i386.exe: warning: opening audio output failed
audio: Failed to create voice `goldfish_audio_in’
qemu-system-i386.exe: warning: opening audio input failed
audio: Failed to create voice `dac’
audio: Failed to create voice `adc’

emulator: ERROR: Could not initialize OpenglES emulation, use ‘-gpu off’ to disable it.

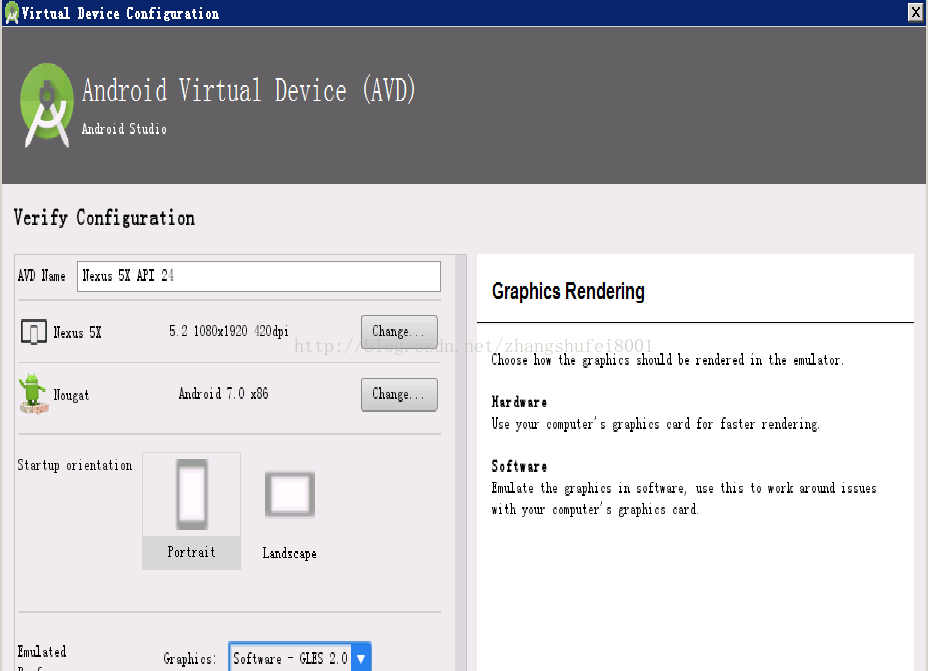
finally set Graphiscs: software-gles2.0, problem solving


Failure [INSTALL_ FAILED_ OLDER_ SDK] solutions

today, I want to learn the version of Android L Material Design required is Android 5.0, so I chose 5.1 Lolipop

when building the project in Android Studio
Failure [INSTALL_FAILED_OLDER_SDK]

error obviously, the SDK version is too old.

solution:

modify the minSdkVersion number in build. Gradble

defaultConfig {
    applicationId "com.example.mooreliu.androidl"
    minSdkVersion 13
    targetSdkVersion 22
    versionCode 1
    versionName "1.0"
}