Tag Archives: Android

Error in dex2jar decompilation apk error.zip The solution of

The following error is reported in dex2jar decompilation APK, and the complete error is shown in the picture:

Detail Error Information in File .\GtsSettingsTestCases-classes- error.zip
Please report this file to  http://code.google.com/p/dex2jar/issues/entry  if possible.


Open error.zip The error contents are as follows: java.lang.RuntimeException : can not merge I and Z


Solution (transferred from: https://www.twblogs.net/a/5c95e18bbd9eee4a0d090cd5 ):

1. From https://github.com/pxb1988/dex2jar Download the source code of dex2jar: dex2jar-2.x.zip

2. Recompile: enter the dex2jar-2. X directory and execute the compile command:

gradlew.bat assemble

(the gradle environment variable needs to be configured. Compiling is easy to time out. You can succeed by trying several times. I tried three times.)

3. After compiling, the compressed package (dex-tools-2.1) will be generated under dex2jar-2. X/DEX tools/build/distributions- SNAPSHOT.tar ,dex-tools-2.1- SNAPSHOT.zip ), decompress a compressed package and recompile APK.

Attached is my own dex2jar:

dex-tools-2.1- SNAPSHOT.tar

dex-tools-2.1- SNAPSHOT.zip

Failed to resolve: failed to resolve

Failed to resolve: failed to resolve*


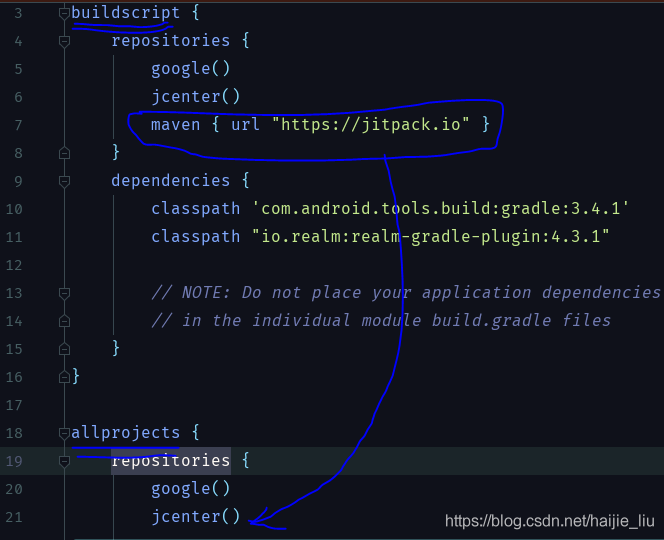
Background: some time ago, I did a PDF reading function, but when I introduced the remote warehouse dependency package, Android studio always reported errors. Failed to resolve: * well, I don’t need to say much nonsense. I’ll post the process of my solution for the reference of workers.


Premise: delete gradle.properties Then file – & gt; setting – & gt; proxy (search) – & gt; noproxy.
1.
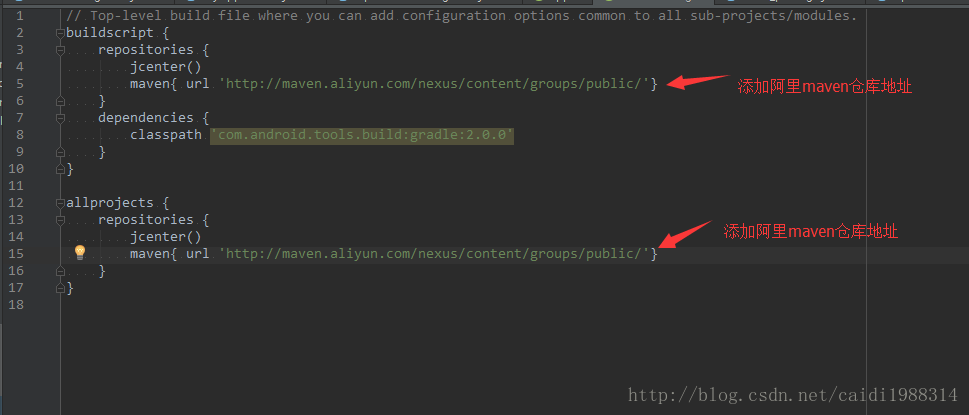
2. Add the address of Alibaba cloud Maven warehouse in Android studio. As shown in the following figure:

3.

Some processing experiences of failed to notify build listener

When writing a demo, there is a problem as follows:

Failed to notify build listener.

When searching on the Internet, it’s all about the current gradle problem. What is the specific problem?I found one of the Blogs:

https://blog.csdn.net/Evan_ L/article/details/87368075

What I’m saying is that the current gradle version supported by Android studio may not be consistent with the version you expect to use in your project and development tools.

So how do we check?We can carry out the following steps:

1. Check the gradle version you expect to use, and enter gradlew – V in terminal in Android studio. (if you have configured gradle environment, enter gradle – V in CMD) as shown in the figure below:

You can see that my version number here is 5.1.1.

2. Check the gradle version supported by your current Android studio. The location is the gradle folder in your Android studio directory. As shown in the figure:

You can see that I support 4.6 here. So to sum up, my initial judgment is that my expected gradle version is too high. So I need to make my gradle version a little lower to meet the needs of my android studio. How to change it

Here, just change your gradle version to the latest version supported by Android studio. After the change, remember to change the version number of the gradle plug-in, otherwise there will be problems. As shown in the figure:

Remember that the version number of the plug-in here must be changed to correspond to the version number of gradle. The specific corresponding relationship can be viewed on Android’s official website. Here is a link:

https://developer.android.google.cn/studio/releases/gradle-plugin.html#updating-plugin

Then, after the version number is mapped, you may need to change some dependent version numbers. Just follow the prompts. I can only say that’s how my problem was solved. I hope I can help you. Of course, what I said may not be right. I hope Daniel can see it and don’t laugh at us.

If you find that there may be something wrong with my blog, you can check this:

https://blog.csdn.net/qq_ 21397217/article/details/65630730

Unexpected error while observing UI hierarchy

solution: adjust to manual screenshot
principle: obtain the UI layout information of the current window and the screenshot of the current page through the ADB command, copy and send it to the computer, and then manually add the screenshot and file through uiautomatorview to analyze and locate the mobile phone elements
first step
You can first create a folder named test in the sdcard directory of your mobile phone
Step 2
open the CMD command line, and enter

adb shell uiautomator dump /sdcard/test/app.uix

# command explanation: output the UI layout information of the current window and input it to/sdcard/test/ app.uix Within the document( app.uix The file does not need to be created manually, and the command will be generated automatically). in this step, the CMD command line will report an error, but the final result will not be affected;
in the third step, the

adb shell screencap -p /sdcard/test/app.png

# command explanation: the ADB mobile phone screenshot command intercepts the current page and saves it to the mobile phone test folder (the mobile phone should be kept unlocked, otherwise the captured picture is pure black);
after completing these two steps, there should be two files in the/sdcard/test folder of the mobile phone
app.png Pictures captured for mobile phones
1 app.uix In order to capture the UI layout information of the image (later, the analysis elements can be operated through uiautomatiorview)
Step 4 of

adb pull /sdcard/test/app.uix E:/app.uix

?Command explanation: the app.uix File copy e disk
Step 5

adb pull /sdcard/test/app.png E:/app.png

Command explanation: copy the captured image to the e disk directory of the computer

at the same time, the two files of the computer should be as follows:

Step 6
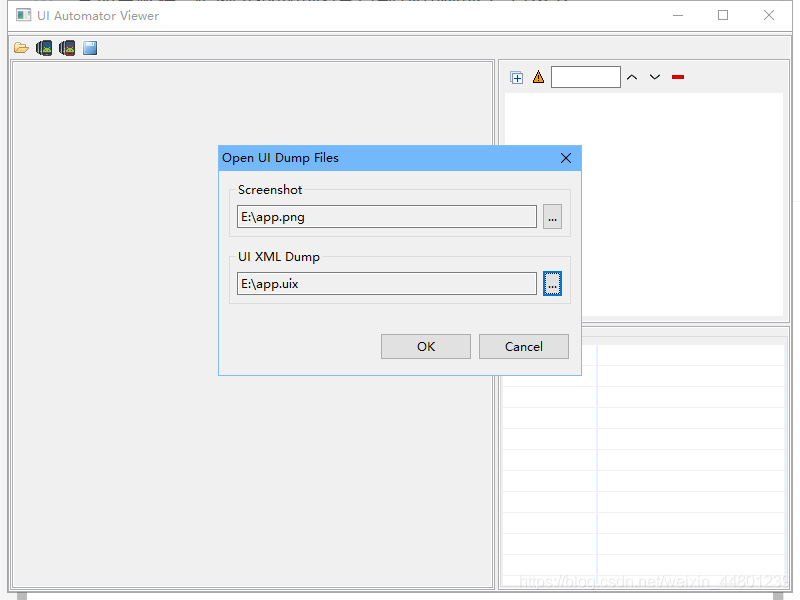
Open UI autoviewer
screenshot select the PNG end picture of disk e, that is, the screenshot of the mobile phone
UI XML dump select the uix end file of disk e, that is, the layout information of the screenshot of the mobile phone

screen These commands can be written as bat files. You need to take a screenshot and run the bat file directly. The contents are as follows ( note: each saved screenshot will cover the previous screenshot ):

@echo on
adb shell uiautomator dump /sdcard/test/app.uix
adb shell screencap -p /sdcard/test/app.png
adb pull /sdcard/test/app.uix E:/app.uix
adb pull /sdcard/test/app.png E:/app.png

Java retainAll throws an unsupported operation exception record

Today, when using Java’s retainAll method, I encountered an incredible problem. I reported a problem with JS bridge. But I’m sure that there is no problem with the JS bridge framework. I’ve been running for such a long time. So the problem lies in the use of the retainAll method of the final debug.

After the sentence “retain all”, although the page flashed back directly, there was no error in retain all. So I tried to try catch on the code to see what error was thrown. After debugging, I found that it was the error of unsupported operation exception. This means that the operation is not supported, that is, there is no such method?So I right-click the retainAll method and find that the comment of the retainAll method is as follows:

   /**
     * Retains only the elements in this list that are contained in the
     * specified collection (optional operation).  In other words, removes
     * from this list all of its elements that are not contained in the
     * specified collection.
     *
     * @param c collection containing elements to be retained in this list
     * @return <tt>true</tt> if this list changed as a result of the call
     * @throws UnsupportedOperationException if the <tt>retainAll</tt> operation
     *         is not supported by this list
     * @throws ClassCastException if the class of an element of this list
     *         is incompatible with the specified collection
     * (<a href="Collection.html#optional-restrictions">optional</a>)
     * @throws NullPointerException if this list contains a null element and the
     *         specified collection does not permit null elements
     *         (<a href="Collection.html#optional-restrictions">optional</a>),
     *         or if the specified collection is null
     * @see #remove(Object)
     * @see #contains(Object)
     */

Then I looked at the object of the array that I called retainAll, which is through the Arrays.asList This is the aslist method, as follows:

 @SafeVarargs
    @SuppressWarnings("varargs")
    public static <T> List<T> asList(T... a) {
        return new ArrayList<>(a);
    }

    /**
     * @serial include
     */
    private static class ArrayList<E> extends AbstractList<E>
        implements RandomAccess, java.io.Serializable
    {
        private static final long serialVersionUID = -2764017481108945198L;
        private final E[] a;

        ArrayList(E[] array) {
            a = Objects.requireNonNull(array);
        }

        @Override
        public int size() {
            return a.length;
        }

        @Override
        public Object[] toArray() {
            return a.clone();
        }

        @Override
        @SuppressWarnings("unchecked")
        public <T> T[] toArray(T[] a) {
            int size = size();
            if (a.length < size)
                return Arrays.copyOf(this.a, size,
                                     (Class<?extends T[]>) a.getClass());
            System.arraycopy(this.a, 0, a, 0, size);
            if (a.length > size)
                a[size] = null;
            return a;
        }

        @Override
        public E get(int index) {
            return a[index];
        }

        @Override
        public E set(int index, E element) {
            E oldValue = a[index];
            a[index] = element;
            return oldValue;
        }

        @Override
        public int indexOf(Object o) {
            E[] a = this.a;
            if (o == null) {
                for (int i = 0; i < a.length; i++)
                    if (a[i] == null)
                        return i;
            } else {
                for (int i = 0; i < a.length; i++)
                    if (o.equals(a[i]))
                        return i;
            }
            return -1;
        }

        @Override
        public boolean contains(Object o) {
            return indexOf(o) != -1;
        }

        @Override
        public Spliterator<E> spliterator() {
            return Spliterators.spliterator(a, Spliterator.ORDERED);
        }

        @Override
        public void forEach(Consumer<?super E> action) {
            Objects.requireNonNull(action);
            for (E e : a) {
                action.accept(e);
            }
        }

        @Override
        public void replaceAll(UnaryOperator<E> operator) {
            Objects.requireNonNull(operator);
            E[] a = this.a;
            for (int i = 0; i < a.length; i++) {
                a[i] = operator.apply(a[i]);
            }
        }

        @Override
        public void sort(Comparator<?super E> c) {
            Arrays.sort(a, c);
        }
    }

That is to say, the array object type generated by aslist is the internal class ArrayList. However, this class inherits the abstractlist and has no retainAll method. The retainAll method is java.util.List Methods in this class, ah Xi.. Solve the case.

So here, I think that I seem to have used the aslist method in other places. It seems that I need to check. After all, there are no add and remove methods.

mark!

Conclusion: This is a good question. It touches the blind area of knowledge and makes me more cautious. In the past, I used to use whatever method I could, but I didn’t really pay attention to the realization of the method. I didn’t know until I reported a mistake. It’s actually a bit fatal for programmers, because problems have already arisen. Therefore, we still need to read more source code and learn to recharge.

Writing to settings when appium of Xiaomi mobile phone and oppo mobile phone starts requires:android.permission.WRITE_ SECURE_ SETTINGS

Error information:
0 java.lang.SecurityException : Permission denial: writing to settings requires:android.permission.WRITE_ SECURE_ SETTINGS

terms of settlement:

Xiaomi: in the developer options, turn on “USB debugging (security settings)”. Allow USB debugging to modify permissions or simulate clicking

Oppo: in the developer option, turn on “disable permission monitoring”.
Copyright notice: This is the original article of CSDN blogger “revepon”, which follows the CC 4.0 by-sa copyright agreement. Please attach the link of the original source and this notice.
Link to the original text: https://blog.csdn.net/zzwfd/article/details/104005744

Solution of toast not displaying in Android

Today, in the test, toast could not be displayed. I analyzed several possibilities

1. There is a problem with the context. The corresponding context may be incorrect

2. The value of message is null

But I checked it several times and there was no problem…. Looking up information on the Internet, I said that I couldn’t update UI in sub thread, but I didn’t open thread… After a night of silence. I found the problem. After using toast, I didn’t call the show method… That’s why I don’t show it. It’s too sloppy…

Error running app:Instant Run requires Tools | Android Enable ADB integration‘ to be enabled.

Error generation environment

The
is generated when running the project in Android studio

Error description

Error running app:Instant Run requires Tools | Android Enable ADB integration' to be enabled.

Cause of error

The project can be started normally before, but it can’t be started after Android studio upgrade

terms of settlement

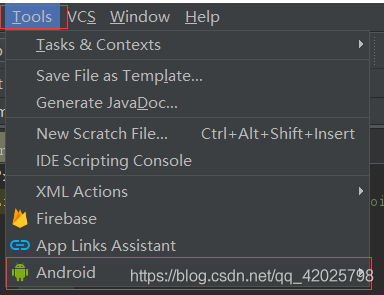
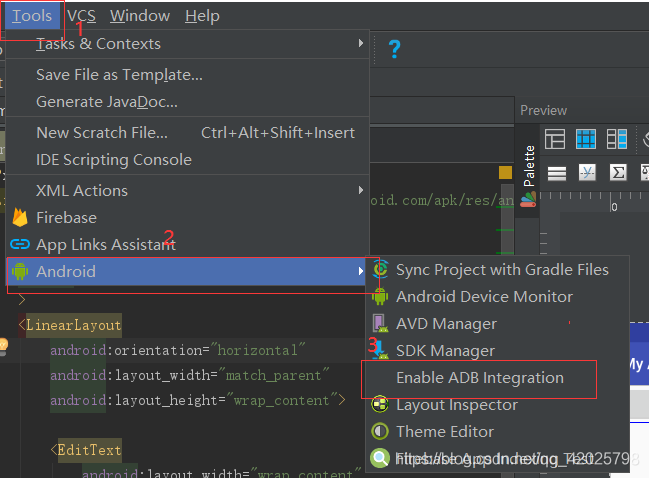
In the options bar, click Tools – & gt; Android – & gt; enable ADB integration


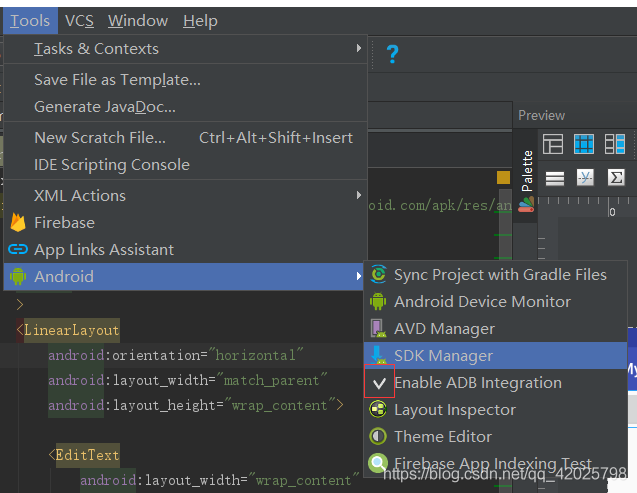
after modification, it is as follows:
there is a tick in front of enable ADB integration.

java.lang.IllegalStateException: Could not execute method for android:onClick

I didn’t think about it before I heard it..

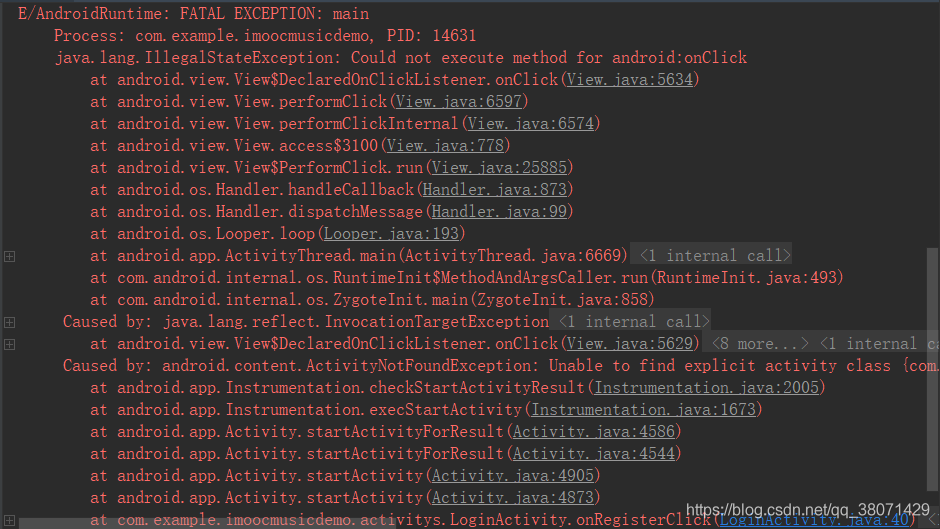
Error screenshot

error message

E/AndroidRuntime: FATAL EXCEPTION: main
    Process: com.example.imoocmusicdemo, PID: 14631
    java.lang.IllegalStateException: Could not execute method for android:onClick
        at android.view.View$DeclaredOnClickListener.onClick(View.java:5634)
        at android.view.View.performClick(View.java:6597)
        at android.view.View.performClickInternal(View.java:6574)
        at android.view.View.access$3100(View.java:778)
        at android.view.View$PerformClick.run(View.java:25885)
        at android.os.Handler.handleCallback(Handler.java:873)
        at android.os.Handler.dispatchMessage(Handler.java:99)
        at android.os.Looper.loop(Looper.java:193)
        at android.app.ActivityThread.main(ActivityThread.java:6669)
        at java.lang.reflect.Method.invoke(Native Method)
        at com.android.internal.os.RuntimeInit$MethodAndArgsCaller.run(RuntimeInit.java:493)
        at com.android.internal.os.ZygoteInit.main(ZygoteInit.java:858)
     Caused by: java.lang.reflect.InvocationTargetException
        at java.lang.reflect.Method.invoke(Native Method)
        at android.view.View$DeclaredOnClickListener.onClick(View.java:5629)
        at android.view.View.performClick(View.java:6597) 
        at android.view.View.performClickInternal(View.java:6574) 
        at android.view.View.access$3100(View.java:778) 
        at android.view.View$PerformClick.run(View.java:25885) 
        at android.os.Handler.handleCallback(Handler.java:873) 
        at android.os.Handler.dispatchMessage(Handler.java:99) 
        at android.os.Looper.loop(Looper.java:193) 
        at android.app.ActivityThread.main(ActivityThread.java:6669) 
        at java.lang.reflect.Method.invoke(Native Method) 
        at com.android.internal.os.RuntimeInit$MethodAndArgsCaller.run(RuntimeInit.java:493) 
        at com.android.internal.os.ZygoteInit.main(ZygoteInit.java:858) 
     Caused by: android.content.ActivityNotFoundException: Unable to find explicit activity class {com.example.imoocmusicdemo/com.example.imoocmusicdemo.activitys.RegisterActivity}; have you declared this activity in your AndroidManifest.xml?
        at android.app.Instrumentation.checkStartActivityResult(Instrumentation.java:2005)
        at android.app.Instrumentation.execStartActivity(Instrumentation.java:1673)
        at android.app.Activity.startActivityForResult(Activity.java:4586)
        at android.app.Activity.startActivityForResult(Activity.java:4544)
        at android.app.Activity.startActivity(Activity.java:4905)
        at android.app.Activity.startActivity(Activity.java:4873)
        at com.example.imoocmusicdemo.activitys.LoginActivity.onRegisterClick(LoginActivity.java:40)
        at java.lang.reflect.Method.invoke(Native Method) 
        at android.view.View$DeclaredOnClickListener.onClick(View.java:5629) 
        at android.view.View.performClick(View.java:6597) 
        at android.view.View.performClickInternal(View.java:6574) 
        at android.view.View.access$3100(View.java:778) 
        at android.view.View$PerformClick.run(View.java:25885) 
        at android.os.Handler.handleCallback(Handler.java:873) 
        at android.os.Handler.dispatchMessage(Handler.java:99) 
        at android.os.Looper.loop(Looper.java:193) 
        at android.app.ActivityThread.main(ActivityThread.java:6669) 
        at java.lang.reflect.Method.invoke(Native Method) 
        at com.android.internal.os.RuntimeInit$MethodAndArgsCaller.run(RuntimeInit.java:493) 
        at com.android.internal.os.ZygoteInit.main(ZygoteInit.java:858) 
I/Process: Sending signal. PID: 14631 SIG: 9
Application terminated.

Cause of error

Caused by: android.content.ActivityNotFoundException: Unable to find explicit activity class {com.example.imoocmusicdemo/com.example.imoocmusicdemo.activitys.RegisterActivity}; have you declared this activity in your AndroidManifest.xml?

resolvent: AndroidManifest.xml Add registeractivity

Android supportsrtl properties

Android studio comes with new projects android:supportsRtl This property.  

This property states whether your application is willing to support right to left layout.

If it is set to true and targetsdkversion is set to 17 or higher, various RTL APIs will be activated, and the system can display RTL layout using your application. If it is set to false, or targetsdkversion is 16 or lower, the RTL API will be ignored or the application will not be affected (your layout will be from left to right). The default value for this property is false. This property is added to API 17.

How to use Android android:supportsRtl attribute

Today, let’s talk about how to use Android

In the Android manifest file android:supportsRtl Property.


Previously, I found a problem on the app, that is, when the app is set to Arabic, the default layout direction of the mobile phone changes from right to left, resulting in a big problem in the interface. Later, by modifying the layout, some problems of the interface were solved, but the interface was not very good-looking when it was displayed from right to left. So I opened the app, and found that the app’s interface was normally arranged from left to right. So looking for information on the Internet, we found that android:supportsRtl Attribute, which finally solves this problem. Record it here.

Since Android 4.2, the Android SDK supports a right to left (RTL) UI layout, although this layout is often used in environments such as Arabic and Hebrew, and rarely used by Chinese users. However, it is very convenient for some special uses.

This is the official website, right android:supportsRtl The English is not very good, can only use the tool and own understanding translation

Link to the original text of the official website: http://developer.android.com/intl/zh-cn/guide/topics/manifest/application-element.html

android:supportsRtl

Declares whether your application is willing to support right-to-left (RTL) layouts.

If set to true and targetSdkVersion is set to 17 or higher, various RTL APIs will be activated and used by the system so your app can display RTL layouts. If set to false or if targetSdkVersion is set to 16 or lower, the RTL APIs will be ignored or will have no effect and your app will behave the same regardless of the layout direction ass ociated to the user’s Locale choice (your layouts will always be left-to-right).

The default value of this attribute is false.

This attribute was added in API level 17.

State whether your application is willing to support right to left layout.

If it is set to true and targetsdkversion is set to 17 or higher, various RTL APIs will be activated, and the system can display RTL layout using your application. If targetsdkversion is set to 16 or lower and set to false, the RTL API will be ignored or not affected, and your application will have the same behavior regardless of the layout direction related to user site selection (your layout will be from left to right).
The default value for this property is false.

This property is added to API 17.

The last sentence also says that this API is only available after 17 (that is, Android 4.2), and this attribute is false by default. APIs before 17 do not support this attribute.

What the hell is this right to left layout.

Frequent users should have found that in the settings – Developer option, there is a mandatory right to left layout direction, as shown in the figure
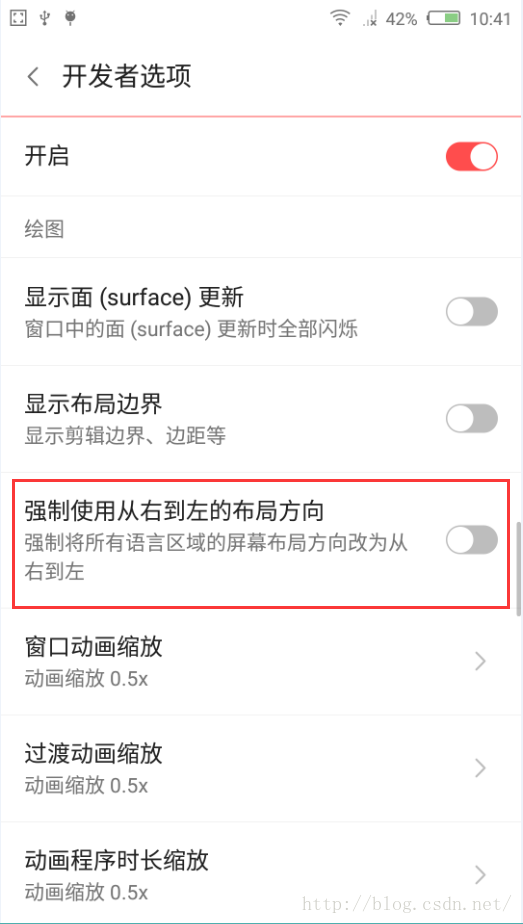
Since there is such a thing, open it and have a look
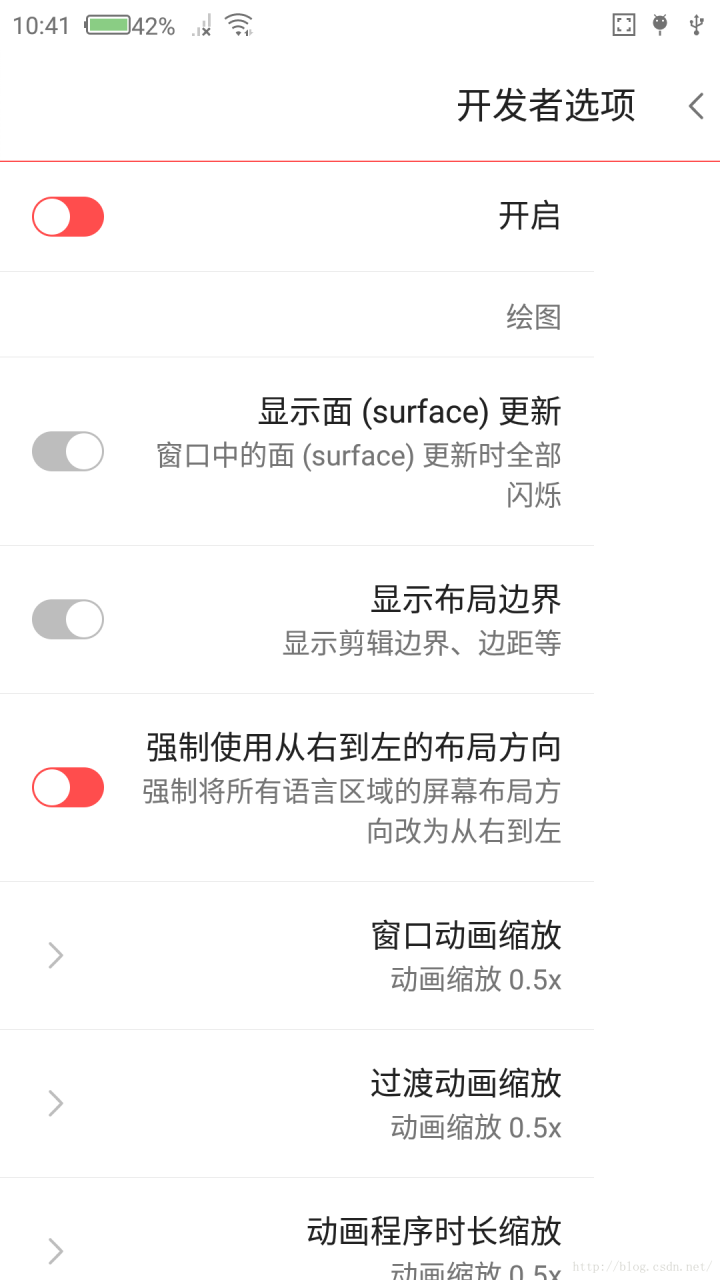
When it is turned on, the text on the left is put on the right, and the switch on the right is put on the left. When you see this, you can understand the meaning of this attribute

To prove this property, try a demo again

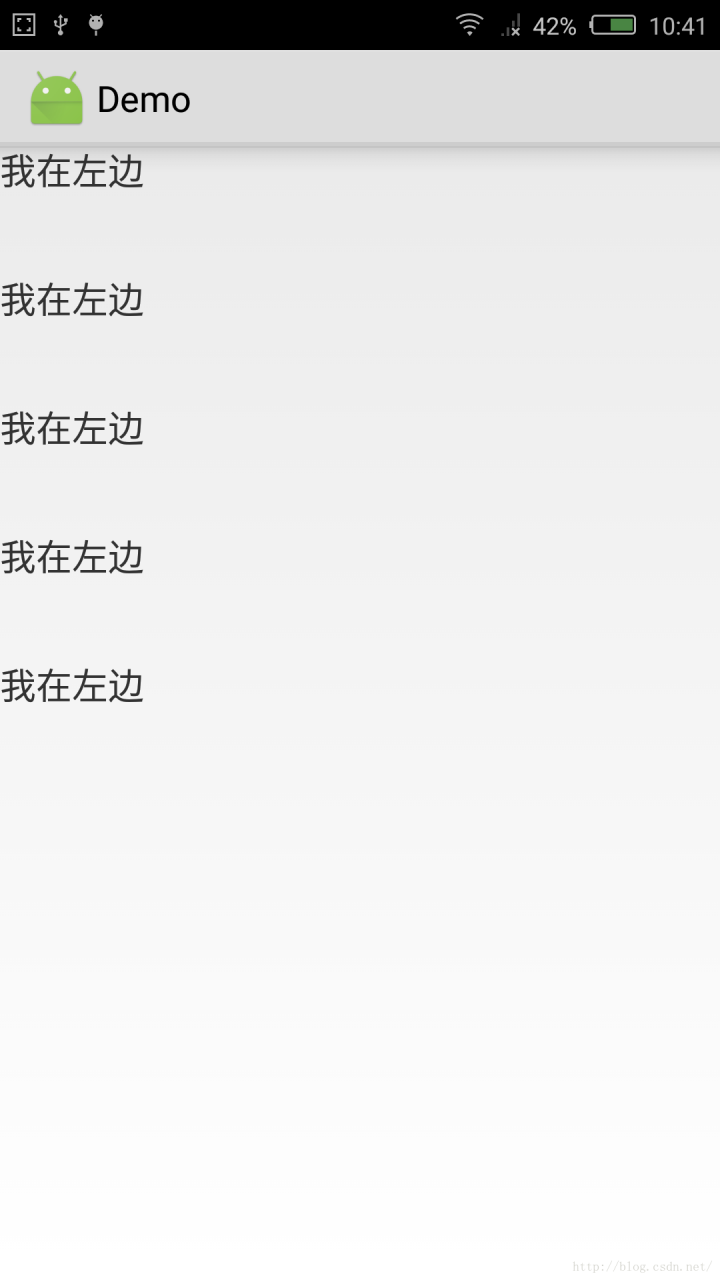
When android:supportsRtl When it is false, the layout of the app will not change even if the mobile phone is forced from right to left, as shown in the figure
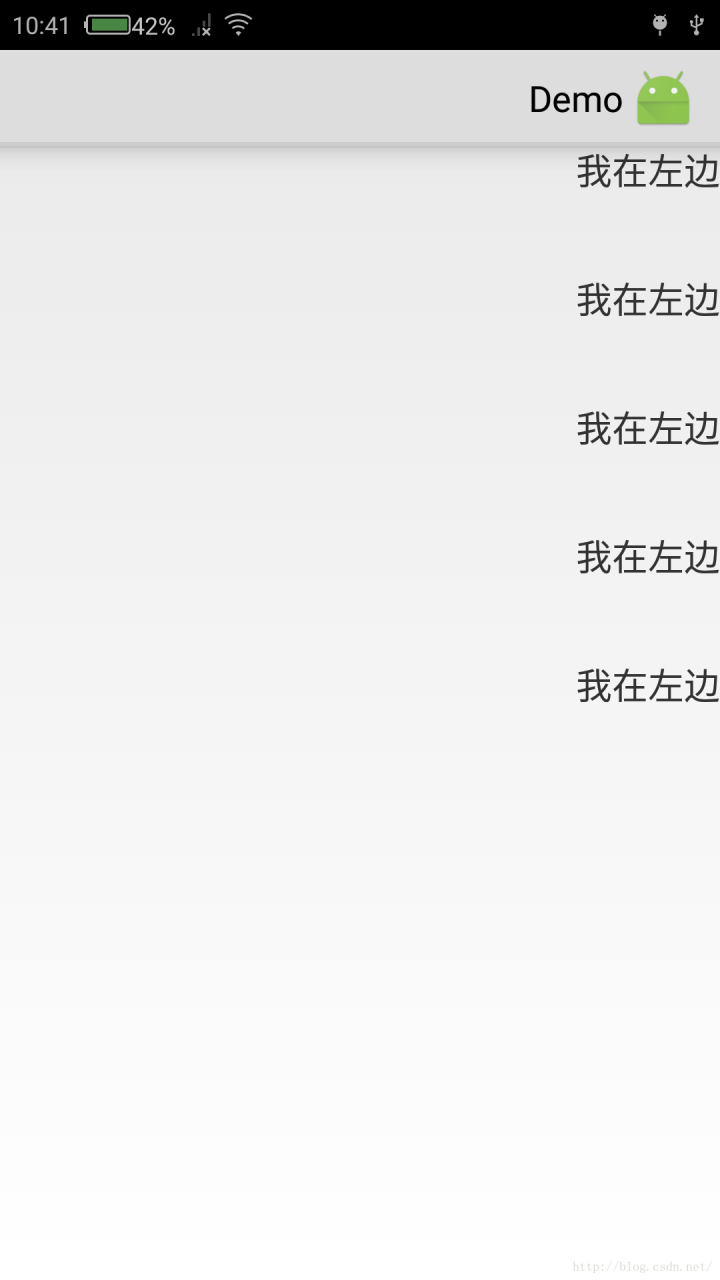
When android:supportsRtl When it is true, and the mobile phone also turns on the forced right to left switch, the layout will be arranged from right to left, as shown in the figure
If you want to use RTL layout, you should also pay attention to an important issue. Suppose there are two & lt; textview & gt; tags in a horizontal linear layout: textview1 and textview2. Textview1 is located in the upper left corner of the window, while textvew2 is on the right side of textview1. The distance to textview1 is 100dp. It’s actually the distance from the left edge of textview2 to the right edge of textview1. If the current layout mode is the default (LTR, left to right), you only need to change textview2’s android:layout_ Set the value of the marginleft property to “100dp”. However, this is the opposite in RTL layout. In RTL layout, textview1 is in the upper right corner of the window, while textview2 runs to the left of textview1, so the distance from textview2 to textview1 actually becomes the distance from the right edge of textview2 to the left edge of textview1. Therefore, textview2 should be set android:layout_ This will cause confusion of UI arrangement in RTL and LTR layout modes. To solve this problem, the following two layout properties are added in Android 4.2.

android:layout_ Marginstart: if in LTR layout mode, this attribute is equivalent to android:layout_ marginLeft。 In RTL layout mode, this attribute is equivalent to android:layout_ marginRight。

android:layout_ Marginend: if in LTR layout mode, this attribute is equivalent to android:layout_ marginRight。 In RTL layout mode, this attribute is equivalent to android:layout_ marginLeft。

In short, actually android:supportsRtl Property indicates whether the app supports right-to-left layout. If this property is false by default, the app will not have right-to-left layout in any case. If this property is set to true by default and targetsdkversion is set to 17 or higher, the layout of the mobile phone will be changed from right to left automatically in Arabic, Hebrew and other environments. Actually, I am android:supportsRtl= “False” solves the problem from right to left.

How to use Android android:supportsRtl That’s it.

It’s that simple.