1. Effect:

DockerWhen the container starts, if you want to mount a directory of the host, you can -vspecify it with parameters.
For example, to start a centoscontainer, mount the /test directory of the host to the /soft directory of the container, which can be specified in the following ways:
docker run -it -v /test:/soft centos /bin/bash
In this way, after the container is started, the /soft directory will be automatically created in the container. In this way, we can make it clear that in the -v parameter, the directory before the colon “:” is the host directory, and the following directory is the directory in the container.
It seems simple, but it’s not. Let’s verify it:
[root@localhost ~]# docker run -it -v /test:soft centos /bin/bash
invalid value "/test:soft" for flag -v: soft is not an absolute path
See 'docker run --help'.
An error is reported directly, indicating that soft is not an absolute path. The so-called absolute path must start with the following slash “/”.
If the /test directory exists on the host, delete it first
[root@localhost ~]# rm -rf /test
[root@localhost ~]# ls /
bin  boot  dev  etc  home  lib  lib64  media  mnt  opt  proc  root  run  sbin  srv  sys  tmp  usr  var
start the container
[root@localhost ~]# docker run -it -v /test:/soft centos /bin/bash
[root@a487a3ca7997 /]# ls
bin  dev  etc  home  lib  lib64  lost+found  media  mnt  opt  proc  root  run  sbin  soft  srv  sys  tmp  usr  var
Check the host and find that a new /test directory has been added
[root@localhost ~]# ls /
bin  boot  dev  etc  home  lib  lib64  media  mnt  opt  proc  root  run  sbin  srv  sys  test  tmp  usr  var
This time, let’s try changing the directory name test1
docker run -it -v test1:/soft centos /bin/bash
Then go to the host to see if a new /test1 directory has been added. The result is not. Is it because I used a relative path, so the generated test1 directory is in the current directory, and it turns out that there is still no. Where is the /soft directory in the container mounted? We can get the answer to this question by looking at the “Mounts” part of the container with the docker inspect command.
"Mounts": [
    {
        "Name": "test1",
        "Source": "/var/lib/docker/volumes/test1/_data",
        "Destination": "/soft",
        "Driver": "local",
        "Mode": "z",
        "RW": true
    }
],
It can be seen that the /soft directory in the container is mounted on the /var/lib/docker/volumes/test1/_data directory on the host
It turns out that the so-called relative path refers to /var/lib/docker/volumes/, which has nothing to do with the current directory of the host.
start a container
[root@localhost ~]# docker run -it -v /test2 centos /bin/bash
[root@ea24067bc902 /]# ls
bin  dev  etc  home  lib  lib64  lost+found  media  mnt  opt  proc  root  run  sbin  srv  sys  test2  tmp  usr  var
Also use the docker inspect command to view the mount directory of the host
"Mounts": [
     {
         "Name": "96256232eb74edb139d652746f0fe426e57fbacdf73376963e3acdb411b3d73a",
         "Source": "/var/lib/docker/volumes/96256232eb74edb139d652746f0fe426e57fbacdf73376963e3acdb411b3d73a/_data",
         "Destination": "/test2",
         "Driver": "local",
         "Mode": "",
         "RW": true
     }
 ],
It can be seen that it is similar to the result in 3, except that it is not a directory name of a relative path, but a randomly generated directory name.
First open a container and view the properties of the /soft directory in the container
[root@localhost ~]# docker run -it -v /test:/soft centos /bin/bash
[root@b5ed8216401f /]# ll -d /soft/
drwxr-xr-x 2 root root 6 Sep 24 03:48 /soft/
View the properties of the /test directory in the host
[root@localhost ~]# ll -d /test/
drwxr-xr-x 2 root root 6 Sep 24 11:48 /test/
Create a new user in the container, modify the owner and group of /soft
[root@b5ed8216401f /]# useradd victor
[root@b5ed8216401f /]# chown -R victor.victor /soft/
[root@b5ed8216401f /]# ll -d /soft/
drwxr-xr-x 2 victor victor 6 Sep 24 03:48 /soft/
Let’s see if the owner and group of the /test directory in the host will change?
[root@localhost ~]# ll -d /test/
drwxr-xr-x 2 mycat mycat 6 Sep 24 11:48 /test/
Turned into mycat. . .
It turns out that this is related to UID. UID, that is, “user identification number”, is an integer, which is used internally by the system to identify users. In general, it corresponds to the user name one-to-one.
First, check the UID corresponding to the victor in the container.
[root@b5ed8216401f /]# cat /etc/passwd | grep victor
victor:x:1000:1000::/home/victor:/bin/bash
The UID of victor is 1000, so who is the user corresponding to 1000 in the host?
[root@localhost ~]# cat /etc/passwd |grep 1000
mycat:x:1000:1000::/home/mycat:/bin/bash
It can be seen that the user corresponding to UID 1000 in the host is mycat.
Here, two situations are mainly verified: 1. The host directory is specified, ie -v /test:/soft. 2. No host directory is specified, ie -v /soft
The first case:
[root@localhost ~]# rm -rf /test    --First delete the /test directory on the host
[root@localhost ~]# ls /    --As you can see, there is no /test directory on the host
bin  boot  dev  etc  home  lib  lib64  media  mnt  opt  proc  root  run  sbin  srv  sys  tmp  usr  var
[root@localhost ~]# docker run -it --name=centos_test -v /test:/soft centos /bin/bash  --To start the container, I specified the name of the container with the --name parameter for ease of removal
[root@82ad7f3a779a /]# exit
exit
[root@localhost ~]# docker rm centos_test   --delete container
centos_test
[root@localhost ~]# ls /   --Found that the / test directory still exists
bin  boot  dev  etc  home  lib  lib64  media  mnt  opt  proc  root  run  sbin  srv  sys  test  tmp  usr  var
It can be seen that even if the container is destroyed, the newly created mount directory will not disappear. It can be further verified that if the owner and group of the host directory are changed, after the container is destroyed, the owner and group of the host directory will not be restored to the state before mounting.
In the second case, through the above verification, we know that if the host’s directory is not specified, the container will randomly configure a directory in /var/lib/docker/volumes/, then we will see if the container destruction in this case will Causes the deletion of the corresponding directory
Start the container first
[root@localhost ~]# docker run -it --name=centos_test -v /soft centos /bin/bash
[root@6b75579ec934 /]# exit
exit
docker inspectView the mount directory generated by the container on the host through the command
"Mounts": [
    {
        "Name": "b53164cb1c9f1917788638692fb22ad11994cf1fbbc2461b6c390cd3e10ea301",
        "Source": "/var/lib/docker/volumes/b53164cb1c9f1917788638692fb22ad11994cf1fbbc2461b6c390cd3e10ea301/_data",
        "Destination": "/soft",
        "Driver": "local",
        "Mode": "",
        "RW": true
    }
],
corresponds to the /var/lib/docker/volumes/b53164cb1c9f1917788638692fb22ad11994cf1fbbc2461b6c390cd3e10ea301/_datadirectory
Destroy the container and see if the directory exists
[root@localhost ~]# docker rm centos_test
centos_test
[root@localhost ~]# ll /var/lib/docker/volumes/b53164cb1c9f1917788638692fb22ad11994cf1fbbc2461b6c390cd3e10ea301
total 0
drwxr-xr-x 2 root root 6 Sep 24 14:25 _data
It is found that the directory still exists, even if the docker service is restarted, the directory still exists
[root@localhost ~]# systemctl restart docker
[root@localhost ~]# ll /var/lib/docker/volumes/b53164cb1c9f1917788638692fb22ad11994cf1fbbc2461b6c390cd3e10ea301
total 0
drwxr-xr-x 2 root root 6 Sep 24 14:25 _data
It can be solved in two ways:
setenforce 0Permanently close: Modify the /etc/sysconfig/selinuxfile, set SELINUXthe value of disabled.--privilegedparameterslike:docker run -it --privileged=true -v /test:/soft centos /bin/bashOne line of code, automatically add the watermark content you specify to the PDF file, fast and free.
Last time we introduced one of the functions of the python-office library: to realize batch Word to PDF, today we introduce the second function of this library:
“One line of code, automatically add your specified watermark content to PDF files, fast and free.
a. If you are using python-office for the first time,
Just need the following command to automatically download and install python-office
pip install python-office
b. If you have read the previous articles and have downloaded and used python-office,
Then you need to run the following command to upgrade python-office to the latest version.
“The update of python-office is very frequent. It is recommended that you update it every time you use it~
pip install --upgrade python-office
After installing python-office, copy and paste directly and run the following code
import office  # import python-office

office.pdf.add_watermark() # No need to make any changes to the code, just run
After running, some prompt text will appear in the console. The python-office developed by the Chinese, of course, the prompt text is Chinese.
You can directly enter the corresponding content according to your own needs, and the program will automatically add a watermark. As shown below.
python-office is an open source third-party library of pypi, designed for python automation office.
“You are also welcome to participate in the construction of the open source project python-office. The open source warehouse address:
- GitHub: CoderWanFeng/python-office
Linux system also has a graphical interface. Its way is different from Windows, called X Window, using the X11 protocol. The X in X11 refers to the X protocol; the 11 refers to the 11th version using the X protocol.
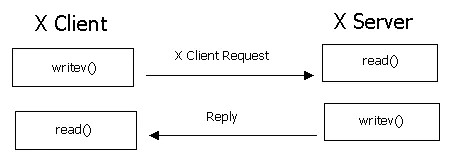
The schematic is above. So when we use the client to log in to a server, when we display the image interface, which is the X client and which is the X server?
The answer is that the client is the X server. For example, we use MobaXterm to log in to the server. MobaXterm is the X Server, and the Linux server is the X Client.
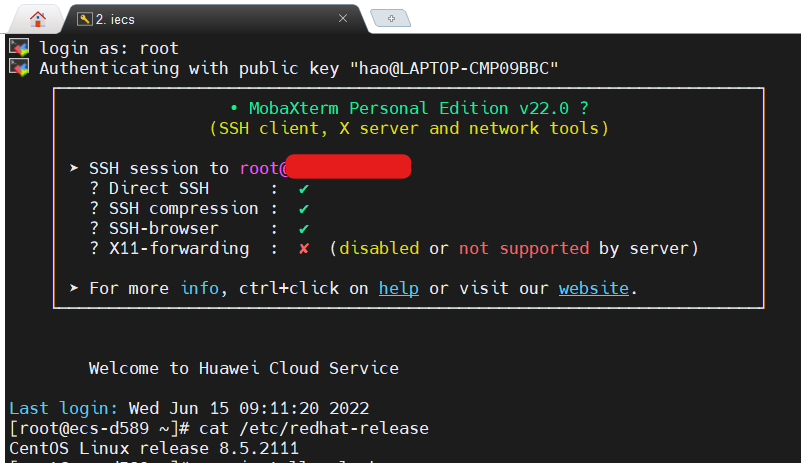
When I log in to my ECS, this graphical interface is unavailable at first: X11-forwarding : ✘ (disabled or not supported by server).
That is to say, when I run a program to display a graphical interface on the server, the result will fail, like the following:
[root@ecs-d589 ~]# xclock
Error: Can't open display:
So what to do? In fact, it can be operated in two places, one is to install the X authentication package, and the other is to open ssh forwarding.
The command to install the X authentication package is: yum install xorg-x11-xauth
its description is as follows:
Summary : X.Org X11 X authority utilities
Description : xauth is used to edit and display the authorization information used in connecting to an X server.
The way to open ssh forwarding is to edit /etc/ssh/sshd_config:
#AllowAgentForwarding yes
AllowTcpForwarding yes   #enable
#GatewayPorts no
X11Forwarding yes      #default is enable
#X11DisplayOffset 10
#X11UseLocalhost yes
#PermitTTY yes
Then restart the sshd service:
[root@ecs-d589 ~]# service sshd restart
Redirecting to /bin/systemctl restart sshd.service
And log out and log back in.
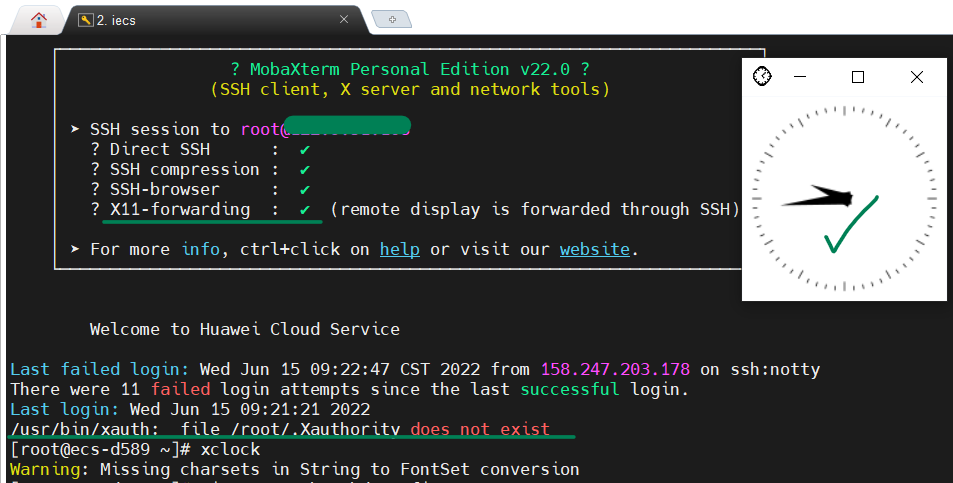
It can be seen that the first prompt X11-Forwarding is that it has been opened normally, and then we run a simple program xclock on the server, and the clock graphical interface of the program can be correctly displayed on the screen.
In addition, there is an additional error message after logging in as follows, we can ignore it for the time being.
/usr/bin/xauth: file /root/.Xauthority does not exist
This article solves two Docker errors:
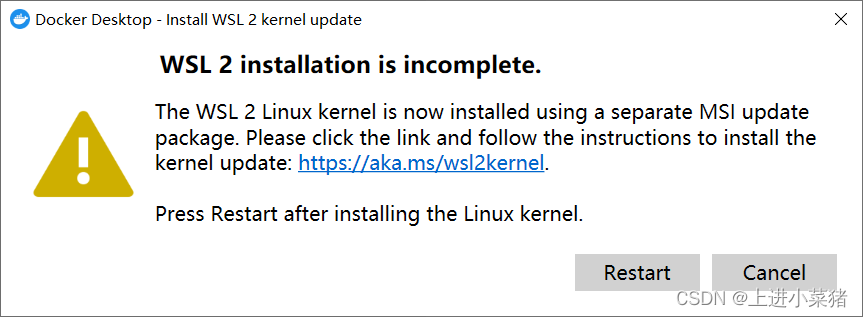
1.WSL 2 installation is incomplete.
2.System.InvalidOperationException: Failed to set version to docker-desktop: exit code: -1
After successfully installing Docker today, I ran Docker and the following error occurred:
WSL 2 installation is incomplete.
The WSL 2 Linux kernel is now installed using a separate MSI update package.Please click the link and follow the instructions to install the kernel update:https://aka.ms/wsl2kernel.
Press Restart after installing the Linux kernel.
Docker is a tool for packaging, distributing, and deploying applications.
Basically a lightweight virtual machine. There are only things we need in the virtual machine, other superfluous things are necessary.
Important Concepts: Image, Container
Image: Similar to software installation package, it can be quickly spread and installed.
Container: After the software is installed, each software running environment is independent and isolated, which is called a container.
Advantages: It ensures that running on different machines is a consistent operating environment, and there will be no situation where my machine runs normally and your machine runs properly.
When we install docker desktop, he asks if we need to use wsl2 (Windows based subsystem for Linux). If not, we’ll run with a Hyper-V virtual machine. However, this subsystem has better performance compared to virtual machines.
The WAL 2 Linux kernel is now installed using a separate MSI update package.
That’s the problem!
Let’s go to the system to check whether the Linux subsystem of Windows is enabled. The steps are as follows:
Control Panel -> Programs -> Programs and Features
Check if you have checked here: Enable Windows Subsystem for Linux
If not, we check it, restart the computer, and open Docker.
If you still report WSL 2 installation is incomplete. problem. There is only one reason left:
the version of wsl2 we are using is very old, so it needs to be updated manually. We can download the latest version of wsl2 from Microsoft’s official website according to the prompt, and then open it normally.
Visit the link below to download and install the update:
https://wslstorestorage.blob.core.windows.net/wslblob/wsl_update_x64.msi
If the download is slow, use the Google browser to download, it is easy to use!
Install the latest version of wsl2:
reboot. run.
So far, most of them can run successfully. If not, there is the ultimate trick:
if you report an error at this time System.InvalidOperationException: Failed to set version to docker-desktop: exit code: -1
The error is as follows:
System.InvalidOperationException:
Failed to set version to docker-desktop: exit code: -1
 stdout: �S��v�[a�{|�W
N/ec\Ջ�v�d\O0
stderr:
   在 Docker.ApiServices.WSL2.WslShortLivedCommandResult.LogAndThrowIfUnexpectedExitCode(String prefix, ILogger log, Int32 expectedExitCode) 位置 C:\workspaces\PR-15387\src\github.com\docker\pinata\win\src\Docker.ApiServices\WSL2\WslCommand.cs:行号 146
   在 Docker.Engines.WSL2.WSL2Provisioning.<ProvisionAsync>d__8.MoveNext() 位置 C:\workspaces\PR-15387\src\github.com\docker\pinata\win\src\Docker.Desktop\Engines\WSL2\WSL2Provisioning.cs:Line 82
--- The end of the stack trace in the previous location where the exception was raised ---
   在 System.Runtime.ExceptionServices.ExceptionDispatchInfo.Throw()
   在 System.Runtime.CompilerServices.TaskAwaiter.HandleNonSuccessAndDebuggerNotification(Task task)
   在 Docker.Engines.WSL2.LinuxWSL2Engine.<DoStartAsync>d__26.MoveNext() 位置 C:\workspaces\PR-15387\src\github.com\docker\pinata\win\src\Docker.Desktop\Engines\WSL2\LinuxWSL2Engine.cs:行号 104
--- The end of the stack trace in the previous location where the exception was raised ---
   在 System.Runtime.ExceptionServices.ExceptionDispatchInfo.Throw()
   在 System.Runtime.CompilerServices.TaskAwaiter.HandleNonSuccessAndDebuggerNotification(Task task)
   在 Docker.ApiServices.StateMachines.TaskExtensions.<WrapAsyncInCancellationException>d__0.MoveNext() 位置 C:\workspaces\PR-15387\src\github.com\docker\pinata\win\src\Docker.ApiServices\StateMachines\TaskExtensions.cs:行号 29
--- The end of the stack trace in the previous location where the exception was raised ---
   在 System.Runtime.ExceptionServices.ExceptionDispatchInfo.Throw()
   在 System.Runtime.CompilerServices.TaskAwaiter.HandleNonSuccessAndDebuggerNotification(Task task)
   在 Docker.ApiServices.StateMachines.StartTransition.<DoRunAsync>d__5.MoveNext() 位置 C:\workspaces\PR-15387\src\github.com\docker\pinata\win\src\Docker.ApiServices\StateMachines\StartTransition.cs:行号 67
--- The end of the stack trace in the previous location where the exception was raised ---
   在 System.Runtime.ExceptionServices.ExceptionDispatchInfo.Throw()
   在 Docker.ApiServices.StateMachines.StartTransition.<DoRunAsync>d__5.MoveNext() 位置 C:\workspaces\PR-15387\src\github.com\docker\pinata\win\src\Docker.ApiServices\StateMachines\StartTransition.cs:行号 92
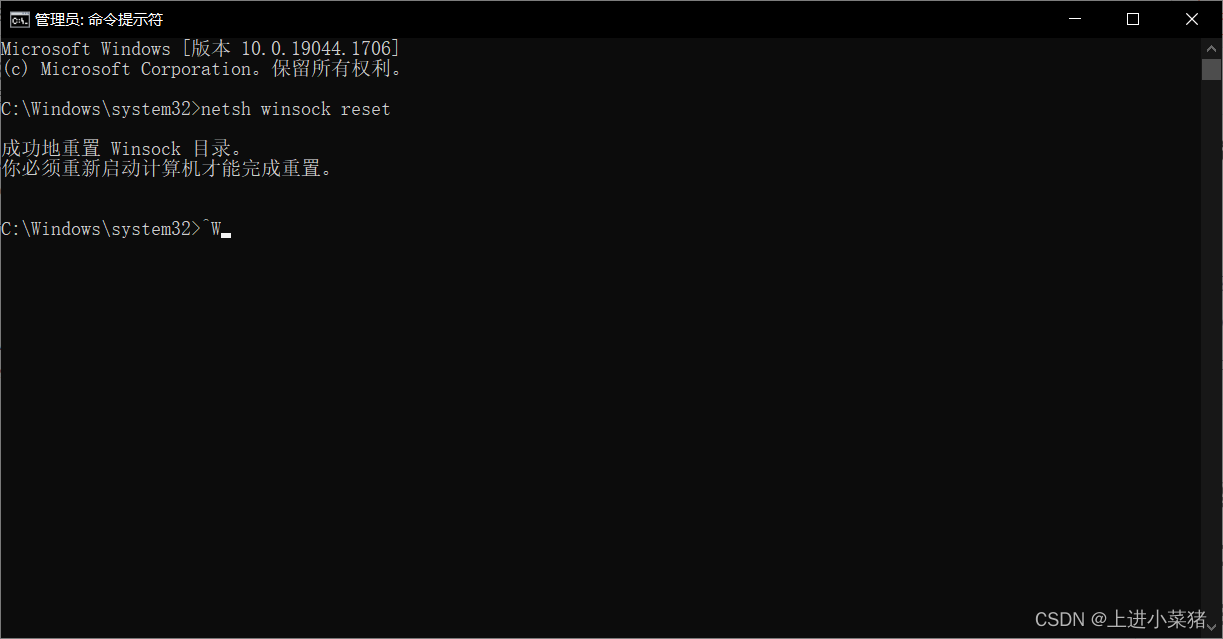
We open cmd as an administrator:
enter:
netsh winsock reset
Execute, 100% solve this problem!
Note: This command should be used with caution. This is to delete the original docker system, which is equivalent to resetting docker-desktop. The images and containers in me are gone. Restarting docker-desktop will regenerate docker-desktop and docker-desktop-data
lnThe function is to establish a synchronous link for a certain file in another location.
The most commonly used parameter of this command is -s, the
specific usage is: ln -s Source file Target file.
When the same file is used in different directories, there is no need to put a file that must be the same in every required directory, but only in a fixed directory, put the file, and then put it in other directories Use the ln command to link (link) it, and you don’t have to repeatedly take up disk space.
For example: ln -s /bin/hello.sh /usr/local/bin/hello-s is the meaning of the code (symbolic).
There are two points to note here:
first, the ln command will keep every link file synchronized, that is, no matter where you change, other files will have the same changes;
second, the ln link There are two kinds of soft links and hard links.
Soft links are that ln -s src dst,it will only generate a mirror image of a file in the location you selected, and will not occupy disk space.
Hard links ln src dst, without the parameter -s, will be in the location you selected. Generate a file with the same size as the source file, whether it is a soft link or a hard link, the file keeps changing synchronously.
Deletion of a connection:
Direct rm dst
Example :rm /usr/local/bin/hello
If you use ls to view a directory, and find that some files have a @symbol behind them, that is a file generated by the ln command, use the ls -lcommand to view, and you can see the displayed link path.
root@ubuntu:/tmp# ./hello.sh
hello world
root@ubuntu:/tmp# ln -s /tmp/hello.sh /bin/shello
root@ubuntu:/tmp# shello
hello world
root@ubuntu:/tmp# ln /tmp/hello.sh /bin/hhello
root@ubuntu:/tmp# hhello
hello world
root@ubuntu:/tmp# rm -rf /bin/shello
root@ubuntu:/tmp# shello
bash: /bin/shello: No such file or directory
root@ubuntu:/tmp# hhello
hello world
root@ubuntu:/tmp# rm -rf /bin/hhello
root@ubuntu:/tmp# ./hello.sh
hello world
root@ubuntu:/tmp# In this article, we’ll focus on how to create and identify threads. We’ll also provide an example of a working C program that explains how to do basic thread programming.
Just as processes are identified by process ID, threads are identified by thread ID. But interestingly, the similarities between the two end there.
The above points give an idea about the difference between process ID and thread ID.
The thread ID is represented by the type “pthread_t”. As we’ve already discussed, in most cases this type is a struct, so there must be a function that can compare two thread IDs.
#include <pthread.h>
int pthread_equal(pthread_t tid1,pthread_t tid2);
As you can see, the above function takes two thread IDs and returns a non-zero value if the two thread IDs are equal, and zero otherwise.
Another situation may arise when a thread wants to know its own thread ID. For this case, the following function provides the required service.
#include <pthread.h>
pthread_t pthread_self(void);
So we see that the function ‘pthread_self()’ is used by a thread to print its own thread ID.
Now, one would ask the situation where the above two functions are required. Suppose there is a case where a linked list contains data from different threads. Each node in the list contains a thread ID and corresponding data. Now whenever a thread tries to get its data from the linked list, it first gets its own ID by calling ‘pthread_self()’, then it calls ‘pthread_equal()’ on each node to see if the node contains its data.
An example of the general case discussed above is where the main thread gets jobs to process and then pushes them into a linked list. Now the individual worker threads parse the linked list and extract the jobs assigned to them.
Normally, when a program starts and becomes a process, it starts with the default thread. So we can say that every process has at least one thread of control. A process can create additional threads using the following functions:
#include <pthread.h>
int pthread_create(pthread_t *restrict tidp, const pthread_attr_t *restrict attr, void *(*start_rtn)(void), void *restrict arg)
The above function takes four arguments, let’s discuss them first:
Below is sample code where we try to use all three functions discussed above.
#include<stdio.h>
#include<string.h>
#include<pthread.h>
#include<stdlib.h>
#include<unistd.h>

pthread_t tid[2];

void* doSomeThing(void *arg)
{
    unsigned long i = 0;
    pthread_t id = pthread_self();

    if(pthread_equal(id,tid[0]))
    {
        printf("\n First thread processing\n");
    }
    else
    {
        printf("\n Second thread processing\n");
    }

    for(i=0; i<(0xFFFFFFFF);i++);

    return NULL;
}

int main(void)
{
    int i = 0;
    int err;

    while(i < 2)
    {
        err = pthread_create(&(tid[i]), NULL, &doSomeThing, NULL);
        if (err != 0)
            printf("\ncan't create thread :[%s]", strerror(err));
        else
            printf("\n Thread created successfully\n");

        i++;
    }

    sleep(5);
    return 0;
}
So what this code does is:
Now, when the above code runs, the output is as follows:
$ ./threads
Thread created successfully
First thread processing
Thread created successfully
Second thread processing
As the output shows, create the first thread and start processing, then create the second thread and start processing. One thing to note here is that the execution order of threads is not always fixed. It depends on the scheduling algorithm of the operating system.
Note: All explanations in this article are done on Posix threads. As can be understood from the type, the pthread_t type represents a POSIX thread. If an application wants to test whether POSIX threads are supported, the application can use the macro _POSIX_THREADS for compile-time testing. To compile code that contains calls to the posix API, use the compile option “-pthread”.
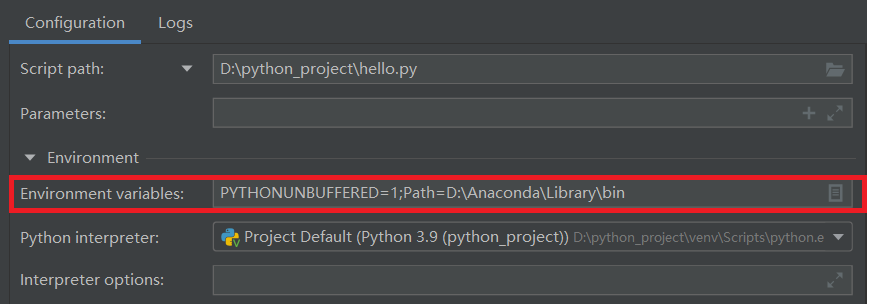
After updating python3.9, import numpy reported an error: DLL load failed while importing _multiarray_umath: The specified module could not be found.
The main problem is environment variables. The solution is: Add an environment variable in pycharm: Path=Anaconda root directory\Library\bin
I got an error when initializing mysql:
FATAL ERROR: please install the following Perl modules before executing /application/mysql/scripts/mysql_install_db:
Data::Dumper
reason:
Missing Data::Dumper in perl module
solution:
Install the autoconf library (the Data:Dumper module will be installed when this package is installed)
yum -y install autoconf
Error Messages:
Bringing up interface eth0: Error: No suitable device found: no device found for connection ‘System eth0’.
The reason is because the HWaddr in the /etc/udev/rules.d/70-persistent-net.rules file and the HWaddr of /etc/sysconfig/network-scripts/ifcfg-eth0 do not match the HWaddr of the new machine
The solution is to restart the machine after deleting /etc/udev/rules.d/70-persistent-net.rules, and then change the HWaddr of /etc/sysconfig/network-scripts/ifcfg-eth0 and 70-persistent-net.rules equal
1. Problem
fatal: refusing to merge unrelated histories
2. Scene
Merge other branches into master branch
3. Reason
The two branches are two different versions with different commit histories, so an error is reported.
4. Solutions
Allow unrelated historical commits and force merges, the code is as follows:
git pull origin master --allow-unrelated-histories
Error message:
Error running XXX. Command line is too long.
Shorten the command line via JAR manifest or via a classpath file and rerun
problem solved:
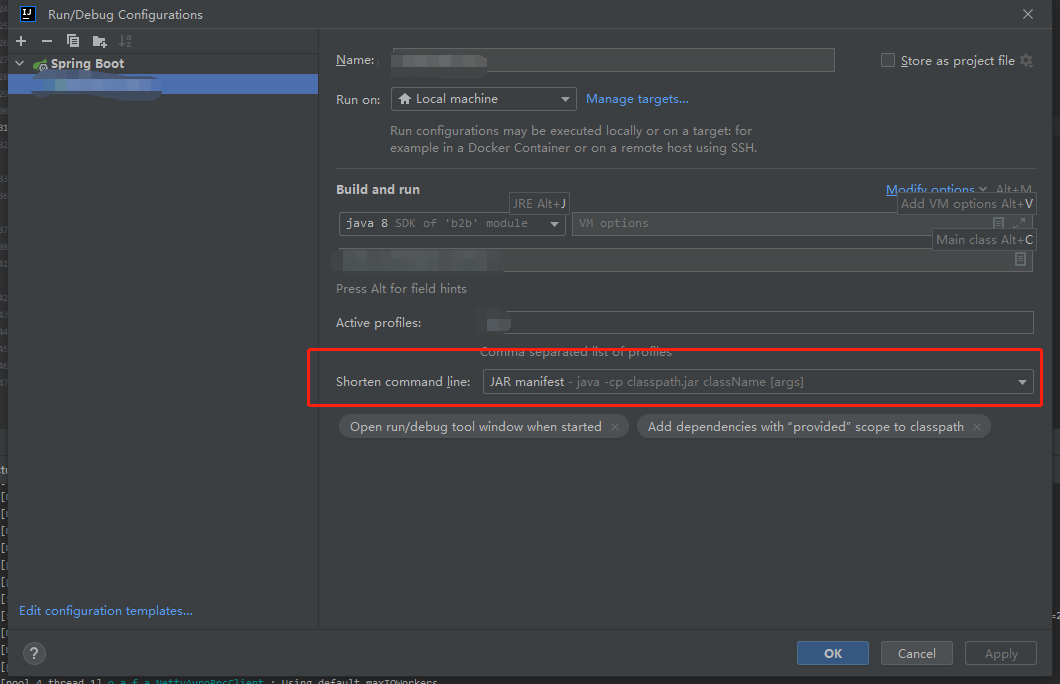
Shorten command line: The default is none, change it to JAR mainfest.