1. Why
Redis is configured with a password.
2. Methods
Use the auth command to enter the password. The rules are as follows:
auth yourPassword
Examples
auth 123456
Then you can insert or query.
Redis is configured with a password.
Use the auth command to enter the password. The rules are as follows:
auth yourPassword
Examples
auth 123456
Then you can insert or query.
Using cronolog to segment the image of tomcat9 catalina.out Log; Tomcat’s catalina.out The log file cannot be divided by date. All the log files are output and written to a single file catalina.out In this way, the. Out log will become larger and larger, and the cost of operation and maintenance will increase. To archive log files by date, cronolog can be used to realize log segmentation.
Use the yum command to install cronlog
yum install cronolog
Directory: Tomcat/bin/ catalina.sh
Original setting:
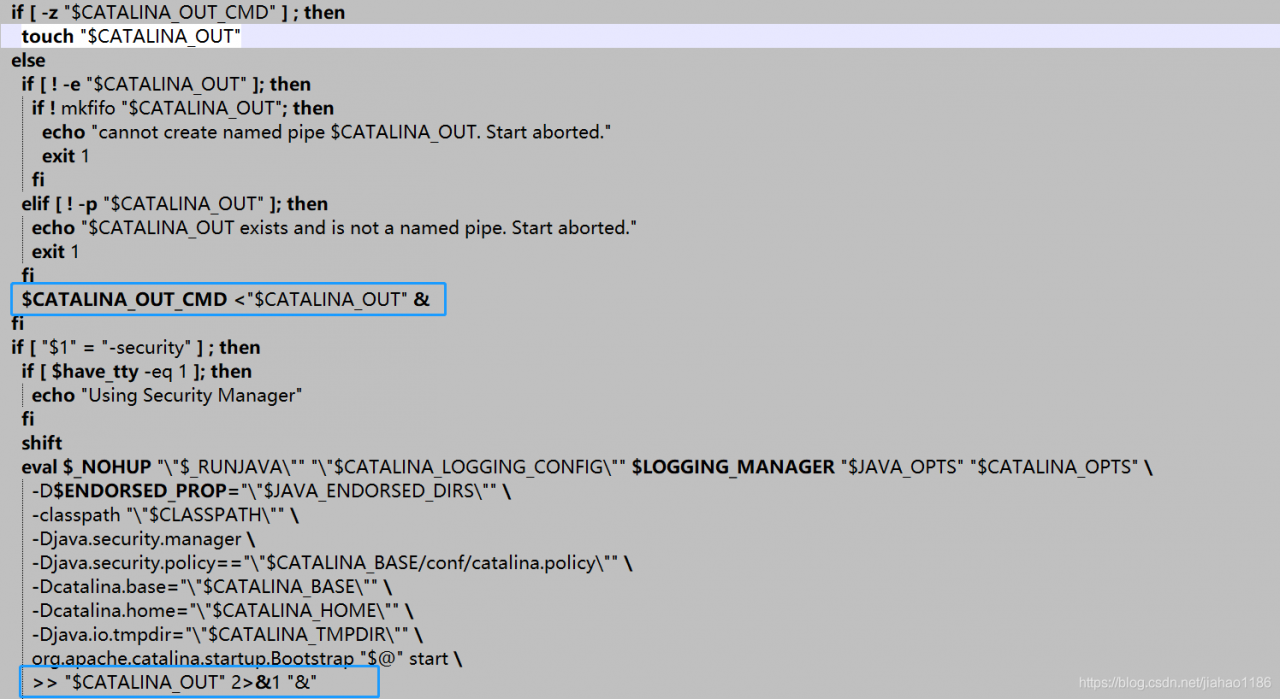
After modification:
shift
 # touch "$CATALINA_OUT"
  if [ "$1" = "-security" ] ; then
    if [ $have_tty -eq 1 ]; then
      echo "Using Security Manager"
    fi
    shift
    eval $_NOHUP "\"$_RUNJAVA\"" "\"$LOGGING_CONFIG\"" $LOGGING_MANAGER $JAVA_OPTS $CATALINA_OPTS \
      -D$ENDORSED_PROP="\"$JAVA_ENDORSED_DIRS\"" \
      -classpath "\"$CLASSPATH\"" \
      -Djava.security.manager \
      -Djava.security.policy=="\"$CATALINA_BASE/conf/catalina.policy\"" \
      -Dcatalina.base="\"$CATALINA_BASE\"" \
      -Dcatalina.home="\"$CATALINA_HOME\"" \
      -Djava.io.tmpdir="\"$CATALINA_TMPDIR\"" \
      org.apache.catalina.startup.Bootstrap "$@" start \
      2&>&1 | /usr/local/sbin/cronolog "$CATALINA_BASE/logs/catalina-%Y-%m-%d.out" &

  else
    eval $_NOHUP "\"$_RUNJAVA\"" "\"$LOGGING_CONFIG\"" $LOGGING_MANAGER $JAVA_OPTS $CATALINA_OPTS \
      -D$ENDORSED_PROP="\"$JAVA_ENDORSED_DIRS\"" \
      -classpath "\"$CLASSPATH\"" \
      -Dcatalina.base="\"$CATALINA_BASE\"" \
      -Dcatalina.home="\"$CATALINA_HOME\"" \
      -Djava.io.tmpdir="\"$CATALINA_TMPDIR\"" \
      org.apache.catalina.startup.Bootstrap "$@" start \
      2&>&1 | /usr/local/sbin/cronolog "$CATALINA_BASE/logs/catalina-%Y-%m-%d.out" &
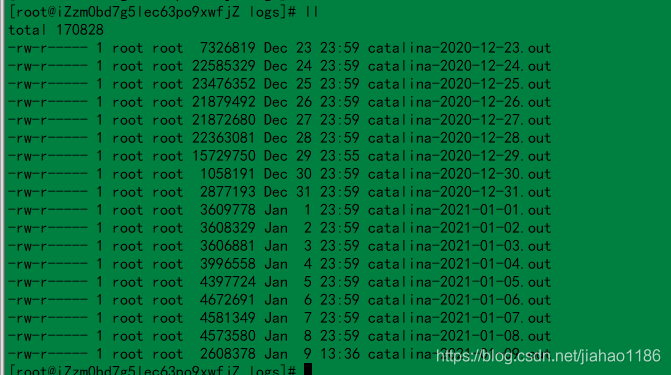
fiRestart Tomcat and the log will take effect according to the date. A screenshot of the log file is shown below.
Add annotation on all mapper interfaces @ mapper; spring boot starts annotation auto scanning.

The following is the Default scan configuration of spring boot. When auto scan is started, all custom beans will be automatically scanned

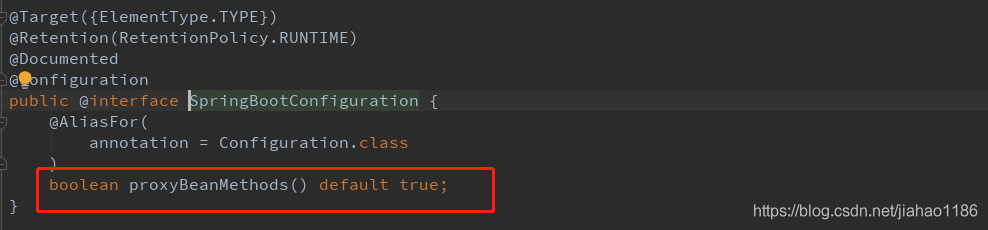
Add the annotation @ mapperscan to the springboot startup class to mark the package path of Dao. Once and for all, recommended!!
import org.mybatis.spring.annotation.MapperScan;
import org.springframework.boot.SpringApplication;
import org.springframework.boot.autoconfigure.SpringBootApplication;
import org.springframework.cloud.client.discovery.EnableDiscoveryClient;
import springfox.documentation.swagger2.annotations.EnableSwagger2;

@EnableSwagger2
@EnableDiscoveryClient
@MapperScan(basePackages = {"com.mp.service.provider.dao"})
@SpringBootApplication
public class MpServiceProviderApplication {
    public static void main(String[] args) {
        SpringApplication.run(MpServiceProviderApplication .class, args);
    }
}
import org.springframework.context.annotation.Bean;
import org.springframework.context.annotation.Configuration;
import org.springframework.web.servlet.config.annotation.CorsRegistry;
import org.springframework.web.servlet.config.annotation.WebMvcConfigurer;

@Configuration
public class CorsConfiguration {
    @Bean
    public WebMvcConfigurer corsConfigurer() {
        return new WebMvcConfigurer() {
            @Override
            public void addCorsMappings(CorsRegistry registry) {
                registry.addMapping("/**")
                        .allowCredentials(true)
                        .allowedMethods("POST", "GET", "PUT", "OPTIONS", "DELETE")
                        .allowedOrigins("*");
            }
        };
    }

}
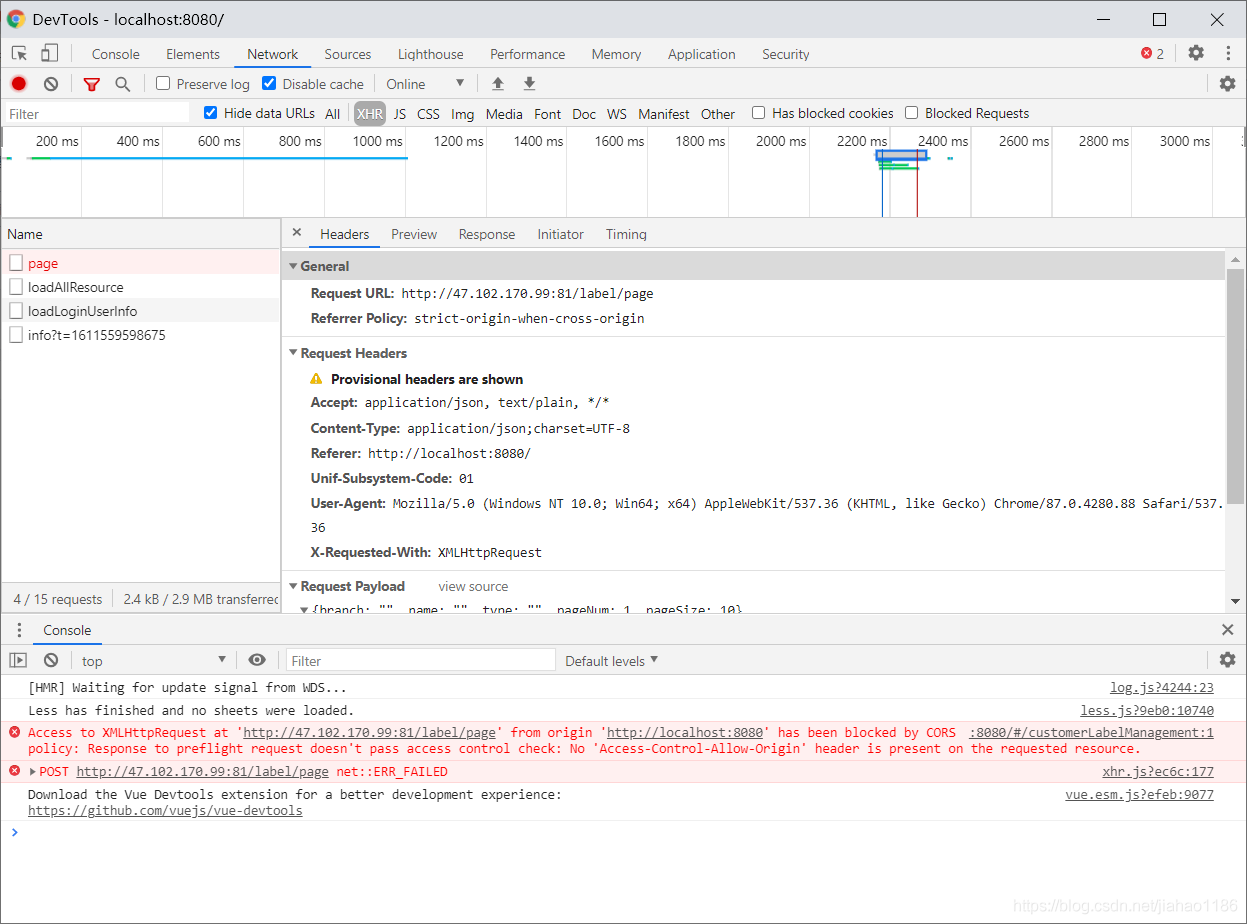
The 1) Attribute value, origins: configure the sources that can be accessed, for example: 0 https://adong.blog.csdn.net/article/details/113126033 2) Property methods: configure the methods of cross domain request support, such as get, post, delete, put, and return all supported methods at one time. 3) Attribute maxage: configures the valid time of the pre check request. The unit is seconds. It indicates how long the second pre check request does not need to be issued. 4) Attribute allowcredentials: configure whether to allow sending cookies for credential requests. Cookies are not sent by default. 5) Attribute allowedheaders: configure the allowed custom request headers for pre checking requests. 6) Attribute exposedheaders: configure the header information of the response, in which other header information can be set. Without configuration, cache control, content language, content type, expires, last modified and pragma fields can be obtained by default. Cause analysis: SVN certificate failed Solution: 1. Open command desk (CMD) 2. Enter SVN LS address (example: SVN LS) https://111.111.111.111/svn/abc ) 3. After the console outputs, enter P and enter (this command is to ask SVN to ignore the certificate and then follow the prompt to solve the problem of server SSL certificate verification failed: certificate issued) Problem Description: the local machine contains SVN command line. If svnsetting svnkit/javahl = true, there will be a conflict with the local SVN command line, resulting in the failure to check out items normally solution: if both svnsetting svnkit and javahl are false, the program will automatically call native SVN in path. Execution AutowiringSupport.processInjectionBasedOnCurrent Context } The URL can’t display some special symbols, so the encoding will be used at this time. The encoding format is: a percent sign followed by the ASCII (hexadecimal) code value of the corresponding character. For example, the encoding value of a space is% 20. (ASCII reference) For example: http://192.168.xxx.xxx/source/20190112 121000.txt Note: such a URL cannot be successfully requested because the URL contains special words. The example URL contains special characters for spaces, so it needs to be converted to http://192.168.xxx.xxx/source/20190112%20121000.txt Such a URL can request success. Supplementary points: Encoding and decoding functions of URL in Java java.net.URLEncoder . encode (string s) and java.net.URLDecoder . decode (string s); 1. First of all, find out the PID of the process number that occupies port 8080 ( tomcat, the default is port 8080. If you modify the monitoring port of tomcat, please write in your Tomcat port number or other port numbers ) what I query is port 7777 netstat -ano | findstr 8080 The last column of the command output indicates the number of the process occupying port 7777, assuming 10976 2. Kill the process, thus freeing the port 1. See if Tomcat is already running If Tomcat is running, the result will be similar to the following: From the above output information, we can know that the process number of Tomcat execution is 5144. 2. Execute the following command to kill the 5144 process 3. Get the occupancy of a certain port (for example, get the occupancy of port 5533 below) The result is as follows: you can see that the process number is 2960, we just need to kill it. Kill process command: npm is installed in this situation. Theme: Detection Method: 1, download Visual C++ 2015 Build Tools Downloaded 38142142;: http://go.microsoft.com/fwlink/?LinkId=691126&_hstc=268264337.464d867a453cb3e0785b9f7f82b81bb9.1517626516073.1519263951770.1519269195452.4&_hssc=268264337.1.1519269195452&_hsfp=3527706607&fixForIE=.exe 2.download GTK, because you need to load some of it, download complete to C:\GTK immediately; download 3814214;(64 seconds): http://ftp.gnome.org/pub/GNOME/binaries/win64/gtk+/2.22/gtk+-bundle_2.22.1-20101229_win64.zip 3. This is a very dependent step, inspiring cmd command, input set VCTargetsPath=C:\Program Files (x86)\MSBuild\ Microsoft.Cpp \v4.0\v140;
> access control allow- Credentials
allowedheads
string array
class or interface
no
access control request heads
Note:
exposed heads
string array
class or interface
no
access control expose heads
* indicates that all domain names are allowed.
PgSQL associated tables perform update to avoid using in query SQL
update m_label set leaf =1 from
        (select t.id as mid from m_label t
         where
                 NOT EXISTS (select distinct(b.parent_id) as id from m_label b where t.id=b.parent_id)) as tb
where id = tb.mid
SVN Error:svn: E230001: Server SSL certificate verification failed: certificate issued


How to download files by post submission under Ajax
/*===================Download file
 * options:{
 * url:'',  //Download Url
 * data:{name:value}, //the datas you want to post
 * method:'post'
 * }
 */
var DownLoadFile = function (options) {
    var config = $.extend(true, { method: 'post' }, options);
    var $iframe = $('<iframe id="down-file-iframe" /&>');
    var $form = $('<form target="down-file-iframe" method="' + config.method + '" /&>');
    $form.attr('action', config.url);
    for (var key in config.data) {
        $form.append('<input type="hidden" name="' + key + '" value="' + config.data[key] + '" /&>');
    }
    $iframe.append($form);
    $(document.body).append($iframe);
    $form[0].submit();
    $iframe.remove();
}
Solve the problem that the native machine cannot use ant script checkout project
example: & lt; svnsetting ID=“ svn.setting ” svnkit=”false” javahl=”false” username=”${svn_ user_ name}” password=”${svn_ user_ PWD} “/ &>
extension of the problem: if SVN command line is not installed on this machine, Download svnant and introduce svnkit/javahl jar package into ant/lib, svnkit/javahl corresponds to true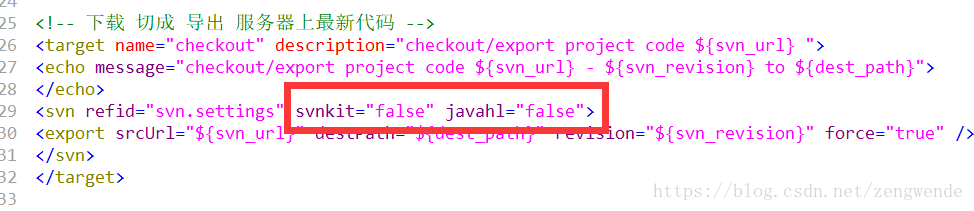
Spring bean object cannot be injected into quartz job
Java handles special characters in URL
some characters have special meanings in the URL, and the basic coding rules are as follows:
special meaning
hexadecimal value
1. + indicates empty space (spaces cannot be used in the URL)% 20
2/ Separate directory and subdirectory% 2F
3.?separate actual URL and parameter% 3F
4.% specify special character% 25
2 5. # indicates the separator% 26 between the parameters specified in the bookmark% 23
6. & amp; URL
URL encoding and decoding functions in JavaScript
escape (string s) and unescape (string s);
JavaScript
Kill Tomcat process in windows and Linux environment (solve the problem of other ports being occupied)
Killing process in Windows
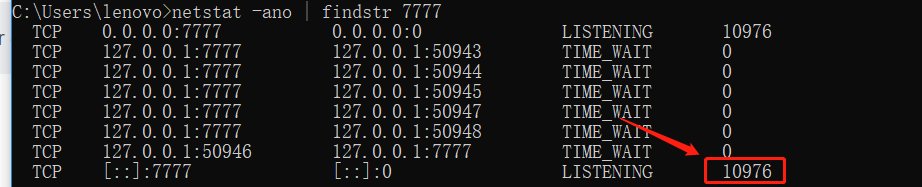
taskkill /f /pid 10976

Closing Tomcat process under Linux operating system
ps -ef |grep tomcat
sun 5144 1 0 10:21 pts/1 00:00:06 /java/jdk/bin/java -Djava.util.logging.manager=org.apache.juli.ClassLoaderLogManager

-Djava.endorsed.dirs=/java/tomcat/common/endorsed -classpath :/java/tomcat/bin/bootstrap.jar:/java/tomcat/bin/commons-logging-api.jar

-Dcatalina.base=/java/tomcat -Dcatalina.home=/java/tomcat -Djava.io.tmpdir=/java/tomcat/temp org.apache.catalina.startup.Bootstrap start
pid = 5144 kill -9 5144
sudo lsof -i :5533
COMMAND  PID        USER   FD   TYPE             DEVICE SIZE/OFF NODE NAME
java    2960 zhengcanrui   55u  IPv6 0xb866409b03202701      0t0  TCP *:5533 (LISTEN)
kill -9 2960
The imported project “c:\Microsoft.Cpp.Default.props” was not found
