When developing jetty 9 embedded system, it starts normally, but when browsing the page, an error is reported as follows:
java.lang.NoSuchMethodError : javax.servlet.http . HttpServletRequest.isAsyncStarted () Z reason: jetty 9 relies on servlet API version 3. X. if other third-party open source libraries in the project implicitly rely on servlet API version 2. X, this error will be reported. Reprinted: https://www.cnblogs.com/yjmyzz/p/5090990.html
At first, I saw more than n solutions on the Internet. Unfortunately, I tried them all, but none of them solved my problem. Later, I tossed around and deleted the. Eclipse (click eclipse) in my C disk. After that, I rerun eclipse. After a while, I can start eclipse normally. Through this warning, I can’t quit eclipse abnormally
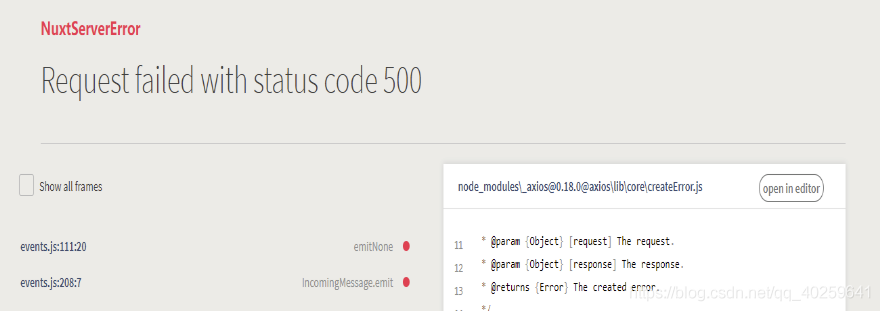
Usually using nuxt and deploying it online are normal, and occasionally 500 errors are reported one day;
Nuxt.js The operation ( NPM run dev ) reported the following error:
The server error log is as follows:
0|qiu  |  ERROR  Request failed with status code 500                           20:17:14
0|qiu  |   at createError (node_modules/axios/lib/core/createError.js:16:15)
0|qiu  |   at settle (node_modules/axios/lib/core/settle.js:18:12)
0|qiu  |   at IncomingMessage.handleStreamEnd (node_modules/axios/lib/adapters/http.js:201:11)
0|qiu  |   at IncomingMessage.emit (events.js:187:15)
0|qiu  |   at IncomingMessage.EventEmitter.emit (domain.js:441:20)
0|qiu  |   at endReadableNT (_stream_readable.js:1094:12)
0|qiu  |   at process._tickCallback (internal/process/next_tick.js:63:19)
2、 Solutions
500 status code: server internal error, unable to complete the request.
Generally speaking, this problem occurs when the server code fails
So the problem lies in the back end, check the interface
3、 Solutions
Annotate the code one by one, and find an interface error in the page, so that the problem can be solved after the back-end correction;
The error of the request interface is as follows (PHP in the background)
It’s a clumsy way to comment the code one by one. If you can, you can directly look at the network of the console to see the interface in error;
4、 Summary
because Nuxt.js It is a framework for server-side rendering. As long as an interface in the page reports an error and the server returns an error, the front-end display page will crash;
And an interface error, nuxt only returns 500 errors, can’t directly locate the problem, need to check one by one, hope nuxt is more and more powerful
The wechat app I developed (online): if you are interested, you can have a look at it and pay close attention to it with one click. Thank you ~ 1. Xiaolv depression Test Assistant (wechat APP): a completely free and ad free depression self-test app, which collects questionnaires from global authorities and provides them to you for free. There are novel score records and posters to share, You can see and learn!
(venv) D:\pyvenv_xlwings64\venv>pip list
Package    Version
---------- -------
comtypes   1.1.7
pip        19.2.3
PyQt5      5.13.1
PyQt5-sip  4.19.19
pywin32    225
setuptools 41.2.0
wheel      0.33.6
xlwings    0.15.3

(venv) D:\pyvenv_xlwings64\venv>python
Python 3.6.5 |Anaconda, Inc.| (default, Mar 29 2018, 13:32:41) [MSC v.1900 64 bit (AMD64)] on win32
Type "help", "copyright", "credits" or "license" for more information.
>>> import xlwings
Traceback (most recent call last):
  File "<stdin>", line 1, in <module>
  File "D:\pyvenv_xlwings64\venv\lib\site-packages\xlwings\__init__.py", line 42, in <module>
    from . import _xlwindows as xlplatform
  File "D:\pyvenv_xlwings64\venv\lib\site-packages\xlwings\_xlwindows.py", line 10, in <module>
    import win32api
ImportError: DLL load failed: The specified program could not be found.
>>>
Cause of the problem
There is a problem with the new version 224 and 225. Just go back to version 223
(venv) D:\pyvenv_xlwings64\venv>pip install pywin32==223
Collecting pywin32==223
  Downloading https://files.pythonhosted.org/packages/9f/9d/f4b2170e8ff5d825cd4398856fee88f6c70c60bce0aa8411ed17c1e1b21f/pywin32-223-cp36-cp36m-win_amd64.whl (9.0MB)
     |████████████████████████████████| 9.0MB 218kB/s
Installing collected packages: pywin32
Successfully installed pywin32-223

(venv) D:\pyvenv_xlwings64\venv>
(venv) D:\pyvenv_xlwings64\venv>
(venv) D:\pyvenv_xlwings64\venv>
(venv) D:\pyvenv_xlwings64\venv>pip list
Package    Version
---------- -------
comtypes   1.1.7
pip        19.2.3
PyQt5      5.13.1
PyQt5-sip  4.19.19
pywin32    223
setuptools 41.2.0
wheel      0.33.6
xlwings    0.15.3

(venv) D:\pyvenv_xlwings64\venv>python
Python 3.6.5 |Anaconda, Inc.| (default, Mar 29 2018, 13:32:41) [MSC v.1900 64 bit (AMD64)] on win32
Type "help", "copyright", "credits" or "license" for more information.
>>> import xlwings
>>>
conda install keras
Collecting package metadata (current_repodata.json): done
Solving environment: failed with initial frozen solve. Retrying with flexible solve.
Solving environment: failed with repodata from current_repodata.json, will retry with next repodata source.
Solution:
conda config --set channel_priority flexible
Then it’s running normally
conda install keras
Collecting package metadata (current_repodata.json): done
Solving environment: failed with initial frozen solve. Retrying with flexible solve.
Solving environment: failed with repodata from current_repodata.json, will retry with next repodata source.
Collecting package metadata (repodata.json): done
Solving environment: done

## Package Plan ##

  environment location: E:\Apps\Anaconda3

  added/updated specs:
    - keras


The following packages will be downloaded:

    package                    |            build
    ---------------------------|-----------------
    tensorflow-base-1.15.0     |mkl_py37h190a33d_0        36.2 MB
    ------------------------------------------------------------
                                           Total:        36.2 MB

The following NEW packages will be INSTALLED:

  keras              pkgs/main/win-64::keras-2.2.4-0
  keras-base         pkgs/main/win-64::keras-base-2.2.4-py37_0

The following packages will be DOWNGRADED:

  tensorflow                       2.0.0-mkl_py37he1bbcac_0 --> 1.15.0-mkl_py37h3789bd0_0
  tensorflow-base                  2.0.0-mkl_py37hd1d5974_0 --> 1.15.0-mkl_py37h190a33d_0
  tensorflow-estima~                     2.0.0-pyh2649769_0 --> 1.15.1-pyh2649769_0


Proceed ([y]/n)?y
After looking at the installation process, it seems that keras is based on tensorflow 1.5…
Then I gave up keras, refactored the code, and used the tensorflow.keras Instead of keras. Most of keras are in tensorflow.keras Have, some can’t directly correspond to their own online search on the line.
Error:
Plugin is too old, please update to a more recent version, or set ANDROID_DAILY_OVERRIDE environment variable to “fa35b67976287d3da3af2aeff1d760df30957c4c”
Shotscreen
Solution
Main project build.gradle file modification
Baidu in the online solution to others, found that the need for the following two steps can be achieved, but most of the methods are only the first step.
Step 1:
Open packages in the installation folder of sublime text and find the Python.sublime -Package, open with decompression software, modify the files inside Python.sublime -Build, add “encoding”: “cp936”
    {
      "cmd": ["C:/Python33/python.exe", "-u", "$file"],
      "file_regex": "^[ ]*File \"(...*?)\", line ([0-9]*)",
      "selector": "source.python",
      "encoding": "cp936"//Add the line, followed by a comma if there is content below
    }
Step 2:
Pythonioencoding is added to the system variable, and UTF-8 is filled in the value
      On the desktop, right-click on Computer and select Properties, select Advanced System Settings, select the Advanced tab, select Environment Variables

      Restart sublime text2.
<?xml version="1.0" encoding="UTF-8"?>

<!--
Licensed to the Apache Software Foundation (ASF) under one
or more contributor license agreements.  See the NOTICE file
distributed with this work for additional information
regarding copyright ownership.  The ASF licenses this file
to you under the Apache License, Version 2.0 (the
"License"); you may not use this file except in compliance
with the License.  You may obtain a copy of the License at
    http://www.apache.org/licenses/LICENSE-2.0
Unless required by applicable law or agreed to in writing,
software distributed under the License is distributed on an
"AS IS" BASIS, WITHOUT WARRANTIES OR CONDITIONS OF ANY
KIND, either express or implied.  See the License for the
specific language governing permissions and limitations
under the License.
-->

<!--
 | This is the configuration file for Maven. It can be specified at two levels:
 |
 |  1. User Level. This settings.xml file provides configuration for a single user,
 |                 and is normally provided in ${user.home}/.m2/settings.xml.
 |
 |                 NOTE: This location can be overridden with the CLI option:
 |
 |                 -s /path/to/user/settings.xml
 |
 |  2. Global Level. This settings.xml file provides configuration for all Maven
 |                 users on a machine (assuming they're all using the same Maven
 |                 installation). It's normally provided in
 |                 ${maven.conf}/settings.xml.
 |
 |                 NOTE: This location can be overridden with the CLI option:
 |
 |                 -gs /path/to/global/settings.xml
 |
 | The sections in this sample file are intended to give you a running start at
 | getting the most out of your Maven installation. Where appropriate, the default
 | values (values used when the setting is not specified) are provided.
 |
 |-->
<settings xmlns="http://maven.apache.org/SETTINGS/1.0.0"
          xmlns:xsi="http://www.w3.org/2001/XMLSchema-instance"
          xsi:schemaLocation="http://maven.apache.org/SETTINGS/1.0.0 http://maven.apache.org/xsd/settings-1.0.0.xsd">


  <!-- localRepository
   | The path to the local repository maven will use to store artifacts.
   |
   | Default: ${user.home}/.m2/repository
  <localRepository>/path/to/local/repo</localRepository>
  -->
  <!-- Create your own download jar package address
  <localRepository>D:\mavens\LocalWarehouse</localRepository>-->
  <!-- The default address for downloading jar packages-->
  <localRepository>F:\Maven\repository</localRepository>


  <!-- interactiveMode
   | This will determine whether maven prompts you when it needs input. If set to false,
   | maven will use a sensible default value, perhaps based on some other setting, for
   | the parameter in question.
   |
   | Default: true
  <interactiveMode>true</interactiveMode>
  -->

  <!-- offline
   | Determines whether maven should attempt to connect to the network when executing a build.
   | This will have an effect on artifact downloads, artifact deployment, and others.
   |
   | Default: false
  <offline>false</offline>
  -->

  <!-- pluginGroups
   | This is a list of additional group identifiers that will be searched when resolving plugins by their prefix, i.e.
   | when invoking a command line like "mvn prefix:goal". Maven will automatically add the group identifiers
   | "org.apache.maven.plugins" and "org.codehaus.mojo" if these are not already contained in the list.
   |-->
  <pluginGroups>
    <!-- pluginGroup
     | Specifies a further group identifier to use for plugin lookup.
    <pluginGroup>com.your.plugins</pluginGroup>
    -->
  </pluginGroups>

  <!-- proxies
   | This is a list of proxies which can be used on this machine to connect to the network.
   | Unless otherwise specified (by system property or command-line switch), the first proxy
   | specification in this list marked as active will be used.
   |-->
  <proxies>
    <!-- proxy
     | Specification for one proxy, to be used in connecting to the network.
     |
    <proxy>
      <id>optional</id>
      <active>true</active>
      <protocol>http</protocol>
      <username>proxyuser</username>
      <password>proxypass</password>
      <host>proxy.host.net</host>
      <port>80</port>
      <nonProxyHosts>local.net|some.host.com</nonProxyHosts>
    </proxy>
    -->
  </proxies>

  <!-- servers
   | This is a list of authentication profiles, keyed by the server-id used within the system.
   | Authentication profiles can be used whenever maven must make a connection to a remote server.
   |-->
  <servers>
    <!-- server
     | Specifies the authentication information to use when connecting to a particular server, identified by
     | a unique name within the system (referred to by the 'id' attribute below).
     |
     | NOTE: You should either specify username/password OR privateKey/passphrase, since these pairings are
     |       used together.
     |
    <server>
      <id>deploymentRepo</id>
      <username>repouser</username>
      <password>repopwd</password>
    </server>
    -->

    <!-- Another sample, using keys to authenticate.
    <server>
      <id>siteServer</id>
      <privateKey>/path/to/private/key</privateKey>
      <passphrase>optional; leave empty if not used.</passphrase>
    </server>
    -->
  </servers>

  <!-- mirrors
   | This is a list of mirrors to be used in downloading artifacts from remote repositories.
   |
   | It works like this: a POM may declare a repository to use in resolving certain artifacts.
   | However, this repository may have problems with heavy traffic at times, so people have mirrored
   | it to several places.
   |
   | That repository definition will have a unique id, so we can create a mirror reference for that
   | repository, to be used as an alternate download site. The mirror site will be the preferred
   | server for that repository.
   |-->
 <mirrors>
	 <!-- maven official mirror -->
	<!--
<mirror>
<id>mirrorId</id>
<mirrorOf>central</mirrorOf>
<name>Human Readable Name </name>
<url>http://repo1.maven.org/maven2/</url>
</mirror><-->

<!-- another mirror -->
<!--
	<mirror>
	<id>alimaven</id>
	<name>aliyun maven</name>
	<url>http://central.maven.org/maven2</url>
	<mirrorOf>central</mirrorOf>
	</mirror>

    <mirror>
    <id>Central</id>
    <url>http://repo1.maven.org/maven2</url>
    <mirrorOf>central</mirrorOf>
    </mirror>


	<mirror>
	<id>junit</id>
	<name>junit Address</name>
	<url>http://jcenter.bintray.com/</url>
	<mirrorOf>central</mirrorOf>
	</mirror>
-->

	<mirror>
	<id>alimaven</id>
	<name>aliyun maven</name>
	<url>http://maven.aliyun.com/nexus/content/repositories/central/</url>
	<mirrorOf>central</mirrorOf>
	</mirror>


  </mirrors>


  <!-- profiles
   | This is a list of profiles which can be activated in a variety of ways, and which can modify
   | the build process. Profiles provided in the settings.xml are intended to provide local machine-
   | specific paths and repository locations which allow the build to work in the local environment.
   |
   | For example, if you have an integration testing plugin - like cactus - that needs to know where
   | your Tomcat instance is installed, you can provide a variable here such that the variable is
   | dereferenced during the build process to configure the cactus plugin.
   |
   | As noted above, profiles can be activated in a variety of ways. One way - the activeProfiles
   | section of this document (settings.xml) - will be discussed later. Another way essentially
   | relies on the detection of a system property, either matching a particular value for the property,
   | or merely testing its existence. Profiles can also be activated by JDK version prefix, where a
   | value of '1.4' might activate a profile when the build is executed on a JDK version of '1.4.2_07'.
   | Finally, the list of active profiles can be specified directly from the command line.
   |
   | NOTE: For profiles defined in the settings.xml, you are restricted to specifying only artifact
   |       repositories, plugin repositories, and free-form properties to be used as configuration
   |       variables for plugins in the POM.
   |
   |-->
  <profiles>
    <!-- profile
     | Specifies a set of introductions to the build process, to be activated using one or more of the
     | mechanisms described above. For inheritance purposes, and to activate profiles via <activatedProfiles/>
     | or the command line, profiles have to have an ID that is unique.
     |
     | An encouraged best practice for profile identification is to use a consistent naming convention
     | for profiles, such as 'env-dev', 'env-test', 'env-production', 'user-jdcasey', 'user-brett', etc.
     | This will make it more intuitive to understand what the set of introduced profiles is attempting
     | to accomplish, particularly when you only have a list of profile id's for debug.
     |
     | This profile example uses the JDK version to trigger activation, and provides a JDK-specific repo.
    <profile>
      <id>jdk-1.4</id>
      <activation>
        <jdk>1.4</jdk>
      </activation>
      <repositories>
        <repository>
          <id>jdk14</id>
          <name>Repository for JDK 1.4 builds</name>
          <url>http://www.myhost.com/maven/jdk14</url>
          <layout>default</layout>
          <snapshotPolicy>always</snapshotPolicy>
        </repository>
      </repositories>
    </profile>
    -->

    <!--
     | Here is another profile, activated by the system property 'target-env' with a value of 'dev',
     | which provides a specific path to the Tomcat instance. To use this, your plugin configuration
     | might hypothetically look like:
     |
     | ...
     | <plugin>
     |   <groupId>org.myco.myplugins</groupId>
     |   <artifactId>myplugin</artifactId>
     |
     |   <configuration>
     |     <tomcatLocation>${tomcatPath}</tomcatLocation>
     |   </configuration>
     | </plugin>
     | ...
     |
     | NOTE: If you just wanted to inject this configuration whenever someone set 'target-env' to
     |       anything, you could just leave off the <value/> inside the activation-property.
     |
    <profile>
      <id>env-dev</id>
      <activation>
        <property>
          <name>target-env</name>
          <value>dev</value>
        </property>
      </activation>
      <properties>
        <tomcatPath>/path/to/tomcat/instance</tomcatPath>
      </properties>
    </profile>
    -->
  </profiles>

  <!-- activeProfiles
   | List of profiles that are active for all builds.
   |
  <activeProfiles>
    <activeProfile>alwaysActiveProfile</activeProfile>
    <activeProfile>anotherAlwaysActiveProfile</activeProfile>
  </activeProfiles>
  -->

</settings>