Category Archives: Linux

[. Net] Several Ways to Generate GUID

preface

 1、GUID:Global Unique Identifier (GUID, Globally Unique Identifier)
 2. The format of GUID is "xxxxxxxxx-xxxx-xxxx-xxxx-xxxxxxxxxxxxxxxx", where each x is a hexadecimal number or character in the range 0-9 or a-f

How to generate guids

var uuid = Guid.NewGuid().ToString(); // 9af7f46a-ea52-4aa3-b8c3-9fd484c2af12  
  
var uuidN = Guid.NewGuid().ToString("N"); // e0a953c3ee6040eaa9fae2b667060e09   
  
var uuidD = Guid.NewGuid().ToString("D"); // 9af7f46a-ea52-4aa3-b8c3-9fd484c2af12  
  
var uuidB = Guid.NewGuid().ToString("B"); // {734fd453-a4f8-4c5d-9c98-3fe2d7079760}  
  
var uuidP = Guid.NewGuid().ToString("P"); //  (ade24d16-db0f-40af-8794-1e08e2040df3)  
  
var uuidX = Guid.NewGuid().ToString("X"); // {0x3fa412e3,0x8356,0x428f,{0xaa,0x34,0xb7,0x40,0xda,0xaf,0x45,0x6f}} 

Prometheus auto discovery and re labeling based on consumer

# add meta informations
curl -X PUT -d '{"id": "db004-hf","name": "node","address": "172.16.168.15","port": 9101,"tags": ["nodes","hf004"],"meta":{"idc":"hf"},"checks": [{"http": "http://172.16.168.15:9101/metrics", "interval": "5s"}]}'  http://172.16.168.10:8500/v1/agent/service/register

scrape_configs:
- job_name: 'consul-node'
  consul_sd_configs:
  - server: '172.16.168.10:8500'
    tags:
    - "nodes"
    refresh_interval: 3s
  relabel_configs:
    - source_labels: [__meta_consul_tags]
      regex: .*hf004.*
      action: keep
    - regex: __meta_consul_service_metadata_(.+)
      action: labelmap

After restarting Prometheus, you can see that the label is automatically marked.

Android: How to Start App Automatically

Need to register for static broadcast (dynamic broadcast)

Give permission:

<uses-permission android:name="android.permission.RECEIVE_BOOT_COMPLETED"/>

Register static broadcast receiver:

<receiver android:name=".MainActivity$MyBroadcastReceiver">
            <intent-filter>
                <action android:name="android.intent.action.BOOT_COMPLETED"/>
            </intent-filter>
        </receiver>

All configuration information:

<?xml version="1.0" encoding="utf-8"?>
<manifest xmlns:android="http://schemas.android.com/apk/res/android"
    package="com.example.startactivity">
    <uses-permission android:name="android.permission.RECEIVE_BOOT_COMPLETED"/>
    <application
        android:allowBackup="true"
        android:icon="@mipmap/ic_launcher"
        android:label="@string/app_name"
        android:roundIcon="@mipmap/ic_launcher_round"
        android:supportsRtl="true"
        android:theme="@style/AppTheme">
        <receiver android:name=".MainActivity$MyBroadcastReceiver">
            <intent-filter>
                <action android:name="android.intent.action.BOOT_COMPLETED"/>
            </intent-filter>
        </receiver>

        <activity android:name=".MainActivity">
            <intent-filter>
                <action android:name="android.intent.action.MAIN" />

                <category android:name="android.intent.category.LAUNCHER" />
            </intent-filter>
        </activity>
    </application>

</manifest>

MainActivity

public class MainActivity extends AppCompatActivity {   

    @Override
    protected void onCreate(Bundle savedInstanceState) {
        super.onCreate(savedInstanceState);
        setContentView(R.layout.activity_main);
    }
    public class MyBroadcastReceiver extends BroadcastReceiver{  //Must be static, otherwise the startup will report an error

        @Override
        public void onReceive(Context context, Intent intent) {
                if(intent.getAction().equals(Intent.ACTION_BOOT_COMPLETED)){
                    Intent mainActivity=new Intent(context,MainActivity.class); //skip to MainActivity
                    mainActivity.addFlags(Intent.FLAG_ACTIVITY_NEW_TASK);
                    context.startActivity(mainActivity);
                }
        }
    }
}

The use of Android setgravity()

Today, let’s talk about how to use set gravity() in Android LinearLayout.

Previously, when doing a function, you need to set the gravity of LinearLayout according to the change of data. Before, I wrote the code directly in the XML file roid: gravity I don’t know how to set the properties when I need to set them dynamically in Java code this time. Later, after searching the information on the Internet, I found that set gravity () can be set. Here is a record.


It is often used in UI layout android: gravity And android: layout_ Gravity.

LinearLayout has two very similar properties:

android: gravity And android: layout_ gravity。

The differences between them are as follows:

android: gravity Attributes are the restrictions on the content of the view. For example, text on a button. You can set the position of the text relative to the view, such as left, right, etc.

in the view android: layout_ Gravity is used to set the position of the view relative to the parent view. For example, if a button is in the LinearLayout, you want to place the button in the left or right position of the LinearLayout, you can set it through this property

Namely android: gravity It is used to set the alignment of the content in the view relative to the view component android: layout_ Gravity is used to set the alignment of the view component relative to the container.

The principle follows android:padding-left, android: layout_ Marginleft is a bit similar. If both properties are set on the button.

android:paddingLeft= The content set on the “30px” button is 30 pixels away from the left boundary of the button
and android: layout_ Marginleft = “30px” the whole button is 30 pixels away from the content set on the left

Let’s get back to the point. We can set the android:gravity= “Center” to make the text in EditText display in the center of the EditText component; at the same time, we set the android: layout_ Gravity = “right” to make the EditText component appear on the right in LinearLayout. Look at the effect:

As we can see, in EditText, the text is centered, and the EditText component itself is aligned to the right of LinearLayout.

Attach layout file:

<LinearLayout
   xmlns:android="http://schemas.android.com/apk/res/android"
    android:orientation="vertical"
    android:layout_width="fill_parent"
    android:layout_height="fill_parent">
    <EditText
        android:layout_width="wrap_content"
        android:gravity="center"
        android:layout_height="wrap_content"
        android:text="one"
        android:layout_gravity="right"/>
</LinearLayout>


Then the above is set through the layout file. , I believe everyone has written, so how to set the location of components through Java code?

The above effects are still considered.

By looking at the SDK, we find that there is a set gravity method. As the name suggests, this method should be used to set the text alignment in the button component.

After a careful search, I didn’t find the setlayoutgravity method. I’m a little disappointed. But it’s right to think about it. If you have this method, you can put the button in the position where the layout is not supported_ What to do in a container of gravity property!

So I thought that this attribute might be in the layout. So I took a closer look at the “layout params” of LinearLayout and found that there is a “gravity” attribute in it. I believe this is used to set the position of components relative to the container itself. Yes, it should be him.

The practice found that, if so, attached code, you see.

The code is relatively simple, but it took me a little time to find them.

		Button button  = new Button(this);
		button.setText("One");
		LinearLayout.LayoutParams lp = new LinearLayout.LayoutParams(LayoutParams.WRAP_CONTENT,LayoutParams.WRAP_CONTENT);
		//This is equivalent to the Android:layout_gravity property in the layout file
		lp.gravity = Gravity.RIGHT;
		button.setLayoutParams(lp);
		// this is equivalent to the Android:layout_gravity property in the layout file
		button.setGravity(Gravity.CENTER);
		
		LinearLayout linear = new LinearLayout(this);
		// Note that for LinearLayout layout, setting horizontal or vertical is a must! Otherwise, the effect will not be visible.
		linear.setOrientation(LinearLayout.VERTICAL);
		linear.addView(button);
		setContentView(linear);


Or you can:

		Button button  = new Button(this);
		button.setText("One");
		//This is equivalent to the Android:gravity property in the layout file
		button.setGravity(Gravity.CENTER);
		
		LinearLayout linear = new LinearLayout(this);
		// Note that for LinearLayout layout, setting horizontal or vertical is a must! Otherwise, you won't see the effect.
		linear.setOrientation(LinearLayout.VERTICAL);
		
		LinearLayout.LayoutParams lp = new LinearLayout.LayoutParams(LayoutParams.WRAP_CONTENT,LayoutParams;)
		// This is equivalent to the Android:layout_gravity property in the layout file
		lp.gravity = Gravity.RIGHT;
		
		linear.addView(button, lp);
		setContentView(linear);


In addition, to set the position in relative layout, use the add rule method, as follows:

params = new RelativeLayout.LayoutParams(LayoutParams.WRAP_CONTENT, LayoutParams.WRAP_CONTENT);
        params.addRule(RelativeLayout.CENTER_IN_PARENT);
        mContainer.addView(progress,params);


One more thing to note here:

android: layout_ Gravity is only valid in LinearLayout and FrameLayout:

1. For LinearLayout:

When android:orientation=vertical (vertical), only the setting in the horizontal direction works, but the setting in the vertical direction does not work. That is: left, right, center_ Horizontal is in effect.

When android:orientation=horizontal (horizontal), only the setting in the vertical direction works, but the setting in the horizontal direction does not. Namely: top, bottom, center_ Vertical is in effect.

2. For FrameLayout: arbitrary android: layout_ The gravity attribute is effective, which makes it very convenient to layout components.


Here is a brief introduction. Android’s setgravity() actually corresponds to LinearLayout or FrameLayout android: gravity Attribute, because relative layout does not have this attribute, the code setting in relative layout does not work. Because the Internet is full of android:gravity And android: layout_ The gravity attribute are talked about together, so I’ll talk about it together. Dynamic settings android: layout_ Gravity is actually through LinearLayout.LayoutParams Of lp. gravity It’s also very simple.


That’s all for Android setgravity().


It’s that simple.

See system logs and ‘systemctl status docker.service‘ for details

(Linex) error reported when executing systemctl restart docker
failed to restart docker.service : Unit is not loaded properly: Invalid argument. See system logs and ‘systemctl status docker.service ’ for details.

If the docker is shut down abnormally, it will be unable to restart the docker. If the docker is shut down abnormally, it will result in / etc / SYSTEMd / system/ docker.service Some processes in the file are still operating, resulting in the problem that docker cannot be restarted. Failed to restart docker.service : Unit is not loaded properly: Invalid argument. See system logs and ‘systemctl status docker.service ’ for details.

Analyze the reasons
/ etc / SYSTEMd / system/ docker.service There are cache or process blocking


Solutions

move file

    1. 1.Add the file just moved to MV/home/docker.service/Etc/SYSTEMd/system.
      will/etc/SYSTEMd/system/docker.service Move files first (MV/etc/SYSTEMd /system)/docker.service /If you run systemctl restart docker, you will be prompted to report an error and let you see the status docker.service (view status) , 2.showing/etc/SYSTEMd/system/docker.service File, open this file, magic display and content, we have just moved this file.
      1. 3.Rerun systemctl restart docker

    again

Backup files

    1. 1.CD/etc/SYSTEMd/system
      2.docker.service Backup CP docker.service docker.service_Bak
      3.force delete docker.service File RM – RF docker.service
      4.Restart systemctl restart docker
      5.View the docker status

Could not find an NgModule. Use the skip-import option to skip importing in NgModule

Could not find an NgModule. Use the skip-import option to skip importing in NgModule

Error recurrence

Create a login component according to the scaffold provided by ng-zorro

ng g ng-zorro-antd:form-normal-login login

For details, click the link to enter the official website and select scaffolding to see the tutorial

Cause of error

Because there are many modules under the project, he doesn’t know where to create them. So a description like the title will appear. So we need to specify where to create it, so that there will be no case that the command does not know where to create it.

Solution

For example, a module is welcome.module.ts . And you want to create one login.module.ts It’s the same level as this module.

|`pages 
|	|`welcome
| 		welcome.module.ts
|	|`login  # This is the following you want to create
|    	login.module.ts  

1. Go to the pages folder

cd pages

2. Use — module = welcome to determine the installation location

ng g ng-zorro-antd:form-normal-login --module=welcome     

3. And then there’s a message

? What should be the name of the component? login

4. Prompt information after success

CREATE src/app/pages/login/login.component.css (239 bytes)
CREATE src/app/pages/login/login.component.html (1187 bytes)
CREATE src/app/pages/login/login.component.spec.ts (602 bytes)
CREATE src/app/pages/login/login.component.ts (751 bytes)
UPDATE src/app/pages/welcome/welcome.module.ts (389 bytes)

5. Let’s explain why this can be done successfully.
Step 2 is to specify the location of the component you want to create. That is to say, you – module = are followed by the modules that can be found in the current path. If you can’t find them, you won’t succeed in creating them.
Step 3 asks you to fill in the name of the component you want to create.

Detailed explanation of basic lstmcell in tensorflow learning

tf.contrib.rnn .BasicLSTMCell

Inherited from: layerrnncell

Aliases:

Class tf.contrib.rnn .BasicLSTMCellClass tf.nn.rnn_ cell.BasicLSTMCellThe basic LSTM cycle network unit is based on http://arxiv.org/abs/1409.2329 . Implementation. Will forget_ Bias (default: 1) is added to the bias of forgetting the door to reduce the previous scale at the beginning of the training. This neuron does not allow cell clipping, projection layer and peep hole connection. It is a basic LSTM neuron. If you want a more advanced model, you can use: tf.nn.rnn_ cell.LSTMCell .

__init__(

    num_units,

    forget_bias=1.0,

    state_is_tuple=True,

    activation=None,

    reuse=None,

    name=None,

    dtype=None

)

Parameter Description:

num_ units:int Type, the number of neurons in LSTM unit, that is, the number of output neurons_ bias:float Type, offset added to forget gate. When recovering from the checkpoint of cudnnlstm training, it must be manually set to 0.0. state_ is_ Tuple: if true, the accepted and returned status is C_ State and M_ State; if false, they join along the column axis. The latter is about to be abandoned. Activation: activation function of internal state. The default is tanhreuse: Boolean type, which describes whether to reuse variables in an existing scope. If it is not true and the existing scope already has the given variable, an error is thrown. name:String Type, the name of the layer. Layers with the same name will share weights, but to avoid errors, reuse is needed in this case= True.dtype : the default data type of this layer. The default value is none, which means that the type of the first input is used. This parameter is required if build is called before call.

Source code:

class BasicLSTMCell(LayerRNNCell):

  """Basic LSTM recurrent network cell.


  The implementation is based on: http://arxiv.org/abs/1409.2329.


  We add forget_bias (default: 1) to the biases of the forget gate in order to

  reduce the scale of forgetting in the beginning of the training.


  It does not allow cell clipping, a projection layer, and does not

  use peep-hole connections: it is the basic baseline.


  For advanced models, please use the full @{tf.nn.rnn_cell.LSTMCell}

  that follows.

  """


  def __init__(self, num_units, forget_bias=1.0,

               state_is_tuple=True, activation=None, reuse=None, name=None):

    """Initialize the base LSTM cell.


    Args:

      num_units:int type, the number of neurons in the LSTM cell, i.e. the number of output neurons

forget_bias:float type, bias adds the forget gate. It must be manually set to 0.0 when recovering from the checkpoints (checkpoints) of CudnnLSTM training.

state_is_tuple:If True, the accepted and returned states are 2-tuples of c_state and m_state; if False, they are connected along the column axis. The latter is about to be deprecated.

activation:The activation function for the internal state. Default is tanh

reuse:Boolean type describing whether to reuse the variable in an existing scope. If not True, and the existing scope already has the given variable, an error will be raised.

name:String type, the name of the layer. Layers with the same name will share weights, but to avoid errors, reuse=True is required in this case.


      When restoring from CudnnLSTM-trained checkpoints, must use

      `CudnnCompatibleLSTMCell` instead.

    """

    super(BasicLSTMCell, self).__init__(_reuse=reuse, name=name)

    if not state_is_tuple:

      logging.warn("%s: Using a concatenated state is slower and will soon be "

                   "deprecated.  Use state_is_tuple=True.", self)


    # Inputs must be 2-dimensional.

    self.input_spec = base_layer.InputSpec(ndim=2)


    self._num_units = num_units

    self._forget_bias = forget_bias

    self._state_is_tuple = state_is_tuple

    self._activation = activation or math_ops.tanh


  @property

  def state_size(self):

    return (LSTMStateTuple(self._num_units, self._num_units)

            if self._state_is_tuple else 2 * self._num_units)


  @property

  def output_size(self):

    return self._num_units


  def build(self, inputs_shape):

    if inputs_shape[1].value is None:

      raise ValueError("Expected inputs.shape[-1] to be known, saw shape: %s"

                       % inputs_shape)


    input_depth = inputs_shape[1].value

    h_depth = self._num_units

    self._kernel = self.add_variable(

        _WEIGHTS_VARIABLE_NAME,

        shape=[input_depth + h_depth, 4 * self._num_units])

    self._bias = self.add_variable(

        _BIAS_VARIABLE_NAME,

        shape=[4 * self._num_units],

        initializer=init_ops.zeros_initializer(dtype=self.dtype))


    self.built = True


  def call(self, inputs, state):

    """Long short-term memory cell (LSTM).


    Args:

      inputs: `2-D` tensor with shape `[batch_size, input_size]`.

      state: An `LSTMStateTuple` of state tensors, each shaped

        `[batch_size, self.state_size]`, if `state_is_tuple` has been set to

        `True`.  Otherwise, a `Tensor` shaped

        `[batch_size, 2 * self.state_size]`.


    Returns:

      A pair containing the new hidden state, and the new state (either a

        `LSTMStateTuple` or a concatenated state, depending on

        `state_is_tuple`).

    """

    sigmoid = math_ops.sigmoid

    one = constant_op.constant(1, dtype=dtypes.int32)

    # Parameters of gates are concatenated into one multiply for efficiency.

    if self._state_is_tuple:

      c, h = state

    else:

      c, h = array_ops.split(value=state, num_or_size_splits=2, axis=one)


    gate_inputs = math_ops.matmul(

        array_ops.concat([inputs, h], 1), self._kernel)

    gate_inputs = nn_ops.bias_add(gate_inputs, self._bias)


    # i = input_gate, j = new_input, f = forget_gate, o = output_gate

    i, j, f, o = array_ops.split(

        value=gate_inputs, num_or_size_splits=4, axis=one)


    forget_bias_tensor = constant_op.constant(self._forget_bias, dtype=f.dtype)

    # Note that using `add` and `multiply` instead of `+` and `*` gives a

    # performance improvement. So using those at the cost of readability.

    add = math_ops.add

    multiply = math_ops.multiply

    new_c = add(multiply(c, sigmoid(add(f, forget_bias_tensor))),

                multiply(sigmoid(i), self._activation(j)))

    new_h = multiply(self._activation(new_c), sigmoid(o))


    if self._state_is_tuple:

      new_state = LSTMStateTuple(new_c, new_h)

    else:

      new_state = array_ops.concat([new_c, new_h], 1)

    return new_h, new_state

The following operations are implemented

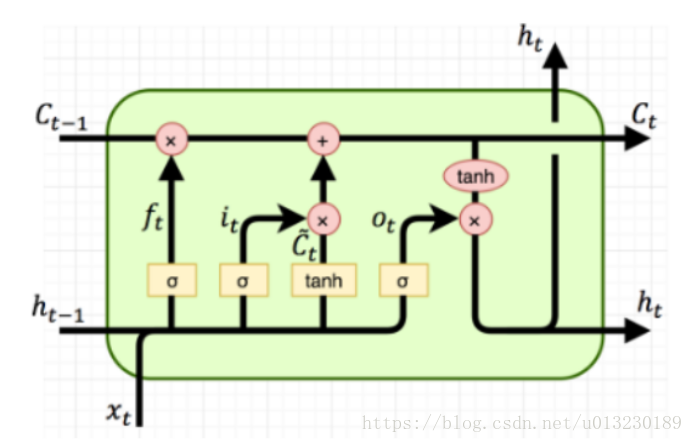
The formula is as follows:

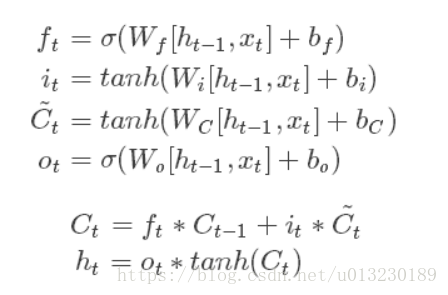
It can be seen from the pictures and formulas that LSTM unit has a single input (CT-1, HT-1, XT) and three outputs (CT, HT, HT).

Constructor init has a state_ is_ Tuple = true. If it is true, the accepted and returned status is C_ State and M_ State; if false, they join along the column axis.

if self._state_is_tuple:
  new_state = LSTMStateTuple(new_c, new_h)
else:
  new_state = array_ops.concat([new_c, new_h], 1)

The hidden state of LSTM unit is (CT, HT) tuple.

Let’s look at the call function. The following line of code is to calculate the forgetting gate, input gate, and output gate (without activating the function).

# i = input_gate, j = new_input, f = forget_gate, o = output_gate

    i, j, f, o = array_ops.split(

        value=gate_inputs, num_or_size_splits=4, axis=one)

The output CT and HT: are calculated

new_c = add(multiply(c, sigmoid(add(f, forget_bias_tensor))),

                multiply(sigmoid(i), self._activation(j)))

    new_h = multiply(self._activation(new_c), sigmoid(o))

Code example:

import tensorflow as tf


output_dim=128

lstm=tf.nn.rnn_cell.BasicLSTMCell(output_dim)

batch_size=10 #Batch size

timesteps=40 #time steps

embedding_dim=300 #word vector dimension

inputs=tf.Variable(tf.random_normal([batch_size,embedding_dim]))

previous_state = (tf.random_normal(shape=(batch_size, output_dim)), tf.random_normal(shape=(batch_size, output_dim)))

output,(new_h, new_state)=lstm(inputs,previous_state)


print(output.shape) #(10, 128)

print(new_h.shape) #(10, 128)

print(new_state.shape) #(10, 128)

[Linux] undefined reference to `itoa’

I wrote a simple C program in Linux, which used Itoa. But when compiling, I prompted “undefined reference to ` Itoa ‘”, I thought it would be OK to add – LC, but the result was the same. Internet found that some people say that this function does not exist in Linux, generally use sprintf to replace. Look at the following code and comments:

#include <stdio.h>
#include <stdlib.h>
//#include <unistd.h>
#include <string.h>

int num = 0;
char namebuf[100];
char prefix[] = "/tmp/tmp/p";

char* gentemp()
{
    int length, pid;

    pid = getpid();
    strcpy(namebuf, prefix);
    length = strlen(namebuf);
    //itoa(pid, &namebuf[length], 10);      // Unix version: itoa() does not exist in the header file <stdlib.h>
    sprintf(namebuf+length, "%d", pid); // use sprintf to convert integers to strings
    strcat(namebuf, ".");
    length = strlen(namebuf);
    printf("before do...while\n");
    char command[1024] = {0};
    do 
    {
        //itoa(num++, &namebuf[length], 10);
        sprintf(namebuf+length, "%d", num++);
        sprintf(command, "touch %s", namebuf);  // Creating files via touch
        system(command);
        printf("command = %s, namebuf[%d]=%d\n", command, num-1, num-1);
    } while (num < 50 && access(namebuf, 0) != -1); // access to determine whether a file exists
    printf("end of do...while\n");

    return namebuf;
}

int main( void )
{
    char *p = gentemp();
    printf("%s\n", p);

    return 0;
}

How to Check Password Modification Complexity

Password modification complexity check

The corresponding password policy modules of Linux are: PAM_ Passwdqc and PAM_ pwquality . PAM_The passwdqc module corresponds to /etc/login.defs ,pam_ Pwquality corresponds to /etc/security/pwquality.conf

Module adding method: etc/pam.d/passwd

vi /etc/pam.d/passwd
password required pam_pwquality.so retry=3

or

echo "password required pam_pwquality.so retry=3" >> /etc/pam.d/passwd

Open the password complexity verification configuration file / etc / security/ pwquality.conf

vi /etc/security/pwquality.conf
retry=3Defines the number of retries that can be made if the login/change password fails.
Difok=0#defines that there must be several characters in the new password to be different from the old one. but if more than 1/2 of the characters in the new password are different from the old one, that new password will be accepted.
minlen=0#defines the minimum length of the user's password.
dcredit=0#defines how many digits must be included in the user's password.
ucredit=0#defines how many uppercase letters must be included in the user's password.
lcredit=0#defines how many lowercase letters must be included in the user's password.
ocredit=0# defines how many special characters (other than numbers and letters) must be included in the user's password.
# where =-1 means that at least one

Modify password validity file/etc/login.defs

PASS_MAX_DAYS   99999     #The maximum validity of the password, 99999: permanent period
PASS_MIN_DAYS 0 # whether the password can be changed, 0 can be changed, non-0 how many days after the password can be changed
PASS_MIN_LEN 5 #Minimum length of password, use pam_cracklib module, this parameter is no longer valid
PASS_WARN_AGE 7 # how many days before the password expires to notify the user to change the password when they log in

[How to Fix]Element is not attached to the page document record

Record the click problem of the select box in automatic test

1. Paste the code first

#Open the Google Chrome
driver=webdriver.Chrome();
#driver.fullscreen_window();
#input the Google
driver.get('https://www.google.com/');
#driver.find_element_by_xpath("//*[@id='tsf']/div[2]/div[1]/div[1]/div/div[2]/input").send_keys('新冠状病毒');
time.sleep(1);
#Click the I'm feel Luckly
driver.find_element_by_css_selector("#tsf > div:nth-child(2) > div.A8SBwf > div.FPdoLc.tfB0Bf > center > input.RNmpXc").click();
time.sleep(1);
# click about us
driver.find_element_by_css_selector("#nav-list > li:nth-child(2) > a").click();
time.sleep(1);
#Cyclic click on select checkbox
for index in range(len(driver.find_elements_by_tag_name("option"))):
    driver.refresh();
    select = driver.find_element_by_id("lang-chooser");
    select_value = select.find_elements_by_tag_name("option");
    time.sleep(2);
    select_value[index].click();
    time.sleep(2);

First, by_ tag_ The name method gets the option information in the select box, which is returned in the form of list

driver.find_elements_by_tag_name("option")

Then use the for loop to traverse the list of select options through the index number, and remove the current option of click ()
because each click on the select option will refresh the whole web page, an error will be reported

element is not attached to the page document

So we need to use it driver.refresh() method to refresh the current page, and then get the elements of the select option box again to click

Latex: How to Modify the Size of the Font

There are these types of fonts in latex:

\tiny
\scriptsize
\footnotesize
\small
\normalsize
\large
\Large
\LARGE
\huge
\Huge

Generally speaking, the default font size is \normalsize. We can redefine the default font size at the beginning:

\documnetclass[12pt]{article}

Just change the value of 12pt. Latex provides three sizes: 10 / 11 / 12pt

Or directly define the text size:

\fontsize{5.0pt}{\baselineskip}\selectfont  text

Change 0.5 to the number you want.

How to Export All data in DataGridView to Local Excel

Export all data in DataGridView to local excel

When the method is called, the parameter can be written into its own DataGridView name

 #region DataGridView Export to local Excel file method
        public void DownloadDataGridView(DataGridView dgv)
        {
            SaveFileDialog saveFileDialog = new SaveFileDialog
            {
                Filter = "Execl files (*.xls)|*.xls",
                FilterIndex = 0,
                RestoreDirectory = true,
                CreatePrompt = true,
                Title = "Exported Excel"
            };
            saveFileDialog.ShowDialog();
            if (saveFileDialog.FileName == "")
            {
                return;
            }//end if
            Stream myStream = saveFileDialog.OpenFile();
            //use the default encode
            StreamWriter sw = new StreamWriter(myStream, System.Text.Encoding.GetEncoding(-0));
            string str = "";
            try
            {
                for (int i = 0; i < dgv.ColumnCount; i++)
                {
                    str += dgv.Columns[i].HeaderText;
                    str += "\t";
                }//end for
                sw.WriteLine(str);
                for (int j = 0; j < dgv.Rows.Count - 1; j++)
                {
                    string strTemp = "";
                    for (int k = 0; k < dgv.Columns.Count; k++)
                    {
                        object obj = dgv.Rows[j].Cells[k].Value;
                        if (obj != null)
                        {
                            strTemp += dgv.Rows[j].Cells[k].Value.ToString();
                        }//end if
                        else
                        {
                            strTemp = "";
                        }//end else
                        strTemp += "\t";
                    }//end for k
                    sw.WriteLine(strTemp);
                }//end for j
                sw.Close();
                myStream.Close();
                MessageBox.Show("Success to Export the Excel File:\n" + saveFileDialog.FileName);
            }//end try
            catch (Exception ex)
            {
                MessageBox.Show(ex.Message);
            }//end catch
            finally
            {
                sw.Close();
                myStream.Close();
            }//end finally
        }
        #endregion