I was going to store the map as a JSON string in window.localStorage, but I found that I could not convert the map to a JSON string
var map = new Map();
map.set(21,'A');
map.set(22,'B');
console.log(JSON.stringify(map));
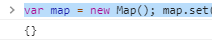
ah
Deploy mongodb fragment combined with replica set to realize distributed storage of MySQL database files (step 10)
Configure the mongos process of the SHARD2 node
[root@shard2 bin]# cat < > /usr/local/mongodb/bin/mongos.conf
bind_ip=192.168.100.103
port=27025
logpath=/usr/local/mongodb/logs/mongos.log
fork=true
maxConns=5000
configdb=configs/192.168.100.101:27017,192.168.100.101:27018,192.168.100.101:27019
END
[root @ shard2 bin] # touch…/logs/mongos.log
[root @ shard2 bin] # chmod 777…/logs/mongos.log
[root @ shard2 bin] # mongos -f/usr/local/mongodb/bin/mongos.conf
about to fork child process, waiting until server is ready for connections.
forked process: 1562
child process started successfully, parent exiting
[root@shard2 ~]# netstat -utpln |grep mongo
tcp        0      0 192.168.100.103:27019   0.0.0.0:*               LISTEN      1095/mongod
tcp        0      0 192.168.100.103:27020   0.0.0.0:*               LISTEN      1122/mongod
tcp        0      0 192.168.100.103:27025   0.0.0.0:*               LISTEN      12122/mongos
tcp        0      0 192.168.100.103:27017   0.0.0.0:*               LISTEN      1041/mongod
tcp        0      0 192.168.100.103:27018   0.0.0.0:*               LISTEN      1068/mongod
Sata3.0 host controller IP
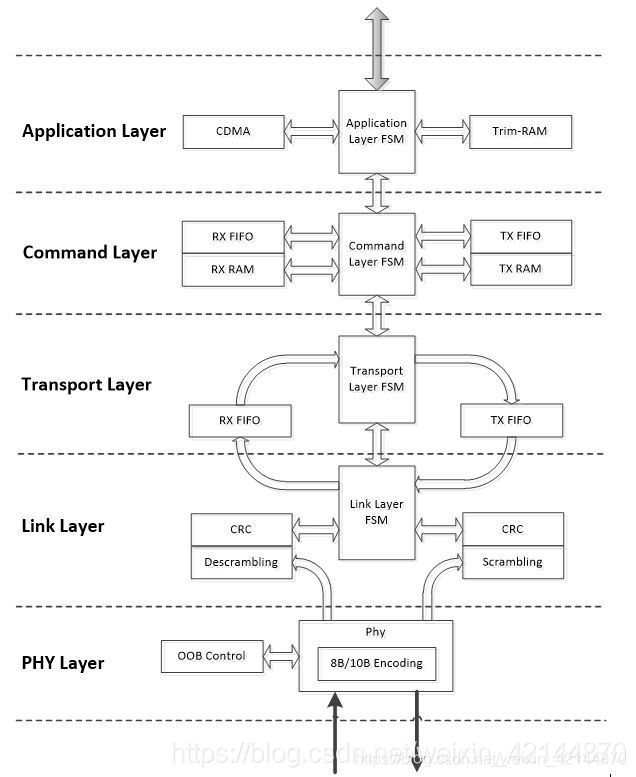
SATA3.0 Host IP not only realizes the PHY (physical layer), LINK (Link layer) and TRN (transport layer) of SATA protocol, but also realizes the CMD (command layer) and APP (application layer), and supports 1.5, 3 and 6Gbps transmission rates, which is fully compatible with SATA specification.
SATA3.0 Host IP provides an efficient and easy to use interface for users to use SATA storage devices. Without user intervention, SATA3.0 Host IP automatically connects, diagnoses, identifies and initializes SATA storage devices, and outputs the Identify Data Structure of SATA devices. SATA3.0 Host IP built-in DMA controller, users can not only access SATA storage devices through IO interface, but also use DMA interface to efficiently read and write SATA storage devices.
SATA3.0 Host IP is not limited to the number of connected SATA storage devices, that is, the number of connected SATA storage devices is programmable.
Kernel features:
- and SATA 1.5 Gbps, 3.0 Gbps and 6.0 Gbps industry specification is fully compatible with the AXI – Lite or application registers (ARI) interface, at the same time support IO (including PIO and Trim) and IO DMA operation data interface adopts the design of RAM, the DMA data interface the AXI – Stream or FIFO design support SerDes interface, and the programmable SerDes interface number (the number of SATA storage devices can be connected is programmable, The quantity depends on the number of GT of FPGA) Support SATA storage device with electric plug support Xilinx device: Spartan-6, Virtex-5, Virtex-6, Artix-7, Kintex-7, Virtex-7, Kintex UltraScale, Kintex UltraScale +, Virtex UltraScale +, Virtex UltraScale +, Virtex UltraScale +, Virtex UltraScale +, Virtex UltraScale +, Virtex UltraScale +, Virtex UltraScale +, Virtex UltraScale + for easy integration of synchronous, integrable Verilog design through fully validated SATA3.0 IP
External interface:
- axi-lite or application register (ARI) interface axi-stream or FIFO streaming data bus RAM block data bus
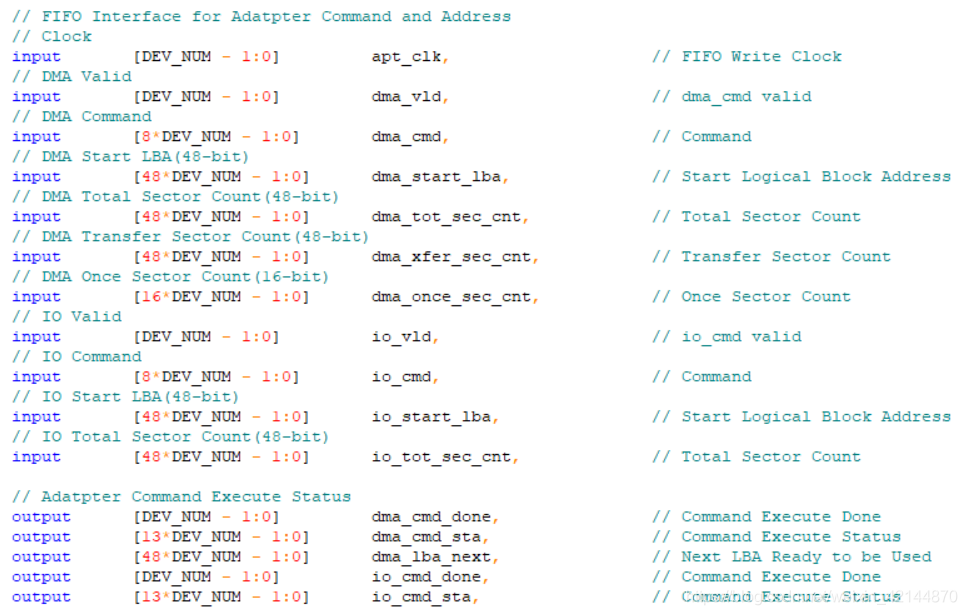
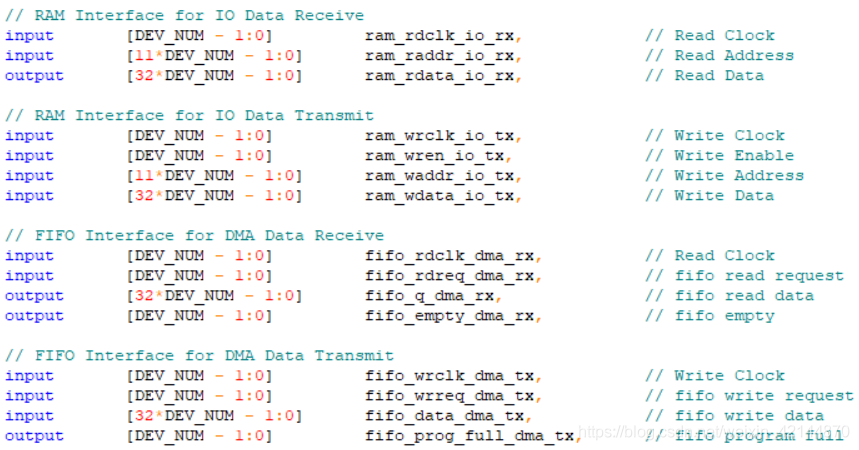
Performance indicators:
- SATA 3.0 Core: Continuous Write Speed> 530MB/s, Continuous Read Speed> 550MB/sSATA 0 Core: Continuous Write Speed> 240MB/s, Continuous Read Speed> 250MB/s s
1 channel (connect 1 SATA storage device) SATA3.0 IP resource usage (XC7K325 as an example) :
- LTS: 3850, FFS: 4630, BRAM: 16, GT: 1
4 channels (connect 4 SATA storage devices) SATA3.0 IP resource usage (XC7K325 as an example) :
- LTS: 15363, FFS: 18468, BRAM: 64, GT: 4
8 channels (connect 8 SATA storage devices) SATA3.0 IP resource usage (XC7K325 as an example) :
- LTS: 30763, FFS: 37011, BRAM: 128, GT: 8
Deliverables:
Design File: Post-synthesis EDIF netlist or RTL SourceTiming and layout constraints, Test or Design Example Project Technical support: email, phone, on-site, training service
Contact Information:
Email:[email protected]
SATA3.0 Host IP Block Diagram
Oracle11gr2 database suddenly “TNS no listener” protocol adapter error
lsnrctl status
TNS-12541 no listening program
TNS-12560 protocol adapter error
TNS-00511 no listener program
According to the online solution I have various reconfiguration listening, but none of them work.
Finally, I saw a post where he accidentally found that the listening log had reached 4G. I looked at mine and sure enough it was the same. I didn’t hesitate to delete it and restart the service. Solve the problem.
Log position app/administrator/diag/TNSLSNR/XXXXXX/listener/trace/listener. The log
Abstract precautions
Abstract methods require that subclasses be overridden after inheritance. So what keywords can’t the abstract keyword be used with?The following keywords, in the abstract class. It is possible to use it, but it is meaningless.
- private: A subclass cannot override an abstract after it has been privatized. Static: Static, taking precedence over an object. Abstract methods require subclass overriding, and static methods cannot be overridden, so the two are contradictory. Final: Modified by final, the abstract cannot be rewritten against the abstract.
Converting PDF file to JPG image in Ubuntu
>
sudo apt-get install imagemagick
ImageMagick
(Use image instead of the specific file name.)
With the convert image. PDF image. JPG can translate directly, but the image resolution is not high
with the following command transformation effect is better
convert -verbose -colorspace RGB -resize 1800 -interlace none -density 300 -quality 100 image.pdf image.jpg
(-Resize the following coefficient to adjust the width of the image in pixels, and the height to scale)
If the following error occurs
convert: not authorized `grade.pdf' @ error/constitute.c/ReadImage/412.
convert: no images defined `*.jpg' @ error/convert.c/ConvertImageCommand/3210.
Because the ImageMagick policy. XML file does not give "read and write PDF files" permission by default.
Open the policy-.xml file
sudo vi /etc/ImageMagick-6/policy.xml
< policy domain="coder" rights="none" pattern="PDF" />   in the "none"   instead "read/write"

In addition, a few simple features of ImageMagick are also posted below

Pictures are made into GIFs
convert *.jpg images.gif
Where * is the wildcard, *. JPG means all the path under the JPG file
in addition to the image format in JPG, can also be PNG and other common image format
Modify image size
Take a single picture for example
convert 'image.jpg' -resize 1200 image2.jpg
(1200 means that the width becomes 1200 pixels, and the height varies proportionally)
Take several pictures for example
convert '*.jpg' -resize 1200 %03d.jpg
(can also be converted to other image format)
(% 3 d. The JPG said to give the picture of the new generation in 000. The JPG, 001 JPG rule named)
(if written image % 3 d. The JPG, said to a new generation of picture by image000. The JPG, image001. The law of the JPG)
This can also be written:
convert '*.jpg[1200]' %03d.jpg
Multipartfiletofileutils (multipartfile to file)
import org.springframework.stereotype.Component;
import org.springframework.web.multipart.MultipartFile;
import java.io.File;
import java.io.FileOutputStream;
import java.io.InputStream;
import java.io.OutputStream;

@Component
public class MultipartFileToFileUtils {
    /**
     * MultipartFile 转 File
     *
     * @param file
     * @throws Exception
     */
    public static File multipartFileToFile(MultipartFile file) throws Exception {

        File toFile = null;
        if (file.equals("") || file.getSize() <= 0) {
            file = null;
        } else {
            InputStream ins = null;
            ins = file.getInputStream();
            toFile = new File(file.getOriginalFilename());
            inputStreamToFile(ins, toFile);
            ins.close();
        }
        return toFile;
    }

    //Get the stream file
    private static void inputStreamToFile(InputStream ins, File file) {
        try {
            OutputStream os = new FileOutputStream(file);
            int bytesRead = 0;
            byte[] buffer = new byte[8192];
            while ((bytesRead = ins.read(buffer, 0, 8192)) != -1) {
                os.write(buffer, 0, bytesRead);
            }
            os.close();
            ins.close();
        } catch (Exception e) {
            e.printStackTrace();
        }
    }

    /**
     * Del Local Files
     * @param file
     */
    public static void delteTempFile(File file) {
        if (file != null) {
            File del = new File(file.toURI());
            del.delete();
        }
    }

}
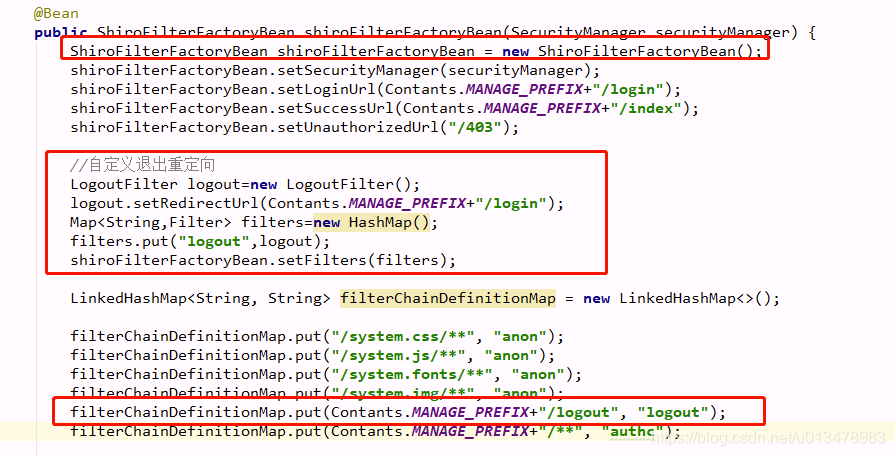
Customize the jump address after Shiro logout
Customize the jump address after Shiro logout
1. Modify the LogoutFilter redirect address
LogoutFilter logout=new LogoutFilter();
logout.setRedirectUrl(Contants.MANAGE_PREFIX+"/login");
2. Modify ShiroFilterFactoryBean’s filters
Map<String,Filter> filters=new HashMap();
filters.put("logout",logout);
shiroFilterFactoryBean.setFilters(filters);
3. Modify the FilterChainDefinitionMap of ShiroFilterFactoryBean
LinkedHashMap<String, String> filterChainDefinitionMap = new LinkedHashMap<>();
filterChainDefinitionMap.put(Contants.MANAGE_PREFIX+"/logout", "logout");


@Bean
public ShiroFilterFactoryBean shiroFilterFactoryBean(SecurityManager securityManager) {
      ShiroFilterFactoryBean shiroFilterFactoryBean = new ShiroFilterFactoryBean();
      shiroFilterFactoryBean.setSecurityManager(securityManager);
      shiroFilterFactoryBean.setLoginUrl(Contants.MANAGE_PREFIX+"/login");
      shiroFilterFactoryBean.setSuccessUrl(Contants.MANAGE_PREFIX+"/index");
      shiroFilterFactoryBean.setUnauthorizedUrl("/403");
//Custom Exit Redirection
LogoutFilter logout=new LogoutFilter();
logout.setRedirectUrl(Contants.MANAGE_PREFIX+"/login");
Map<String,Filter> filters=new HashMap();
filters.put("logout",logout);
shiroFilterFactoryBean.setFilters(filters);

LinkedHashMap<String, String> filterChainDefinitionMap = new LinkedHashMap<>();
filterChainDefinitionMap.put("/system.css/**", "anon");
filterChainDefinitionMap.put("/system.js/**", "anon");
filterChainDefinitionMap.put("/system.fonts/**", "anon");
filterChainDefinitionMap.put("/system.img/**", "anon");
filterChainDefinitionMap.put(Contants.MANAGE_PREFIX+"/logout", "logout");
filterChainDefinitionMap.put(Contants.MANAGE_PREFIX+"/**", "authc");
shiroFilterFactoryBean.setFilterChainDefinitionMap(filterChainDefinitionMap);
return shiroFilterFactoryBean;
}
See the picture below
How to Use Subfigure in Latex
First add the subfigure macro package in the introduction area.
\usepackage{subfigure}
Suppose I want to arrange three images as three sub-images to solve the problem of cross-page arrangement of images, then use the following code:
\begin{figure}[h]
	\addtocounter{figure}{-1} %%%%%%%%%note1
	\centering
	\subfigure{
		\begin{minipage}[t]{1\linewidth}%%%%%%%%%note2
			\includegraphics[width=0.9\linewidth]{Index}%%%%%%%%%note3
		\caption{Image 1 Name}
		\label{0}
		\end{minipage}%
	}%

%%%%%%%%%note4
	\subfigure{
		\begin{minipage}[t]{1\linewidth}
				\includegraphics[width=0.9\linewidth]{Index}
			\caption{Image 2 Name}
			\label{1}
		\end{minipage}%
	}%


	\subfigure{
		\begin{minipage}[t]{1\linewidth}
			\includegraphics[width=0.9\linewidth]{Index}
		\caption{Image Name}
		\label{2}
		\end{minipage}
	}%

	\centering
\end{figure}
Description:
Note 1: Note that you need to subtract 1 from the image label manually when using a subfigure, because the larger image composed of three subfigures is also involved in counting. Note 2: This controls the width of each subgraph. For example, if you want to put 4 graphs in a row, set this to 0.25\linewidth. Note 3: This controls the size of each subgraph. Note 4: Note that this line (there may be several pictures) has been arranged, move to the next line.
Using CV2 to solve sliding verification code
preface
Due to the need of work, I began to study the slider verification code. After all, I am engaged in data, not image recognition. According to my previous experience, I first went to git to look for the relevant projects and found the experience written by a big man. Because too long ago, simply changed, found a Python new module, life is short, I use Python, honest don’t deceive me!
git address
git address
Analysis of the
This is mainly OpenCV-Python, which is a bit too big, and it will take at least a month to fully understand it. A final decision: just work
in accordance with the train of thought:
1. Initialization browser
def __init__(self, url, username, password):
        """
        Initialize browser configuration, set constant light

        :param url : target url
        :param username : username
        :param password : password

        """
        # headless browser, you can open it if you need to, because I want to see the sliding process so I don't choose headless for now
        # profile = webdriver.FirefoxProfile()
        self.browser = webdriver.Chrome()
        self.wait = WebDriverWait(self.browser, 30)
        self.url = url
        self.username = username
        self.password = password
2. Save the picture
def save_img(block_img_url):
        """
        Save Image

        :param block_img_url: Image url
        :return:
        """
        try:
            img = requests.get(block_img_url).content
            with open('block.jpeg', "wb") as f:
                f.write(img)
            return True
        except:
            return False
3. Identify the gap, which is mainly used in OpenCV-Python
def get_gap():
        """
        Identify gaps

        :return:
        """
        img = cv.imread('block.jpeg')
        # Process Gaussian filtering
        G_Blur = cv.GaussianBlur(img,(5, 5), 0)
        # Edge detection Tweakable threshold
        canny = cv.Canny(G_Blur, 150, 400)
        # Contour detection
        contours, hierachy = cv.findContours(
            canny, cv.RETR_EXTERNAL, cv.CHAIN_APPROX_SIMPLE)


        # TODO here is a bit around so far have not completely eaten parameters is difficult to control nothing more than to find out the specific location of the profile

        for i, contour in enumerate(contours):
            m = cv.moments(contour)
            print(m)
            if m['m00'] == 0:
                cx = cy = 0
            else:
                cx, cy = m['m10']/m['m00'], m['m01']/m['m00']
            if 6000 < cv.contourArea(contour) < 8000 and 370 < cv.arcLength(contour, True) < 390:
                if cx < 400:
                    continue

                # External Rectangle
                x, y, w, h = cv.boundingRect(contour)
                cv.rectangle(img, (x, y), (x + w, y + h), (0, 0, 255), 2)
                # Display recognition results
                cv.imshow('img', img)

                print('【Notch identification】 {x}px'.format(x=x/2))
                return x/2
        return 0
Initial velocity: V0, Displacement: X, Time: T, Acceleration: A, satisfies the following formula:
= V0 * t + 1/2 * a * t^2
    def trajectory(distance):
        """
        Simulated trajectory

        :param distance: distance
        :return:
        """
        # Initial position
        distance -= 50
        # Initial velocity
        v = 0
        # Unit time is 0.2s to count the trajectory, the trajectory is the displacement within 0.2
        t = 0.2
        # list of displacements/tracks, one element in the list represents 0.2s displacement
        tracks = []
        # the current displacement
        current = 0
        # The mid value is reached and deceleration begins
        mid = distance * 4/5
        # Slide through a little bit first, then slide back the other way at the end
        distance += 10
        # a = random.randint(1,3)
        while current < distance:
            if current < mid:
                # The smaller the acceleration, the smaller the displacement per unit time, the more detailed the simulated trajectory
                # a = random.randint(2, 4) # accelerated motion
                a = 3
            else:
                # a = -random.randint(3, 5) # deceleration
                a = -2
            # Initial velocity
            v0 = v
            # displacement in 0.2 seconds time
            s = v0 * t + 0.5 * a * (t ** 2)
            # Current position
            current += s
            # Add to the track list
            tracks.append(round(s))

            # The velocity has reached v, which is used as the initial velocity for the next time
            v = v0 + a * t

        # TODO to improve the passing rate, not sure if it's desirable
        # Slide backwards to the approximate exact position
        for i in range(4):
            tracks.append(-random.randint(2, 3))
        for i in range(4):
            tracks.append(-random.randint(1, 3))
        return tracks
5. Main functions
	def tx_main(self):
        """
        Main Function

        :return:
        """

        # Move slider routine
        WebDriverWait(self.browser, 20, 1).until(
            EC.presence_of_element_located((By.ID, 'tcaptcha_iframe'))
        )
        self.browser.switch_to.frame(
            self.browser.find_element_by_id('tcaptcha_iframe'))  # Loading iframe
        time.sleep(0.5)
        block_img_url = self.browser.find_element_by_xpath(
            '//img[@id="slideBg"]').get_attribute('src')
        # Make sure to include the url prefix or not
        print(block_img_url)

        if self.save_img(block_img_url):
            getGap = self.get_gap()
            if getGap:
                track_list = self.trajectory(getGap)
                time.sleep(0.5)
                # Slider positioning
                attribute_ing = self.browser.find_element_by_xpath(
                    '//div[@id="tcaptcha_drag_thumb"]'
                )
                # Click the mouse
                ActionChains(self.browser).click_and_hold(
                    on_element=attribute_ing
                ).perform()
                time.sleep(0.5)
                print(track_list)

                for track in track_list:
                    ActionChains(self.browser).move_by_offset(
                        xoffset=track, yoffset=0
                    ).perform()
                time.sleep(1.5)
                ActionChains(self.browser).release(
                    on_element=attribute_ing
                ).perform()
                time.sleep(1.5)

                return True
            else:
                # TODO Failure to retry Here you can add the number of failures
                self.re_start()
        else:
            print('Failed to get image')
            return False
Here you need to build a subclass to achieve the QQ number account password login
ECMAScript arguments object
In the functional code, using a special object called arguments, developers can access arguments without explicitly specifying their names.
For example, in the function sayHi(), the first argument is message. This value is also accessible with arguments[0], which is the value of the first argument (the first argument is at position 0, the second argument is at position 1, and so on).
Thus, we can override the function without explicitly naming parameters:
function sayHi() {
  if (arguments[0] == "bye") { return; } alert(arguments[0]); }
Number of test parameters
You can also use the arguments object to detect the number of arguments to a function by referring to the arguments.length property.
The following code prints the number of arguments used per call to the function:
function howManyArgs() {
  alert(arguments.length);
}

howManyArgs("string", 45);
howManyArgs();
howManyArgs(12);
The above code displays “2”, “0”, and “1” in turn.
Note: Unlike other programming languages, ECMAScript does not verify that the number of arguments passed to a function is equal to the number of arguments defined by the function. A developer-defined function can take any number of arguments (up to 255, according to Netscape documentation) without throwing any errors. Any missing arguments are passed to the function as undefined, and extra functions are ignored.
Analog function overloading
To simulate function overloading, use the arguments object to determine the number of arguments passed to the function:
function doAdd() {
  if(arguments.length == 1) {
    alert(arguments[0] + 5);
  } else if(arguments.length == 2) {
    alert(arguments[0] + arguments[1]);
  }
}

doAdd(10);	//output "15"
doAdd(40, 20);	//output "60"
When there is only one argument, the doAdd() function increments the argument by 5. If there are two arguments, the two arguments are added and their sum is returned. So, doAdd(10) outputs “15”, while doAdd(40, 20) outputs “60”.
It’s not as good as overloading, but it’s good enough to get around this limitation of ECMAScript.
Function overview Function object
JS to find the last character of the string and remove it
var str = "hello-world-"
        // \S non-blank character $ ending {1} Match a
        str = str.replace(/\S{1}$/, '');
        console.log(str);
The second way is to use string interception and there are three APIs for string interception and I’m only going to talk about two of them
var str = "hello-world-"

 console.log(str.slice(0, -1));

console.log(str.substring(0, str.length - 1));
The final output is hello-world
Watch me keep my front-end knowledge updated