Author Archives: Robins

Solve gradle project refresh failed

recently reinstalled the system, and then re-installed Android Studio encountered a pit, opened the Studio to create the project prompted gradle project refresh failed to find all kinds of methods, I have seen a lot of solutions on the Internet, some have tried to no effect, the following is my own solution can refer to.

step 1: find the Studio Android directory D:\Android\Android Studio\gradle, copy the downloaded file to the directory

step 2: download the gradle version: https://pan.baidu.com/s/1hsKUK6K password: 7 im3

part 3: set the proxy address my Settings are as follows (of course you can also try to set No proxy) :
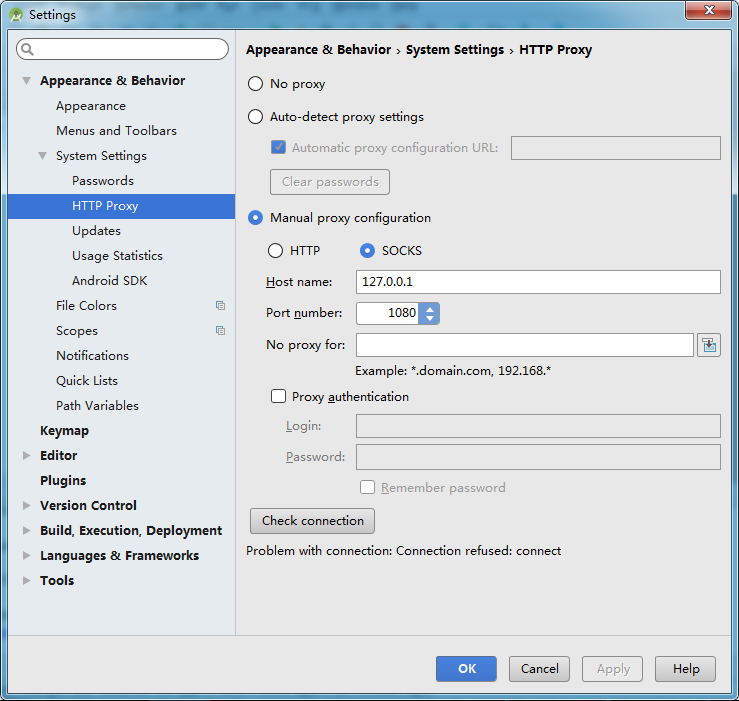
      

Step 4: restart Android Studio,


if the problem has not been solved, I recommend using the following solution:

thank blogger: bear bear children turn from: https://www.jianshu.com/p/43b795895a79

different situations will have different solutions, you need to open the log file to find the detailed error information.

C:\Users\{Username}\.AndroidStudio2.1\system\log

1. Mandatory IPV4

add the variables in the environment variable

_JAVA_OPTIONS

set a variable’s value to,

– Djava.net.preferIPv4Stack=true

restart Android Studio, automatic update gradle.

2. Update JDK1.7 to JDK1.8

File-> Other Settings-> Default Project Structure… Delete. Gradle file

delete folder

c:\users\{username}\. Gradle

then restart Android Studiao to update gradle. Open the gradle properties file for the project and add the following configuration items:

org.gradle. Jvmargs = -xmx512m-xx :MaxPermSize=512m

.

5. Set the correct gradle version

File-> Settings

Build,Execution,Deployment-> Build Tools-> Gradle

this solves the Gradle version mismatch problem. 6. Manual synchronous gradle

Tools-> Android-> Sync Project with Gradle Files

7.

Build-> Clean Project

8. Invalidate and Restart

File-> Invalidate Caches/Restart…

Invalidate and Restart

9. Update android SDK

for the problem of not downloading the corresponding version of SDK, download as required.

10. Change the engineering build directory. The grade file

is sometimes Gradle this’ project_name 】 【 ‘project refresh failed: No cached version of the android. View the build: Gradle: 2.10 + available for offline mode.

Encounter this kind of situation will open the project directory of the build. Gradle file, after change

dependencies {

classpath ‘com. Android. View the build: gradle: 2.10 +’

}

open C: \ Users \} {your user name \. Gradle \ caches files, found no below 2.10 directory, under normal circumstances, When you restart Studio, if you don’t, you will re-download the file directory. If you can’t download it normally, just copy it and put it in the directory.

this is just the solution to my problem, maybe you have the same problem as me, I hope this blog can help you.

failed to load resource file osql.rll

running the osql command, an error

is suddenly reported

“failed to load resource file osql.rll”

to search osql.rll, found that the file is still there, not lost.

1. Try to restart the system, but it is invalid;

2, in the Microsoft download center to download (https://www.microsoft.com/en-us/download/)

SQLCMD installer and ODBC Driver 11 for SQL Server

and then restart the system to use

reproduced in: https://blog.51cto.com/301ren/1684162

php_ network_ Getaddresses: getaddressinfo failed: name or service not known solution

php_network_getaddresses: getaddrinfo failed: Name or service not known

PHP connects to alicycle RDS version database. At the beginning, the project domain name is configured. After the resolution is successful, the access is

that cannot be connected to the database

the solution is to restart the PHP service

service php-fpm restart

connect successfully after restart

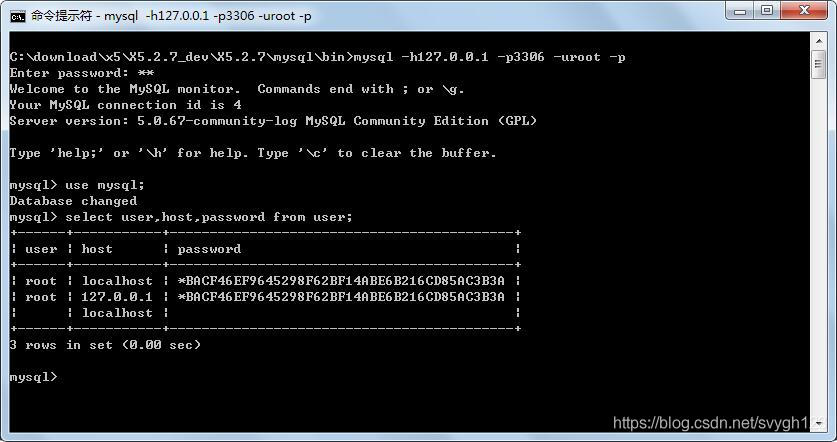
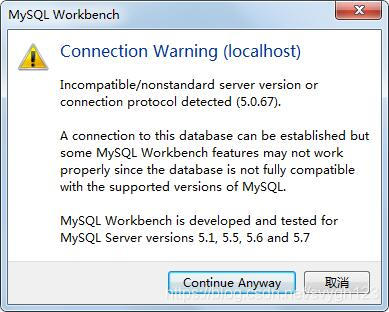
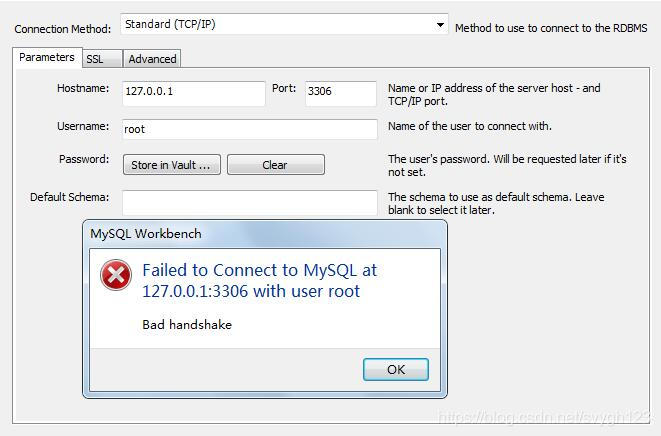
MySQL Workbench Failed to Connect to MySQL at 127.0.0.1:3306 with user root Bad handshake

Msi

installation package: mysql-workbench-community-8.0.18-winx64. Msi

version no. : MySQL Workbench 8.0 CE

connection tip:

tried

1. Neither localhost nor ::1

2. Query whether host exists under user, -> Invalid


3. Add
bind-address = 127.0.0.1


” under [mysqld] in my. Navicat and hedisql can both connect

finally found a solution in bug-75745: due to the high version of the incompatible, download version 6.3.10 at the workbench download address to install

why do you want to use MySQL Workbench?Because you need to switch databases in multiple environments in your work, so after using heidisql(GPL open source) and navicat(charged), I tried a wave of MySQL Workbench(Community GPL open source) and found that there are multiple tabs to switch multiple environment databases, which can be used. If you are used to heidisql and navicat, you can use them without changing

“[warning] failed to retrieve plugin descriptor for caused by Maven security agent settings org.apache.maven . plugins:… “

when creating a simple Maven project with the Maven command, the following tip is given:

Downloading: http://repo.maven.apache.org/maven2/org/apache/maven/plugins/maven-clean-plugin/2.5/maven-clean-plugin-2.5.pom

“[WARNING] Failed to retrieve the plugin descriptor for org.. Apache maven. Plugins: maven – clean – plugin: 2.5: the plugin org. Apache. Maven. Plugins: maven – clean – plugin: 2.5 or one of its dependencies could not be Resolved: Failed to read an artifact descriptor for org.. Apache maven. Plugins: maven – clean – plugin: jar: 2.5 “

from the Internet to see some reasons for analysis, summarized as follows:

1) maven.apache.org

cannot be accessed from the network used

2) the proxy server is not configured or is incorrectly configured.

if your company requires you to use a secure authenticated proxy to access the Internet for security reasons, then you need to configure the HTTP proxy for Maven. Add the agent configuration to the configuration file %MAVEN_HOME%/conf/setting.xml:

<proxies>  
    <proxy>  
      <id>optional</id>  
      <active>true</active>  
      <protocol>http</protocol>  
      <username>proxyuser</username>  
      <password>proxypass</password>  
      <host>proxy.host.net</host>  
      <port>80</port>  
      <nonProxyHosts>local.net|some.host.com</nonProxyHosts>  
    </proxy>      
</proxies>

username: proxy server username

password: proxy server password

host: proxy server address

port: proxy server port

nonProxyHosts: host address

that is not accessed using the proxy server

OpenLDAP main: TLS init def ctx failed: -1

problem error

system: Ubuntu 14.04
version: OpenLDAP 2.4.42
tool: slapd ldap-utils openssl libssl-dev

creates the certificate through openssl and adds it to the cn=config database. Restart the service failed. Syslog error
“main: TLS init def CTX failed: -1”

I created cert file by openssl in ubuntu 14.04. So I installed openssl/libssl-cert before, the error shown in this environment. When started the service, it failed with “main: TLS init def CTX failed: -1 “in syslog.

solution

It works after following steps:

  1. check your certfile path whether it is correct. Check whether the certificate file path in the cn=config configuration exists and is correct
  2. check your file permission. Inspection certificate file permissions
    chown openldap. Openldap/etc/SSL/certs/ldapcert pem
    chown openldap. Openldap/etc/SSL/private/ldapkey pem
    chmod -r 0400/etc/SSL/certs/ldapcert. Pem
    chmod -r 0400 The/etc/SSL/private/ldapkey. Pem
    Example Example:
    – rw – r – r – 1 root root 1383 Dec 1 09:47/etc/SSL/certs/cacert pem
    – r – 1 the openldap openldap 3808 Dec 1 09:48/etc/SSL/certs/ldapcert pem
    – r – 1 the openldap openldap 09:47 891 Dec 1 /etc/ssl/private/ldapkey.pem
  3. Whether install libssl-dev/ssl-cert, especially ssl-cert. Whether libssl-dev/ssl-cert
  4. Whether add user openldap to group ssl-cert. Adduser openldap ssl-cert adduser openldap ssl-cert
  5. Whether certfile is correct. Verification certificate is correct
    openssl verify - CAfile/etc/SSL/certs/cacert pem/etc/SSL/certs/ldapcert pem
  6. Check apparmor. With the 1 st step, if your cert file is not under the path/etc/SSL /... Your should add your cert file path to/etc/apparmor. D/usr. Sbin. Slapd, then reload the apparmor service like this:
    /etc/init. D/apparmor reload
    check apparmor, cooperate with the first, if not in the/etc/SSL /.. Need to configure the/etc/apparmor. D/usr. Sbin. Slapd, and restart the apparmor service
    If you have any other question, do feel free to concat to me 32634366 @qq.com

    ps:
    I have stuck with this for a long time, it done work after installed ssl-cert and added user openldap to group ssl-cert.

    ref:
    http://readthefuckingmanual.net/error/1257/


Asynchronous loading JS does not allow the use of document write solution

asynchronous loading js does not allow the use of document write solution

to recommend a cat smoking website: love cat family (http://15cat.com), I hope you like


var scriptFile = document.createElement('script');

scriptFile.setAttribute("type","text/javascript");

scriptFile.setAttribute("src",'http://api.map.baidu.com/api?type=quick&ak=o9B4Ol99j9NcBXSu5nFTR7uI&v=1.0');

document.getElementsByTagName("head")[0].appendChild(scriptFile);

When you finally want to add it to the head, chrome comes up with the following warning.
Failed to execute ‘write’ on ‘Document’: It isn’t possible to write into a document from an asynchronously-loaded external script Unless it is explicitly opened.
What is this?
PS: An error in chrome in console (a red error mark) will prevent the script from executing after the error, a warning (yellow exclamation mark) just won’t execute where it was warned.

Solution.
This occurs because the code introduced contains a document.write method, and asynchronously loaded js is not allowed to use the document.write method.
Since the document has been loaded and parsed, the document stream is closed.
So the js you load asynchronously can no longer write into the document, such as using document.write.
So two direct links can be introduced.


var usel = '<script src="';
usel += gds[0].imageurl;
usel += '"></script>';
document.write(usel);


Android Failure [INSTALL_ FAILED_ VERSION_ Downgrad] solutions

copyright notice: this article is the original work of the blogger and follows CC 4.0 by-sa copyright agreement. Please attach the link of the original text and this statement.

the article links: https://blog.csdn.net/hyjecjtu/article/details/17677671 in the process of installation APK, because VersionName (version) in the process, because now installed version below your machine version, so there will be a Android Failure [INSTALL_FAILED_VERSION_DOWNGRADE]

solution: adb install -r-d C:\Users\ yj. Huang\Desktop\EEntry. Apk (package name)
— — —
copyright notice: this article is the original article of CSDN blogger “liitong”, following CC 4.0 by-sa copyright agreement, please attach the source link and this statement.
the original links: https://blog.csdn.net/hyjecjtu/article/details/17677671

“Failed to load session” Ubuntu “problem solving summary

“Failed to load session “ubuntu” problem solving summary :

1.
sudo apt-get update
sudo apt-get install
sudo dpkg-reconfigure ubuntu-desktop
Sudo reboot
sudo apt-get install gnome-session
sudo apt-get install lightdm
sudo apt-get install unity-greeter
sudo dpkg-reconfigure lightdm

2. Rebooting the computer appears. Unable to login in the login screen. User login failed.
enter the password and return to the login interface

infinite loop, unable to find the reason.

later found that the unity-2d-launcher was not installed.

tried a lot in the middle, but nothing worked. Basically apt-get Install Unity-2D-Launcher and GnOMe-Session. I don’t know which one worked.

3
4 sudo apt-get install GDM
5

sudo apt-get install –reinstall GDM

0
1 sudo apt-get remove –purge GDM
2
3
4 sudo apt-get install GDM
5

restart invalid, as if the default is lightdm. Some people recommend GDM, I don’t care.

anyway, the problem was finally solved. Still happy.

4
3.
install apt-get unity-2d launcher gnome-session

install GDM

sudo apt-get update
0
1 sudo apt-get update
0
1 sudo apt-get GDM
2
3 default use lightdm
4
5 We’re done now.

4.

looked for some ways, finally found that GDM is not installed (GDM is GNOME graphics desktop landers), the solution:
sudo apt-get-d install –reinstall GDM

sudo apt-get remove –purge GDM

sudo apt-get install GDM

Error: SRC refspec master does not match any. error: failed to push some refs to

after being associated with the remote warehouse,

when we push the file from the local warehouse to the online warehouse through the push command

has the following error

error: src refspec master does not match any.

error: failed to push some refs to

common cause:

1. The local git repository directory is empty

2. Local warehouse add not commit

3. Git init error

use the command git add + file name , add the file to the repository, and then push normally.

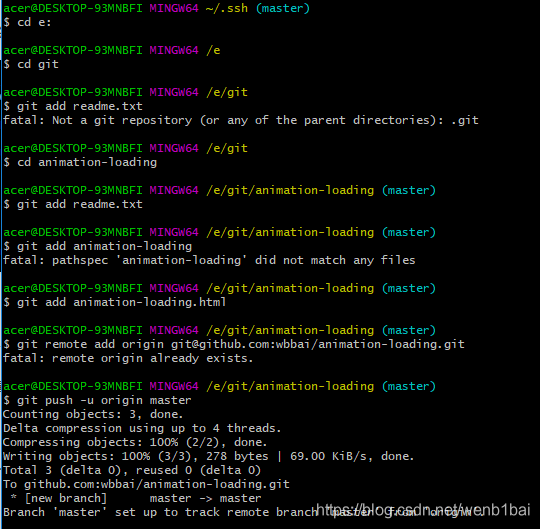
here are some of the errors I made while operating.

****************************************************************************************

when add HTML files in a double 叒 error

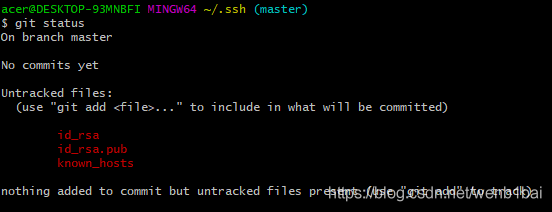
and then use git status to check the file status, found that the three files are still associated with the remote warehouse SSH file, the original file path is wrong,

and then switch the path, git add file, push file to finally submit the local warehouse to the online warehouse

Load balancing failed to find a valid mailbox database

this period of time customer mail system upgrade, basically the same as before, CAS+HUB NLB, DAG database,

try creating a new mailbox. Error reporting

Load balancing failed to find a valid mailbox database.”

but if you choose a specific database it’s ok,

after the search reasons are as follows:

1) select update RU6

for exchange sp1

2) check to see if the database has dismount

3) mail database server not installed, but I think this should appear this error 🙂

reproduced in: https://blog.51cto.com/4763146/987147