Author Archives: Robins

ajp_read_header: ajp_ilink_receive failed

Using the HTTPD proxy_AJp module, proxy_AJp.conf is configured as follows

ProxyPass /examples/ ajp://localhost:8009/examples/

error occurs when accessing http://hostname/examples:

[Wed Feb 01 15:56:37 2012] [error] (70014)End of file found: ajp_ilink_receive() can't receive header

[Wed Feb 01 15:56:37 2012] [error] ajp_read_header: ajp_ilink_receive failed

[Wed Feb 01 15:56:37 2012] [error] (120006)APR does not understand this error code: proxy: read response failed from (null) (localhost)

Tomcat startup information:

Feb 1, 2012 4:54:34 PM org.apache.catalina.startup.HostConfig deployDirectory

INFO: Deploying web application directory ROOT

Feb 1, 2012 4:54:35 PM org.apache.coyote.http11.Http11Protocol start

INFO: Starting Coyote HTTP/1.1 on http-8090

Feb 1, 2012 4:54:36 PM org.apache.jk.common.ChannelSocket init

INFO: Port busy 8009 java.net.BindException: Address already in use

Feb 1, 2012 4:54:36 PM org.apache.jk.common.ChannelSocket init

INFO: JK: ajp13 listening on /0.0.0.0:8010

Feb 1, 2012 4:54:36 PM org.apache.jk.server.JkMain start

INFO: Jk running ID=1 time=0/645 config=null

Feb 1, 2012 4:54:37 PM org.apache.catalina.startup.Catalina start

INFO: Server startup in 207063 ms

solution:

it can be seen from the tomcat startup information that port 8009 is used, so change the ajp port under conf/server.xml from 8009 to 8010


<Connector port="8009" protocol="AJP/1.3" redirectPort="8443" />

instead


<Connector port="8010" protocol="AJP/1.3" redirectPort="8443" />

ProxyPass is also modified to port 8010


ProxyPass /examples/ ajp://localhost:8010/examples/

specific why 8009 port is used, it is not clear, welcome to communicate.

Solution: DevTools failed to load SourceMap:… net::ERR_HTTP_RESPONSE_CODE_FAILURE problem

This error has been reported consistently in the Google Chrome developer console.

first solution:

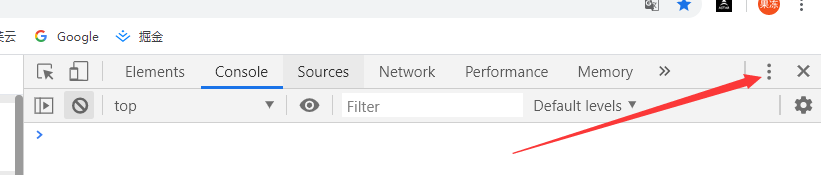
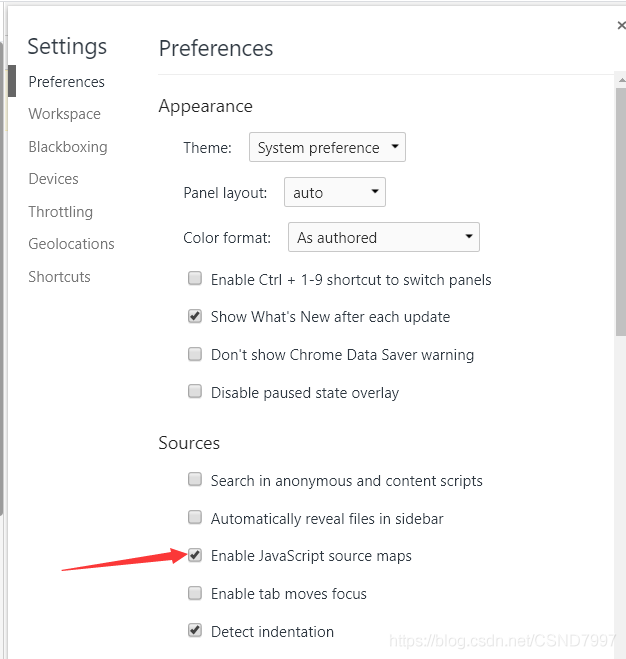
    1. in the Google chrome debugging tool, set the debugging tool, click on it and select Settings

    1. close this option

    although this is a good way to hide errors, it doesn’t make them disappear, it’s just that you can’t see it in the controller. Another option is to download the missing map file (a brief discussion of the principles will follow).

The second:

    1. has a file that refers to the source mapping file that does not exist, just like the warning in my first picture pointed to the wangediter.min.js.map file

Git failed to submit data error: failed to push some refs to’https://github.com/XXXXXXX/gif.git’

Load code cloud use tutorial address: http://www.jianshu.com/p/084e0aabbab3
Problem a: execute the Git remote add origin https://github.com/XXXXXXX/gif.git
Fatal: Remote Origin Already exists.
When this problem occurs, Git Remote displays all the remote libraries and USES the command Git Remote RM Origin to delete the origin.

Issue 2: git push-u origin master pushes the local repository to github
fatal: I don’t handle protocol ‘git@https’
This problem, use the command git remote add origin http://github.com/XXXXXXX/gif.git.

question 3: perform $git push -u origin master
the Username for ‘https://github.com/XXXXXXX/gif.git’
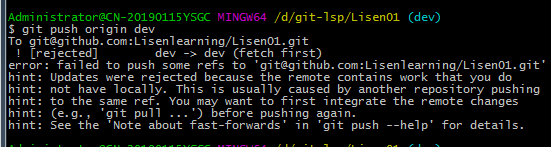
! [rejected] master – & gt; Master (the fetch first)
error: failed to push some refs to ‘https://github.com/XXXXXXX/gif.git’
hint: Updates were rejected because the remote contains work that you do
hint: Not have mature. This is usually caused by another repository pushing
hint: To the same ref. You may want to first integrate the remote changes
hint: (e.g., ‘git pull… ‘) before pushing again.
hint: See the ‘Note about fast-forward ‘in ‘git push –help’ for details.
The main reason for the error is that there is already a README file on git repository, so there may be conflicts during submission. In this case, you need to choose to keep the online file or discard the online file. If you discard the online document, you need to choose to force push when pushing, which requires the following command

git push origin master -f

If you choose to keep the readME file online, you need to execute it first

git pull origin master

Git usage steps:

Build a new ABC warehouse on GitHub.
Create a Git repository locally:
1, the mkdir ABC
2, CD ABC
3, git init
4. Add file (file)
5, Git add file1 file2 file…
6. Git-commit-m “Add Files”
7, git remote add origin https://git.oschina.net/xxx/abc.git
8. Git push-U Origin Master
Here, an error message appears:
error: failed to push some refs to ‘https://git.oschina.net/xxx/abc.git’
hint: Updates were rejected because the tip of your current branch is behind
hint: its remote counterpart. Merge the remote changes (e.g. ‘git pull’)
hint: before pushing again.
hint: See the ‘Note about fast-forwards’ in ‘git push –help’ for details.
The push failed because a READme.md file was initialized on GitHub. The files in the remote repository are newer than the local ones, so to use Git Pull you need to grab the latest file, merge it with the local file and commit it.
9, the git pull
Error:
remote: Counting objects: 5, done.
remote: Compressing objects: 100% (2/2), done.
remote: Total 3 (delta 0), reused 3 (delta 0)
Unpacking objects: 100% (3/3), done.
From github.com:michaelliao/learngit
fc38031.. 291 bea8 dev – & gt; origin/master
There is no tracking information for the current branch.
Please specify which branch you want to merge with.
See git-pull(1) for details
git pull < remote> < branch>
The reason is that there is no connection between the local master and the remote Origin /master.
10. Set up the connection
$ git branch –set-upstream master origin/master
11, the git pull
12. Then submit
git commit -m “merge README.MD”
13. Git push-U Origin Master completed local uploading to remote warehouse

move_uploaded_file() failed to open stream: Permission denied


Warning: move_uploaded_file(…) : failed to open stream: Permission denied in …..
Warning: move_uploaded_file(): Unable to move
This problem occurs because the PHP program does not have permission to create files in the specified directory

The first solution:
chmod -r 755
Adjusts the target path permissions
The second solution
Find the owner of the Apache process, and then change the owner of the target path folder to be the owner of the Apache process
chown -R [owner] [directory]

Built on Ethereum, puppeth cannot be used to create the initial block, and an error is reported Fatal: Failed to write genesis block: unsupported fork ordering: eip15

I’m gonna go ahead and create a new genesis. Json in my genesis folder,
Writing:

{
  "config": {
    "chainId": 666,
    "homesteadBlock": 0,
    "eip150Block": 0,
    "eip150Hash": "0x0000000000000000000000000000000000000000000000000000000000000000",
    "eip155Block": 0,
    "eip158Block": 0,
    "byzantiumBlock": 0,
    "constantinopleBlock": 0,
    "petersburgBlock": 0,
    "istanbulBlock": 0,
    "ethash": {}
  },
  "nonce": "0x0",
  "timestamp": "0x5ddf8f3e",
  "extraData": "0x0000000000000000000000000000000000000000000000000000000000000000",
  "gasLimit": "0x47b760",
  "difficulty": "0x00002",
  "mixHash": "0x0000000000000000000000000000000000000000000000000000000000000000",
  "coinbase": "0x0000000000000000000000000000000000000000",
  "alloc": { },
  "number": "0x0",
  "gasUsed": "0x0",
  "parentHash": "0x0000000000000000000000000000000000000000000000000000000000000000"
}

Save, run, geth Genesis init Genesis. Json
If I write the initial block with a short negative code, I get an error:

Fatal: Failed to write genesis block: unsupported fork ordering: eip150Block not enabled, but eip155Block enabled at 0


SMTP Error: The following recipients failed

Describe the problems I encountered:
After receiving phpmailer, The following Error was reported: SMTP Error: The following Error was received: XXXX Server Error: ‘4.7.1 < mail address sending to> Relay access denied’
I put the code in the same room with SMTP server on the machine can normal to send, after the change back to ali cloud is an error, I am depressed, Google once met this question a lot, but haven’t been able to solve my problem, and then I try to modify the inside of the phpmailer configuration, after changing the SMTPAuth to true unexpectedly send mail properly, the original is useless authentication out of wrong, but I in another machine SMTPAuth is false is normal, don’t know the reason why is it the same room so no authentication is required

Error: Failed dependencies: error encountered when installing rpm package

Under Linux install RPM packages often encounter the following problem:
error: Failed dependencies:
… The
ellipsis indicates the missing package for installing this RPM.
when you encounter this problem, you can add two parameters after the installation of RPM package command, such as:
rpm-ivh libstdc++5.0-3.3.3-62745cl.i386. RPM
is changed to:
RPMS -ivh libstdc++5.0-3.3.3-62745cl.i386. RPM –nodeps –force

plus those two parameters mean that
is installed without having to dependencies among packets, and
does not count error: Failed dependencies: such errors
In RedHat Linux and Other RedHat compliant distributions such as Mandrake, the entire distribution is installed using RPM. So the best way to install new software is to

downloading RPM packages from the network.
1) to install a package using an RPM, the simplest command is as follows:

# rb-ivh foo-1.0l-l.is386.rpm (the package in question is foo-1.0l-l.is386.rpm, all of the following)

foo#################### ############. Installation is simple.

2) remove installed packages
to uninstall package foo, simply enter the following command:

# rpm-e foo

note: the package name is foo, not the RPM file name “foo-1.01-l.b.i. 386.rpm”.

3) upgrading packages to upgrade the software is similar to install the software:

# RPM – Uvh foo – 2.0 – l.i 386 RPM

foo# # # # # # # # # # # # # # # # # # # #

user note: RPM will automatically install the old version of the corresponding software package. Rpmsave

saving /etc/foo.conf as /etc/foo.conf.rpmsave

so that the user can manually change the configuration file. In addition, if the user wants to install the older version of the software, the user will see the following error message:

# rpm-uvh foo-1.0-l.i386. RPM

foo packag foo-2.0-l(which is newer) is already installed

error: foo-1.0l-l.i 386. RPM cannot be installed

.
user can use rpm-q to query the corresponding software in the RPM database, RPM will give the name of the software package, version, release version number, for example:

# rpm-q foo

foo-2.0-l

the following is the query can use the specific parameters:
-a query the current system installed all software packages.
-f filename query includes ga file packages.
– F with the -f parameter, just input is standard input (for example the find/usr/bin | RPM – qF)
– q package name:
– q query the package with the -p parameter, just input is standard input (for example the find/MNT/cdrom/RedHat/RPMS | RPM – qQ)
here is the format of the output options:
– I displays the name of the package, description, distribution, size, date of compilation, the date of installation, developers and other information.
-l display the files contained in the software package
-s display the current status of the files contained in the software package, only two states: normal and missing
-d display the documents in the software package (such as man,info,README, etc.)
-c display the configuration files in the software package, these files generally need to be manually modified by the user after installation, for example: Sendmail. Cf, passwd, inittab etc.
if using the -v parameter can be similar to the output of the ls -l

5) in the RPM packages
users can use the RPM used to check the package has been installed, the RPM can check file size, MD5 check code, file permissions, type, and the information such as owner.
here is the parameter description:
– a simple calibration software package if the file exists
– b check package in a single file

– c check installation of all packages – d compare a source package and already installed packages

if the test through, there is no any error messages, if there is an error message, its format is as follows: the error information is one of the eight string, if it is a “. “, means there is no problem, here is the meaning of the corresponding characters: MD5 check error
5 MD5 check error
S file size error
L symbolic connection
T file modification time error
D device file error
U user name error
G group name error
M attributes (including overwrite weight and file type) error
if the user sees this information, it is best to reinstall or manually repair.

+ + + + + + + + + + + + + + + + + + + + + + + + + + + + + + + + + + + + + + + + + + + + + + + + + + + + + + + + + + + + + + + +
+ + + + + + + + + + + + + + + + + + + + + + + + + + + + + + + + + + + + + + + + + + + + + + + + + + + + + + + + + + + + + + + +

the RPM practical skills!
1) users can install packages via FTP. If users will be able to connect on the network, want to install a new software package, you can directly use it to install to the URL:
for example: under ftp.linuxsir.com/pub/linux/redhat/RPMS/ now have this file package: foo – 1.0-1. I386 RPM, then you can use this command:

# RPM -i ftp.linuxsir.com/pub/linux/redhat/RPMS/foo-1.0-1.i386.rpm

to install, also can query!

2) if the user accidentally wushan several files, but not sure whether those documents, want to check to the whole system, in order to understand which parts may be damaged, you can use:

# RPM – Va

3) if the user meets a person not to come out of the file, want to know it belongs to the words of a software package, you can do it:

# rpb-qf /usr/X11R6/bin/xjewel

results are obtained with the following information:
xjewel-1.6-1

4) if the user gets a new RPM file, but does not know its contents; Or to find out which files a particular file package will install on your system, do this:

gvim: GConf-WARNING **: Client failed to connect to the D-BUS daemon

64-bit Debian GNU/Linux 8.2.0
# gvim mount
(gvim:1657): gnomeUI-WARNING **:When connecting to the session manager:
The specified authentication protocol is not supported.
(gvim:1657): GConf-WARNING **:Client failed to connect to the D-BUS daemon:
No reply received. Possible causes include:remote application not sending reply, message bus security policy blocking reply, reply timeout, or network connection disruption.
Solution:Use the “soo–” command to get the root identity.

How to solve error: failed to push some refs to ‘[email protected]:……git pull conflict

The reason for this conflict is that the branch of the remote warehouse has been modified, but you have not pulled it locally, and you have also made the changes locally, so the system does not know whether to focus on the remote warehouse or the local warehouse, so the conflict occurs.

so how to fix it?
Method one:
1. Git Stash saves local changes to the cache
2, the git pull
3. Git Stash Pop # merges local and remote changes
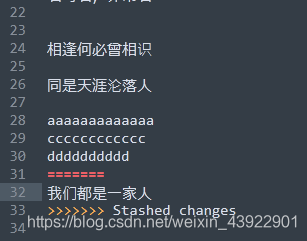
4. At this point, the conflict needs to be resolved manually, as shown below. Delete the marker line, and then determine which needs to be modified
5. Redo git add and git commit,git push

mysql problem solving: mysqladmin: connect to server at’localhost’ failed

The mysql service could not be started. The output error message of the mysql script was modified as follows:

$ /etc/init.d/mysql start
Starting MySQL database server: mysqld/usr/bin/mysqladmin: connect to server at 'localhost' failed
error: 'Can't connect to local MySQL server through socket '/var/run/mysqld/mysqld.sock' (2)'
Check that mysqld is running and that the socket: '/var/run/mysqld/mysqld.sock' exists!
160811 10:54:23 mysqld_safe Logging to syslog.
160811 10:54:23 mysqld_safe Starting mysqld daemon with databases from /var/lib/mysql
160811 10:54:28 mysqld_safe mysqld from pid file /var/run/mysqld/mysqld.pid ended
/usr/bin/mysqladmin: connect to server at 'localhost' failed
error: 'Can't connect to local MySQL server through socket '/var/run/mysqld/mysqld.sock' (2)'
Check that mysqld is running and that the socket: '/var/run/mysqld/mysqld.sock' exists!
 ./usr/bin/mysqladmin: connect to server at 'localhost' failed
error: 'Can't connect to local MySQL server through socket '/var/run/mysqld/mysqld.sock' (2)'
Check that mysqld is running and that the socket: '/var/run/mysqld/mysqld.sock' exists!
 ./usr/bin/mysqladmin: connect to server at 'localhost' failed
error: 'Can't connect to local MySQL server through socket '/var/run/mysqld/mysqld.sock' (2)'
Check that mysqld is running and that the socket: '/var/run/mysqld/mysqld.sock' exists!
 ./usr/bin/mysqladmin: connect to server at 'localhost' failed
error: 'Can't connect to local MySQL server through socket '/var/run/mysqld/mysqld.sock' (2)'
Check that mysqld is running and that the socket: '/var/run/mysqld/mysqld.sock' exists!
 ./usr/bin/mysqladmin: connect to server at 'localhost' failed
error: 'Can't connect to local MySQL server through socket '/var/run/mysqld/mysqld.sock' (2)'
Check that mysqld is running and that the socket: '/var/run/mysqld/mysqld.sock' exists!
 ./usr/bin/mysqladmin: connect to server at 'localhost' failed
error: 'Can't connect to local MySQL server through socket '/var/run/mysqld/mysqld.sock' (2)'
Check that mysqld is running and that the socket: '/var/run/mysqld/mysqld.sock' exists!
 ./usr/bin/mysqladmin: connect to server at 'localhost' failed
error: 'Can't connect to local MySQL server through socket '/var/run/mysqld/mysqld.sock' (2)'
Check that mysqld is running and that the socket: '/var/run/mysqld/mysqld.sock' exists!
 ./usr/bin/mysqladmin: connect to server at 'localhost' failed
error: 'Can't connect to local MySQL server through socket '/var/run/mysqld/mysqld.sock' (2)'
Check that mysqld is running and that the socket: '/var/run/mysqld/mysqld.sock' exists!
 ./usr/bin/mysqladmin: connect to server at 'localhost' failed
error: 'Can't connect to local MySQL server through socket '/var/run/mysqld/mysqld.sock' (2)'
Check that mysqld is running and that the socket: '/var/run/mysqld/mysqld.sock' exists!
 ./usr/bin/mysqladmin: connect to server at 'localhost' failed
error: 'Can't connect to local MySQL server through socket '/var/run/mysqld/mysqld.sock' (2)'
Check that mysqld is running and that the socket: '/var/run/mysqld/mysqld.sock' exists!
 ./usr/bin/mysqladmin: connect to server at 'localhost' failed
error: 'Can't connect to local MySQL server through socket '/var/run/mysqld/mysqld.sock' (2)'
Check that mysqld is running and that the socket: '/var/run/mysqld/mysqld.sock' exists!
 ./usr/bin/mysqladmin: connect to server at 'localhost' failed
error: 'Can't connect to local MySQL server through socket '/var/run/mysqld/mysqld.sock' (2)'
Check that mysqld is running and that the socket: '/var/run/mysqld/mysqld.sock' exists!
 ./usr/bin/mysqladmin: connect to server at 'localhost' failed
error: 'Can't connect to local MySQL server through socket '/var/run/mysqld/mysqld.sock' (2)'
Check that mysqld is running and that the socket: '/var/run/mysqld/mysqld.sock' exists!
 ./usr/bin/mysqladmin: connect to server at 'localhost' failed
error: 'Can't connect to local MySQL server through socket '/var/run/mysqld/mysqld.sock' (2)'
Check that mysqld is running and that the socket: '/var/run/mysqld/mysqld.sock' exists!
 ./usr/bin/mysqladmin: connect to server at 'localhost' failed
error: 'Can't connect to local MySQL server through socket '/var/run/mysqld/mysqld.sock' (2)'
Check that mysqld is running and that the socket: '/var/run/mysqld/mysqld.sock' exists!
 failed!

Problem solving method:
according to the error message, we know that the cause of the problem is that the local IP cannot be accessed. Execute the ifconfig command:

bond0     Link encap:Ethernet  HWaddr fc:4d:d4:3d:1a:cf  
      inet addr:192.168.1.10  Bcast:192.168.1.255  Mask:255.255.255.0
      inet6 addr: fe80::fe4d:d4ff:fe3d:1acf/64 Scope:Link
      UP BROADCAST RUNNING MASTER MULTICAST  MTU:1500  Metric:1
      RX packets:220431 errors:0 dropped:0 overruns:0 frame:0
      TX packets:536525 errors:0 dropped:0 overruns:0 carrier:0
      collisions:0 txqueuelen:0 
      RX bytes:17535415 (16.7 MiB)  TX bytes:43680367 (41.6 MiB)

eth0      Link encap:Ethernet  HWaddr fc:4d:d4:3d:1a:cf  
      UP BROADCAST RUNNING SLAVE MULTICAST  MTU:1500  Metric:1
      RX packets:220431 errors:0 dropped:0 overruns:0 frame:0
      TX packets:536525 errors:0 dropped:0 overruns:0 carrier:0
      collisions:0 txqueuelen:1000 
      RX bytes:17535415 (16.7 MiB)  TX bytes:43680367 (41.6 MiB)
      Interrupt:20 Memory:fb300000-fb320000 

Ifconfig response shows that the local loopback device has not started. Execute “Ifconfig lo up” to pull up the local loopback device:

# ifconfig lo
lo        Link encap:Local Loopback  
      inet addr:127.0.0.1  Mask:255.0.0.0
      inet6 addr: ::1/128 Scope:Host
      UP LOOPBACK RUNNING  MTU:16436  Metric:1
      RX packets:0 errors:0 dropped:0 overruns:0 frame:0
      TX packets:0 errors:0 dropped:0 overruns:0 carrier:0
      collisions:0 txqueuelen:0 
      RX bytes:0 (0.0 B)  TX bytes:0 (0.0 B)

Restart mysql service after the local loop device is pulled up:

$ /etc/init.d/mysql restart
Stopping MySQL database server: mysqld.
Starting MySQL database server: mysqld.

Another method is the entry “bind-address = 127.0.0.1” in the comment /etc/mysql/my.cnf file. Note: the bind-address entry is used to disable remote access to the mysql database, i.e. only allow local access.
port Settings that allow remote access:

# netstat -antp
Active Internet connections (servers and established)
Proto Recv-Q Send-Q Local Address           Foreign Address         State       PID/Program name
tcp        0      0 0.0.0.0:3306            0.0.0.0:*               LISTEN      29394/mysqld
...

Port Settings that allow local access only:

# netstat -antp
Active Internet connections (servers and established)
Proto Recv-Q Send-Q Local Address           Foreign Address         State       PID/Program name
tcp        0      0 127.0.0.1:3306          0.0.0.0:*               LISTEN      2657/mysqld
...

The second approach is not recommended for security reasons.