Tag Archives: ubuntu

U-boot NFS download file error: loading: * * * error: File lookup fail solution

The reason for this error is:
the version of NFS used in uboot is V2, while the version of NFS used in Ubuntu is V3, V4 and above. As a result, uboot can no longer find files in the NFS server.

The solution is to make NFS in buntu compatible with v2. Modify the /etc/default/NFS kernel server file.

Open the file: sudo VIM/etc/default/NFS kernel server (note that sudo or root permissions are required), and modify it as follows:

# Number of servers to start up
RPCNFSDCOUNT=" -V 2 8"

# Runtime priority of server (see nice(1))
RPCNFSDPRIORITY=0

# Options for rpc.mountd.
# If you have a port-based firewall, you might want to set up
# a fixed port here using the --port option. For more information, 
# see rpc.mountd(8) or http://wiki.debian.org/SecuringNFS
# To disable NFSv4 on the server, specify '--no-nfs-version 4' here
RPCMOUNTDOPTS="-V 2 --manage-gids"

# Do you want to start the svcgssd daemon?It is only required for Kerberos
# exports. Valid alternatives are "yes" and "no"; the default is "no".
NEED_SVCGSSD=""

# Options for rpc.svcgssd.
RPCSVCGSSDOPTS="--nfs-version 2,3,4 --debug --syslog"

Restart the NFS server. sudo service nfs-kernel-server restart

How to Solve Error “ImportError: cannot import name imsave“

Problem description

Today, when running a GitHub code two years ago, an error was reported:

from scipy.misc import imsave

ImportError: cannot import name 'imsave'

But after checking, I found that I have installed the SciPy module. When checking the internal function module of SciPy, I found that there are no functions such as imsave

import scipy.misc

print(dir(scipy.misc))

After searching, it is found that the reason is the SciPy version: after SciPy 1.3, functions such as SciPy. Misc. Imread/imsave will be discarded.

resolvent

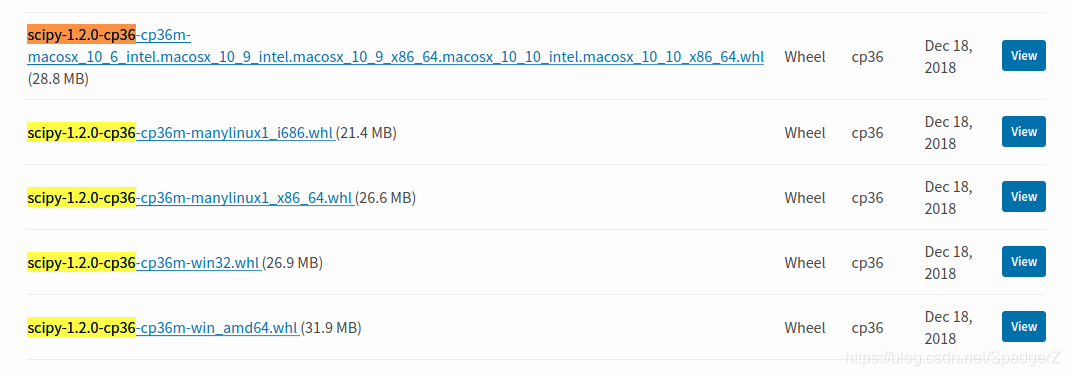
To re install the previous version of SciPy, first log in to the official website of SciPy and find the corresponding WHL file. As the python environment of this machine is Ubuntu + python = 3.6.9, download the third corresponding file:

Then uninstall the previous SciPy and install the file

# uninstal scipy
pip uninstall scipy


# install
pip install scipy-1.2.0-cp36-cp36m-manylinux1_x86_64.whl

Check the SciPy internal function again


You can see that there are functions like imread, imsave, imshow, etc

Linux Ubuntu ImportError: Libtk8.5.so: cannot open shared object file:No such file Install tkinter Library

Ubuntu resolves errors importerror: libtk8.5.so: cannot open shared object file:No such File to install Tkinter Library


terms of settlement


terms of settlement


at the beginning, I wanted to install with PIP3, but all of them made mistakes. It seems that PIP does not have this library?Then use </ font> instead

sudo apt-get update
sudo apt-get install python3-tk

   done

note: if there is an error in the installation process, you can refer to my previous article to add image source processing – Linux Ubuntu modify image source


The solution of unsuccessful rosdep update

After encountering this problem, we refer to no less than ten online tutorials, none of which is effective, including but not limited to:

1. Hang up VPN (it seems that many people finally rely on science to get online, but I still can’t hang it here

2. Modify the upper limit of time parameter: useless, the system has the default maximum value, about one minute, to treat the symptoms but not the root cause

3. Modify the host file: all kinds of addresses of Google and GitHub have been added in, which is useless

4. Hang hot spot: same as 1, useless

For the final solution, please refer to Baidu Post Bar:

sudo apt-get update

sudo apt-get install python-rosdep

  In the second step, there is an error message when installing Python rosdep. It seems that some files were not successfully installed, but in the end, rosdep update succeeded.

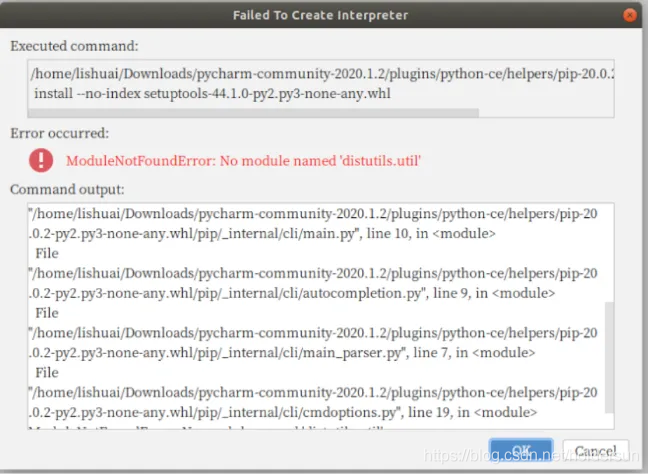
Create a new project in pycharm: modulenotfounde rror:No module named ‘distutils.util‘

The error is as follows:

Don’t panic. It’s not a big problem

When installing pycharm in the Ubuntu system and creating a new project, prompt

ModuleNotFoundError: No module named ‘distutils.util’

The reason is that Ubuntu 18.04 does not install PIP by default, so you need to install python3 pip,

Enter the command in the terminal:

sudo apt-get install python3-pip

When you create a new project again, the problem can be solved

The resolution of Ubuntu 16.04 screen can’t be modified and the solution of circulating login

Today, there are many problems with the graphics card driver. One of them is that after the computer restarts, the resolution of the display screen becomes 800600, and the normal resolution is 19201080. There is no other resolution option in the system settings, so it cannot be modified. Try to create the xorg. Conf file, which is described on the Internet, to set the custom desktop resolution. After the modification, the resolution has changed, but it is 1600 * 1200, which is still very abnormal. Using the combination of CVT and xrandr to modify the resolution indicates another error, xrandr: failed to get size of gamma for output default. One problem after another, what a tangle!

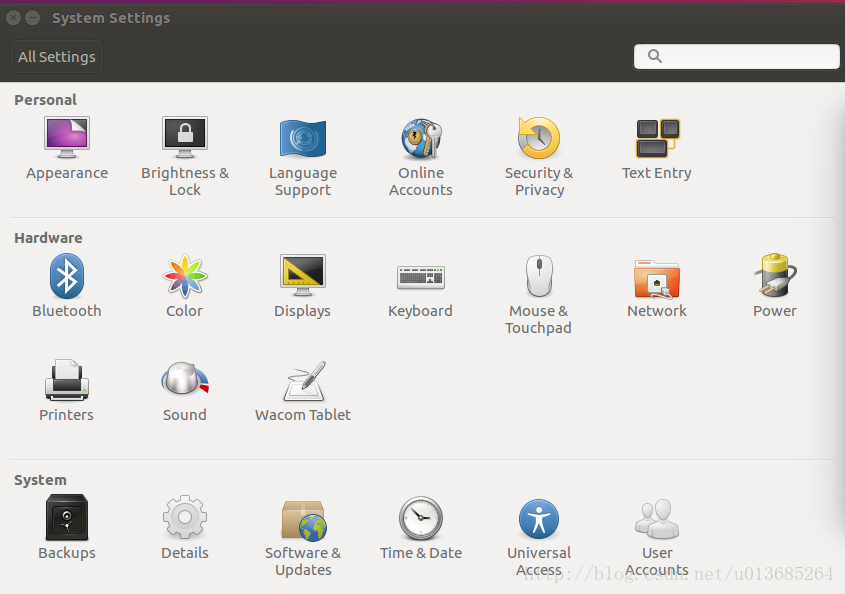
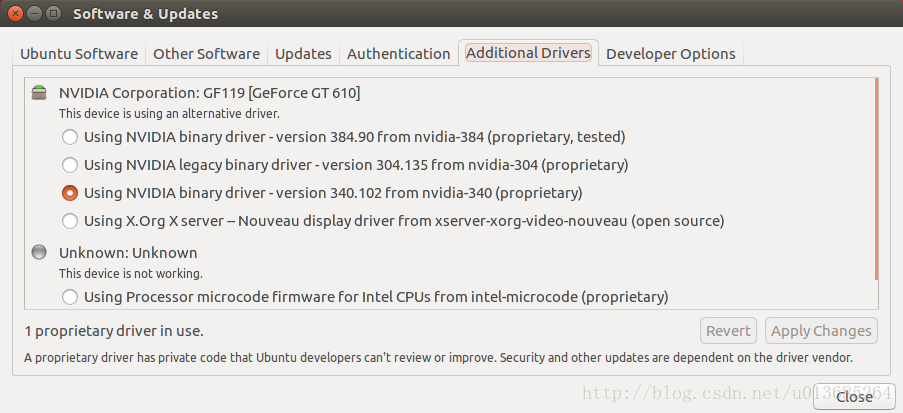
It has to be said that it’s really unpleasant to search these professional problems with Baidu in China. What often appears are some irrelevant or unsolvable web pages. Fortunately, it’s all solved now, and the problem is still in the driver side of the graphics card [1]. Software & amp; update in system settings; In updates, click additional drivers and change it to NVIDIA driver (I choose the third one here, as shown in the figure below). The application modification needs to wait for a little time, restart the computer after completion, and the resolution is normal again.

After the driver is re installed, the problem of circular login appears again. You may encounter it later. Record the solution here.

ctrl +alt +f2  
sudo service lightdm stop  
sudo apt-get --purge remove nvidia-*  

After many months, I stepped on the big pit of circular login again, but the previous solution was invalid. Another possible problem is that the owner and all groups of the. Xauthority file become root. There is a. Xauthority file in the user’s home directory. View the owner and all groups of the file

ls -la .Xauthority

If it is root, you need to change it to your login user:

sudo chown username:username .Xauthority

(there will always be all kinds of accidents in the actual solution, one by one, don’t worry.)

Restart and stop of nginx in Linux service

Case 1: nginx has service

Nginx installed in Linux will register service service by default. You can directly start, stop and restart according to the following operations

service nginx start  # start
service nginx stop  # stop
service nginx restart  # restart

Case 2: the original nginx service is not clear

Find the installation directory of nginx to understand the situation of nginx

# Find Nginx installation information
find/-name nginx

# Go to the nginx sbin directory and restart
. /nginx -s reload

# If you have modified the Nginx configuration, check the configuration with -t
. /nginx -t

# Check to see if it starts
ps aux | grep nginx
# or
ps -ef | grep nginx

Nginx more

Adding prefix to nginx agent of Python flash project
deployment of ngnix + gunicorn + Flash project in Ubuntu environment

[solution] install L2TP and related settings in Ubuntu 18.04

preface

Before, according to the company’s business needs, it was necessary to connect L2TP VPN on ubuntu16.04
for a whole day, but it was not installed successfully
Baidu tried all kinds of methods
finally, I felt that a system should be re installed. Rebooted Ubuntu 18.04

Solution
1. Command line input:

sudo apt-get install network-manager-l2tp-gnome

2. From the drop-down arrow in the upper right corner of Ubuntu 18.04, find Settings or directly click the gear type icon to enter settings
3. In the Settings interface, select Network , and VPN
appears in the interface. 4. Click + on the right side of VPN ,
to see Layer 2 Tunneling Protocol (L2TP)
to explain that the executed command takes effect
5. Click L2TP to enter the interface and fill in the proxy address, user name and password
the rest are default. Test the connection
note: if the company has other settings, it needs to communicate with colleagues.

[solution] a perfect solution to the problem of failed to load module “Canberra GTK module” in Ubuntu

[solution] series updated…

Problem Description:

Prompt for error when executing command in Ubuntu 18.04 command line: failed to load module "Canberra GTK module"

Solution:
1. Execute the following command, I believe it will work wonders

sudo apt-get install libcanberra-gtk-module

2. During execution, enter y
3 according to the prompt, and re execute the command that just reported the error

Opencv2.4.9 + ffmpeg1.2.12 installation configuration and problem solution under Ubuntu 14.04

In the process of video processing, two feature extraction methods, space-time interest points (stip) and improved dense trajectories (IDT), are used. We can find the open algorithm source code on the author’s home page. They need opencv and ffmpeg to run smoothly under Linux. We have used these two tools before, but now we want to use them again after changing the working environment, but there are still many problems in the process of configuration and installation. Therefore, I feel it is necessary to record the specific process, problems and solutions for future use, and hope to bring a little help to others.


Opencv2.4.9 and ffmpeg 1.2.12 source package download

These two software in the official website can be directly found in various versions of the source code package, download, compile and install. If you don’t particularly need the latest version of the software, I suggest that you use the earlier version that has been used by most people, and you can easily find the corresponding solution when there is a problem. I chose opencv2.4.9 and ffmpeg 1.2.12.

Opencv2.4.9 download
the official website provides download links from the earlier version 1.0.0 to 3.1 and 2.4.13, which means that different operating systems have different software packages
http://opencv.org/downloads.html
The download address of version 2.4.9 that I used is as follows:
0 https://sourceforge.net/projects/opencvlibrary/files/opencv-unix/2.4.9/opencv-2.4.9.zip/downloadFFmpeg1.2.12 The latest version of ffmpeg is 3.1.4, and the update speed is relatively fast. Personal choice of the early version 1.2.12 has been able to meet the actual needs, and the download address is as follows:
0 https://ffmpeg.org/olddownload.html

Ffmpeg compilation configuration

Ffmpeg is a leading multimedia framework, which can be used to record, convert digital audio and video, and convert them into open source programs. It includes the leading audio/video coding libraries libavcodec, libavutil, libavformat, etc.

1. Uninstall the previously installed ffmpeg and x264 software
in order to prevent version problems, it is recommended to uninstall the previously (possibly) installed version first. The order is as follows:

sudo apt-get -qq remove ffmpeg x264 libx264-dev

2. Install dependencies and related software

sudo apt-get install yasm
sudo aptitude install libx264-dev libfaac-dev libmp3lame-dev libtheora-dev libvorbis-dev libxvidcore-dev  libxext-dev libxfixes-dev

3. Compile and install
decompress the ffmpeg package and enter the decompressed directory

cd ffmpeg-1.2.12

Environment configuration [4]

./configure --prefix=/usr/local/ffmpeg --enable-gpl --enable-version3 --enable-nonfree --enable-postproc --enable-pthreads --enable-libfaac --enable-libmp3lame --enable-libtheora --enable-libx264 --enable-libxvid --enable-x11grab --enable-libvorbis --enable-nonfree --enable-pic --enable-shared

Note that there may be carriage return or character problems in the process of copying. If there is a problem with the prompt command, you need to carefully check the space and carriage return. If you use prefix to specify the installation path of the software, you need to modify the corresponding path in the configuration file so that the system can find the installation path of ffmpeg

vi /etc/profile

Press insert and add the following two lines at the end of the file:

export FFMPEG_HOME=/usr/local/ffmpeg 
export PATH=$FFMPEG_HOME/bin:$PATH

Press ESC and enter “: WQ” to exit and save, and then make the above changes take effect. The command is as follows:

source profile

After all configuration is completed, prepare to install. The command is as follows:

make
make install

After installation, you will see three directories in/usr/local/ffmpeg: Bin executable file directory, lib static and dynamic link library directory, and header files used in include programming.

4. Check whether the installation configuration is correct
it is said on the Internet that you can test whether the installation is successful by executing ffplay to play the video file in the bin directory. However, I did not generate ffplay after compiling and installing. There are only ffmpeg and ffserver in the bin directory. Therefore, we directly check whether the version is correct, and there is no problem when we use it later. The order is as follows:

ffmpeg -version

The correct version and configuration information appears, indicating that the installation is successful.

Opencv compilation and installation

The full name of OpenCV is: open source computer vision library. Opencv is a cross platform computer vision library based on BSD license (open source), which can run on Linux, windows and Mac OS operating systems. It is lightweight and efficient, which is composed of a series of C functions and a small number of C + + classes. It also provides the interfaces of python, ruby, MATLAB and other languages, and realizes many general algorithms in image processing and computer vision [5].

1. Install dependencies

sudo apt-get -qq install libopencv-dev build-essential checkinstall cmake pkg-config libjpeg-dev libjasper-dev libavcodec-dev libavformat-dev libswscale-dev libdc1394-22-dev libxine-dev libgstreamer0.10-dev libgstreamer-plugins-base0.10-dev libv4l-dev python-dev python-numpy libtbb-dev libqt4-dev libgtk2.0-dev libopencore-amrnb-dev libopencore-amrwb-dev x264 v4l-utils 

2. Compile and install
to unzip the downloaded opencv package and enter the unzipped directory

cd opencv-2.4.9

Create compile directory, compile and install

mkdir release
cd release
cmake -D CMAKE_BUILD_TYPE=RELEASE -D CMAKE_INSTALL_PREFIX=/usr/local ..
make
sudo make install

It takes a long time to compile here. After completion, the following prompt information will be printed on the last line:

-- Configuring done
-- Generating done
-- Build files have been written to: /opt/opencv-2.4.9

During the compilation process, you may stay in the line “configuring done” for a long time. Don’t stop the compilation in a hurry. You need to wait patiently for the compilation to complete. During the installation process, there will be a progress prompt in the form of “[10%]” percentage, and the process will be very slow. Please wait patiently.

Tip: after cmake is completed, relevant information will appear, in which you can check whether ffmpeg has been supported. If yes is supported, ffmpeg will appear after it. There are also some encoding and formats with yes.

3. Environment configuration
all library files are installed under/usr/local/lib by default, and all header files are installed under/usr/local/include/opcv * /. Modify the environment configuration [6], and the command is as follows:

vim /etc/ld.so.conf

Press the insert key to add in the last line of the file

/usr/local/lib

Press ESC key to enter “: WQ” to exit and save, and then execute the following command:

ldconfig

At this point, opencv installation is complete.

Libcxcore. So. 2 cannot find a solution to the problem

After opencv is installed, the IDT algorithm can run normally, but the following errors appear when executing stip program:

./bin/stipdet: error while loading shared libraries: libcxcore.so.2: cannot open shared object file: No such file or directory

Look at the problem, it means that the shared library file libcxcore. So. 2 can’t be found during the execution of the program. This file or path doesn’t exist. From the online search results, most of the problems are prepared to use stip to obtain video features, but dense track programs do not have this problem. This problem and several solutions are available on the stackoverflow website for reference [7].

I didn’t succeed in creating soft links. Maybe I didn’t set it correctly at that time, and then I didn’t have root permission. Finally, I adopted a temporary method. To set the search directory of shared library, the command is as follows:

export LD_LIBRARY_PATH=[enter your path]/opencv-2.4.9/release/lib

When executing some external programs under Linux, you may be prompted that the shared library cannot be found, which is quite common. The reason for this problem is that although the shared library has been installed, the program cannot find the file when it is ready to call.

My problem is that the shared library file is installed in other “non/lib or/usr/lib” directory, but after the installation, the non root user does not have the permission to add a path in the “/ etc/LD. So. Conf”. So export is a global variable LD_ LIBRARY_ Path, and then run the program will go to this directory to find the shared library [8].

Execute stip program

If you directly execute “.”/bin/stippet – help “in this directory, you will not be able to execute. You must turn stippet and stipshow into executable files. For convenience, I directly changed it to fully open executable permissions [9]. The order is as follows:

chmod 777 bin/stipdet
chmod 777 bin/stipshow

For programs with dense trajectories, the same method can be used to execute normally. In addition, the global variable of export will no longer take effect every time the command window is closed. Therefore, before executing the stip program, we must first set the search directory of the shared library according to the above method, and there will be no problem that libcxcore. So. 2 cannot be found.

Opencv version view

During use, you may need to check the installed version of OpenCV. You can use the following command [10]:

pkg-config --modversion opencv

PKG config is a very useful tool for compiling applications and library files. One of its functions is to check the version number of the library.

Python calls opencv module

If you need to use Python to call opencv module, you can install Python first and then load CV [4]. The order is as follows:

sudo apt-get install python-opencv
sudo apt-get install python-numpy
python
import cv


References: <
> 1] https://www.di.ens.fr/~laptev/interestpoints.html
[2] https://lear.inrialpes.fr/people/wang/improved_trajectories
[3] https://ffmpeg.org/about.html
[4] http://blog.csdn.net/u010106759/article/details/51931815
[5] http://opencv.org/
[6] http://blog.csdn.net/firefoxbug/article/details/7554409
[7] http://stackoverflow.com/questions/5212728/libcxcore-so-2-missing-in-opencv
[8] http://blog.csdn.net/sahusoft/article/details/7388617
[9] http://blog.chinaunix.net/uid-21880738-id-1813031.html
[10] http://blog.csdn.net/ppp2006/article/details/47445903
Install Java runtime JRE in Ubuntu 16.04

Recently, we need to use Vuze software to download things in the Ubuntu system. When we run the program, we are prompted that there is a lack of JRE environment. In order to solve this problem, we have found many solutions on the Internet. Under normal conditions, run the following command to install:

sudo apt-get install openjdk-7-jre

However, after the command is executed, the error “package ‘openjdk-7-jre’ has no installation candidate” is prompted, as shown in the figure below

This problem should be caused by the current data source does not contain JRE, but it is also troublesome to find an available data source to add. In fact, you can directly download the tar.gz package corresponding to JRE from Oracle’s Java official website. The command is as follows:

wget http://javadl.oracle.com/webapps/download/AutoDL?BundleId=225345_090f390dda5b47b9b721c7dfaa008135

Unzip the downloaded file, I put it directly under the home directory, and change the unzipped folder name to JRE, which is ~/JRE . Then, set the environment variables by modifying the /etc/profile file. The command is as follows:

sudo gedit /etc/profile

Add the following lines at the end of the file:

export JAVA_HOME=~/jre
export PATH=$PATH:$JAVA_HOME/bin
export CLASSPATH=$JAVA_HOME/lib

Save, exit. Enter the following command to make it work. (you may need to restart the system here)

sudo source /etc/profile

Check the Java version,

java -version

If the version information is displayed successfully, the environment is installed successfully

When executing the source command, the prompt "command not found" is also dizzy. The reason mentioned on the Internet is due to the modification of the path environment variable. You need to re export the environment variable through the following command:

export PATH=/bin:/usr/bin:/usr/local/bin

So far, the problem has been solved.