Tag Archives: Operation and maintenance

[Solved] OCI runtime create failed: /usr/bin/nvidia-container-runtime did not terminate successfully: unknown

Docker build Image error:

OCI runtime create failed: /usr/bin/nvidia-container-runtime did not terminate successfully: unknown
Root cause: need to install nvidia-container-runtime
How to Solve:

1. Online installation

distribution=$(. /etc/os-release;echo $ID$VERSION_ID)
curl -s -L https://nvidia.github.io/nvidia-container-runtime/$distribution/nvidia-container-runtime.repo |\
tee /etc/yum.repos.d/nvidia-container-runtime.repo
yum install nvidia-container-runtime

2. If stuck on connecting to nvidia.github.io

1) yum -y install yum-utils

2) mkdir ~/nvidia && cd ~/nvidia

3) repotrack nvidia-container-runtime

4)rpm -Uvh –force –nodeps *.rpm

Failed to start firewalld.service: Unit is masked [How to Solve]

Centos7 failed to start firewall: Failed to start firewalld.service: Unit is masked.

Solution:

The error “Failed to start firewalld.service: Unit is masked.” appears when you run “systemctl start firewalld”. The service needs to be unlocked:

systemctl unmask firewalld.service
systemctl start firewalld

[Solved] Failed to Setup IP tables: Unable to enable SKIP DNAT rule: (iptables failed: iptables –wait -t na…

Error message: Failed to Setup IP tables: Unable to enable SKIP DNAT rule: (iptables failed: iptables –wait -t nat -I DOCKER -i br-b1938128a963 -j RETURN: iptables: No chain/target/match by that name. (exit status 1))

reason: The error report after operating the Linux firewall on/off operate.

Solution:

restart docker via the following command:

service docker restart

VScode Error: extension failed XHR Failed (Ubuntu Virtual Machine)

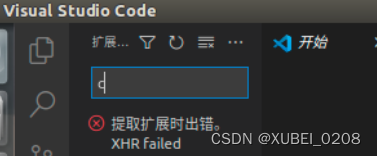
In the process of learning Linux embedded development, I encountered the following problems: after installing VS code in the Ubuntu virtual machine, it need to install appropriate plug-ins. At this point, vscode fails to expand XHR Failed, as shown in the figure:

And press the F1 key inside Vs code to open Developer:Toggle Developer Tools, enter the Console to query the reason, The error shown in the figure below appears (That is, Ubuntu system will point the domain name to the specified IP solve this problem):

After searching the Internet for many solutions, the following operations can solve the problem:

1. Open the hosts file in the Ubuntu terminal

sudo gedit /etc/hosts

2. Add the corresponding relationship between IP and domain name in the file as follows, and save the hosts file:

13.107.42.18 marketplace.visualstudio.com

3. Restart Ubuntu.

error: C compiler cannot create executables [How to Solve]

Phenomenon:

./configure --prefix=/usr/local/python3.6
checking build system type... x86_64-pc-linux-gnu
checking host system type... x86_64-pc-linux-gnu
checking for python3.6... no
checking for python3... no
checking for python... python
checking for --enable-universalsdk... no
checking for --with-universal-archs... no
checking MACHDEP... linux
checking for --without-gcc... no
checking for --with-icc... no
checking for gcc... gcc
checking whether the C compiler works... no
configure: error: in `/tmp/Python-3.6.13':
configure: error: C compiler cannot create executables
See `config.log' for more details

Solution:

1. View log

# cat config.log |grep error
gcc: error: unrecognized command line option '-V'
gcc: fatal error: no input files
gcc: error: unrecognized command line option '-qversion'
gcc: fatal error: no input files
/usr/libexec/gcc/x86_64-redhat-linux/4.8.5/cc1: error while loading shared libraries: libmpfr.so.4: cannot open shared object file: No such file or directory
configure:4005: error: in `/tmp/Python-3.6.13':
configure:4007: error: C compiler cannot create executables

Missing libmpfr.so.4 File

2. Install mpfr

Package name:mpfr-3.1.1-4.el7.x86_64

~# yum install mpfr-3.1.1-4.el7.x86_64 -y
......
Verification:
~# ll /usr/lib64/libmpfr.so.4
libmpfr.so.4      libmpfr.so.4.1.1  
~# ll /usr/lib64/libmpfr.so.4
lrwxrwxrwx 1 root root 16 Sep  7 22:26 /usr/lib64/libmpfr.so.4 -> libmpfr.so.4.1.1

Finally, the problem is solved

[Solved] KingbaseES V8R3 Error: cluster.log ERROR: md5 authentication failed

Case description:

In the cluster of KingbaseES V8R3 cluster The error message “ERROR: md5 authentication failed; DETAIL: password does not match” often appears in the log. This case shows the cause of this error.

Applicable version:KingbaseES V8R3

Problem phenomenon:
cluster.log:

Analysis: 1, when the system user connects to port 9999 to execute “show pool_nodes”, you need to access the cluster kingbasecluster service and verify the user’s identity by cluster_password.

As shown below: cluster.log information

2. The password of the system user needs to be verified by the database sys_hba.conf (the password is encrypted by md5).

As shown below: cluster.log information

3. And port 9999 corresponds to the kingbasecluster service, which also needs to be verified by the md5 password in the cluster_password file.

4. If the database password and the password in cluster_password do not match, you cannot log in.

5. This error message does not affect the health detection of the background database by kingbasecluster.

Problem-solving:

When changing the database user system password in the cluster.
        1、Modify the password of the system user in the database.
        2, also need to modify the password of system user in cluster_password by sys_md5 tool. 
        3, you need to modify the password of system in the recovery.done and recovery.conf configuration files.

[Solved] Ubuntu16.4Install vcs2016 Error: mount.vboxsf: mounting failed with the error: Invalid argument

Cause of the problem

VCS 2016 requires gcc4.8 and g++4.8, while VBoxGuestAdditions-6.1 – * * requires version 4.9+ to install (the ‘-fstack-protector-strong compilation option need to be supported).

Solution:

1. Check the version through
ls /usr/bin/gcc*. If not, install the corresponding version;

2. Then use the following command to perform version management
sudo update-alternatives –install /usr/bin/gcc gcc /usr/bin/gcc-5 100

3. Switch the new version of gcc with the following command
sudo update-alternatives –config gcc

4. Reinstall the VBoxGuestAdditions tool
cd /opt/VBoxGuestAdditions-6.1.36/init
sudo vboxadd setup

5. Finally, the problem was solved by re-hanging it in the directory

[Solved] KVM Failed to Startup Error: error: Network not found: no network with matching name ‘default‘

An error was reported when starting the KVM virtual machine on the command line: startup failed, and the default network could not be found

[root@localhost ~]# virsh start centos7.0
error: Failed to start domain centos7.0
error: Network not found: no network with matching name 'default'

However, there was a default network before, and an error was reported when it was restarted after a night. First, find the path of default.xml,

[root@localhost ~]# find/-name "default.xml"
/run/libvirt/storage/default.xml
/etc/libvirt/storage/default.xml
/etc/libvirt/storage/autostart/default.xml
/usr/share/backgrounds/default.xml
/usr/share/libvirt/networks/default.xml

It can be seen that there are many xml files. Select those related to network and libvirt for execution

[root@localhost ~]# virsh net-define /usr/share/libvirt/networks/default.xml
Network default defined from /usr/share/libvirt/networks/default.xml

[root@localhost ~]# virsh net-start default
Network default started

Start successfully, check:

[root@localhost ~]# virsh net-list
 Name                 State      Autostart     Persistent
----------------------------------------------------------
 default              active     no            yes

Finally, just start the KVM virtual machine:

[root@localhost ~]# virsh start centos7.0
Domain centos7.0 started

The graphical interface has also been viewed successfully:

[Solved] Cannot run program “svn” (in directory “D: xxxx”): CreateProcess error=2, the system cannot find the specified file.


1. Error content

Cannot run program “svn” (in directory “xxxx”): CreateProcess error=2, the system cannot find the specified file

2. Reason

The command was not installed when TortoiseSVN was installed, so version management cannot be performed through the command

3. Solution

1. Find the TortoiseSVN installation package you downloaded at that time and reinstall it

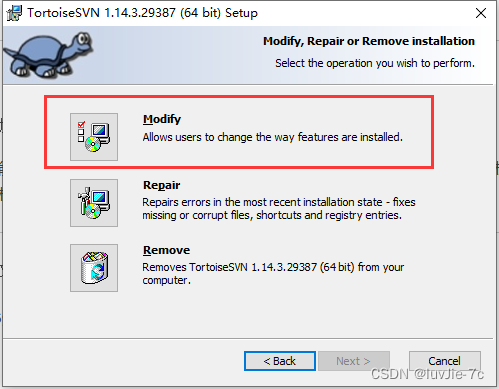
2. Select the first one here

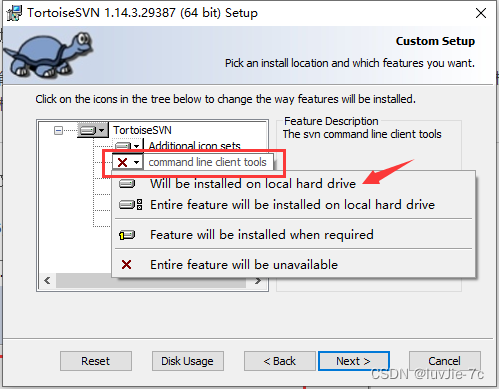
3. The second option is X, which means that you have not installed the command. Click on and check the first one, and then confirm the next step