Tag Archives: OpenCV

cv2.error: OpenCV(3.4.2) error: (-215:Assertion failed) !empty() in function ‘detectMultiScale‘

cv2。错误:(-215:断言失败)!empty()函数’ detectMultiScale ‘

报错信息

cv2.error: OpenCV(3.4.2) /Users/travis/build/skvark/opencv-python/opencv/modules/objdetect/src/cascadedetect.cpp:1698: error: (-215:Assertion failed) !empty() in function 'detectMultiScale'

solution

cv2.CascadeClassifier('**/**/**.xml')

check the above path, in any case similar to check the path is correct

Installing opencv and Linux Makefile:160 : recipe for target ‘all’ failed problem resolution

system used: MAC, remote server: Linux (UBuntu).

installing opencv to the server can accelerate the training speed and enhance the test function to a certain extent. Look up a few methods on the net all write too complex, oneself close test after feasible use the simplest language description record at this.

connect to the server with a terminal on the macbook and download opencv package from github:

git clone https://github.com/Itseez/opencv.git
git clone https://github.com/Itseez/opencv_contrib.git

download completed, opencv and opencv_contrib folders can be seen in your download directory, move opencv_contrib directory to opencv directory.

add the required dependency libraries:

sudo apt-get install build-essential
sudo apt-get install cmake git libgtk2.0-dev pkg-config libavcodec-dev libavformat-dev libswscale-dev
sudo apt-get install python-dev python-numpy libtbb2 libtbb-dev libjpeg-dev libpng-dev libtiff-dev libjasper-dev libdc1394-22-dev

done, use the CD command to enter the opencv directory, and then create a new folder:

mkdir build

goes into the build directory and starts compiling —

1. If your server has no anaconda pre-installed, execute:

cmake -D CMAKE_INSTALL_PREFIX=/usr/local -D CMAKE_BUILD_TYPE=Release -D OPENCV_EXTRA_MODULES_PATH=../opencv_contrib/modules ..

2. If you have anaconda on your server, there may be some conflicts. If you use the command above, a Makefile:160: recipe for target ‘all’ failed with an error. Just change it to:

cmake -D CMAKE_BUILD_TYPE=RELEASE -D CMAKE_INSTALL_PREFIX=/usr/local -D WITH_TBB=ON -D BUILD_SHARED_LIBS=OFF -D WITH_OPENMP=ON -D ENABLE_PRECOMPILED_HEADERS=OFF ..

is followed by:

make -j8

After

is compiled, execute:

sudo make install

this way, we can use OPencv in Ubuntu for all languages. You can see the results of the opencv compilation under /usr/local/lib.

cd /usr/local/lib
ls

you can see that there is a large number of lib oepncv, on the stable!

Reading and saving opencv Python video

Capture Video from Camera

gets video from the camera:

to capture video, you need to create a VideoCapture object. Its parameters can be the device index or the name of the video file (described below). The device index simply specifies the number of which camera. Zero represents the first camera and one represents the second camera. After that, you can capture the video frame by frame. But finally, don’t forget to release the capture.

import numpy as np
import cv2

cap = cv2.VideoCapture(0)

while(True):
    # Capture frame-by-frame
    ret, frame = cap.read()

    # Our operations on the frame come here
    gray = cv2.cvtColor(frame, cv2.COLOR_BGR2GRAY)

    # Display the resulting frame
    cv2.imshow('frame',gray)
    if cv2.waitKey(1) & 0xFF == ord('q'):
        break

# When everything done, release the capture
cap.release()
cv2.destroyAllWindows()

cap.read () : returns a Boolean (True/False). This returns true if the frame was read correctly, false otherwise. You can check this return value to see if the video is over.

cap. IsOpened () : checks if the cap is initialized. If it is not initialized, open it with cap.open () . The above code reports an error when the CAP is not initialized.

Get (propId) :

cap.get (propId) : accesses some of the features of the video, where propId is a number from 0 to 18, each number representing the video’s Property Identifier. Some of these values can be modified using cap.set (propId, value) , and value is the modified value.

For example, I check the frame width and height by cap.get (3) and cap.get (4). The default value is 640×480. But I want to change it to 320×240, using ret = cap.set (3, 320) and RET = cap.set (4, 240).


Playing Video from file

to play video from file:

is the same as capturing video from the camera, just change the camera index and video file name. When displaying frames, select the appropriate cv2.waitkey () time. If this value is too small, the video will be very fast, and if it is too large, the video will be slow (this can be used to display the video in slow motion). Normally, 25 milliseconds will do.

import numpy as np
import cv2

cap = cv2.VideoCapture('vtest.avi')

while(cap.isOpened()):
    ret, frame = cap.read()

    gray = cv2.cvtColor(frame, cv2.COLOR_BGR2GRAY)

    cv2.imshow('frame',gray)
    if cv2.waitKey(1) & 0xFF == ord('q'):
        break

cap.release()
cv2.destroyAllWindows()

Saving a Video

save video:

creates a VideoWriter object, specifying the output file name (for example: output.avi). Then you specify the FourCC code (FourCC is the 4-byte code used to specify the video codec. List of available code. Next, pass in frames per second (FPS) and frame size. The last is the isColor flag. If it is True, the encoder encodes a color frame; otherwise, a grayscale frame.

import numpy as np
import cv2

cap = cv2.VideoCapture(0)

# Define the codec and create VideoWriter object
fourcc = cv2.VideoWriter_fourcc(*'XVID')
out = cv2.VideoWriter('output.avi',fourcc, 20.0, (640,480))

while(cap.isOpened()):
    ret, frame = cap.read()
    if ret==True:
        frame = cv2.flip(frame,0)

        # write the flipped frame
        out.write(frame)

        cv2.imshow('frame',frame)
        if cv2.waitKey(1) & 0xFF == ord('q'):
            break
    else:
        break

# Release everything if job is finished
cap.release()
out.release()
cv2.destroyAllWindows()

official document

Opencv, CV2. Puttext() usage

these basic functions are lost for a while, and then forgotten.

cv2.putText(I,'there 0 error(s):',(50,150),cv2.FONT_HERSHEY_COMPLEX,6,(0,0,255),25)

each parameter is in order: photo/added text/upper-left coordinates/font/font size/color/font thickness

Python opencv (3) get image size

The shape attribute of the image matrix

represents the size of the image, and shape returns the tuple tuple. The first element represents the number of rows of the matrix, the second tuple represents the number of columns of the matrix, and the third element is 3, indicating that the pixel value consists of the three primary colors of light.

import cv2
import numpy as np
fn="baboon.jpg"
if __name__ == '__main__':
    print 'load %s as ...' % fn
    img = cv2.imread(fn)
    sp = img.shape
    print sp
    sz1 = sp[0]#height(rows) of image
    sz2 = sp[1]#width(colums) of image
    sz3 = sp[2]#the pixels value is made up of three primary colors
    print 'width: %d \nheight: %d \nnumber: %d' %(sz1,sz2,sz3)

运行结果:
加载baboon.jpg…

(512、512、3)宽度:512
身高:512年
数字:3

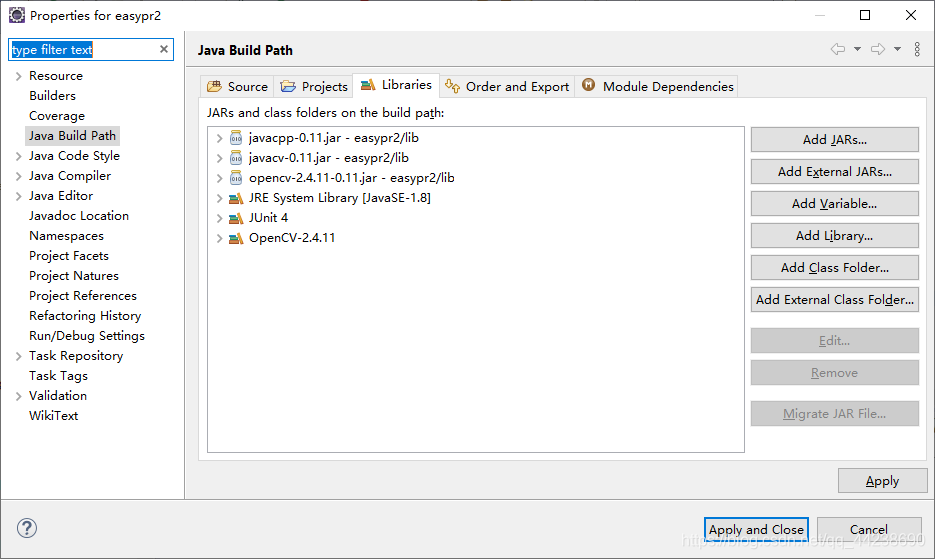
Java cpp-0.11.jar, opencv-windows-x86_ 64.jar,opencv-2.4.11-0.11.jar

, although you probably know how to import easypr, let’s do it briefly.

  1. import easypr
    File-> import-> Existing Projects into Workspace-> Browse… . Choose your download easypr – Java
  2. import the jar package
    link: https://pan.baidu.com/s/1PXRL2uoeZmmZK4hyY5MJCg
    extraction code: 1234
    this is four outsourcing network location address.
    select import project -> Build Path-> Configure Build Path… ->

Edge detection: two methods

  • Laplace algorithm gives edge
import cv2
import numpy
from scipy import ndimage
def strokeEdges(src,dst,blurksize,edgeKsize):
    src=numpy.array(src)
    yuansrc=src
    dst=numpy.array(dst)
    if blurksize>=3:
        blurredSrc=cv2.medianBlur(src,blurksize)
        graySrc=cv2.cvtColor(blurredSrc,cv2.COLOR_BGR2GRAY)
    else:
        graySrc=cv2.cvtColor(blurksize,cv2.COLOR_BGR2GRAY)
    ##以上操作是对图片模糊化然后边缘灰化 是否模糊化的标准就是blurksize是否小于3
    ##
    cv2.Laplacian(graySrc,cv2.CV_8U,graySrc,edgeKsize)
    ##拉普拉斯算法 第一个参数是原图 第二个参数是深度 也就是和图片形式有关例如 RGB分别由8位
    ##那么深度就是2的24次方 这里的cv2.CV_8U具体看下面
    ##第三个参数dest是结果的图片 Ksize是核的大小 为奇数 (并不是数字越大或者越小就越好 这个好不好原因还未知)
    #此时这里的边缘检测已经是完成了
    normalizedInverseAlpah=(1.0/255)*(255-graySrc)
    channels=cv2.split(src)
    #通道拆分
    for channel in channels:
        channel[:]=channel*normalizedInverseAlpah
    cv2.merge(channels,dst)
    cv2.imshow('dst',dst)
    cv2.imshow('graySrc',graySrc)
    cv2.imshow('shouw',yuansrc)
    cv2.waitKey()
    cv2.destroyAllWindows()
src=cv2.imread('D:\\pycharm\\text.jpg')
dst=src
strokeEdges(src,dst,7,5)

as for the above code there are two points which you won’t find if you don’t look at it the first question is why do we use numpy.array to 2d the second question is why do we change the channels when there is no change in the for loop but then the channels change at the end
Question the answer is in the loop and strokeEdges normalizedInverseAlpah = (1.0/255) of the * (255 – graySrc) this operation numpy array for the concrete operation of operation rules will give the answer in the code snippet below
problem two answers will give the answer in the code snippet below if I go back to review or future readers see the trouble knock code of your answer to see what problem we have appeared in

import numpy
gray=[2]
channels=[[1,2,3],[1,2,3],[1,2,3]]
for channel in channels:
    channel[:]=channel*2
print(channels)
print('____________________________')
channels=[[1,2,3],[1,2,3],[1,2,3]]
channels=numpy.array(channels)
for channel in channels:
    channel[:]=channel*[1,2,3]
print(channels)
print('____________________________')
channels=[[1,2,3],[1,2,3],[1,2,3]]
channels=numpy.array(channels)
for channel in channels:
    channel[:]=channel*2
print(channels)
  • Canny algorithm obtained the edge
import cv2
img=cv2.imread('D:\\pycharm\\text.jpg')
cv2.imshow('canny',cv2.Canny(img,0,100))
cv2.waitKey()
cv2.destroyAllWindows()

canny function itself and not for image noise reduction operation so if you want to use canny must advance using low channel filtering denoising
cv2, canny is the first parameter to the natural images in the second and the third parameter is respectively on the threshold and the threshold is simple to understand is the edge of the small number will appear more but the same risk is likely to take noise as edges or appeared on the edge of the following is not big number will edge if too less will appear the edges as not

Undeclared identifier CV in opencv4.2.0_ WINDOW_ AUTOSIZE

environment : OpenCV 4.2.0

#include "opencv2/imgproc/imgproc.hpp"
#include "opencv2/core/core.hpp"
#include "opencv2/highgui/highgui.hpp"

#include <iostream>
#include <stdio.h>

using namespace std;
using namespace cv;

//......

    /// 创建窗口
    namedWindow("Source Image", CV_WINDOW_AUTOSIZE);
    
    //......

    /// 对于方法 SQDIFF 和 SQDIFF_NORMED, 越小的数值代表更高的匹配结果. 而对于其他方法, 数值越大匹配越好
    if (match_method == CV_TM_SQDIFF || match_method == CV_TM_SQDIFF_NORMED)
    {
        //......
    }

error :

“CV_WINDOW_AUTOSIZE” : undeclared identifier.

“CV_TM_SQDIFF_NORMED” : undeclared identifier.

reason :

opencv4 partial naming changes, change CV_WINDOW_AUTOSIZE to WINDOW_AUTOSIZE; CV_TM_SQDIFF_NORMED is changed to TM_SQDIFF_NORMED.