Tag Archives: linux

File under WGet download directory

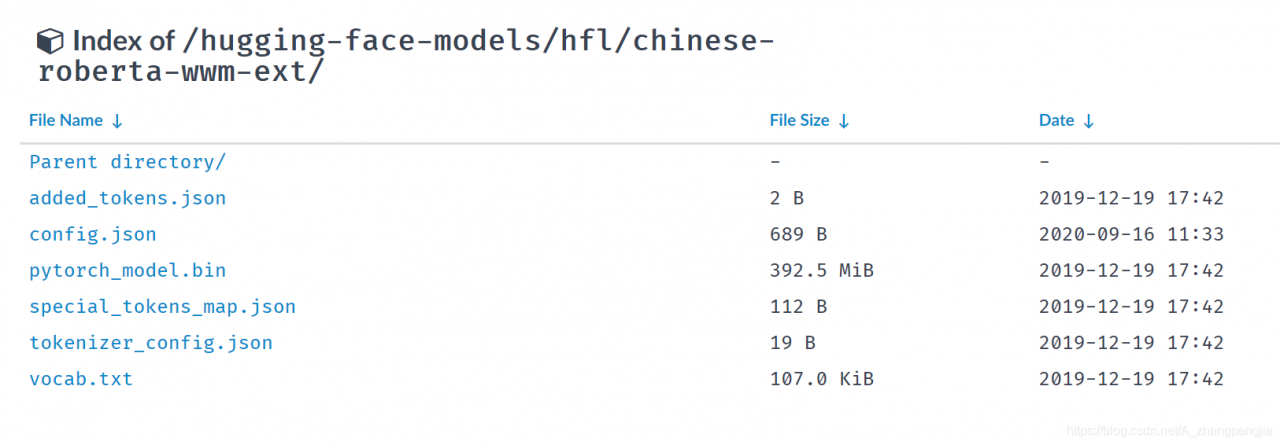
Wget downloads all the contents under a certain folder in Tsinghua Source
Website: https://mirrors.tuna.tsinghua.edu.cn/hugging-face-models/hfl/chinese-roberta-wwm-ext/

wget -r -np -nH -R index.html --limit-rate=2M https://mirrors.tuna.tsinghua.edu.cn/hugging-face-models/hfl/chinese-roberta-wwm-ext/

-r: Traverse all subdirectories -NP: less than the previous level of subdirectories to -nh: Do not save files to the hostname folder -r index.html: do not download index.html files –limit-rate: is the speed limit
Results:

Solution to the problem that listen TCP 0.0.0.0:3306: bind: address already in use port is occupied in Linux centos7

Problem description:
When installing the mysql container running docker in the host environment, the port is occupied

Reason analysis:
The port is occupied and cannot bind the address
Solutions:
netstat -nap look for port 3306 look at the pid that the program is running and find that it is actually occupied, remember the pid
netstat -nap | grep 3306

kill the process, here is kill 1107

Modulenotfounderror: no module named ‘CV2’ – (version problem)

Ubuntu Running OpenCV project tip: ModuleNotFoundError: No Module Named ‘Cv2’
Haha, that was the problem when it was first installed. Just throw me up.
1. Reason: the versions are inconsistent
The problem is that when installing OpencV-Python, the detailed version number is appended, which makes it different from the Python environment. In addition, there will be other problems, I can’t remember exactly.
2. Solutions

    first use the instruction: PIP install opencv-python to execute once, if the .py file or so to see the next one; Just do not append the version number when installing OpencV-Python.

Ubuntu18.04 installing Tomcat 8.5

Refer to the link
1. Download
and go to Apache Tomcat® official website to download
. Select the tar.gz version under Core
2. Move, unzip

mv apache-tomcat-8.5.60.tar.gz /opt/software
tar -zxvf /opt/software/apache-tomcat-6.0.41.tar.gz -C /opt/module/tomcat8.5.60 

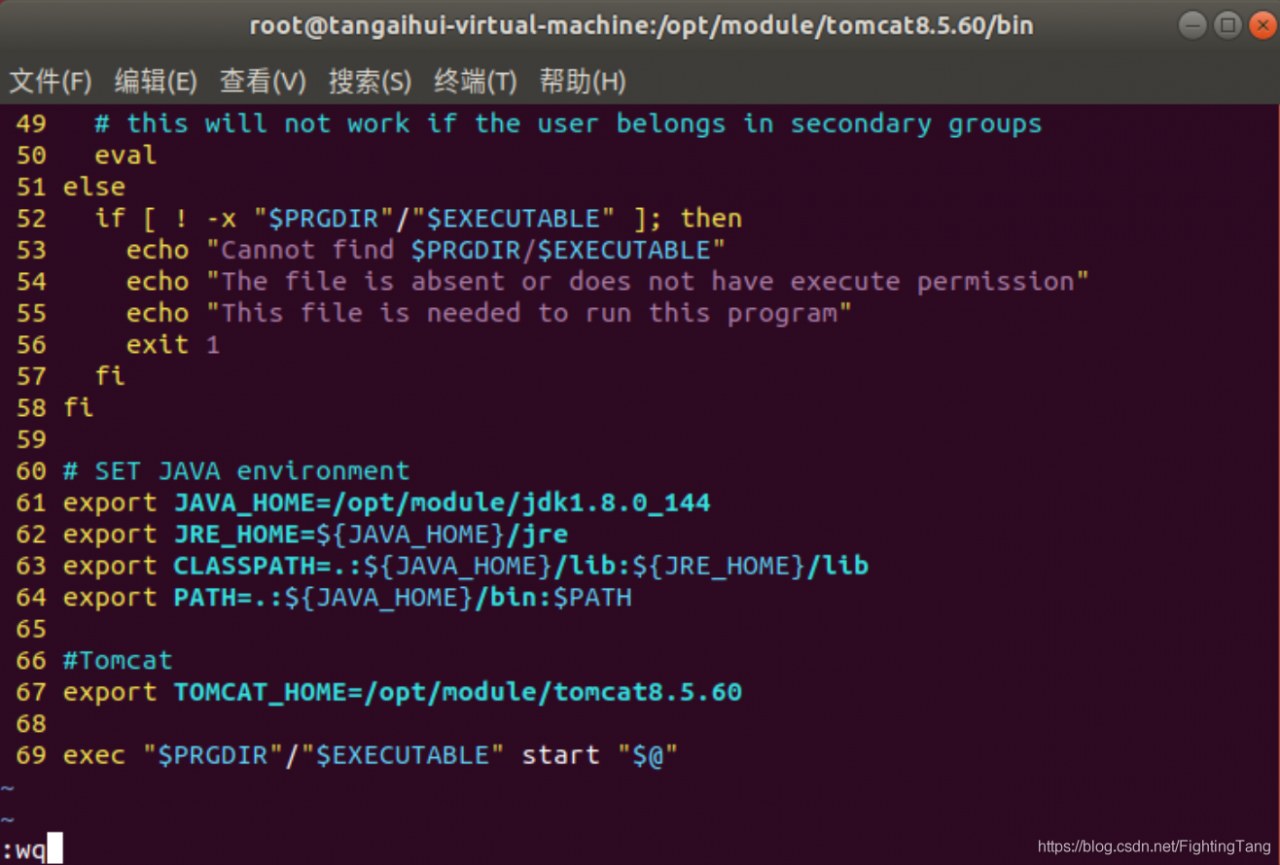
3. Modify the configuration (1) to modify the startup script, add lines 67-66
/opt/module/tomcat8.5.60/bin/startup. Sh

(2) start in tomcat bin directory, run./startup. Sh, Start tomcat
./startup. Sh

(3) verify
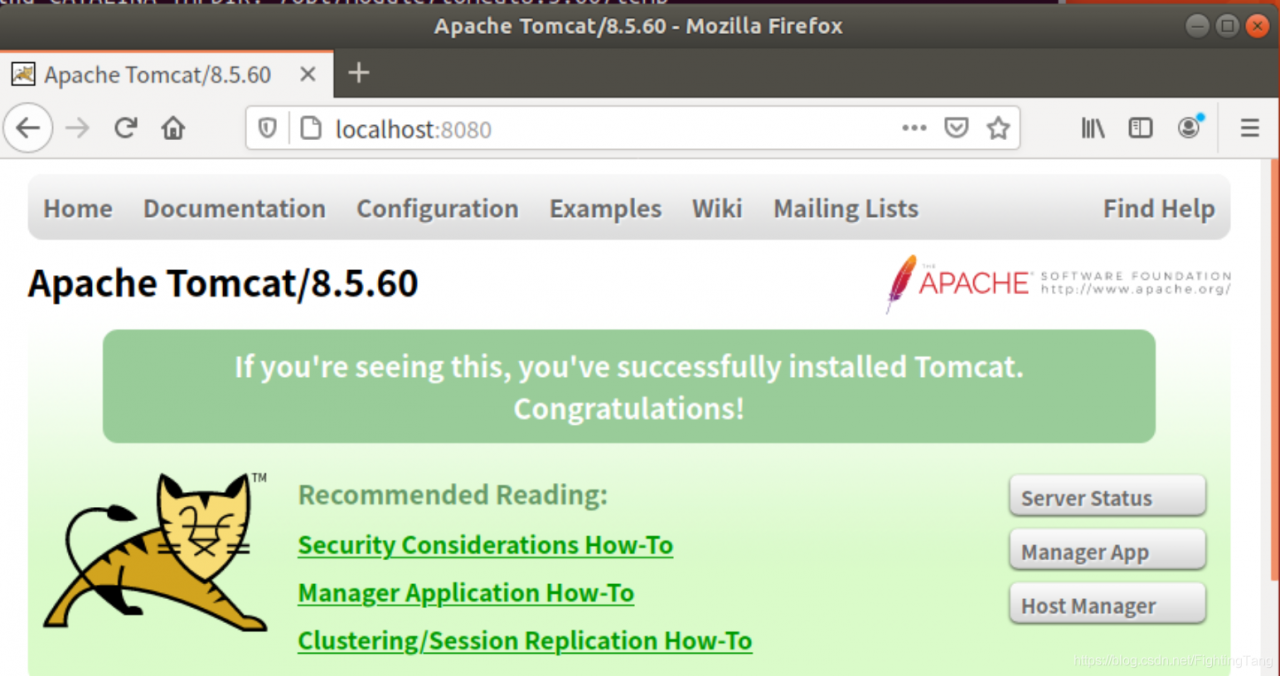
browser enter localhost:8080, access successful

Running error of dbeaver installed by deepin

After installing DBeaver, double-click the DBeaver icon to launch an error:
A Java Runtime Environment or Java Development Kit(dkmust be available in order to run eclipse. no java virtual machinewas found after searching the following locations:……
To the/usr/share/dbeaver/dbeaver ini
add JDK path
 
in
-vmargs
-Xms64m
-Xmx1024m
Before the increase

/home/vm gusen huanjin/jdk1.8.0 _111/bin
 

Putty remote login VMware virtual machine Linux

Install SSH service
There is no SSH service installed in Ubuntu by default. If you connect to Ubuntu via SSH, you need to manually install sSH-Server yourself. To determine whether to install SSH service, the following command can be used:

    : www.linuxidc.com@linuxidc:~$SSH localhost SSH: connect to host localhost port 22: Connection destination: Connection union

 
As shown above, it means that it has not been installed yet. It can be installed through APT. The command is as follows:

    : www.linuxidc.com@linuxidc:~$sudo apt-get install openssh-server

 
The system will be installed automatically. After the installation is completed, the service will be started first:

    www.linuxidc.com@linuxidc:~$sudo/etc/init. D/SSH start
     
    After startup, you can check to see if the service started correctly with the following command
    Ps

      www.linuxidc.com@linuxidc:~$- e | grep SSH 6212?00:00:00 SSHD
       
      As indicated above, start OK. Note that the default port for SSH is 22. You can change the port, stop,
      and then start. The configuration is under /etc/ssh/sshd_config, as shown below.

        www.linuxidc.com@linuxidc:~$vi /etc/ SSH /sshd_config # Package generated configuration file # See the SSHD (8) manpage for details # What ports, IPs and protocols we listen for Port 22
         
        Finally, it’s time to connect. See the following command:
        SSH [email protected]

          www.linuxidc.com@linuxidc:~$
          Disconnect:
          The

            exit
             
            Log into the virtual machine via Putty
            First of all, make sure that the virtual machine and host can ping each other. If you can’t ping the general, then the follow-up work cannot be carried out. You can search the Web for references to articles on VIRTUAL machine IP configuration
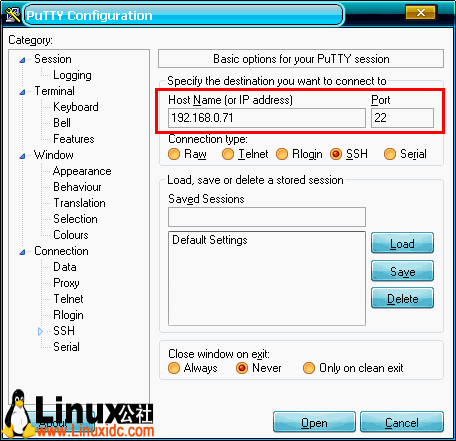
            Next, open the Putty client and the following interface appears. Fill in the relevant parameters:

            Where the IP address is the IP address of Ubuntu in the virtual machine.
            finally click Open to enter Putty, enter the user name and password to log in.

How to clean up the disk space of Linux server

Sometimes, a service suddenly hangs and starts again but fails to start. A look, the original disk space is full, so, how to clean it. The introduction is as follows:
Df-h, this command is used to view the server space. The rendering after running is as follows:

As you can see, I have 8 grams left.

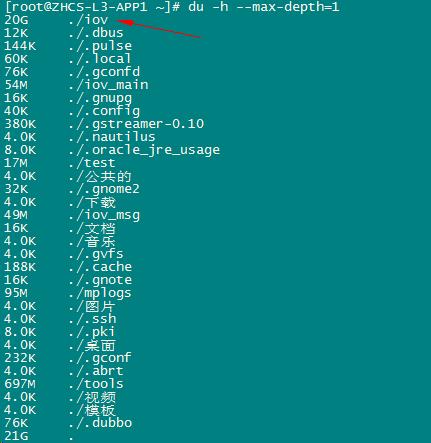
Du-h — Max-depth =1, this command is used to see the current directory, which file occupies the most space, the operation effect is as follows:

As you can see, the IOV directory takes up a lot of space, 20G.
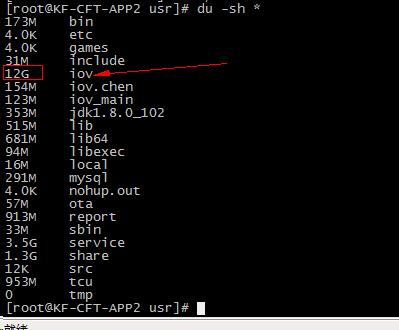
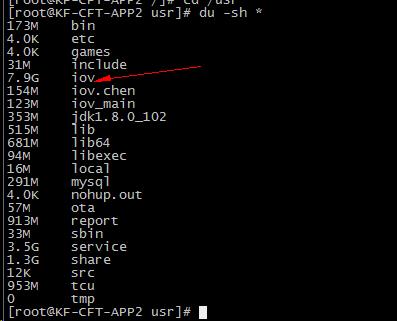
In addition, du-sh *, this command is also used to see the size of each file and folder under the current directory. The operation effect is as follows:

As you can see, the IOV directory takes up a lot of space, 12G.
Enter ioV directory, repeatedly execute the above view command, follow up all the way, find each directory takes up more space of the file, useless can be deleted.

As you can see, this nohup.out log file takes up a lot of space (1.9g). Now leave it empty.
The command can be used: cp /dev/null nohup.out. After clearing, check again, the occupancy is reduced (696K) as expected.

So, how do you clean up if the nohup.out file isn’t taking up space?

Very simple, just use the normal delete command.
Delete command: RM [options] file or directory

Option description:
-F-force ignores files that do not exist and forces deletion without prompting
-i– Interactive for interactive deletion
-r |-r –recursive deletes all directories and files under a listed directory
-v — Verbose verbose displays details of the steps performed
Command instance:
1. Delete the a.T.Xt file
Rm – rf a.t xt
2. Delete the Mplogs directory
rm -rf mplogs

Here we use example 2 to delete, and the effect is as follows:

Now that I’ve cleaned up a little bit, I go back to the root directory, and I’ve reduced the footprint.

[Linux] [kernel] bug: scheduling while atomic problem analysis

The kernel module local_clients is used to listen for DHCP packages and write the host name, IP, MAC, etc to file /proc/local_clients/local_clients_info, and the Webserver parses this question. MyPhone
/TMP # cat /proc/local_clients/local_clients_info
58-7f-57-8b-bc-0d 192.168.0.100 myPhone
now we need to improve this module by adding monitoring DNS messages to determine the IP and MAC of the host connected to AP. The result is written to /proc/local_clients/local_clients_info, and the problem is resolved in user space. If an entry with an UNKNOWN hostname is found, the hostname is obtained through the user program client_mGMT via NBNS or MDNS.
/TMP # cat /proc/local_clients/local_clients_info
14-cc-20-16-fb-da 192.168.0.110 UNKNOWN
Problem: The function of resolving host name was realized, but it took more than 2 hours to run, and the serial port appeared abnormal printing as follows:
[3419.912000] BUG: scheduling while atomic:client_mgmt/1051/0x00000100
[3419.916000] Modules linked in: Umac ath_dev(P)ath_rate_atheros(P) ath_hal(P) asf(P) adf(P) athrs_gmac local_clients
[3419.928000] Cpu 0
[3419.932000]

0:00 000000000000010000000000000000 [3419.936000]
4:000041 832e4500 000000fe 23c637bb
[3419.944000]

And b9aca00129b0ea4c4ec4e0cfffffff8 [3419.948000]
12 :fffffffe 592f6656 00000004031a4
[3419.952000]

16:00 000 d5b832d0000000010000041a1a8 [3419.960000]
20 :825c3e98 000000041a1a8 00001000
[3419.964000]

00000 f800b22c8 24:00 [3419.972000]
28 :825c2000 825c3e50 825c3f10 832c42c0
[3419.976000] Hi :000fd669
[3419.980000] Lo :2c3458d0
[3419.980000] epc :832d42d8 remove_timeout_stas+0x4c/0x8c [local_clients]
[local_clients] 3419.988000] Tainted: P
[3419.992000] ra: 832 d42c0 remove_timeout_stas + 0 x34/0 x8c [local_clients]
[3420.000000] Status: 1000 ff03 KERNEL EXL IE
[3420.004000] Cause: PrId :00019374 (MIPS 24Kc)
~ #
~ # ps
PID USER VSZ STAT COMMAND
1 root 1512 S init
2 root 0 SW< [kthreadd]
3 root 0 SW< [ksoftirqd/0]
4 root 0 SW< [events/0]
5 root 0 SW< [khelper]
6 root 0 SW< [async/mgr]
7 root 0 SW< [kblockd/0]
8 root 0 SW [pdflush]
9 root 0 SW [pdflush]
10 root 0 SW< [kswapd0]
13 root 0 SW< [mtdblockd]
1059 root 1512 S sh -c cat /proc/local_clients/local_clients_info >/TMP /log.txt
1060 root 1504 D cat /proc/local_clients/local_clients_info
1071 root 3716 S /usr/bin/httpserver
1072 root 1512 S sh-c client_mgmt -s 192.168.0.101
1073 root 1196 D Client_mgmt-s 192.168.0.101
1074 root 1512 s sh-c cat /proc/local_clients/local_clients_info >/TMP /log.txt
1075 root 1504 D cat /proc/local_clients/local_clients_info
1164 root 3716 S /usr/bin/httpserver
1165 root 1512 S sh-c client_mgmt-s 192.168.0.101
1166 root 1196 D /usr/bin/httpserver
1165 root 1512 S sh-c client_mgmt-s 192.168.0.101
1166 root 1196 D Client_mgmt-s 192.168.0.101
1167 root 1512 s sh-c cat /proc/local_clients/local_clients_info >/TMP /log.txt
1168 root 1504 D cat /proc/local_clients/local_clients_info
1225 root 3716 S /usr/bin/httpserver
1226 root 1512 S sh-c client_mgmt-s 192.168.0.101
1227 root 1196 D /usr/bin/httpserver Client_mgmt-s 192.168.0.101
1228 root 1512 s sh-c cat /proc/local_clients/local_clients_info >/TMP /log.txt
1229 root 1504 D cat /proc/local_clients/local_clients_info
1441 root 3716 S /usr/bin/httpserver
1442 root 1512 S sh-c client_mgmt -s 192.168.0.101
1443 root 1196 D Client_mgmt-s 192.168.0.101
1444 root 1512 s sh-c cat /proc/local_clients/local_clients_info > /tmp/log.txt
1445 root 1504 D cat /proc/local_clients/local_clients_info
Remove_timeout_stas is an aging operation on the global variable l_clientS_info_list. The whole process is protected by a MUtex. It is suspected to be a mutex deadlock, but when I check the code, I find no place where unlock does not return. A special tip found in the logs: Scheduling Whileatomic; Search the key word, found that article: http://blog.csdn.net/cfy_phonex/article/details/12090943; When the Linux kernel prints bugs: scheduling from the idlethread “and” bad: scheduling from the idlethread “, it is usually a function called in the interrupt processing function that can sleep, such as semaphore,mutex,sleep, etc. It’s related to mutex. But the puzzle is when dealing with interrupts. Where are the interruptions?
looks at the log and finds that cat processes are all stuck. Could it be the interrupt caused by cat?Looking up the instructions for CAT, CAT prints a file to the standard output device. Since CAT produces interrupts, interrupt processing is to open the file and output it to the terminal, focusing on the processing function that reads the PROc file.
kernel module local_clients registers a method for manipulating proc files/here’s another one to explore/:
static structseq_operations clients_seq_ops = {
.start = clients_seq_start,
.next = clients_seq_next,
.stop = clients_seq_stop,
.show = clients_seq_show
}; When the cat/proc/local_clients/local_clients_info is called, clients_seq_start is executed first and clients_seq_show, clients_seq_start is executed next:
{
printk(” pos = % LLD \n “, *pos);
remove_timeout_stas();/Mutex_lock (& amp; amp) is called in this function. local_clients_mutex);/
//mutex_lock(& local_clients_mutex);
if (*pos > = MAX_WIRELESS_CLIENTS_NUM)
{
return NULL;
}
printk(” return addr: %p, pos = % LLD \n “,l_clients_info_list + *pos, *pos);

return l_clients_info_list + *pos;

}
problem caused by: two operations called mutex_lock; A cat-triggered interrupt invokes the read /proc/local_clients/local_clients_info. A cat-triggered interrupt invokes the read function clients_seq_start in the proc file system. Local_clients_mutex).
another is that when a HOST in WLAN issues a DNS message and local_clients listens to a DNS message, it also invokes mutex_lock(& amp; amp) before adding the IP, MAC, and HOST information of the HOST sending the message to the file local_clients_info. Local_clients_mutex);
means that there are two orders. One is that when the cat interrupt handler is called, local_clients adds an entry that causes the cat interrupt handler to be scheduled and reports an error. Alternatively, local_clients calls mutex_lock when adding an entry, and cat interrupts trigger calls mutex_lock, and the mutex_lock in the interrupt waits, so the interrupt handler goes to sleep, which is against the purpose of the interrupt handling mechanism.
Solution: Use spin_lock instead of mutex_lock. The difference between the two is: spin_lock, which can be checked repeatedly to see if the lock can be obtained, but will not fall asleep (busy waiting, so the spin_lock protection code should be short and dry, not consuming too much CPU time). The semaphore, while waiting for the signal to be released, goes to sleep until it is awakened; The interrupt handler cannot go to sleep (that is, cannot call sleep, or wait for a semaphore resource).

test 1)
tests mutex_lock before modification and spin_lock after modification. Shell script is used to loop cat /proc/local_clients/local_clients_info file, and a bat script is used for nslookup operation on WLAN terminal PC to make PC continuously send DNS message. The test finds that mutex_lock is used to give error prompt:
/TMP # tftp-g 192.168.0.104-r test.sh; Chmod 777 test. Sh
test. 100% sh | * * * * * * * * * * * * * * * * * * * * * | 78 ETA
/TMP 0:00:00 # 192.168.0.104 TFTP – g – r test. Sh. Chmod 777 test. Sh
test. 100% sh | * * * * * * * * * * * * * * * * * * * * * | 78 0:00:00 ETA #.
/TMP/test. The sh
[193.176000] BUG: scheduling while atomic: Cat /1835/0x00000100
[193.184000] Modules linked in: Umac ath_dev(P) ath_rate_atheros(P) ath_hal(P) asf(P) adf(P) athrs_gmac local_clients tp_domain parentCtrl
[193.196000] Cpu 0
[193.200000]

0:00 000000000000010000000100000000 [193.204000]
4:000030 832e32ac 00000080 c4653600
[193.208000]

And b9aca00364c598bc4ec4d38fffffff8 [193.216000]
12:0000002d 592f59ba 0000003f 00455924
[193.220000]

16:00 0000 c1832d0000000010007fc7fc70 [193.224000]
20:825cde98 00000000 7fc7fc70 00001000
[193.232000]

0000 a9800b22c8 24:00 [193.236000]
28:825cc000 825cde50 825cdf10 832d42c0
[193.240000] Hi: 001a99e2
[193.244000] Lo: 8f4e21b0
[193.248000] 832 d42d8 remove_timeout_stas + 0 x4c/0 x8c [local_clients]
[193.256000] Tainted: P
[193.260000] ra: 832 d42c0 remove_timeout_stas + 0 x34/0 x8c [local_clients]
[193.264000] the Status: 1000ff03 KERNEL EXL IE
[193.268000] Cause: 10800400
[193.272000] PrId: 00019374 (MIPS 24Kc)
test 2)
whether it is possible to be caused by multiple cat mutex_lock calls lead to problems
execute multiple cat call scripts in the shell, run for a long time, there is no problem; Cat is a user-mode process, so does the kernel perform two open files at the same time?
the answer is no, it involves the process scheduling, cat is the user mode process, and the punching file belongs to the kernel mode operation, from the user mode to the kernel mode operation, there are two ways, 1 is the system call, 2 is the interrupt, here is obviously the use of system call. If the system is in a core mindset and is processing system calls, then no other process in the system can steal CPU time and the scheduler must wait for the system call to complete before it can choose another process to execute, but an interrupt can terminate the system call. So the problem is probably caused by mutex_lock.
Cont:
in AP(MTK7628), when the mi 6 connection, there is a similar problem, causing other wireless devices can not connect to AP, but in the latest version of MIUI V8.2.23.0 this problem has been fixed.
[06-07 12:03:49]BUG: scheduling while atomic: RtmpMlmeTask/154/0x00000100
[06-07 12:03:49]Modules linked in: mt_wifi
[06-07 12:03:49]Cpu 0
[06-07 12:03:49]

00000000000000 c03582ec00000002 0:00 [06-0712:03:49]
4 : c0503000 c05e2728 00000000 c050a6ef
[06-07 12:03:49]

8: c050a6fc80f53d3e0000000480f53d44 [06-0712:03:49]
12 : 00044000 00000004 00000002 00000000
[06-07 12:03:49]

16:00 000002 c05e2728c0503000c0360000 [06-0712:03:49]
20 : c04844bc c03e0000 c048436c c043fdac
[06-07 12:03:49]

000000 c0358e28 24:00 [06-0712:03:49]
28 : 80f52000 80f53db8 c0484284 c03e334c
[06-07 12:03:49]Hi : 00000000
[06-07 12:03:49]Lo : 00000040
[06-07 12:03:49]epc : c03582ec RTMPCheckEntryEnableAutoRateSwitch+0x0/0x90 [mt_wifi]
[06-07 12:03:49] Not tainted
[06-07 12:03:49]ra : c03e334c APMlmeDynamicTxRateSwitching+0x130/0x9a8 [mt_wifi]
[06-07 12:03:49]Status: 1100ff03 KERNEL EXL IE
[06-07 12:03:49]Cause : 50808000
[06-07 12:03:49]PrId : 00019655 (MIPS 24Kc)
How To Install Google Chrome on Linux Mint 19

Add Google Chrome Repository
First, download the Google signing key and install it.

wget -q -O - https://dl.google.com/linux/linux_signing_key.pub | sudo apt-key add -

Set up the Google Chrome repository.

echo "deb [arch=amd64] http://dl.google.com/linux/chrome/deb/ stable main" | sudo tee /etc/apt/sources.list.d/google-chrome.list

Install Google Chrome
Update the repository index.

apt update

To Install Google Chrome Stable, use the below command.

apt install -y google-chrome-stable

source, ~/.bashrc, ~/.bash_ Profile details

The source command is used to execute a script, so:

For example, in a script you export $KKK=111, if you use./ a.shh to execute the script, after execution, you run echo $KKK and find no value. If you use source to execute, and then echo, you will find KKK=111. Because calling./ a.shh to execute the shell is run in a subshell, so after execution, the structure does not reflect in the parent shell, but the source is different, it is executed in this shell, so you can see the result

when you first login to Linux, first start /etc/profile, then start one of the ~/.bash_profile, ~/.bash_login, or ~/.profile files in the user directory.
The order of execution is: ~/.bash_profile, ~/.bash_login, ~/.profile.
If the ~/.bash_profile exists, the ~/.bashrc file is also typically executed.

if [-f ~/.bashrc];
if [-f ~/.bashrc]; Then
.. /bashrc
fi

~/.bashrc, generally there will be the following code:
if [-f /etc/bashrc]; Then
. /etc/bashrc
fi

so ~/.bashrc will call /etc/bashrc file. Finally, the ~/.bash_logout file is also executed when the shell exits.

execution order: /etc/profile-& gt; (~/.bash_profile | ~/.bash_login | ~/.profile) -> ~/.bashrc -> /etc/bashrc ->

(1) /etc/profile: this file sets the environment information for each user of the system and executes when the user logs in for the first time. And collect shell Settings from the configuration file in the /etc/profit.d directory.

(2) /etc/bashrc: execute this file for every bash shell user. When the bash shell is opened, the file is read (that is, bashrc is executed every time a new terminal is opened).

(3) ~/.bash_profile: each user can use this file to enter shell information dedicated to their own use. When the user logs in, this file is only executed once. By default, some environment variables are set to execute the user’s.bashrC file.

(4) ~/.bashrc: this file contains bash information dedicated to your bash shell, which is read when you log in and every time you open a new shell.

(5) ~/.bash_logout: this file is executed every time the system exits (bash shell). In addition, variables set in /etc/profile (global) can be applied to any user, while variables set in ~/.bashrc (local) can only inherit from variables in /etc/profile, they are “father and son” relationship.

(6) ~/.bash_profile: interactive, login into bash running ~/.bashrc: interactive, non-login into bash running usually the Settings are about the same, so usually the former calls the latter.

The use of various environment variables such as /etc/profile and /etc/environment Settings files
1) First add export LANG=zh_CN to /etc/profile, log out of the system and log in again. The login prompt shows English.
2) First delete export LANG=zh_CN in /etc/profile, add LNAG=zh_CN to /etc/environment, log out of the system and log in again. The login prompt shows Chinese.

user environment is always created by executing /etc/profile before reading /etc/environment. Why is this different?Instead of executing /etc/environment first and /etc/profile later?
this is because: /etc/environment is the environment for setting the whole system, while /etc/profile is the environment for setting all users, the former is irrelevant to the logon user, while the latter is relevant to the logon user.

system application execution environment with users can be independent, but related to the system environment is, so when you log in, you can see, such as date, time, information display format and LANG is related to the system environment, the default LANG = en_US, LANG = zh_CN if the system environment, the message is in Chinese, or in English.

for the user’s shell initialization is to execute /etc/profile first, then read the file /etc/environment; For the whole system, /etc/environment is executed first. Is that correct?
logon order should be
/etc/enviroment –> /etc/profile –> $HOME/.profile –> $HOME/. Env (if present)
/etc/profile is the environment variable for all users
/etc/enviroment is the environment variable for the system

login system the order that the shell reads should be
/etc/profile-& gt; /etc/enviroment –> $HOME/.profile –> $HOME/.env
the reason should be the difference between the user environment and the system environment. If the same variable has different values in the user environment (/etc/profile) and the system environment (/etc/environment), then the user environment should be used as the criterion.