Tag Archives: linux

Error report of xv6 operating system make Makefile:192 : * * solutions to receive comments before first target. Stop

Error report of xv6 operating system make Makefile:192 : * * solutions to receive comments before first target. Stop

Hello everyone, my name is Qi Guanjie (Q í Gu ā NJI é). I record the learning process in CSDN. Time flies and the future is promising. Come on ~ the blog address is Qi Guanjie’s blog, and the nickname of station B is Qi Guanjie , and the address is Qi Guanjie’s station B

This article is original for Qi Guanjie, please support the original, part of the platform has been stealing articles from bloggers!!!


   there are many small partners who often encounter errors when doing experiments with the xv6 operating system Makefile:192 : *** recipe commences before first target. Stop. , and then I don’t know where the error is. Here is a possible error reporting situation and the solution (at present, only this method is used to review the error reporting. If there are other errors, you can send a makefile file to have a look).

Here, I will review the contents of makefile for error reporting

OBJS = \
	bio.o\
	console.o\
	exec.o\
	file.o\
	fs.o\
	ide.o\
	ioapic.o\
	kalloc.o\
	kbd.o\
	lapic.o\
	log.o\
	main.o\
	mp.o\
	picirq.o\
	pipe.o\
	proc.o\
	sleeplock.o\
	spinlock.o\
	string.o\
	swtch.o\
	syscall.o\
	sysfile.o\
	sysproc.o\
	trapasm.o\
	trap.o\
	uart.o\
	vectors.o\
	vm.o\

# Cross-compiling (e.g., on Mac OS X)
# TOOLPREFIX = i386-jos-elf

# Using native tools (e.g., on X86 Linux)
#TOOLPREFIX = 

# Try to infer the correct TOOLPREFIX if not set
ifndef TOOLPREFIX
TOOLPREFIX := $(shell if i386-jos-elf-objdump -i 2>&1 | grep '^elf32-i386$$' >/dev/null 2>&1; \
	then echo 'i386-jos-elf-'; \
	elif objdump -i 2>&1 | grep 'elf32-i386' >/dev/null 2>&1; \
	then echo ''; \
	else echo "***" 1>&2; \
	echo "*** Error: Couldn't find an i386-*-elf version of GCC/binutils." 1>&2; \
	echo "*** Is the directory with i386-jos-elf-gcc in your PATH?" 1>&2; \
	echo "*** If your i386-*-elf toolchain is installed with a command" 1>&2; \
	echo "*** prefix other than 'i386-jos-elf-', set your TOOLPREFIX" 1>&2; \
	echo "*** environment variable to that prefix and run 'make' again." 1>&2; \
	echo "*** To turn off this error, run 'gmake TOOLPREFIX= ...'." 1>&2; \
	echo "***" 1>&2; exit 1; fi)
endif

# If the makefile can't find QEMU, specify its path here
# QEMU = qemu-system-i386

# Try to infer the correct QEMU
ifndef QEMU
QEMU = $(shell if which qemu > /dev/null; \
	then echo qemu; exit; \
	elif which qemu-system-i386 > /dev/null; \
	then echo qemu-system-i386; exit; \
	elif which qemu-system-x86_64 > /dev/null; \
	then echo qemu-system-x86_64; exit; \
	else \
	qemu=/Applications/Q.app/Contents/MacOS/i386-softmmu.app/Contents/MacOS/i386-softmmu; \
	if test -x $$qemu; then echo $$qemu; exit; fi; fi; \
	echo "***" 1>&2; \
	echo "*** Error: Couldn't find a working QEMU executable." 1>&2; \
	echo "*** Is the directory containing the qemu binary in your PATH" 1>&2; \
	echo "*** or have you tried setting the QEMU variable in Makefile?" 1>&2; \
	echo "***" 1>&2; exit 1)
endif

CC = $(TOOLPREFIX)gcc
AS = $(TOOLPREFIX)gas
LD = $(TOOLPREFIX)ld
OBJCOPY = $(TOOLPREFIX)objcopy
OBJDUMP = $(TOOLPREFIX)objdump
CFLAGS = -fno-pic -static -fno-builtin -fno-strict-aliasing -O2 -Wall -MD -ggdb -m32 -Werror -fno-omit-frame-pointer
CFLAGS += $(shell $(CC) -fno-stack-protector -E -x c /dev/null >/dev/null 2>&1 && echo -fno-stack-protector)
ASFLAGS = -m32 -gdwarf-2 -Wa,-divide
# FreeBSD ld wants ``elf_i386_fbsd''
LDFLAGS += -m $(shell $(LD) -V | grep elf_i386 2>/dev/null | head -n 1)

# Disable PIE when possible (for Ubuntu 16.10 toolchain)
ifneq ($(shell $(CC) -dumpspecs 2>/dev/null | grep -e '[^f]no-pie'),)
CFLAGS += -fno-pie -no-pie
endif
ifneq ($(shell $(CC) -dumpspecs 2>/dev/null | grep -e '[^f]nopie'),)
CFLAGS += -fno-pie -nopie
endif

xv6.img: bootblock kernel
	dd if=/dev/zero of=xv6.img count=10000
	dd if=bootblock of=xv6.img conv=notrunc
	dd if=kernel of=xv6.img seek=1 conv=notrunc

xv6memfs.img: bootblock kernelmemfs
	dd if=/dev/zero of=xv6memfs.img count=10000
	dd if=bootblock of=xv6memfs.img conv=notrunc
	dd if=kernelmemfs of=xv6memfs.img seek=1 conv=notrunc

bootblock: bootasm.S bootmain.c
	$(CC) $(CFLAGS) -fno-pic -O -nostdinc -I. -c bootmain.c
	$(CC) $(CFLAGS) -fno-pic -nostdinc -I. -c bootasm.S
	$(LD) $(LDFLAGS) -N -e start -Ttext 0x7C00 -o bootblock.o bootasm.o bootmain.o
	$(OBJDUMP) -S bootblock.o > bootblock.asm
	$(OBJCOPY) -S -O binary -j .text bootblock.o bootblock
	./sign.pl bootblock

entryother: entryother.S
	$(CC) $(CFLAGS) -fno-pic -nostdinc -I. -c entryother.S
	$(LD) $(LDFLAGS) -N -e start -Ttext 0x7000 -o bootblockother.o entryother.o
	$(OBJCOPY) -S -O binary -j .text bootblockother.o entryother
	$(OBJDUMP) -S bootblockother.o > entryother.asm

initcode: initcode.S
	$(CC) $(CFLAGS) -nostdinc -I. -c initcode.S
	$(LD) $(LDFLAGS) -N -e start -Ttext 0 -o initcode.out initcode.o
	$(OBJCOPY) -S -O binary initcode.out initcode
	$(OBJDUMP) -S initcode.o > initcode.asm

kernel: $(OBJS) entry.o entryother initcode kernel.ld
	$(LD) $(LDFLAGS) -T kernel.ld -o kernel entry.o $(OBJS) -b binary initcode entryother
	$(OBJDUMP) -S kernel > kernel.asm
	$(OBJDUMP) -t kernel | sed '1,/SYMBOL TABLE/d; s/ .* / /; /^$$/d' > kernel.sym

# kernelmemfs is a copy of kernel that maintains the
# disk image in memory instead of writing to a disk.
# This is not so useful for testing persistent storage or
# exploring disk buffering implementations, but it is
# great for testing the kernel on real hardware without
# needing a scratch disk.
MEMFSOBJS = $(filter-out ide.o,$(OBJS)) memide.o
kernelmemfs: $(MEMFSOBJS) entry.o entryother initcode kernel.ld fs.img
	$(LD) $(LDFLAGS) -T kernel.ld -o kernelmemfs entry.o  $(MEMFSOBJS) -b binary initcode entryother fs.img
	$(OBJDUMP) -S kernelmemfs > kernelmemfs.asm
	$(OBJDUMP) -t kernelmemfs | sed '1,/SYMBOL TABLE/d; s/ .* / /; /^$$/d' > kernelmemfs.sym

tags: $(OBJS) entryother.S _init
	etags *.S *.c

vectors.S: vectors.pl
	./vectors.pl > vectors.S

ULIB = ulib.o usys.o printf.o umalloc.o

_%: %.o $(ULIB)
	$(LD) $(LDFLAGS) -N -e main -Ttext 0 -o $@ $^
	$(OBJDUMP) -S $@ > $*.asm
	$(OBJDUMP) -t $@ | sed '1,/SYMBOL TABLE/d; s/ .* / /; /^$$/d' > $*.sym

_forktest: forktest.o $(ULIB)
	# forktest has less library code linked in - needs to be small
	# in order to be able to max out the proc table.
	$(LD) $(LDFLAGS) -N -e main -Ttext 0 -o _forktest forktest.o ulib.o usys.o
	$(OBJDUMP) -S _forktest > forktest.asm

mkfs: mkfs.c fs.h
	gcc -Werror -Wall -o mkfs mkfs.c

# Prevent deletion of intermediate files, e.g. cat.o, after first build, so
# that disk image changes after first build are persistent until clean.  More
# details:
# http://www.gnu.org/software/make/manual/html_node/Chained-Rules.html
.PRECIOUS: %.o

UPROGS=\
	_cat\
	_echo\
	_forktest\
	_grep\
	_init\
	_kill\
	_ln\
	_ls\
	_mkdir\
	_rm\
	_sh\
	_stressfs\
	_usertests\
	_wc\
	_zombie\
fs.img: mkfs README $(UPROGS)
	./mkfs fs.img README $(UPROGS)

-include *.d

clean: 
	rm -f *.tex *.dvi *.idx *.aux *.log *.ind *.ilg \
	*.o *.d *.asm *.sym vectors.S bootblock entryother \
	initcode initcode.out kernel xv6.img fs.img kernelmemfs \
	xv6memfs.img mkfs .gdbinit \
	$(UPROGS)

# make a printout
FILES = $(shell grep -v '^\#' runoff.list)
PRINT = runoff.list runoff.spec README toc.hdr toc.ftr $(FILES)

xv6.pdf: $(PRINT)
	./runoff
	ls -l xv6.pdf

print: xv6.pdf

# run in emulators

bochs : fs.img xv6.img
	if [ ! -e .bochsrc ]; then ln -s dot-bochsrc .bochsrc; fi
	bochs -q

# try to generate a unique GDB port
GDBPORT = $(shell expr `id -u` % 5000 + 25000)
# QEMU's gdb stub command line changed in 0.11
QEMUGDB = $(shell if $(QEMU) -help | grep -q '^-gdb'; \
	then echo "-gdb tcp::$(GDBPORT)"; \
	else echo "-s -p $(GDBPORT)"; fi)
ifndef CPUS
CPUS := 2
endif
QEMUOPTS = -drive file=fs.img,index=1,media=disk,format=raw -drive file=xv6.img,index=0,media=disk,format=raw -smp $(CPUS) -m 512 $(QEMUEXTRA)

qemu: fs.img xv6.img
	$(QEMU) -serial mon:stdio $(QEMUOPTS)

qemu-memfs: xv6memfs.img
	$(QEMU) -drive file=xv6memfs.img,index=0,media=disk,format=raw -smp $(CPUS) -m 256

qemu-nox: fs.img xv6.img
	$(QEMU) -nographic $(QEMUOPTS)

.gdbinit: .gdbinit.tmpl
	sed "s/localhost:1234/localhost:$(GDBPORT)/" < $^ > $@

qemu-gdb: fs.img xv6.img .gdbinit
	@echo "*** Now run 'gdb'." 1>&2
	$(QEMU) -serial mon:stdio $(QEMUOPTS) -S $(QEMUGDB)

qemu-nox-gdb: fs.img xv6.img .gdbinit
	@echo "*** Now run 'gdb'." 1>&2
	$(QEMU) -nographic $(QEMUOPTS) -S $(QEMUGDB)

# CUT HERE
# prepare dist for students
# after running make dist, probably want to
# rename it to rev0 or rev1 or so on and then
# check in that version.

EXTRA=\
	mkfs.c ulib.c user.h cat.c echo.c forktest.c grep.c kill.c\
	ln.c ls.c mkdir.c rm.c stressfs.c usertests.c wc.c zombie.c\
	printf.c umalloc.c\
	README dot-bochsrc *.pl toc.* runoff runoff1 runoff.list\
	.gdbinit.tmpl gdbutil\

dist:
	rm -rf dist
	mkdir dist
	for i in $(FILES); \
	do \
		grep -v PAGEBREAK $$i >dist/$$i; \
	done
	sed '/CUT HERE/,$$d' Makefile >dist/Makefile
	echo >dist/runoff.spec
	cp $(EXTRA) dist

dist-test:
	rm -rf dist
	make dist
	rm -rf dist-test
	mkdir dist-test
	cp dist/* dist-test
	cd dist-test; $(MAKE) print
	cd dist-test; $(MAKE) bochs || true
	cd dist-test; $(MAKE) qemu

# update this rule (change rev#) when it is time to
# make a new revision.
tar:
	rm -rf /tmp/xv6
	mkdir -p /tmp/xv6
	cp dist/* dist/.gdbinit.tmpl /tmp/xv6
	(cd /tmp; tar cf - xv6) | gzip >xv6-rev10.tar.gz  # the next one will be 10 (9/17)

.PHONY: dist-test dist

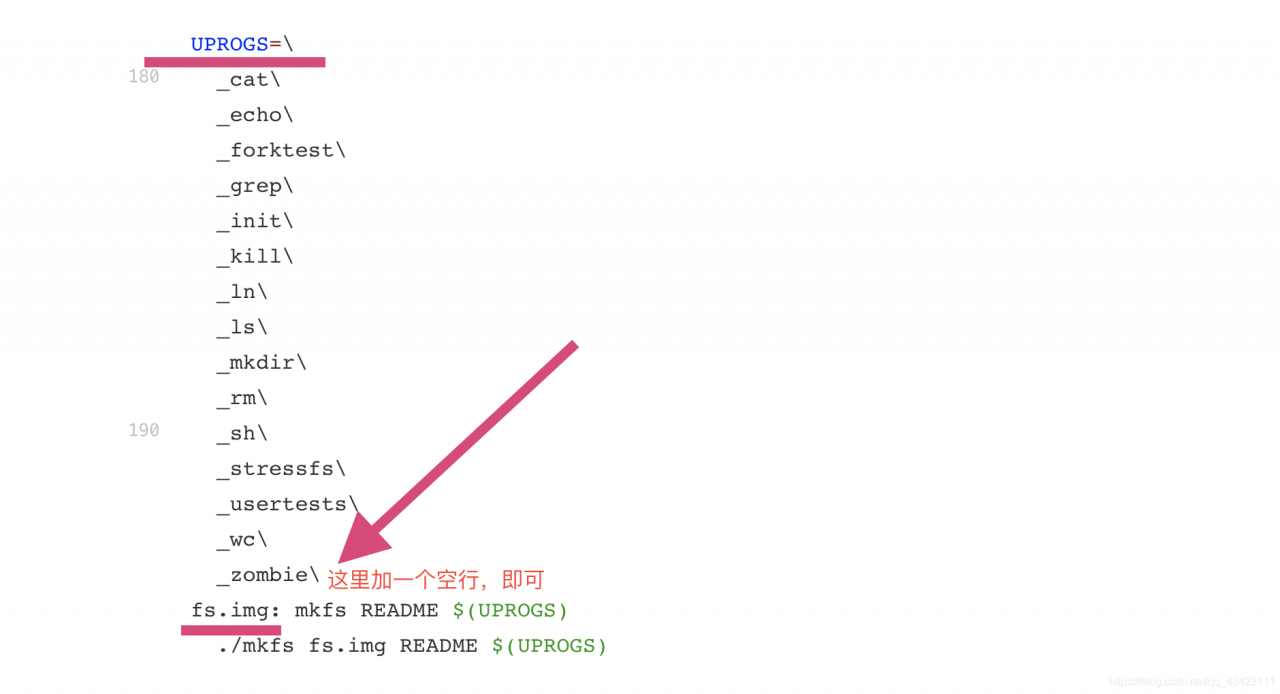
Solution: it’s actually very simple, because you’re in fs.img : a blank line is missing, which may be due to the careless deletion of the blank line during modification, resulting in his error. Add a blank line at the end of uprogs in the position shown in the figure.

Hello everyone, my name is Qi Guanjie (Q í Gu ā NJI é). I record the learning process in CSDN. Time flies and the future is promising. Come on ~ the blog address is Qi Guanjie’s blog, and the nickname of station B is Qi Guanjie , and the address is Qi Guanjie’s station B

This article is original for Qi Guanjie, please support the original, part of the platform has been stealing articles from bloggers!!!
Nohup command in Linux: nohup: assigning input and attaching output to‘ nohup.out ’

A few days ago, I found a giant cow’s AI learning website, which is easy to understand, funny and humorous. I can’t help sharing it with you. Click to jump to the tutorial.


1、 Using nohup in Linux

Under UNIX / Linux, for example, if you want a program to run in the background, many of them use & amp; at the end of the program to make the program run automatically.

For example, we need to run Weblogic in the background:
/ startWebLogic.sh &

But many of our programs are not made into daemons like Weblogic. Maybe our programs are just ordinary programs, which usually use & amp; endings.

But if the terminal is shut down, the program will also be shut down.

But in order to be able to run in the background, we can use the nohup command.

For example, we have a startWebLogic.sh To run in the background, use nohup:

nohup ./ startWebLogic.sh &

Tips:

[~]$ appending output to nohup.out

Well, prove that the program runs successfully, and put the output information of the program running into the current directory nohup.out Go to the file.

Nohup command

Purpose: Linux command usage, running command without hang up.

Syntax: nohup command [Arg…] [& amp;]

Description: the nohup command runs the command specified by the command parameter and any associated Arg parameters, ignoring all the up signals.

After logging off, use the nohup command to run the program in the background. To run the nohup command in the background, add & amp; (the symbol for “and”) to the end of the command.

nohup: ignoring input and appending output to ` nohup.out ‘ignore input and output, record information to nohup.out File.


2、 Using Linux redirection to solve the problem nohup.out No write permission problem

■ scene

When executing the nohup command, the following error without write permission often occurs.

nohup: ignoring input and appending output to ` nohup.out ‘
nohup: failed to run command `/etc/nginx_ check.sh ‘: Permission denied


■ Linux redirection:

0, 1 and 2 represent standard input, standard output and standard error message output respectively, which can be used to specify the standard input or output to be redirected.

In general use, the default is the standard output, which is 1. When we need special use, we can use other labels.

For example, output the error information of a program to the log file. / program 2 & gt; log.

In this way, the standard output is still on the screen, but the error information will be output to the log file.


In addition, the redirection between 0, 1 and 2 can also be realized. 2 & gt; & amp; 1: redirect error messages to standard output.

There is also a special file / dev / null under Linux, which is like a bottomless hole. All the information redirected to it will disappear without a trace.

This is useful to redirect the output to / dev / null when we don’t need to echo all of the program’s information.

If you want both normal output and error information not to be displayed, redirect both standard output and standard error to / dev / null, for example:

# ls 1>/dev/null 2>/dev/null

Another way is to redirect the error to standard output and then to / dev / null, for example:

# ls >/dev/null 2>&1

Note: the order here cannot be changed, otherwise the desired effect cannot be achieved. At this time, redirect the standard output to / dev / null,

Standard errors are then redirected to standard output.

Since standard output has been redirected to / dev / null, standard error will also be redirected to / dev / null, so everything is quiet.


About nohup

When using the nohup command, it is often due to the output nohup.out The path for does not have write permission and nohup cannot be used.

This is a way to use Linux redirection to nohup.out Redirect to a path with write permission, or throw it directly into / dev / null.

nohup ./program >/dev/null 2>/dev/null &

perhaps

nohup ./program >/dev/null 2>&1 &


3、 Using nohup to set background process

Introduction: sometimes you need to set up a background process on Linux, but when you close terminal, it will be killed by the system. How to make the background process run continuously?

Usage:

nohup command-with-options &

When you tap the above command on the screen, the following information will appear on the screen:

$ nohup: ignoring input and appending output to ` nohup.out ’

Hit enter and exit nohup.out In the current interface, enter the normal command line.

Output log information:

The next output log information will be output to nohup.log . that is, the log information output on the screen is directly output to nohup.log Documents.

Flag of background process:

If a command is only identified by & amp;, it is running in the background in the current session. If the current session is closed or the current terminal tool is closed, its affiliated processes will be closed.

The normal running background process needs nohup and & amp; to ensure its normal running in the background.


Transferred from: https://blog.csdn.net/blueheart20/article/details/78226066

            https://www.cnblogs.com/quchunhui/p/5582371.html

            http://aniyo.iteye.com/blog/1496442


pg_ctl: no database directory specified and environment variable PGDATA unset , centos 7 postgreSQL

centos 7 postgreSQL pg_ CTL invalid

In the
section

~/.bash_profile

Next configuration

export PGDATA=/var/lib/pgsql/11.0/data 

But it didn’t work.

However, it can be written like this

Go to

/usr/pgsql/bin

After that, it can be executed

./pg_ctl -D /var/lib/pgsql/11.0/data start

Take notes

Error reporting in CentOS 7 using yum

Yesterday, we encountered a problem. CentOS 7 reported an error using the yum installation command

yum install unzip zip

yum install unzip zip

Error reporting
Baidu error reporting is probably due to the image problem. To use the alicloud image
modification command, first backup CentOS- Base.repo , rename it

mv /etc/yum.repos.d/CentOS-Base.repo /etc/yum.repos.d/CentOS-Base.repo.backup

Then download the image
centos7:

wget -O /etc/yum.repos.d/CentOS-Base.repo http://mirrors.aliyun.com/repo/Centos-7.repo

And then you see, there’s a new CentOS- Base.repo
Just clear the yum cache and regenerate it

yum clera
yum makecache

When the cache is regenerated, it will run for a while. When the cache is generated and no error is reported, you can download it using yum

Installing docker on Huawei Kunpeng server arm64

Installing docker on Huawei Kunpeng server arm64


1、 Download of installation package

The required version of the installation package can be downloaded according to the actual needs

https://download.docker.com/linux/ubuntu/dists/xenial/pool/stable/arm64/

2、 Installation procedure

1. Download the installation package

wget https://download.docker.com/linux/ubuntu/dists/xenial/pool/stable/arm64/containerd.io_1.2.6-3_arm64.deb

wget https://download.docker.com/linux/ubuntu/dists/xenial/pool/stable/arm64/docker-ce_19.03.8~3-0~ubuntu-xenial_arm64.deb

wget https://download.docker.com/linux/ubuntu/dists/xenial/pool/stable/arm64/docker-ce-cli_19.03.8~3-0~ubuntu-xenial_arm64.deb


2. Installation

Enter the location where the installation package is downloaded and install it

dpkg -i *.deb

Set boot up

systemctl enable docker

Start docker service

systemctl start docker

View docker status

systemctl status docker


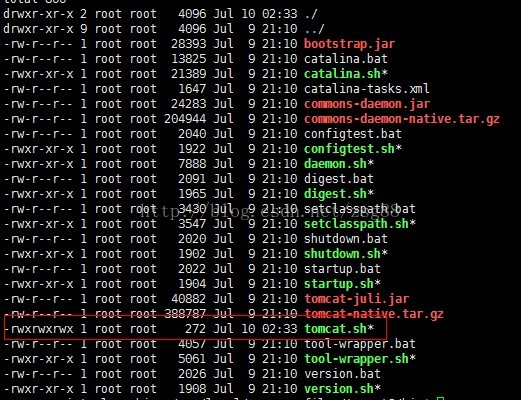
Add executable permissions to Linux files

Some executable files under Linux, such as. Sh ending, etc;

If we want to run such a file, we need to add an executable permission to the file;

Otherwise, this file cannot be executed.

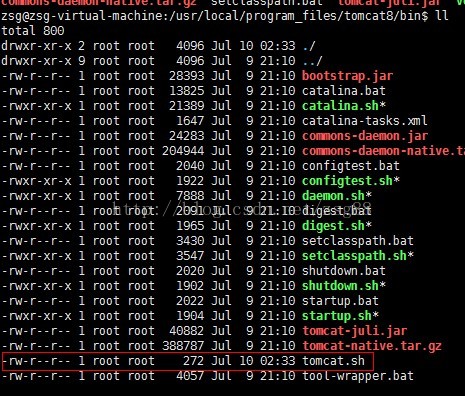
We use VI to build a tomcat.sh File, command ll view

You can see here that there is no executable permission.

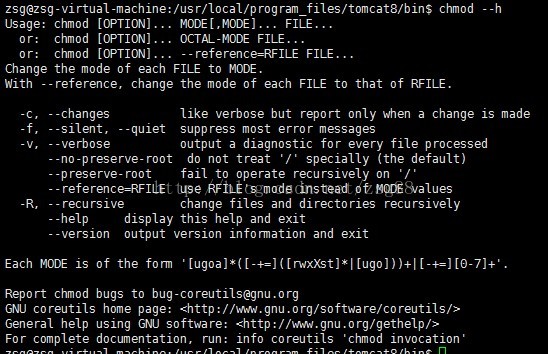
Next, we need to use the Chmod command. Let’s take a look at the help information of the Chmod command.

Enter Chmod — H
to enter Chmod — H

Then we add the executable permission
Chmod 777 tomcat.sh

In executing the LL command, make a comparison with before

Then it’s ready to run

Springboot error, unable to read configuration file: could not resolve placeholder ‘xxx’ in value “${XXX}

Just configure the following code on the startup class

@Bean
    public static PropertySourcesPlaceholderConfigurer placeholderConfigurer() {

        PropertySourcesPlaceholderConfigurer placeholderConfigurer = new PropertySourcesPlaceholderConfigurer();

        placeholderConfigurer.setIgnoreUnresolvablePlaceholders(true);

        return placeholderConfigurer;
    }

should be OK

The solution of undefined reference to error

Chen Yunwen


When compiling programs under Linux, we often encounter “undefined reference to XXX” error,

Here is a summary of some possible reasons and solutions for those in need:


Speaking of undefined reference error, let’s first mention the link rules of Linux GCC


The search order of links is as follows:


    – L to find the path specified by the environment variable library from left to right_ Path, use the ‘:’ partition to find / etc from left to right/ ld.so.conf The specified path order is / lib and / usr / lib (64 bit is / lib64 and / usr / lib64)

Search order of dynamic library calls:


The path specified by the – rpath parameter of

    LD is the path specified by the LD script that is written dead in the code_ LIBRARY_ Path / etc/ ld.so.conf The specified paths / lib and / usr / lib (64 bit is / lib64 and / usr / lib64)
are

In general, we use the – L method to specify the search path when linking, and use LD when calling dynamic link library_ LIBRARY_ Path to specify the link path

Another problem to note is that as long as the first one is found, it will be returned, and the later ones will not be found. For example, – L. / a – L. / B – LX has libx in a, libx. A and libx. A in B libx.so In this case, libx. A in. / a will be used instead of following the principle of dynamic library priority, because. / A is found first and there is no dynamic inventory with the same name in


For dynamic link library, the actual symbol positioning is carried out at run time. When compiling. So, if the library it needs is not associated with it, such as libx.so You need to use uldict, But forget to compile libx.so Add – luldit when compiling libx.so I won’t make a mistake when I’m here, because at this time libx.so It is considered as a library, in which there are some symbols that do not know the specific implementation, which are legal and can be specified at runtime or when compiling other binary programs

If G + + – lpath – LX is used The linker will find that the required uldict symbol table can not be found and report an error. However, if the program is loaded in dlopen mode, the program will run directly in this place and report an error because it is in runtime. Another case is that an external interface has been declared and defined in the dynamic library, but it has forgotten to implement it. At this time, the Similar mistakes can occur

If such an error is reported in the runtime, we should pay attention to whether it is due to the fact that some libraries are not linked or some interfaces are not implemented


With the above foundation, it is not difficult to see that the reasons for the undefined reference error are as follows:

    no corresponding library (. O /. A /. So) uses the entity defined in the library, but no library (- LXXX) or library path (- lyyy) is specified, which will lead to this error. The order of connecting library parameters is not right. By default, the more basic the library is, the more it should be written later, Whether it is static or dynamic, the version of GCC / LD does not match the compatibility of the version of GCC / LD. Due to the compatibility problems of the large versions of GCC 2 to GCC 3 (in fact, there are some problems in GCC 3.2 to 3.4), when using the low version of the machine on the high version machine, such errors will be caused. This problem is more common in the 32-bit environment, In addition, the 64 bit library is used carelessly in the 32-bit environment, or vice versa. The C / C + + interdependence and the mixed use of linking GCC and G + + compilation results need to ensure that both sides of extern “C” can use the interface. In our 64 bit environment, the GCC linking G + + library also needs to add – lstdc + +, For details, please refer to the description of hybrid compilation in the previous article. The problem of runtime error is basically due to the program using dlopen mode to load. So, but. So does not link all the required libraries. Please refer to the description of hybrid use of static library and dynamic library in the above section


Solutions for permission denied

Get an installation file that ends with. Run and give it executable permission. If the SELinux module is enabled, please disable it first!

For example:

# chmod +x NVIDIA-Linux-x86_ 64-295.59.run

When pasting files to a directory (myresources), such a prompt appears

Permission denied

The permission is not set, just copy and paste a file, how can it be like this?

solutions:

$ sudo chmod -R 777 myResources

Among them,
– R refers to all subdirectories and files cascaded to the directory,
777 means that all users have the highest permissions

ROS package ROS_ astra_ Camera cannot open RGB lens

ROS package ROS_ astra_ Camera cannot open RGB lens

https://github.com/orbbec/ros_ astra_ Camera
the official document mentions opening depth and RGB lens with the following command:
roslaunch Astra_ camera stereo_ s.launch

After executing the above command, use rqt_ image_ View can see the depth image, but not the RGB image, and an error is reported:
[camera / stereo]_ s-2] process has died [pid 8255, exit code 255, cmd /home/riki/gxb_ workspace/devel/lib/astra_ camera/camera_ node /camera/image_ raw:=/camera/rgb/image_ raw __ name:=stereo_ s __ log:=/home/riki/.ros/log/071dba06-7bcb-11eb-a85a-000c293dff09/camera-stereo_ s-2.log].
log file: /home/riki/.ros/log/071dba06-7bcb-11eb-a85a-000c293dff09/camera-stereo_ s-2*.log

The solution: open stereo_ s. In the launch file, change the value in this line to your device’s camera number. For example, my device’s camera number is 0x0502, so you can open the RGB lens.

The camera number can be viewed through lsusb command:
gxb_ workspace/src/ros_ astra_ camera/launch$ lsusb
Bus 001 Device 004: ID 2bc5:0403
Bus 001 Device 003: ID 2bc5:0502
Bus 001 Device 002: ID 04f2:b64f Chicony Electronics Co., Ltd
Bus 001 Device 001: ID 1d6b:0002 Linux Foundation 2.0 root hub
Bus 002 Device 004: ID 0e0f:0008 VMware, Inc.
Bus 002 Device 003: ID 0e0f:0002 VMware, Inc. Virtual USB Hub
Bus 002 Device 002: ID 0e0f:0003 VMware, Inc. Virtual Mouse
Bus 002 Device 001: ID 1d6b:0001 Linux Foundation 1.1 root hub