Tag Archives: linux

Error: error from slirp4netns while setting up port redirection: map[desc:bad request: add_hostfwd:

Causes: accidentally use kill -9 to delete the Podman container running java program process, start the container again with an error

Description of the problem: The problem is because the port is occupied, can not start

Solution: This is because the port is occupied, you can only find out which process is occupying the port through netstat (I am showing the PID/slirp4netns ), and then kill the process number of the occupied port PID with kill -9

[Solved] Invalid signature error for ROS repository while trying to do sudo apt-get update

After installing ROS in Ubuntu system, the apt-get update command reports an error:

W: An error occurred during the signature verification. The repository is not updated and the previous index files will be used. GPG error: http://packages.ros.org/ros/ubuntu bionic InRelease: The following signatures were invalid: EXPKEYSIG F42ED6FBAB17C654 Open Robotics <[email protected]>
W: Failed to fetch http://dl.google.com/linux/chrome/deb/dists/stable/InRelease  Could not resolve 'dl.google.com'
W: Failed to fetch http://packages.ros.org/ros/ubuntu/dists/bionic/InRelease  The following signatures were invalid: EXPKEYSIG F42ED6FBAB17C654 Open Robotics <[email protected]>
W: Failed to fetch http://packages.microsoft.com/repos/code/dists/stable/InRelease  Could not resolve 'packages.microsoft.com'
W: Some index files failed to download. They have been ignored, or old ones used instead.

Solution:
we have to re-add the mentioned GPG key to the system by using command below

sudo apt-key adv --keyserver keyserver.ubuntu.com --recv-keys F42ED6FBAB17C654

[Solved] Ubuntu Install jdk Error: Error occurred during initialization of VM

1. First make sure the environment variables are configured correctly.
2. Then make sure there is tools.pack and rt.pack in the directory where jdk is located, take the directory /usr/java/jdk1.8.0_221-amd64 where jdk1.8.0_221-amd64 is located as an example, make sure there is tools.pack under /usr/java/jdk1.8.0_221-amd64/lib .pack, and make sure that rt.pack is available under /usr/java/jdk1.8.0_221-amd64/jre/lib.
3. Use the tool unpack200 under /usr/java/jdk1.8.0_221-amd64/bin to extract tools.pack and rt.pack to tools.jar and rt.jar respectively,
This is done using the command line as follows.
root@iZbp1260wj4hpl4umpaodkZ:/usr/java/jdk1.8.0_221-amd64/jre/lib# …/bin/unpack200 rt.pack rt.jar
root@iZbp1260wj4hpl4umpaodkZ:/usr/java/jdk1.8.0_221-amd64/lib# …/bin/unpack200 tools.pack tools.jar

Ubuntu Error: dpkg: error processing package mysql-community-server (–configure):

Dpkg: error dpkg: error processing package mysql-community-server (–configure):

Whether sudo apt upgrade or sudo apt autoremove is used, the problem remains.

Use mysql deb package to install report error:

sudo apt upgrade
Reading package lists... Done
Building dependency tree
Reading state information... Done
Calculating upgrade... Done
The following packages have been kept back:
  libmysqlclient-dev mysql-client mysql-server mysql-testsuite
0 upgraded, 0 newly installed, 0 to remove and 4 not upgraded.
4 not fully installed or removed.
After this operation, 0 B of additional disk space will be used.
Do you want to continue?[Y/n] y
Setting up mysql-community-server (5.7.37-1ubuntu18.04) ...
update-alternatives: error: alternative path /etc/mysql/mysql.cnf doesn't exist
dpkg: error processing package mysql-community-server (--configure):
 installed mysql-community-server package post-installation script subprocess returned error exit status 2
dpkg: dependency problems prevent configuration of mysql-server:
 mysql-server depends on mysql-community-server (= 5.7.37-1ubuntu18.04); however:
  Package mysql-community-server is not configured yet.

dpkg: error processing package mysql-server (--configure):
 dependency problems - leaving unconfigured
dpkg: dependency problems prevent configuration of mysql-community-test:No apport report written because the error message indicates its a followup error from a previous failure.

 mysql-community-test depends on mysql-community-server (= 5.7.37-1ubuntu18.04); however:
  Package mysql-community-server is not configured yet.

dpkg: error processing package mysql-community-test (--configure):
 dependency problems - leaving unconfigured
dpkg: dependency problems prevent configuration of mysql-testsuite:No apport report written because the error message indicates its a followup error from a previous failure.

 mysql-testsuite depends on mysql-community-test (= 5.7.37-1ubuntu18.04); however:
  Package mysql-community-test is not configured yet.

dpkg: error processing package mysql-testsuite (--configure):
 dependency problems - leaving unconfigured
No apport report written because MaxReports is reached already

The solution is as follows:

Try the following command

sudo apt-get install -f

To see if it can fix broken dependencies

If failed, clear MySQL server:

 sudo apt-get purge mysql-community-server mysql-community-server 

Then clean up and update:

 sudo apt-get autoclean && sudo apt-get clean && sudo apt-get update 

General upgrade:

 sudo apt-get upgrade 

Now try reinstalling:

sudo apt-get install mysql-server and mysql-community-server 

If you do this from the root prompt, the leading sudo command will not be booted

[Solved] Ubuntu conda ProxyError: Conda cannot proceed due to an error in your proxy configuration

Using conda install with a proxy may result in the following error:

ProxyError: Conda cannot proceed due to an error in your proxy configuration.
Check for typos and other configuration errors in any ‘.netrc’ file in your home directory,
any environment variables ending in ‘_PROXY’, and any other system-wide proxy
configuration settings.


Solution:
Input the command:env | grep -i "_PROXY" and here is the outcome:

HTTP_PROXY=http://http://localhost:8888/
https_proxy=http://http://localhost:8888/
http_proxy=http://http://localhost:8888/
no_proxy=localhost,127.0.0.0/8,::1
NO_PROXY=localhost,127.0.0.0/8,::1
HTTPS_PROXY=http://http://localhost:8888/

Then enter the command unset to delete these agents:

unset  https_proxy
unset  http_proxy
unset  no_proxy
unset  HTTPS_PROXY
unset  HTTP_PROXY
unset  NO_PROXY

Then enter CONDA installation command to solve the problem successfully

[Solved] kubeadm join Cluster Error: error execution phase kubelet-start

preface

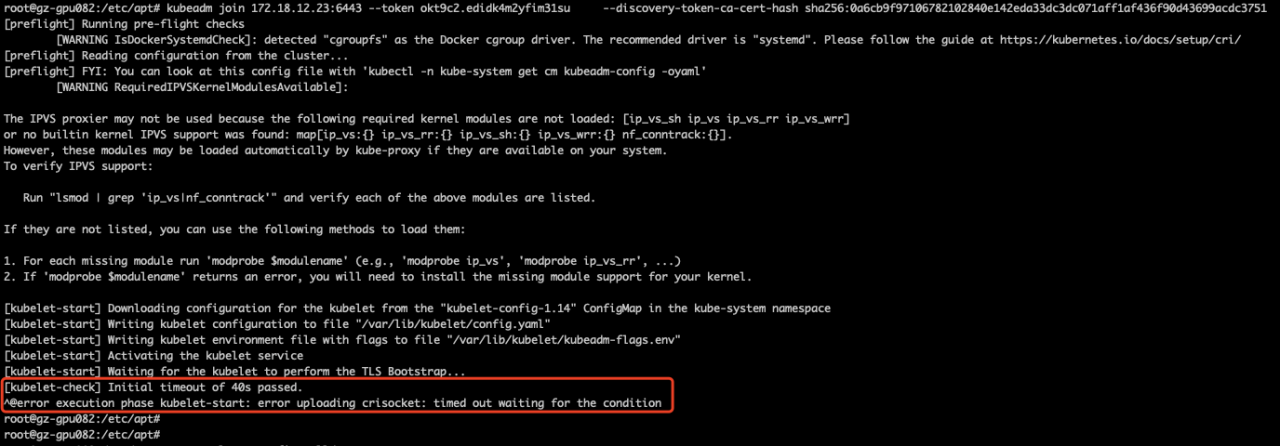
An error is reported when adding a k8s-node using kubedm join , as follows:

error execution phase kubelet-start: error uploading crisocket: timed out waiting for the condition

Solution:

1 reset the cluster configuration of this machine

kubeadm reset -f

2 stop service

sudo tee /tmp/test.sh <<-'EOF'
systemctl stop kubelet kube-proxy docker containerd
ps -ef | grep containerd | awk '{print $2}' | xargs -I {} kill -9 {}
rm -rf /etc/systemd/system/kube-proxy.service
rm -rf /etc/systemd/system/kubelet.service
systemctl stop zabbix-agent.service
systemctl disable zabbix-agent.service
systemctl stop node_exporter_custom.service
systemctl disable node_exporter_custom.service
systemctl reset-failed
rm -rf /usr/local/bin/kube*
EOF
chmod +x /tmp/test.sh && bash /tmp/test.sh

3 start docker

systemctl start docker

4 join the cluster

Run kubedm token create -- print-join-command on Master to get token information

Then execute the following command on the node node to rejoin the k8s cluster

# k8s-node
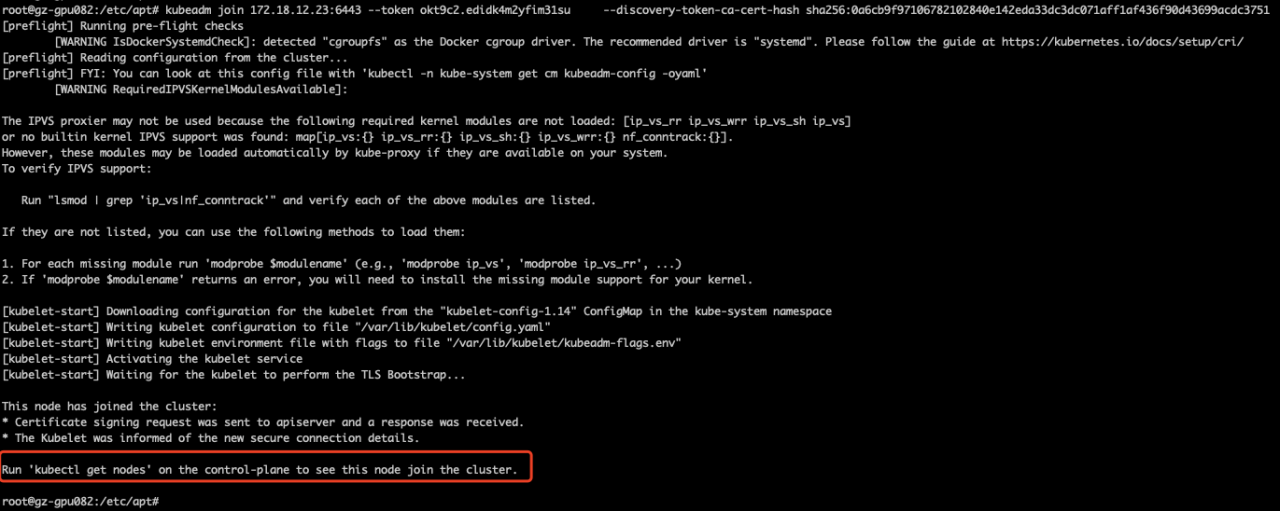
kubeadm join 172.18.12.23:6443 --token okt9c2.edidk4m2yfim31su \
--discovery-token-ca-cert-hash sha256:0a6cb9f97106782102840e142eda33dc3dc071aff1af436f90d43699acdc3751

Success information

5 verify on k8s-master

kubectl get node
kubectl get pod -A

[Solved] ffmpeg Error: fatal error: zlib.h: Not having that file or directory

Environmental Science:

Ubuntu18. 04×86-64

Error phenomenon:

When compiling ffmpeg code, the following errors sometimes occur:

libavformat/http.c:25:10: fatal error: zlib.h: Not having that file or directory
 #include <zlib.h>

Solution:

Enter the following on the command line

sudo apt-get install zlib1g-dev

Press enter to execute, and the following output appears:

Reading the package list... Done
Analyzing the dependency tree of the package       
Reading status information... Done       
The following [new] packages will be installed.
  zlib1g-dev
0 packages upgraded, 1 new package installed, 0 packages to uninstall, and 316 packages not upgraded.
176 kB of archives need to be downloaded.
Unpacking will consume 457 kB of additional space.
Get:1 http://cn.archive.ubuntu.com/ubuntu bionic/main amd64 zlib1g-dev amd64 1:1.2.11.dfsg-0ubuntu2 [176 kB]
Downloaded 176 kB in 2 seconds (82.2 kB/s)  
Unselected package zlib1g-dev:amd64 is being selected.
(Database is being read ... The system currently has 149705 files and directories installed.)
Preparing to unpack ... /zlib1g-dev_1%3a1.2.11.dfsg-0ubuntu2_amd64.deb ...
Unpacking zlib1g-dev:amd64 (1:1.2.11.dfsg-0ubuntu2) ...
Setting up zlib1g-dev:amd64 (1:1.2.11.dfsg-0ubuntu2) ...
Working on triggers for man-db (2.8.3-2ubuntu0.1) ...

Problem solving

[Solved] RuntimeError: unexpected EOF, expected 73963 more bytes. The file might be corrupted.

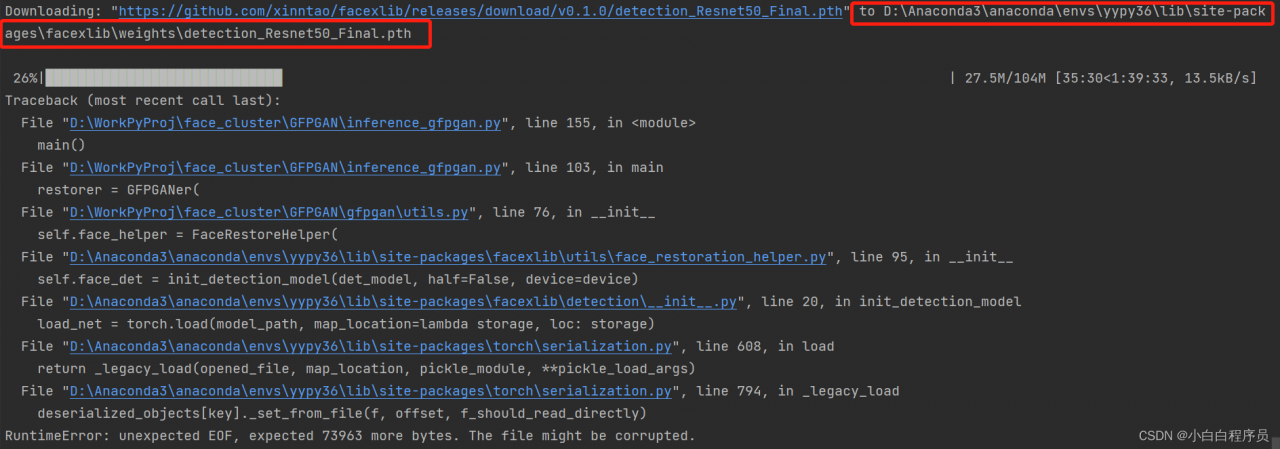
RuntimeError: unexpected EOF, expected 73963 more bytes. The file might be corrupted.

Problem Description:

When the project executes Python script, when downloading the pre training model weight of pytorch, if the weight is not downloaded due to network instability and other reasons, an error will be reported runtimeerror: unexpected EOF, expected xxxxx more bytes The file might be corrupted.

Cause analysis:

This error indicates that the downloaded weight file may be damaged. You need to delete the damaged weight file and execute the code to download again.


Solution:

To find the location where the downloaded weight file is saved, this paper analyzes three situations:

1. Windows System & Anaconda Environment

The path of download is D:\Anaconda3\anaconda\envs\yypy36\Lib\site-packages\facexlib\weightsdetection_Resnet50_Final.pt, so you need go to this folder and delete the weight file as the screenshot below:
2. Windows system & Python environment:

The code automatically downloads the model weights file and saves it to the C:\Users\username/.cache\torch\checkpoints folder. Note that .cache may be a hidden file, you need to view the hidden file to see it, just delete the weight file.

3. Linux systems:
Linux system weights files are usually saved under: \home\username\.cache\torch. Note that .cache is a hidden folder and will only be shown if you press ctrl+Alt+H in winSCP; or, in the home directory, use ls -a to show it. root mode, the default path for downloaded weight files is under: /root/.cache/torch/checkpoints. Just delete the weight file.

In the above three cases, after deleting the weight file, execute the code again to download again.

Additional:

If the execution program downloads the code too slowly or the network stability is not good, we can directly download it manually from the website where the weight file is located and put it in the specified location. The Linux system can adopt WGet method.

wget -P Local path where the weights are saved Address of the weights

If the download is interrupted, WGet supports continuous transmission at breakpoints. Add a parameter - C :

wget -P Local path where weights are saved -c Address of weights

eg:

wget -P /home/20220222Proj/pretrained_models -c https://github.com/xinntao/Real-ESRGAN/releases/download/v0.2.1/RealESRGAN_x2plus.pth

Ubuntu18.04 Compile Error: android 7 FAILED [How to Solve]

Upgrade to Ubuntu 18.04. Compilation error. Make a backup.

The error message is as follows

FAILED: /bin/bash -c "prebuilts/misc/linux-x86/flex/flex-2.5.39 -oout/target/product/bullhead/obj/STATIC_LIBRARIES/libedify_intermediates/lexer.cpp bootable/recovery/edify/lexer.ll"
flex-2.5.39: loadlocale.c:130:_nl_intern_locale_data: ??'cnt < (sizeof (_nl_value_type_LC_TIME)/sizeof (_nl_value_type_LC_TIME[0]))' ???
Aborted (core dumped)

Solution:

Adding export LC_ALL=C before compiling will solve the problem.